JavaScript - DOM
Bài đăng này đã không được cập nhật trong 4 năm
Giới thiệu
DOM là viết tắt của Document Object Model (Mô hình tài liệu đối tượng), thường có dạng một cây cấu trúc dữ liệu dùng để truy xuất tài liệu trong HTML và XML.
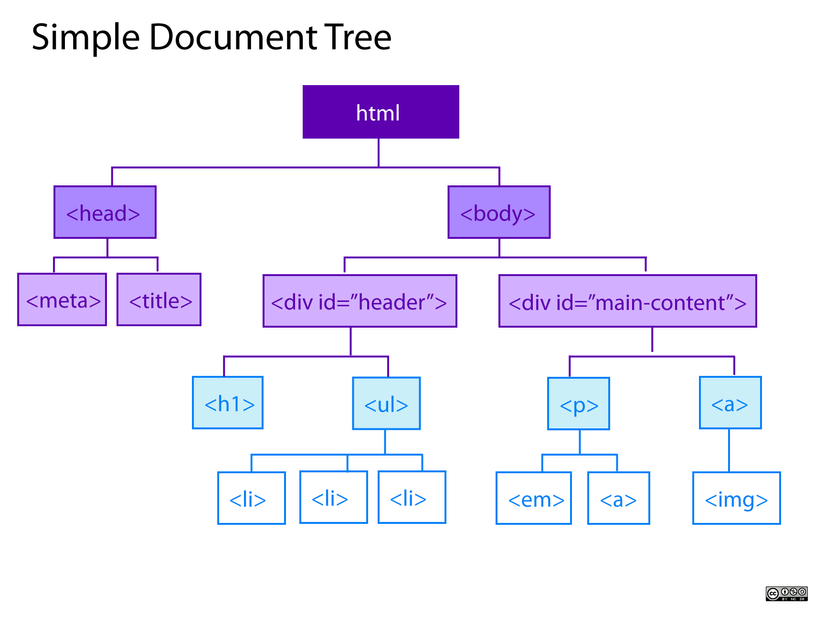
Như trong hình thì lớn nhất sẽ là thẻ <html> sau đó đến các thẻ <head> và <body> là cùng cấp với nhau. Trong <head> và <body> sẽ có các thẻ con và cháu so với thẻ <html>. Với DOM, chúng ta có thể gọi các đối tượng này là các Nodes hoặc là HTML Collection.
Get Element
Để có thể lấy được các đối tượng của HTML, chúng ta có thể sử dụng các phương thức: getElementById(), getElementsByTagName() hay getElementsByClassName(). Chúng ta sẽ xem qua một vài ví dụ.
Chúng ta có đoạn code html sau:
<div id="boxA" class="boxA" style="margin: 20px auto;">
    <h1 id="title">Lorem ipsum.</h1>
    <p class="content">Lorem ipsum dolor ...commodo consequat.</p>
    <div id="author">Lorem ipsum.</div>
    <div id="website">Lorem ipsum dolor.</div>
</div>

<div id="abc"> DIV class=abc</div>
<div id="bef"> DIV class=abc</div>
Với phương thức getElementById(), chúng ta có thể lấy ra những node có id được truyền vào trong phương thức.
window.onload = function(){
    var title = document.getElementById("title");
    console.log(title);

    var author = document.getElementById("author");
    console.log(author);

    var website = document.getElementById("website");
    console.log(website);
}
Như trên thì tôi lấy ra các đối tượng có id là : title, author, website. Để biết kết quả ra sao thì chúng ta sẽ mở file bằng trình duyệt Chrome, ấn kiểm tra phần tử và chọn tab Console để xem kết quả.

Có thể thấy là chúng ta đã lấy ra được chính xác các node với id mong muốn.
Thử với phương thức getElementsByTagName()
    var elemts = document.getElementsByTagName("div");
	console.log(elemts);
Với phương thức này, chúng ta sẽ lấy ra các nodes là thẻ div.

Kết quả chúng ta nhận được là 5 đối tượng nodes, bạn có thể đối chiếu với đoạn HTML ở trên. Ở đây, elemts của chúng ta là một NodeList, chúng ta có thể truy cập đến từng phần tử thông qua phương thức item(). Tôi sẽ truy cập và đổi màu chữ cho từng phần tử của elemts.
    var elemts = document.getElementsByTagName("div");
    console.log(elemts);

    if(elemts.length > 0) {
        console.log(elemts.length);

        for(var i=0; i<elemts.length; i++) {
            elemts.item(i).style.color = "red";
          }
    }
Các bạn có thể đọc thêm về nodes tại đây.
Attribute
Ví dụ ở trên, tôi đã sử dụng thuộc tính attribute để có thể thay đổi màu chữ của từng nodes, cụ thể ở đây là style.
Bây giờ tôi có một đoạn html khác:
    <div id="boxA" class="boxA" style="margin: 20px auto;" title="Lorem ipsum dolor.">
    Lorem ipsum dolor.
    </div>
Để lấy được attributes của thẻ div với id là boxA, ta sẽ dùng đoạn code sau.
    window.onload = function(){
		var boxA = document.getElementById("boxA");

		var nodeAttr = boxA.attributes;
        console.log(nodeAttr);
		console.log(nodeAttr.getNamedItem("class"));
		console.log(nodeAttr.getNamedItem("class").value);
		console.log(nodeAttr.getNamedItem("class").name);
        console.log(nodeAttr.getNamedItem("class").textContent);
	}
Đoạn code trên chúng ta sẽ lấy nodes của boxA bằng phương thức getElementById(). Sau đó sẽ gán nodeAttr bằng attributes của boxA.
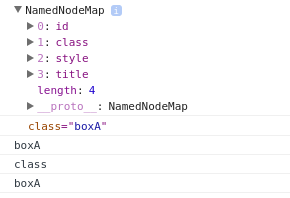
Như kết quả chúng ta có thể thấy, nodeAttr là một NamedNodeMap với các item là id, class, style và title. Giống y hệt các thuộc tính trong đoạn code html ở trên. Sau đó tôi lấy thử các giá trị của class.
Như vậy là chúng ta đã truy cập vào được các thuộc tính của một nodes.
Giờ chúng ta thử thêm một đường viền cho thẻ div này nhé
window.onload = function(){
    var boxA = document.getElementById("boxA");
    console.log(boxA);

    var nodeAttr = boxA.attributes;
    var currentAttr = nodeAttr.getNamedItem("style").value;
    nodeAttr.getNamedItem("style").value = "border: solid 3px red;"
	}
Chỉ đơn giản là lấy ra item với tên là style rồi gán giá trị vào. Rất đơn giản đúng không.
Child
Trong mọi cấu trúc HTML, chúng ta sẽ luôn có các thẻ cha và sau đó là thẻ con. Vậy làm sao có thể truy cập đến các thẻ con trong DOM ?
Đầu tiên cần một đoạn HTML làm ví dụ đã
<div id="boxA" class="boxA" >
    <h1> H1 tag</h1>
    <p> P tag</p>
    <div> DIV tag</div>
</div>
Giờ thì chúng ta lấy các nodes con nào
window.onload = function(){
		var boxA = document.getElementById("boxA");
		var nodes = boxA.childNodes;
		console.log(nodes);
		for(var i = 0; i<nodes.length; i++){
			if(nodes.item(i).nodeName !="#text"){
				nodes.item(i).style.color = "blue";
				console.log(nodes.item(i) + " - " + nodes.item(i).nodeName );
			}
		}
	}
Chúng ta sử dụng thuộc tính childNodes để lấy ra các nodes con của node boxA. Nhưng có một vấn đề, ngoài các nodes con là các thẻ <h1>,
,
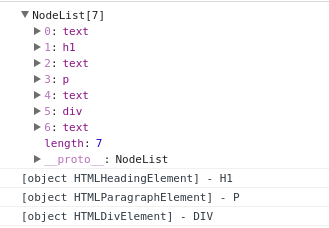
Nên để chính xác nhất thì chúng ta sẽ kiểm tra xem nodes con đó có phải là nodes text hay không, sau đó sẽ tiến hành đổi màu chữ. Như trên ảnh thì tôi đã in ra được các nodes con của boxA.
Trong một trường hợp nào đó, bạn chỉ muốn lấy nodes con đầu tiên hoặc cuối cùng, hãy sử dụng firstChild hoặc lastChid.
var firstNode = boxA.firstChild;
    if(firstNode.nodeName == "#text"){
        console.log("boxA.firstChild: " + firstNode.nextSibling.nodeName);
    }else{
    console.log("boxA.firstChild: " + firstNode.nodeName);
    }

        var lastNode = boxA.lastChild;
        if(lastNode.nodeName == "#text"){
            console.log("lastNode: " + lastNode.previousSibling.nodeName);
        }else{
            console.log("lastNode: " + lastNode.nodeName);
        }
Và kết quả, ta thấy nodes đầu là <h1> và cuối là <div>>, hoàn toàn giống với đoạn HTML đã sử dụng.

Từ nodes cha, ta có thể tìm đến nodes con. Vậy từ nodes con có thể truy cập đến nodes cha không ? Có, chúng ta sẽ sử dụng thuộc tính parentNode.
Đầu tiên chỉnh html cái đã.
<div id="boxA" class="boxA" >
    <h1> H1 tag</h1>
    <p> P tag</p>
    <div> DIV tag</div>
    <div id="child">Child Node</div>
</div>
Còn đây là code lấy nodes cha
    var childNodes = document.getElementById("child");
    console.log(childNodes);

    var childNodes_parent = childNodes.parentNode;
    console.log(childNodes_parent);
    console.log(childNodes_parent.attributes.id);
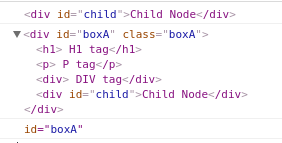
Như kết quả, chúng ta đã lấy ra được nodes cha và tên class cha.
Nodes method DOM có một số phương thức khá hữu dụng cho chúng ta sử dụng.
Để kiểm tra xem một nodes có nodes con hay không, ta có thể dùng phương thức hasChildNodes().
    <input id="copy" type="button" onclick="checkChilds();" value="Kiem tra node con"/>
    <div id="boxA" class="boxA"></div>
	<div id="boxB" class="boxA">Box B</div>
    <div id="boxC" class="boxA">
    	<p>P tag</p>
    </div>
function checkChilds()
{
    var boxA = document.getElementById("boxA");
    console.log(boxA.hasChildNodes());

    var boxB = document.getElementById("boxB");
    console.log(boxB.hasChildNodes());

    var boxC = document.getElementById("boxC");
    console.log(boxC.hasChildNodes());
}
Kết quả của phương thức này sẽ là giá trị kiểu boolean, true với những nodes có nodes con.
Nếu muốn thêm một nodes, ta sẽ dùng appendChild().
    <input id="copy" type="button" onclick="addNewNode();" value="Kiem tra node con"/>
    <div id="boxA" class="boxA">
    	<div>Home</div>
        <div>About</div>
        <div>Product</div>
    </div>

	<div id="boxB" class="boxA"></div>
function addNewNode()
{
    var boxA = document.getElementById("boxA");
    var firstNode = boxA.firstChild;

    if(firstNode.nodeName == "#text"){
        firstNode = firstNode.nextSibling;
    }

    console.log(firstNode);
    var boxB = document.getElementById("boxB");
    firstNode.style.backgroundColor = "blue"
    boxB.appendChild(firstNode);
}
Ở trên chúng ta lấy ra nodes con đầu tiên của boxA, sau đó gán vào boxB. Nhưng có vấn đề đó là nodes ở boxA sẽ bị mất, chúng ta có thể dùng cloneNode để copy nodes của boxA và đưa sang boxB. Như vậy boxA vẫn được giữ nguyên.
function addNewNode()
{
    var boxA = document.getElementById("boxA");
    var firstNode = boxA.firstChild;
    if(firstNode.nodeName == "#text"){
        firstNode = firstNode.nextSibling;
    }

    console.log(firstNode);

    var nodeCopy = firstNode.cloneNode(true);
    console.log(nodeCopy);

    var boxB = document.getElementById("boxB");
    boxB.appendChild(nodeCopy);
}
Khi muốn xóa một node, chúng ta có thể dùng removeChild().
function removeNode()
{
    var boxA = document.getElementById("boxA");
    var firstNode = boxA.firstChild;
    if(firstNode.nodeName == "#text"){
        firstNode = firstNode.nextSibling;
    }
    boxA.removeChild(firstNode);
}
Hoặc replaceChild() để thay thế một nodes nào đó
function reNode()
{
    var boxA = document.getElementById("boxA");
    var firstNode = boxA.firstChild;
    if(firstNode.nodeName == "#text"){
        firstNode = firstNode.nextSibling;
    }
    console.log(firstNode);

    var boxB = document.getElementById("boxB");
    var firstNodeB = boxB.firstChild;
    if(firstNodeB.nodeName == "#text"){
        firstNodeB = firstNodeB.nextSibling;
    }
    console.log(firstNodeB);
    boxB.replaceChild(firstNode,firstNodeB);
    }
Cuối cùng, để thêm một nodes trước nodes nào đó, ta dùng phương thức insertBefore().
function reNode()
{
    var boxB = document.getElementById("boxB");
    var firstNodeB = boxB.firstChild;
    if(firstNodeB.nodeName == "#text"){
        firstNodeB = firstNodeB.nextSibling;
    }
    console.log(firstNodeB);

    var boxA = document.getElementById("boxA");
    var firstNode = boxA.firstChild;
    if(firstNode.nodeName == "#text"){
        firstNode = firstNode.nextSibling;
    }
    console.log(firstNode);

    boxB.insertBefore(firstNode,firstNodeB);
}
Kết
Có thể đọc về nodes sẽ hơi khó hiểu, nhưng nếu chúng ta chú ý, việc tìm hiểu về jQuery sẽ đơn giản hơn. Chúng ta sẽ tiết kiệm được thời gian cho những câu hỏi kiểu như tại sao nó lại thế ^^.
All rights reserved
