[iOS][Realm] Realm Tutorial - Part 1: To Do List With Realm
Bài đăng này đã không được cập nhật trong 8 năm
Introduction to Realm
Realm là một giải pháp thay thế SQLite và CoreData tuyệt vời, giúp nhanh chóng và tốn ít thời gian để thiết kế Data cho App iOs. Bạn có thể tham khảo tài liệu từ Realm nhà phát triển. để tìm hiểu sâu hơn về kiến trúc app.
Realm Quick Tour
Các bước cơ bản khi làm việc với Realm
- Tạo Model Item:
class Item: Object {
    dynamic var detail = ""
    dynamic var status = 0
}
- Tạo object Item:
let item = Item()
item.detail = "Design a prototype"
item.status = 0
- Lưu nó lại:
let realm = try! Realm()
try! realm.write {
  realm.add(item)
}
- Khi nào cần, thì lại lấy nó ra:
let items = realm.objects(Item.self)
- Nếu chỉ muốn lấy các object với status = 0:
let items = realm.objects(Item.self).filter("status = 0")
Chỉ đơn giản thế thôi là đủ có thể làm app với Realm rồi.
Making Todo App
1. Tạo Project mới
Bây giờ chúng ta sẽ bắt đầu 1 demo app hoàng chỉnh. Tạo một Xcode Project mới bằng "Single View Application" và đặt tên là "RealmTodo"

2. Cài đặt Realm bằng CocoaPods
Mở Podfile và thêm thư viện RealmSwift (Nếu còn chưa biết sử dụng Cocoapod thì xem tại đây)
target 'RealmTodo' do

  use_frameworks!
  pod 'RealmSwift'

end
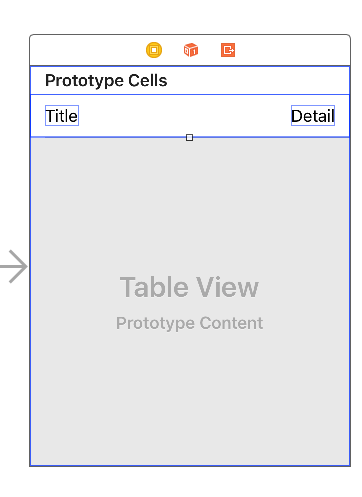
3. Thiết kế ViewController bằng Storyboard
Chúng ta sẽ thiết kế ViewController, TableView, TableViewCell tương tự như hình dưới:
 Trong file ViewController.swift nhanh chóng implement đoạn code này vào để hỗ trợ hiện thị lên tableView (detail từng dòng thì sẽ không nói ở bài này)
// ViewController.swift
import UIKit

class ViewController: UIViewController, UITableViewDelegate, UITableViewDataSource { // [1]
  @IBOutlet weak var tableView: UITableView!

  // MARK: UITableViewDataSource
  // [2]
  func tableView(_ tableView: UITableView, cellForRowAt indexPath: IndexPath) -> UITableViewCell {
    let cell = tableView.dequeueReusableCell(withIdentifier: "Cell", for: indexPath)
    cell.textLabel!.text = "it works"
    cell.detailTextLabel!.text = "on going"
    return cell
  }

  // [3]
  func numberOfSections(in tableView: UITableView) -> Int {
    return 1
  }

  // [4]
  func tableView(_ tableView: UITableView, numberOfRowsInSection section: Int) -> Int {
    return 1
  }

}
Chạy thử lên và check kết quả ra sao?

- Thêm các sự kiện: Thêm các sự kiên cho nút New:
@IBAction func addNew(sender: AnyObject) {

    let alertController : UIAlertController = UIAlertController(title: "New Todo", message: "What do you plan to do?", preferredStyle: .alert)

    alertController.addTextField { (UITextField) in

    }

    let action_cancel = UIAlertAction.init(title: "Cancel", style: .cancel) { (UIAlertAction) -> Void in

    }
    alertController.addAction(action_cancel)

    let action_add = UIAlertAction.init(title: "Add", style: .default) { (UIAlertAction) -> Void in

    }
    alertController.addAction(action_add)

    present(alertController, animated: true, completion: nil)

}
Và kết quả:

5. Add Realm vào project
Bức khởi động đã xong, bây giờ chúng ta sẽ vào phần thân bài. Chúng ta cần tạo một Model tên là TodoItem, trong item chưa thông tin và trạng thái của item đó đã được hoàng thành hay chưa?
// TodoItem.swift
import RealmSwift
class TodoItem: Object {
  dynamic var detail = ""
  dynamic var status = 0
}
Quay về ViewController.swift, chúng ta lại import RealmSwift, và khai báo biến.
// ViewController.swift
let realm = try! Realm() // [1]
var todoList: Results<TodoItem> { // [2]
    get {
        return realm.objects(TodoItem.self)
    }
}
[1]. Chúng ta khởi tạo biến toạn cục realm và nó được dùng xuyên sút cả class. [2]. Chúng khai báo lấy gì từ object Realm ra. 6. Add Data vào Database Bây giờ chúng ta chuẩn bị thêm dữ liệu vào Realm, trong project này đã tạo sẵn UIAlertController và UITextField để nhập dữ liệu. Chúng ta chỉ cần thêm vài dòng code vào addNew: function
// ViewController.swift

. . .
alertController.addAction(action_cancel)

let action_add = UIAlertAction.init(title: "Add", style: .default) { (UIAlertAction) -> Void in

    let textField_todo = (alertController.textFields?.first)! as UITextField
  print("You entered \(textField_todo.text)")
  . . .
let todoItem = TodoItem() // [1]
todoItem.detail = textField_todo.text!
todoItem.status = 0

try! self.realm.write({ // [2]
    self.realm.add(todoItem)
    self.tableView.insertRows(at: [IndexPath.init(row: self.todoList.count-1, section: 0)], with: .automatic)
})
}
Chỉnh sửa lại một chút ở đoạn Datasource của Tableview
// ViewController.swift
func tableView(_ tableView: UITableView, cellForRowAt indexPath: IndexPath) -> UITableViewCell {
    let cell = tableView.dequeueReusableCell(withIdentifier: "Cell", for: indexPath)

    let item = todoList[indexPath.row]

    cell.textLabel!.text = item.detail
    cell.detailTextLabel!.text = "\(item.status)"

    return cell
  }

func tableView(_ tableView: UITableView, numberOfRowsInSection section: Int) -> Int {
    return todoList.count
}
- Chọn để hoàn thành item
// ViewController.swift
// MARK: UITableViewDelegate
func tableView(_ tableView: UITableView, didSelectRowAt indexPath: IndexPath) {
    let item = todoList[indexPath.row]
    try! self.realm.write({
        if (item.status == 0){
            item.status = 1
        }else{
            item.status = 0
        }
    })
    tableView.reloadRows(at: [indexPath], with: .automatic)
}
- Swipe để xóa Item
func tableView(_ tableView: UITableView, canEditRowAt indexPath: IndexPath) -> Bool {
    return true
}

// [2]
func tableView(_ tableView: UITableView, commit editingStyle: UITableViewCellEditingStyle, forRowAt indexPath: IndexPath) {

    if (editingStyle == .delete){
        let item = todoList[indexPath.row]
        try! self.realm.write({
            self.realm.delete(item)
        })

        tableView.deleteRows(at:[indexPath], with: .automatic)

    }
}
- bật chế độ edit cho Table View Cell.
- Thêm action delete thì Realm sẽ xóa item tại IndexPath đó.
Nhìn lại ứng dụng
Cho tới giờ chúng ta đã nhanh chóng sử dụng được Realm, thêm object, hiện thị, chỉnh sửa và xóa object. Mọi công việc đơn giản đã hoàn thành.
Make Realm in App Groups
Bây giờ chúng ta sẽ cài đặt để app có thể chạy được với Today Widget hoặc Apple Watch. Bằng cách chúng lưu database vào App Groups.
Mở Project Target -> Capability -> Enable App Groups. Nếu bạn muốn tạo thêm Target cho Today Widget và Apple Watch, bạn . cũng cần phải Enable App Groups cho các target đó luôn.

Today Widget
Tạo một Target Today Widget mới tên là Today Extension
Let’s Create Shared File
Tiếp tục ta lại tạo SwiftFile có thể truy cập với nhiều target.

// SharedFile.swift
import Foundation
public let K_GROUP_ID = "group.com.irekasoft.RealmTodo"
public let K_DB_NAME = "db.realm"
À mà còn phải chọn thêm Target cho file model: TodoItem.swift.
Migrate at the Main Target
Quay về về ViewController.swift, và chúng ta thay đổi 1 chút về cấu trúc gọi Realm
// Change the Realm definition to this
var realm : Realm!

// At viewDidLoad function
override func viewDidLoad() {

  super.viewDidLoad()

  let directory: URL = FileManager.default.containerURL(forSecurityApplicationGroupIdentifier: K_GROUP_ID)!

  let fileURL = directory.appendingPathComponent(K_DB_NAME)
  realm = try! Realm(fileURL: fileURL)

  // Extras if you wonder where your files is saved
  print("file url \(realm.configuration.fileURL)")

}
Bằng cahcs này chúng ta trỏ database vào vị trí mới trong App Group, chúng ta sẽ tạo Database mới và nên việc chạy lại app sẽ ko còn thấy các kết quả trước đây mà ta đã thêm vào nửa.
Updating Pod
Mở file Pod, chỉnh lại một tí.
target 'RealmTodo' do
  # Comment the next line if you're not using Swift and don't want to use dynamic frameworks
  use_frameworks!
  pod 'RealmSwift'

end

target 'Today Extension' do
  # Comment the next line if you're not using Swift and don't want to use dynamic frameworks
  use_frameworks!
  pod 'RealmSwift'

end
TodayWidget’s View Controller
Mở file TodayViewController.swift’ và update lại một chút Cocoapods Property.
import RealmSwift

// Inside the class
var realm : Realm!
var todoList: Results<TodoItem> {
  get {
    return realm.objects(TodoItem.self)
  }
}

override func viewDidLoad() {
  super.viewDidLoad()
  let directory: URL = FileManager.default.containerURL(forSecurityApplicationGroupIdentifier: K_GROUP_ID)!

  let fileURL = directory.appendingPathComponent(K_DB_NAME)
  realm = try! Realm(fileURL: fileURL)
}
Ngay tại MainInterface.storyboard, chúng ta add thêm Table View vào trong Today’s Widget UI. Sử dụng 'Right Detail' Cell với identifier là 'Cell'
// Add this to the protocol conformation
UITableViewDataSource

// MARK: - UITableViewDataSource
func tableView(_ tableView: UITableView, numberOfRowsInSection section: Int) -> Int {
  return todoList.count
}

func tableView(_ tableView: UITableView, cellForRowAt indexPath: IndexPath) -> UITableViewCell {

  let cell = tableView.dequeueReusableCell(withIdentifier: "Cell", for: indexPath)

  let item = todoList[indexPath.row]

  cell.textLabel!.text = item.detail
  cell.detailTextLabel!.text = "\(item.status)"

  return cell

}
Bây giờ chúng ta update Database trong app thì tự động ở ngoài chủng được hiển thị thêm.

Source Code: Github
All rights reserved
