iOS URI Deep Link
Bài đăng này đã không được cập nhật trong 4 năm
1. Giới thiệu
Deep link là gì?
Deep link là các đường link cho phép chúng ta đi tới 1 tính năng, nội dung cụ thể nào đó của ứng dụng. Nội dung có thể là một màn hình, một trang hay một tab cụ thể.
Ví dụ như app Twitter, với đường link twitter://timeline mở bằng Safari, iOS sẽ mở Twitter và dịch chuyển thẳng tới phần timeline.
Chúng ta có thể dùng deep link để:
- Mở một màn hình cụ thể (khác với màn hình mặc định, màn hình Home khi mở app)
- Liên kết giữa các app khác nhau qua việc mở app và truyền tham số.
- Tạo các đường link điều hướng trong app.
- Thu thập và phân tích hành vi người dùng
Để thực hiện chúng ta sẽ sử dụng URI (Uniform Resource Identifier)
Từ iOS 9, Apple đã thêm Universal Link thay cho URI, trong khuôn khổ bài viết này chúng ta chỉ tìm hiểu về URI.
Để demo ta sẽ tạo một project đơn giản gồm 1 màn hình danh sách sản phẩm và 1 màn hình chi tiết sản phẩm. Khi mở 1 deep link qua Safari thì sẽ mở chương trình và hiện chi tiết sản phẩm.
2. Demo:
2.1. Tạo project:
Ta bắt đấu bằng project iOS với template Single View Application, ngôn ngữ Swift 3.0.
2.2. Product:
Đối tượng chính của chương trình là Product, gồm các thông tin id, name và price:
class Product {
    var id: String
    var name: String
    var price: Double

    var priceString: String {
        return "$\(price)"
    }

    init(id: String, name: String, price: Double) {
        self.id  = id
        self.name = name
        self.price = price
    }
}
2.3. ProductDataSource:
ProductDataSource quản lý danh sách sản phẩm, để đơn giản trong dự án này chúng ta fix 1 mảng sản phẩm:
class ProductDataSource {

    private let products = [
        Product(id: "iphone", name: "iPhone 7", price: 600),
        Product(id: "ipad", name: "iPad Air", price: 400),
        Product(id: "macbook", name: "Macbook Pro", price: 1500),
        ]

    static let sharedInstance = ProductDataSource()

    private init() {

    }

    subscript(index: Int) -> Product? {
        if index < products.count {
            return products[index]
        }
        return nil
    }

    subscript(id: String) -> Product? {
        return products.first { $0.id == id }
    }

    var count: Int {
        return products.count
    }
}
2.4. Giao diện:
Chúng ta sẽ dựng giao diện qua Storyboard, gồm 2 UIViewController như sau:
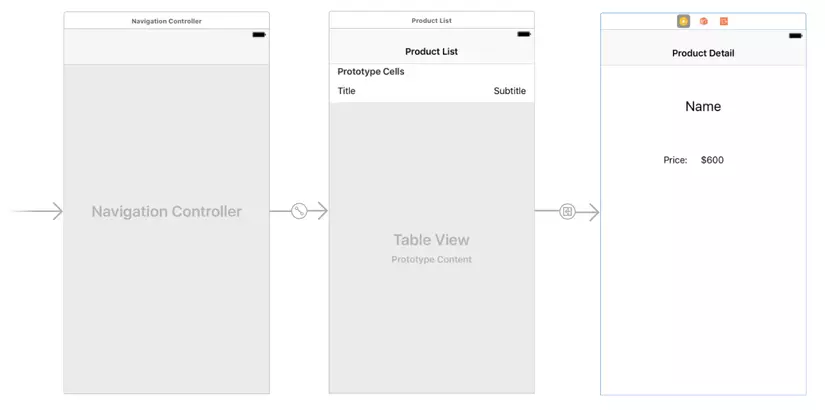
Trong đó ProductListViewController chứa 1 UITableView có nhiệm vụ hiển thị danh sách sản phẩm, ở đây ta dùng luôn cell mặc định, có kiểu là Right Detail.
ProductDetailViewControlelr bao gồm 2 UILabel dùng để hiển thị tên và giá sản phẩm.
Code bên dưới 2 view controller như sau:
class ProductListViewController: UIViewController {

    let productDataSource = ProductDataSource.sharedInstance

    override func viewDidLoad() {
        super.viewDidLoad()

    }

    // MARK: - Navigation

    // In a storyboard-based application, you will often want to do a little preparation before navigation
    override func prepare(for segue: UIStoryboardSegue, sender: Any?) {
        if segue.identifier! == "showProductDetail" {
            let vc = segue.destination as! ProductDetailViewController
            vc.product = sender as! Product
        }
    }

}

extension ProductListViewController: UITableViewDataSource, UITableViewDelegate {
    func numberOfSections(in tableView: UITableView) -> Int {
        return 1
    }

    func tableView(_ tableView: UITableView, numberOfRowsInSection section: Int) -> Int {
        return productDataSource.count
    }

    func tableView(_ tableView: UITableView, cellForRowAt indexPath: IndexPath) -> UITableViewCell {
        let cell = tableView.dequeueReusableCell(withIdentifier: "ProductCell", for: indexPath)
        if let product = productDataSource[indexPath.row] {
            cell.textLabel?.text = product.name
            cell.detailTextLabel?.text = product.priceString
        }

        return cell
    }

    func tableView(_ tableView: UITableView, didSelectRowAt indexPath: IndexPath) {
        tableView.deselectRow(at: indexPath, animated: true)
        if let product = productDataSource[indexPath.row] {
            self.performSegue(withIdentifier: "showProductDetail", sender: product)
        }

    }
}
class ProductDetailViewController: UIViewController {

    @IBOutlet weak var productNameLabel: UILabel!
    @IBOutlet weak var productPriceLabel: UILabel!

    var product: Product!

    override func viewDidLoad() {
        super.viewDidLoad()

        productNameLabel.text = product.name
        productPriceLabel.text = product.priceString
    }

    func setupCloseButton() -> Void {
        let closeButton = UIBarButtonItem(title: "Close", style: .plain, target: self, action: #selector(close))
        self.navigationItem.leftBarButtonItem = closeButton
    }

    func close() -> Void {
        self.dismiss(animated: true, completion: nil)
    }
}
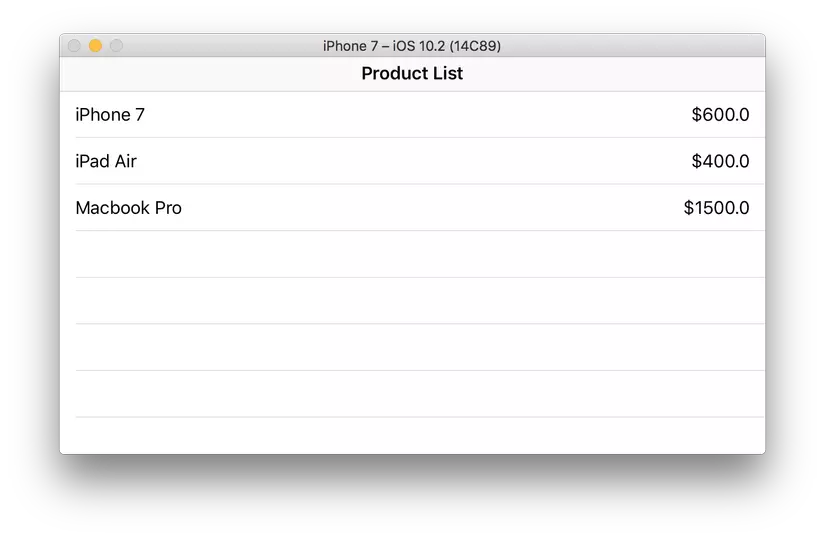
Đến đây thì chúng ta đã gần như xong, khi chạy chương trình sẽ có danh sách sản phẩm và chi tiết sản phẩm:
Tiếp đến chúng ta sẽ làm phần xử lý deep link.
2.5. Deep link:
Trước hết chúng ta cần đăng ký URL type bằng cách vào Target settings > Info, ở mục URL Types nhấn (+) để thêm type, nhập Identifier và URL Schemes:
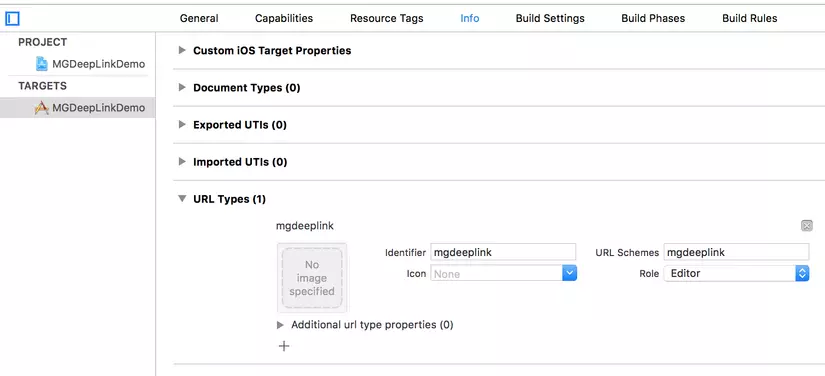
Deep link của chúng ta sẽ có dạng: mgdeeplink://products/detail?id=iphone
Theo format: [scheme]://[host]/[path]
Trong đó:
- scheme: đã đăng ký ở bước trên để iOS biết sẽ dùng app nào để mở 1 loại url cụ thể
- host: đại diện cho website, tên server của bạn trên web, 1 app có thể đối ứng với nhiều loại host
- path: cho phép chúng ta truyền thêm các tham số
Khi mở link trên trong iOS, ví dụ như mail hay Safari, sẽ có thông báo hiện lên hỏi chúng ta có muốn mở app không?:
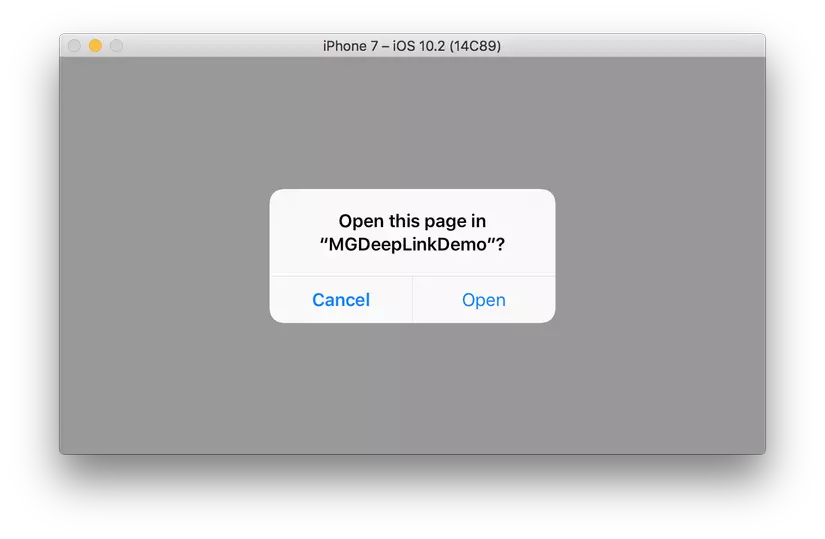
Nếu chọn Open thì app sẽ được bật và link sẽ được handle trong hàm application(_:open:options:) của AppDelegate:
func application(_ app: UIApplication, open url: URL, options: [UIApplicationOpenURLOptionsKey : Any] = [:]) -> Bool {
    var schemes = [String]()

    if let bundleURLTypes = Bundle.main.infoDictionary?["CFBundleURLTypes"] as? [NSDictionary] {
        for bundleURLType in bundleURLTypes {
            if let scheme = bundleURLType["CFBundleURLSchemes"] {
                if let streamArray = scheme as? [String] {
                    schemes += streamArray
                }
            }
        }
    }

    schemes = schemes.map({ (s) -> String in
        return s.lowercased()
    })

    if ("error" == url.host) {
        print("error")
        return false
    }

    guard schemes.contains((url.scheme?.lowercased())!) else {
        print("unknown")
        return false
    }

    let paths = url.pathComponents

    guard paths.count > 0 else {
        print("invalid url path")
        return false
    }

    let urlComponents = NSURLComponents(url: url, resolvingAgainstBaseURL: false)

    if paths.count == 2 {
        if paths[1] == "detail" {
            if let queryItems = urlComponents?.queryItems, queryItems.count == 1 &&
                    queryItems[0].name == "id"
            {
                if let id = queryItems[0].value {
                    showProduct(id: id)
                }
            }
        }
    }

    return true
}
Trong hàm này, trước hết chúng ta kiểm tra xem link có hợp lệ không, sau đó phân tích các tham số của link để lấy thông tin, ở đây chúng ta cần id của sản phẩm. Sau khi có id chúng ta sẽ gọi hàm showProduct(id:) để hiện thông tin sản phẩm:
func showProduct(id: String) {
    guard let product = ProductDataSource.sharedInstance[id] else {
        return
    }
    if let vc = UIStoryboard(name: "Main", bundle: nil).instantiateViewController(withIdentifier: "ProductDetailViewController") as? ProductDetailViewController {
        vc.product = product
        vc.setupCloseButton()
        let nav = UINavigationController(rootViewController: vc)

        self.window?.rootViewController?.present(nav, animated: true, completion: nil)
    }
}
Kết quả:

3. Kết luận:
Như vậy chúng ta đã hoàn thành việc tìm hiểu về deep link trong iOS qua một ví dụ đơn giản. Hy vọng các bạn có thể áp dụng deep link vào các ứng dụng của mình.
All rights reserved
