iOS Push Notification với Amazon's AWS
Bài đăng này đã không được cập nhật trong 6 năm
Push Notification iOS với AWS (SNS)
Thông thường bạn đã quá quen với Push Notification xử dụng thông qua dịch vụ của google FCM. Nhưng có bao giờ bạn đặt câu hỏi còn dịch vụ nào khác tương đương đôi khi là vượt trội hơn chưa. Bây giờ mình sẽ giới thiệu tạo push notification cơ bản với AWS (SNS).
Push notification là một tính năng quan trọng và cần thiết trong bất kỳ ứng dụng di động nào. AWS của Amazon cung cấp dịch vụ push cho thiết bị di động thông qua Simple Notifications Service (SNS). Cá nhân mình thấy việc thực hiện push trên iOS với Swift và SNS hơi khó khăn, phần lớn là do tài liệu không có hướng dẫn chi tiết từng bước về chủ đề này cũng như việc tiếp cận yêu cầu tài khoản apple develop và nằm ngoài giới hạn của một số người. Hôm nay mình s hướng dẫn từng bước đơn giản về triển khai push notification trên iOS với Swift và SNS. Bây giờ chúng ta sẽ cùng tạo ra một ứng dụng push notification Swift / SNS awesome nào.
1. Tạo 1 project trên Xcode
Mở XCode và tạo 1 ứng dụng của bạn có thể gọi ứng dụng bất cứ điều gì bạn thích, nhưng hãy chắc chắn rằng tên đó là duy nhất.
2. Tạo file p12 certificate:
Tạo ID ứng dụng của bạn, kích hoạt push notification và file p12 cho ứng dụng mới của bạn.
Create an App ID
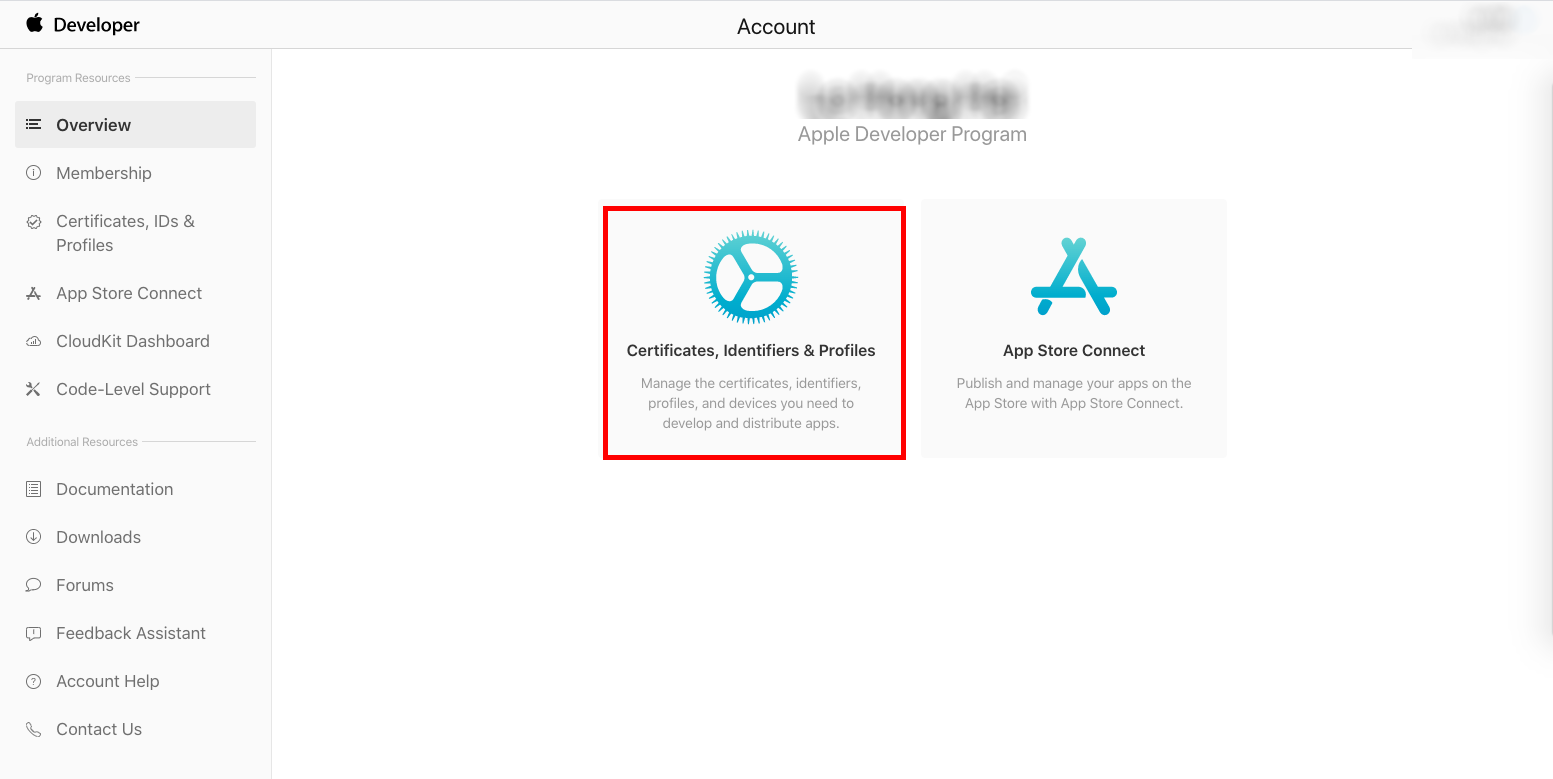
- Đăng nhập Apple developer account và lựa chọn Certificates, Identifiers and Profiles
![]()
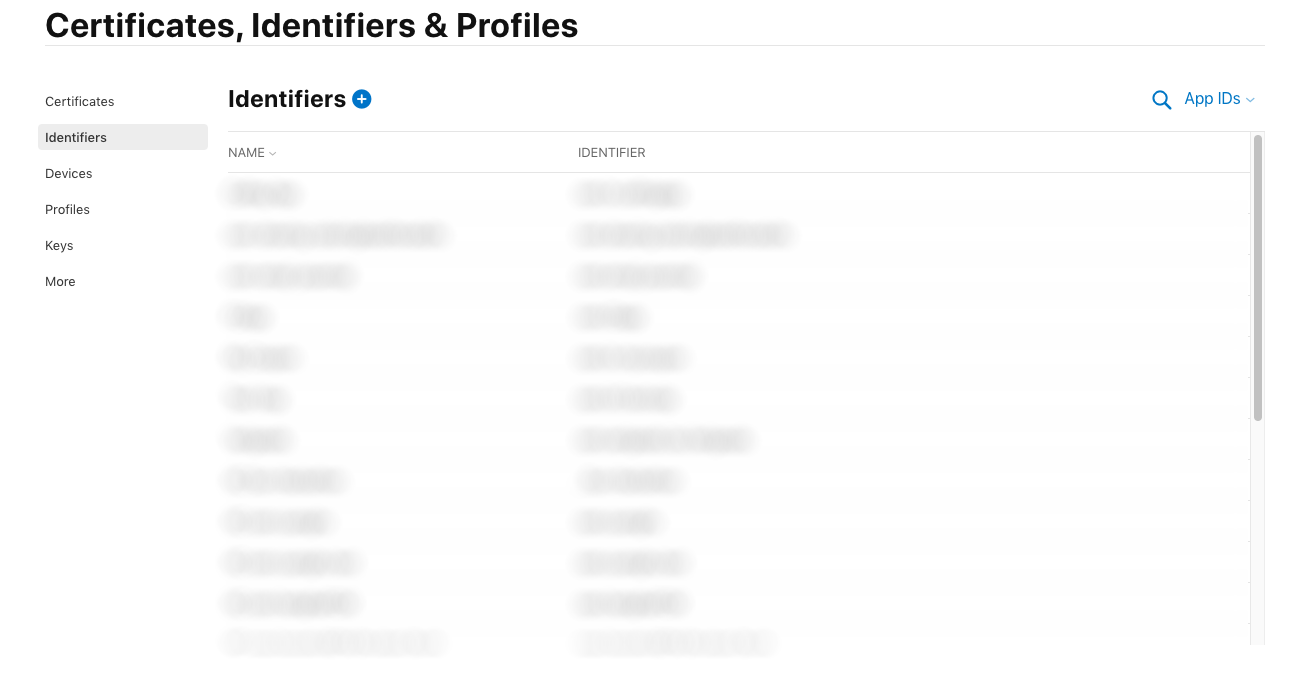
- Chọn Identifiers
![]()
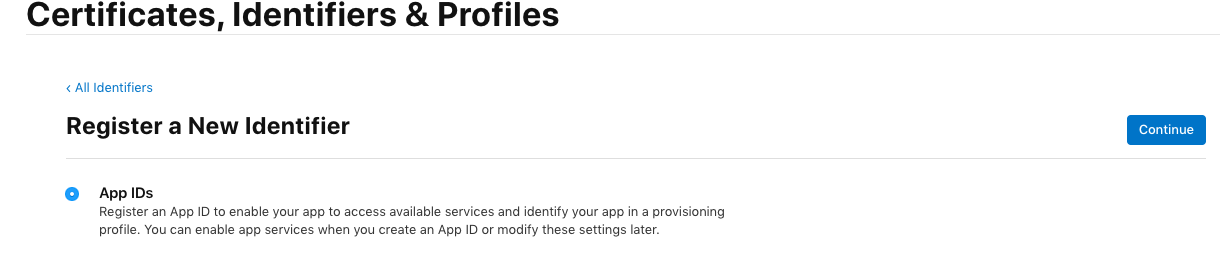
- Chọn nút (+) để tạo mới cho ứng dụng của bạn
- Lựa chọn APPID và con tờ niu!
![]()
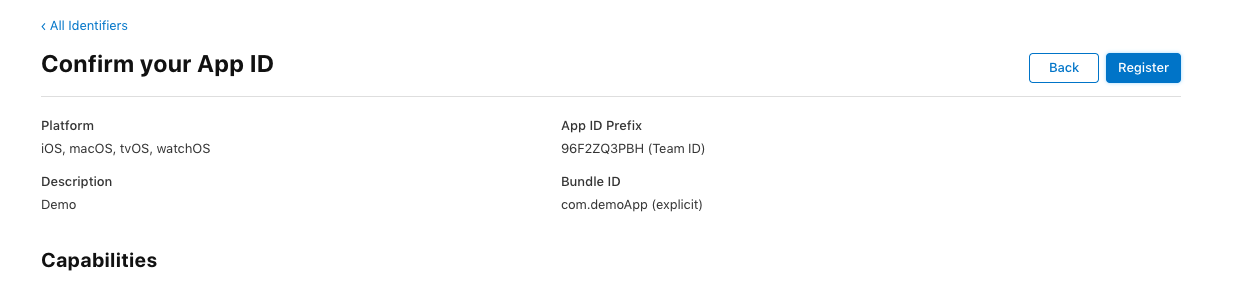
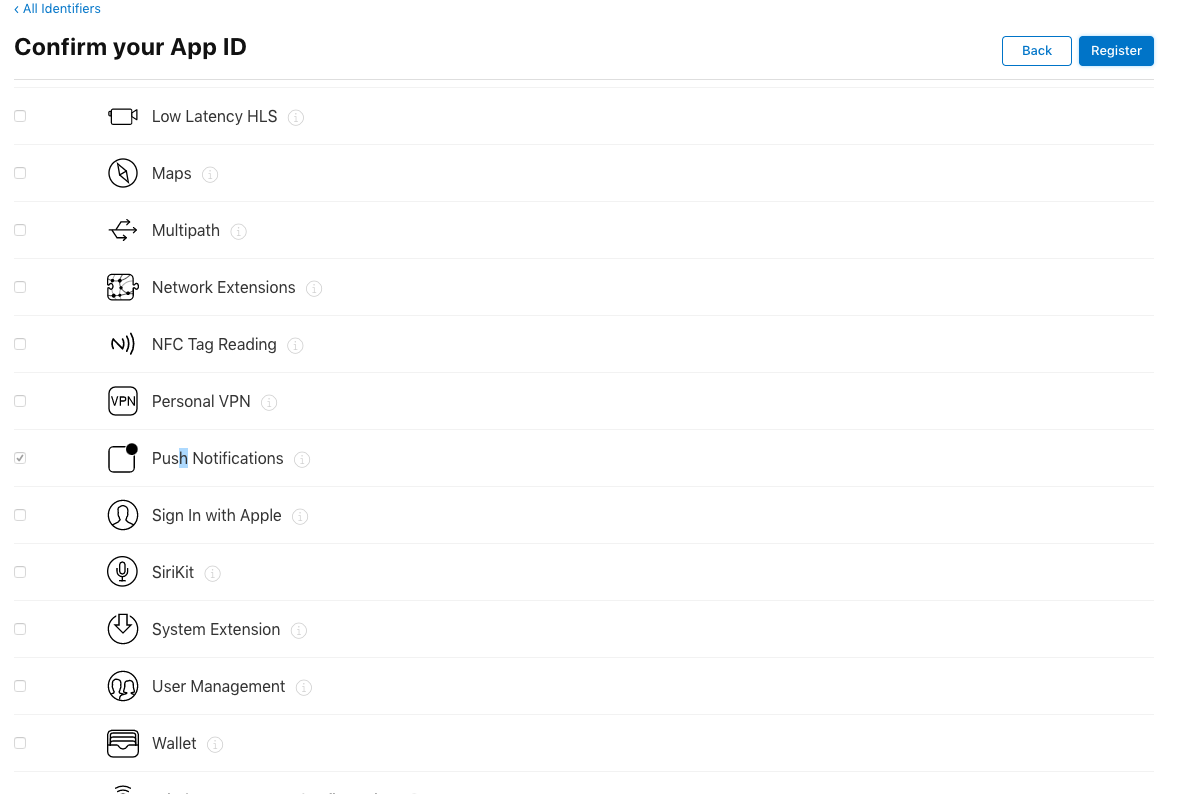
- Chỉ định tên ứng dụng của bạn, ID bundel và chọn Push Notifiction, sau đó con tờ niu!
![]()
![]()
- Chọn Register và hoàn tất thôi.
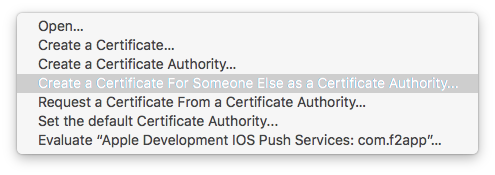
Tạo Certificate từ Keychain Access
- Mở ứng dụng Keychain Access trong Mac OS X của bạn và chọn Keychain Access -> Certificate Assistant -> Request a Certificate From a Certificate Authority

- Nhập địa chỉ email và lựa chọn `Saved to disk’, sau đó tiếp tục.
Tạo Development Certificate
- Quay trở lại developer account và chọn ứng dụng của bạn đã tạo khi nãy trong list Identifiers.
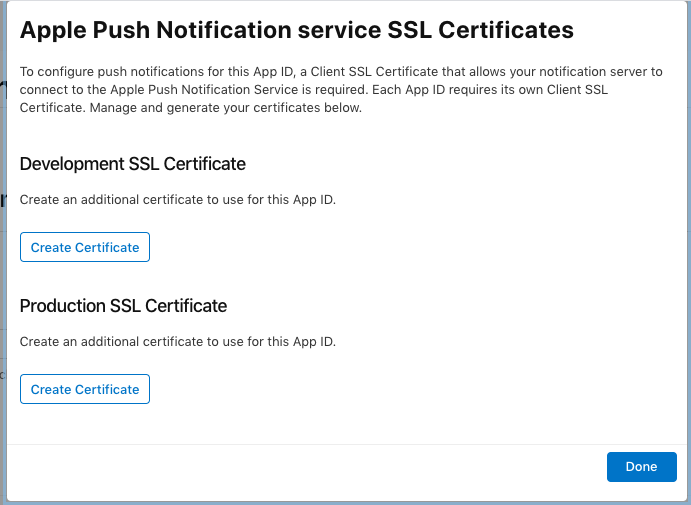
- Lựa chọn configure ở mục push notification bạn sẽ nhìn thấy bảng sau:

-
Ở Development SSL certificates chọn Create Certificate
![]()
-
Chọn file a Certificate Signing Request đã tạo bằng keychain access
-
Download Development Certificate và tiếp tục bước tiếp theo thôi nào.


Tạo APNS .p12 certificate
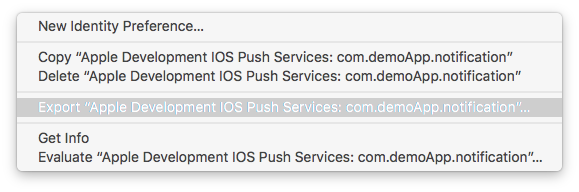
- Nhấp đúp vào Development certificate đã tạo ra trong bước trước để thêm nó vào Keychain Access. Đi tới Keychain Access, chọn login tìm certification và nhấn chuột phải để export
- Nhập password cho certificate và tiếp tục
- Nhập computer admin password để hoàn tất lựa chọn nơi để lưu lại file p12 của bạn.
Cài đặt AWS
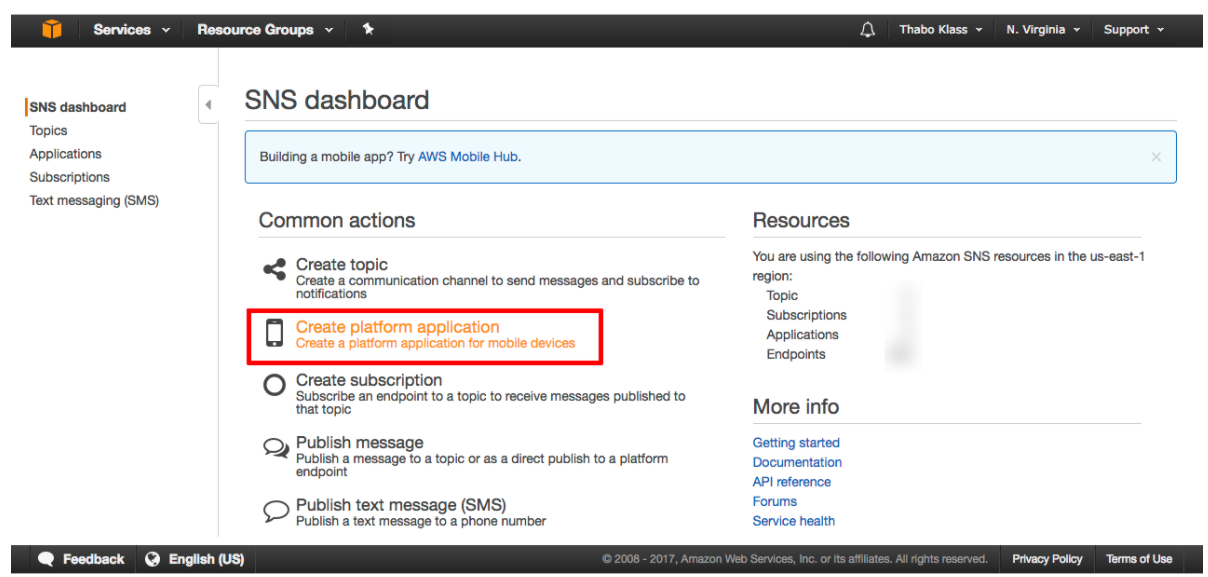
- Create a new platform application: Đăng nhập vào AWS của bạn và chuyển đến bảng điều khiển SNS. Lựa chọn ' Create platform application '
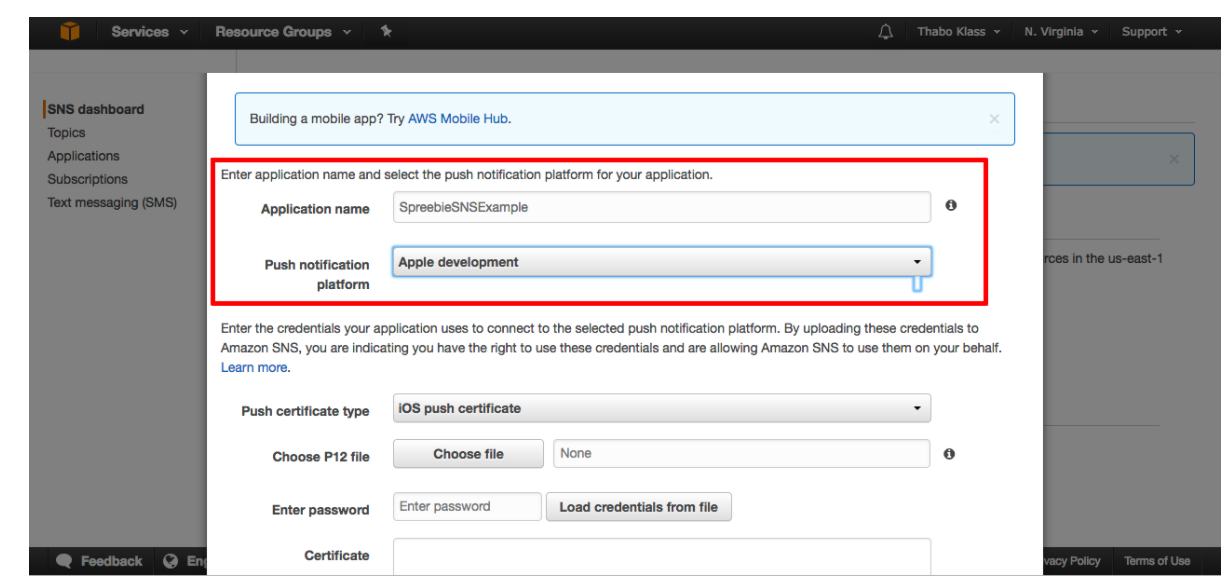
- Nhập thông tin cho ứng dụng của bạn:
Nhập tên ứng dụng của bạn (tên duy nhất của bạn). Push notification platform nên đặt "Apple development".
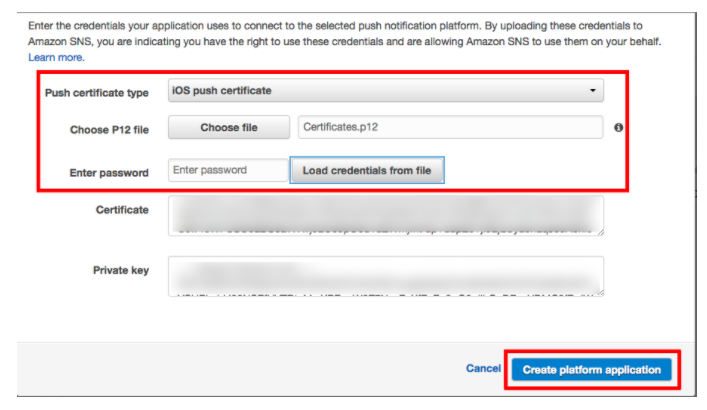
- Kết thúc việc tạo ứng dụng trên AWS:
Push certificate type: chọn ' iOS Push Certificate ' . Chọn ' Choose file ' và chọn tệp chứng chỉ P12 bạn đã tạo. Nhập mật khẩu của bạn nếu bạn đã tạo certificate. Nếu bạn không có mật khẩu, hãy để trống. Khi mọi thứ hoàn tất, hãy nhấp vào nút 'Create platform application '.
Sao chép application ARN để tiếp tục config trong XCode cho project của bạn
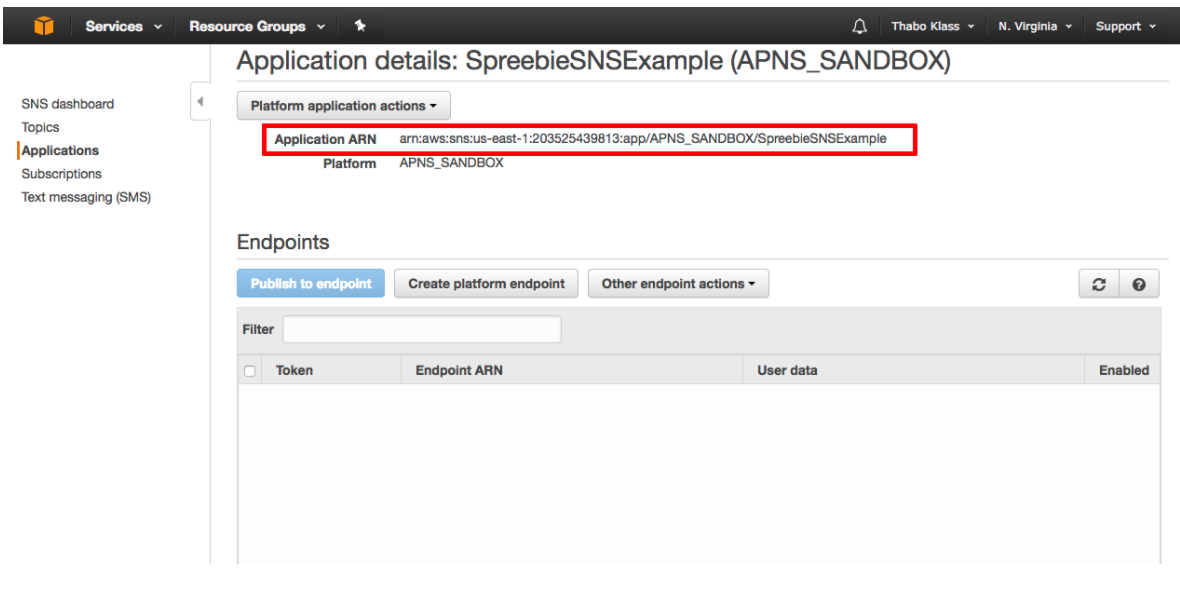
- Thêm SNS ARN vào app delegate của bạn: mở tệp AppDelegate.Swift
/// The SNS Platform application ARN
let SNSPlatformApplicationArn = “arn:aws:sns:us-east-1:203525439813:app/APNS_SANDBOX/SpreebieSNSExample”
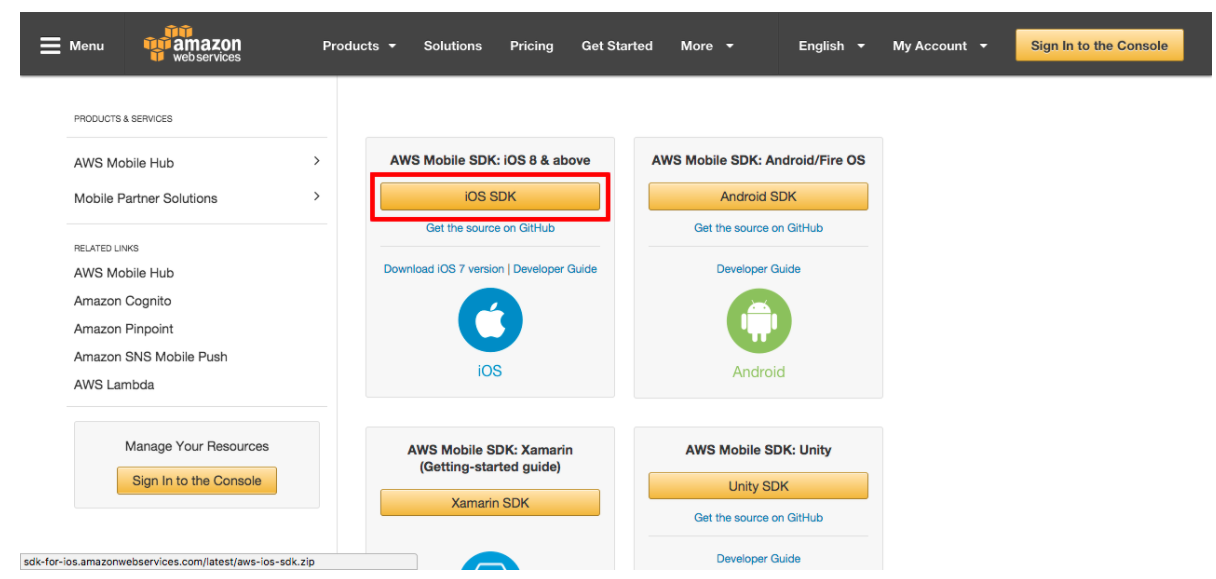
- Download the AWS SDK for iOS
Truy cập trang AWS SDK dành cho iOS tại đây và tải xuống SDK
- Unzip the SDK files and kéo vào project của bạn
SDK bạn đã tải xuống và thêm các tệp AWSCore. Framework, AWSCognito.framework và AWSSNS.framework vàoproject của bạn
- Embed the frameworks : Embed các franework vừa thêm vào dự án bằng cách: YourProject -> Targets -> General -> Embedded Binaries. Add AWSCore.framework, AWSCognito.framework and AWSSNS.framework.
- Import AWSSNS vào app delegate: import the AWSSNS framework vào AppDelegate.swift của bạn.
import AWSSNS
- Create a bridging header: AWS SDK được viết bằng objective-C, bạn sẽ cần phải tạo một bridging header để cho nó có thể hoạt động với Swift
Chú ý: Việc tạo bridging header bằng new file cần phải được thêm vào build settings
Import modules vảo bridging header
#import <AWSCore/AWSCore.h>
#import <AWSCognito/AWSCognito.h>
- Tạo application endpoint trong app delegate
Trong AppDelegate.swift thêm đoạn mã cho didRegisterForRemoteNotificationsWithDeviceToken:
func application(_ application: UIApplication, didRegisterForRemoteNotificationsWithDeviceToken deviceToken: Data) {
    /// Attach the device token to the user defaults
    var token = “”
    for i in 0..<deviceToken.count {
        token = token + String(format: “%02.2hhx”, arguments: [deviceToken[i]])
    }
    print(token)
    UserDefaults.standard.set(token, forKey: “deviceTokenForSNS”)
    /// Create a platform endpoint. In this case, the endpoint is a
    /// device endpoint ARN
    let sns = AWSSNS.default()
    let request = AWSSNSCreatePlatformEndpointInput()
    request?.token = token
    request?.platformApplicationArn = SNSPlatformApplicationArn
    sns.createPlatformEndpoint(request!).continueWith(executor: AWSExecutor.mainThread(), block: { (task: AWSTask!) -> AnyObject! in
        if task.error != nil {
            print(“Error: \(String(describing: task.error))”)
        } else {
            let createEndpointResponse = task.result! as AWSSNSCreateEndpointResponse
            if let endpointArnForSNS = createEndpointResponse.endpointArn {
                print(“endpointArn: \(endpointArnForSNS)”)
                UserDefaults.standard.set(endpointArnForSNS, forKey: “endpointArnForSNS”)
            }
        }
        return nil
    })
}
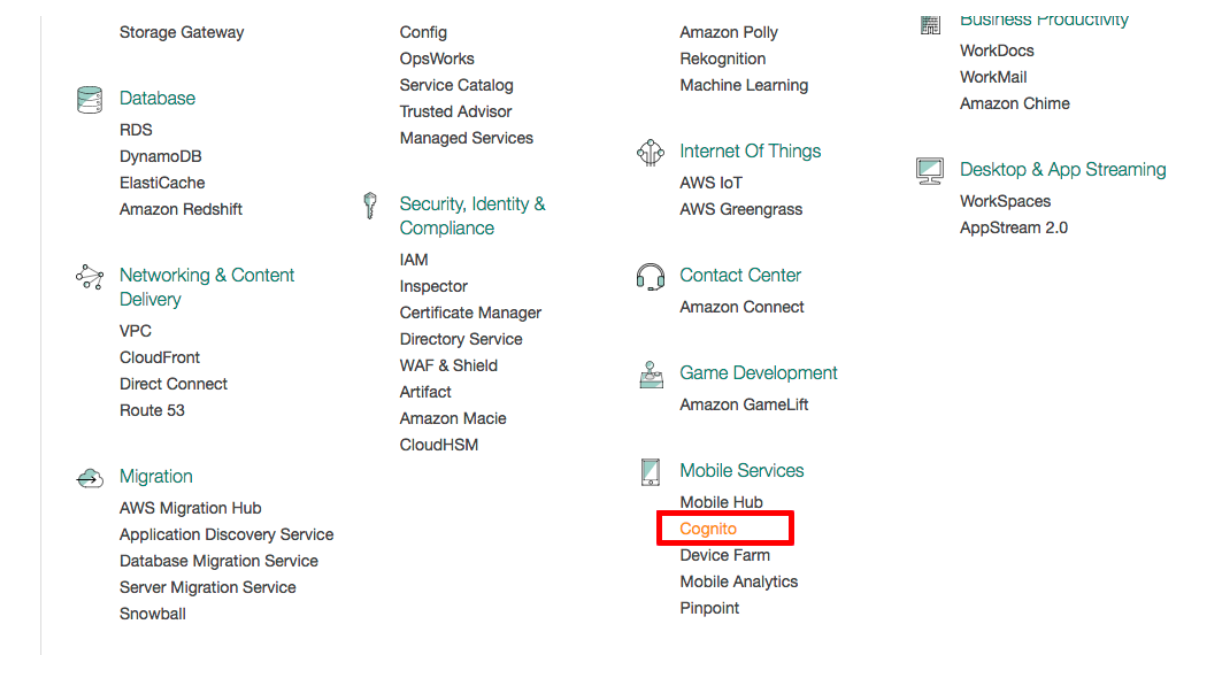
- Create an identity pool with Cognito: AWS Cognito quản lý xác thực và cung cấp cho bạn chứng chỉ bảo mật để thực hiện call API. Vì vậy, để ứng dụng của chúng ta thực hiện các cuộc gọi API SNS, nó phải có một danh tính pool danh sách các chức năng cho phép.
- Truy cập Cognito: truy cập trang tổng quan AWS chính và mở Cognito
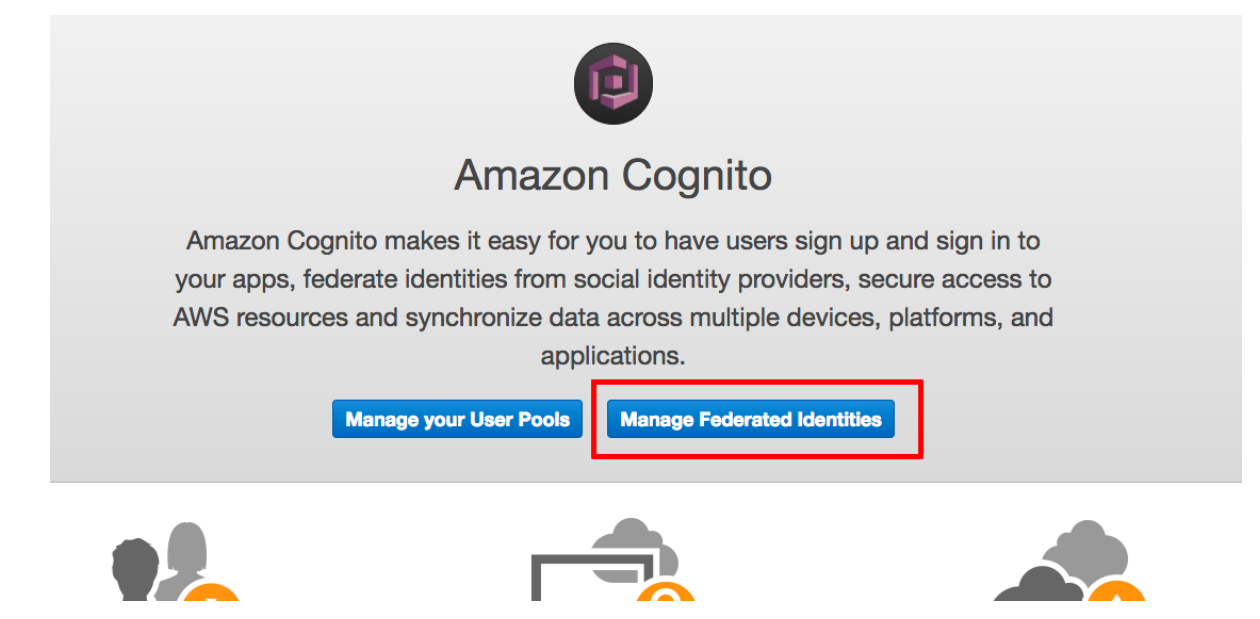
- Manage federated identities: bấm vào nút ' Manage Federated Identities ' để mở identity pools của bạn
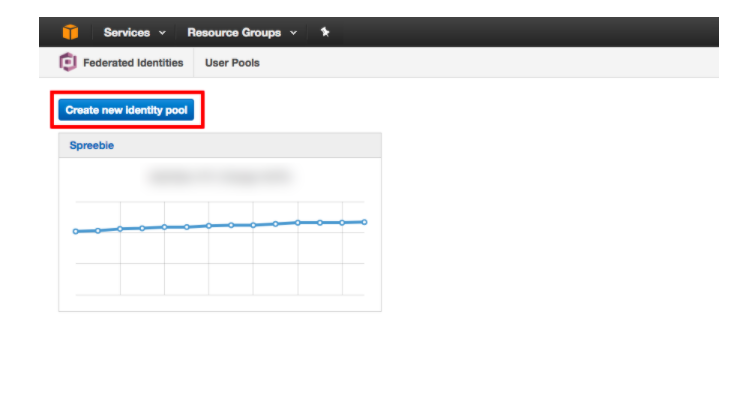
- Tạo mới identity pool: nhập tên cho identity pool và chọn ' Enable access to unauthenticated identities
- Add Cognito code: mở liên kết sample code với identity pool mới của bạn và sao chép the identity pool ID
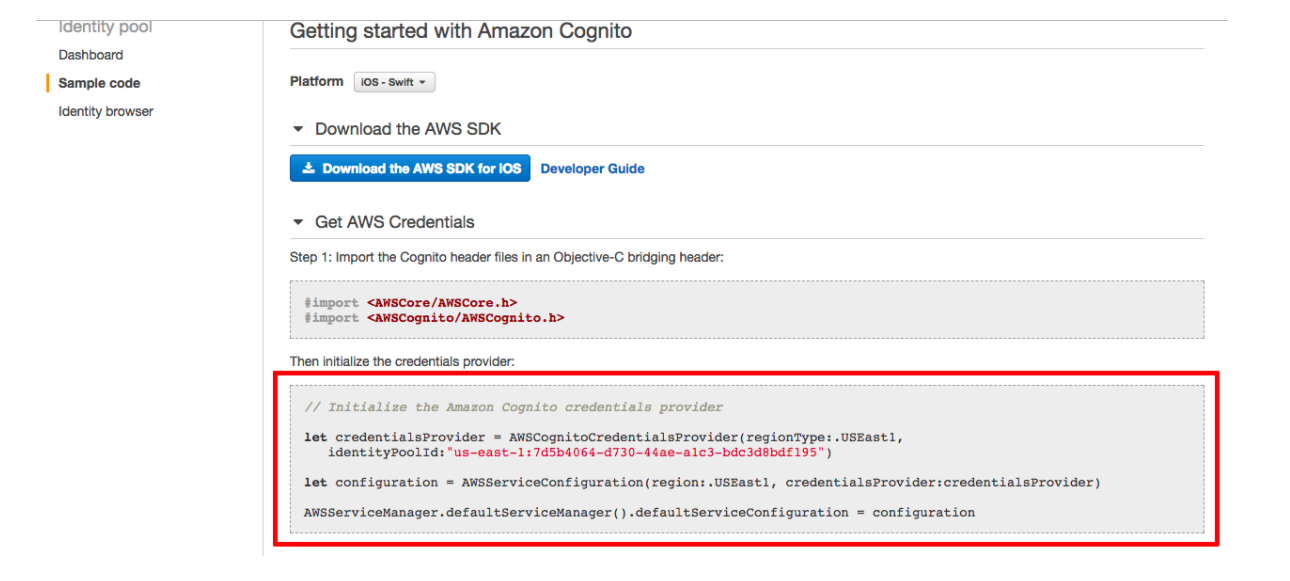
func application(_ application: UIApplication, didFinishLaunchingWithOptions launchOptions: [UIApplicationLaunchOptionsKey: Any]?) -> Bool {
    // Override point for customization after application launch.
    /// Setup AWS Cognito credentials
    let credentialsProvider = AWSCognitoCredentialsProvider(
        regionType: AWSRegionType.USEast1, identityPoolId: “us-east-1:7d5b4064-d730–44ae-a1c3-bdc3d8bdf195”)
    let defaultServiceConfiguration = AWSServiceConfiguration(
        region: AWSRegionType.USEast1, credentialsProvider: credentialsProvider)
    AWSServiceManager.default().defaultServiceConfiguration = defaultServiceConfiguration
    return true
}
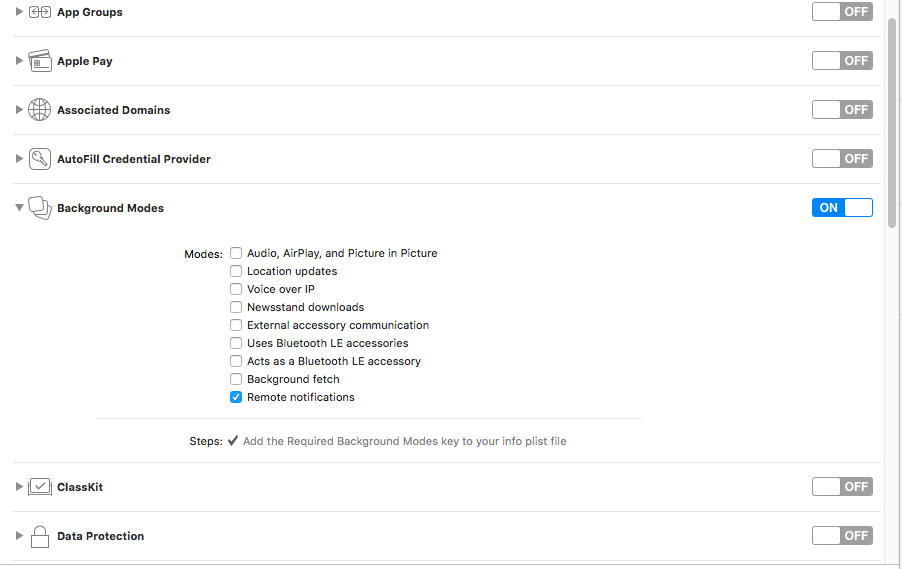
- Enable push capability: cho phép push notifications & remote notificaton trong YourProject -> Target -> Capabilities.

- Register for push notifications:
Trong didFinishLaunchingWithOptions thêm registerForPushNotifications(application: application) trước khi return true để đăng ký push cho application.
registerForPushNotifications(application: application)
- Implement push notifications cho ứng dụng:
- Implement the registerForPushNotifications method:
func registerForPushNotifications(application: UIApplication) {
    /// The notifications settings
    if #available(iOS 10.0, *) {
        UNUserNotificationCenter.current().delegate = self
        UNUserNotificationCenter.current().requestAuthorization(options: [.badge, .sound, .alert], completionHandler: {(granted, error) in
            if (granted)
            {
                UIApplication.shared.registerForRemoteNotifications()
            }
            else{
                //Do stuff if unsuccessful…
            }
        })
    } else {
        let settings = UIUserNotificationSettings(types: [UIUserNotificationType.alert, UIUserNotificationType.badge, UIUserNotificationType.sound], categories: nil)
        application.registerUserNotificationSettings(settings)
        application.registerForRemoteNotifications()
    }
}
- Implement the userNotificationCenter delegate methods:
// Called when a notification is delivered to a foreground app.
@available(iOS 10.0, *)
func userNotificationCenter(_ center: UNUserNotificationCenter, willPresent notification: UNNotification, withCompletionHandler completionHandler: @escaping (UNNotificationPresentationOptions) -> Void) {
   print(“User Info = “,notification.request.content.userInfo)
   completionHandler([.alert, .badge, .sound])
}
// Called to let your app know which action was selected by the user for a given notification.
@available(iOS 10.0, *)
func userNotificationCenter(_ center: UNUserNotificationCenter, didReceive response: UNNotificationResponse, withCompletionHandler completionHandler: @escaping () -> Void) {
   print(“User Info = “,response.notification.request.content.userInfo)
   completionHandler()
}
- Chạy ứng dụng của bạn và xem kết quả thôi nào.
Kết nối iphone của bạn và cài đặt ứng dụng thông qua Xcode Nếu quá trình hoàn tất bạn có thể thấy new endpoit ở AWS Dashboard -> SNS -> Applications -> YourApplication. Bây giờ hãy chọn Publish to Endpoint và send notification to your phone.
![]()

Tổng kết
Vậy là trong bài viết hôm nay mình đã hướng dẫn các bạn từ a -> z trong việc tạo 1 ứng dụng push notification cho ios với dịch vụ của AWS. Cảm ơn bạn đã theo dõi hết bài viết nếu bài viết hữu ích cho mình xin 1 upvote để mình có động lực làm bài viết tiếp theo về so sánh về FCN và SNS xem chúng có gì khác nhau nhé.
All rights reserved
