[iOS] Hướng dẫn sử dụng UNNotificationServiceExtension
Bài đăng này đã không được cập nhật trong 4 năm
1. Giới thiệu
Từ iOS 10 Apple đã giới thiệu một thư viện mới giúp chúng ta giao tiếp với Remote Notification. Thay vì chỉ hiện thị Remote notification một cách đơn điệu như trước thì chúng ta có thể làm Notification càng thêm sinh động hơn, bằng cách trèn thêm hình ảnh hoặc text. Video dưới là kết quả mà mình đã đạt được khi sử dụng UNNotificationServiceExtension:
Như bạn thấy thay vì chỉ hiện thị notification bình thường, mình đã dowload thêm một bức ảnh và hiện thị lên, khá là sinh động đấy chứ.2. Tạo Push Notification về thiết bị iOS
Để có thể tạo mô phỏng push notification về điện thoại của mình, thay vì sử dụng dịch vị của bên thứ 3 hoặc phải code rất rất nhiều để tương tác với Apple Push Service, mình giới thiệu các bạn một phần mềm hoàn toàn miễn phí giúp mô phỏng việc push notification. Các bạn truy cập https://github.com/noodlewerk/NWPusher làm theo hướng dẫn để cài đặt phần mềm. Phần này yêu cầu các bạn phải nắm rõ cơ chế hoạt động của Apple Push service rồi bao gồm: việc tạo push certifcate như thế nào trên Apple Portal, lấy device token như thế nào. Phần này nếu các bạn chưa hiểu rõ, thì nên xem lại kiến thức phần này trước. Giờ mình sẽ hướng dẫn sử dụng phần mềm trên. Sau khi mở ứng dụng lên thì sẽ có giao diện như bên dưới
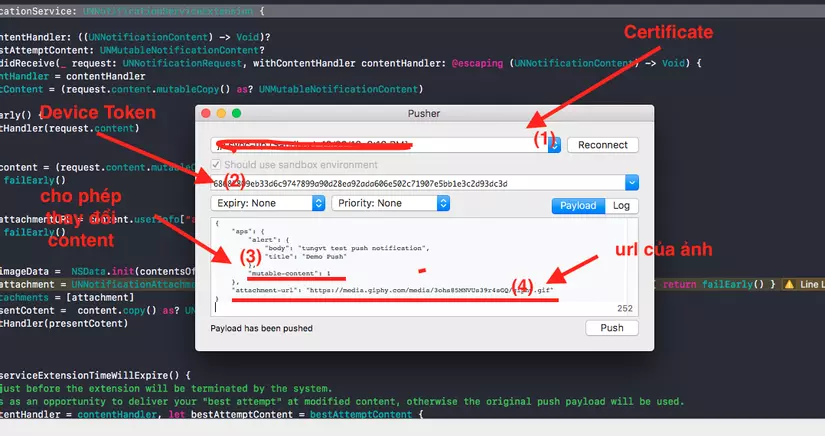
(1) trước tiên cần phải config cho push certificate ở đây, nhớ là chỉ file .p12 mới được chấp nhận. Các tạo .p12 từ push certifcate như thế nào thì bạn có thể Google.
(2) Đây là device token của thiết bị nhận PUSH, cách lấy device token như thế nào thì mình không nói ở đây, các bạn có thể Google, hết sức đơn giản thôi.
Phần Payload có 2 trường quan trọng mà mình muốn nói đến là:
"mutable-content": 1 flag này được set giá trị là 1 cho phép bạn thay đổi cách hiện thị của Notification, nếu không mở cờ này lên thì ta không thay đổi được hiện thị mặc định của notification đâu.
attachment-url trường này lưu đường dẫn của bức ảnh mà ta muốn hiện thì, sau khi lấy được đường đẫn rồi thì mình sẽ download ảnh về rồi hiện thị lên cùng với notification.
Cấu trúc của payload các bạn có thể tham khảo bên dưới.
{
    "aps": {
        "alert": {
            "body": "tungvt test push notification",
            "title": "Demo Push"
        },
        "mutable-content": 1
    },
    "attachment-url": "https://media.giphy.com/media/3ohs85MNVUs39r4sGQ/giphy.gif"
}
Như vậy đã config xong, giờ chúng ta nhấn Push và xem điều gì xảy ra, nếu mọi chuyện tốt đẹp thì dòng chữ Payload has been pushed sẽ được hiển thị lên và thiết bị của bạn sẽ nhận được notification

3. Sử dụng UNNotificationServiceExtension
Để có thể sử dụng được thư viện trên, chúng ta cần tạo thêm một target mới trong Xcode project. Các bạn làm theo hướng dẫn bên dưới
-
In Xcode, select New > Target to add a new target to your project.
-
In the iOS > Application Extension section, select the Notification Service Extension target.
-
Click Next.
-
Specify the name and other details for your app extension.
-
Click Finish. Khi đó chúng ta sẽ có được một
targetmới tên làRemoteNotificationService, trong đó có một file mới tên làNotificationService. Mọị thao tác với remote notification sẽ được thực hiện ở trong file đó.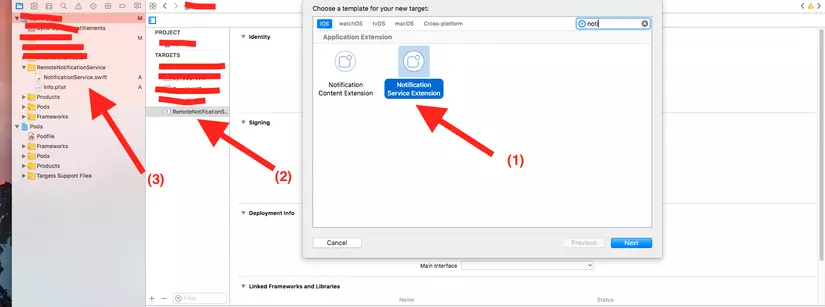
(1)Kiểu target mà ta cần chọn là Notification Service Extension(2)target mới sau khi được tạo(3)File NotificationService.swift: chúng ta sẽ thao tác với notification ở đây. Dưới đây là fileNotificationService.swiftcủa mình:
import UserNotifications
import UIKit

final class NotificationService: UNNotificationServiceExtension {

    private var contentHandler: ((UNNotificationContent) -> Void)?
    private var bestAttemptContent: UNMutableNotificationContent?
    override func didReceive(_ request: UNNotificationRequest, withContentHandler contentHandler: @escaping (UNNotificationContent) -> Void) {
        self.contentHandler = contentHandler
        bestAttemptContent = (request.content.mutableCopy() as? UNMutableNotificationContent)

        func failEarly() {
            contentHandler(request.content)
        }

        guard let content = (request.content.mutableCopy() as? UNMutableNotificationContent) else {
            return failEarly()
        }

        guard let attachmentURL = content.userInfo["attachment-url"] as? String else {
            return failEarly()
        }

        guard let imageData =  NSData.init(contentsOf:NSURL(string: attachmentURL)! as URL) else { return failEarly() }
        guard let attachment = UNNotificationAttachment.create(imageFileIdentifier: "image.gif", data: imageData, options: nil) else { return failEarly() }
        content.attachments = [attachment]
        if let presentCotent =  content.copy() as? UNNotificationContent {
            contentHandler(presentCotent)
        }
    }

    override func serviceExtensionTimeWillExpire() {
        // Called just before the extension will be terminated by the system.
        // Use this as an opportunity to deliver your "best attempt" at modified content, otherwise the original push payload will be used.
        if let contentHandler = contentHandler, let bestAttemptContent = bestAttemptContent {
            contentHandler(bestAttemptContent)
        }
    }

}

extension UNNotificationAttachment {

    /// Save the image to disk
    static func create(imageFileIdentifier: String, data: NSData, options: [NSObject : AnyObject]?) -> UNNotificationAttachment? {
    let fileManager = FileManager.default
    let tmpSubFolderName = ProcessInfo.processInfo.globallyUniqueString
        let tmpSubFolderURL = NSURL(fileURLWithPath: NSTemporaryDirectory()).appendingPathComponent(tmpSubFolderName, isDirectory: true)

    do {
        try fileManager.createDirectory(at: tmpSubFolderURL!, withIntermediateDirectories: true, attributes: nil)
    let fileURL = tmpSubFolderURL?.appendingPathComponent(imageFileIdentifier)//tmpSubFolderURL?.URLByAppendingPathComponent(imageFileIdentifier)
        try data.write(to: fileURL!, options: [])
        let imageAttachment = try UNNotificationAttachment(identifier: imageFileIdentifier, url: fileURL!, options: options)
    return imageAttachment
    } catch let error {
    print("error \(error)")
    }

    return nil
    }
}
Trong phần code trên thì chúng ta cần quân tâm nhất tới hàm didReceive đây là nơi hệ thống sẽ gọi vào khi có một notification được nhận. Tạo hàm đó mình làm nhiệm vụ đó là lấy url của ảnh qua trường "attachment-url" mà ta đã định nghĩa ở playload. Download ảnh về hết sức đơn giản bằng NSData, lưu ảnh lại rồi gửi ra ngoài để hiện thị bằng đoạn code contentHandler(presentCotent).
Nếu không có lỗi gì xảy ra thì bạn sẽ thu được kết quả như video trên.
All rights reserved
