[Infra] HTTP load-balancing using HaProxy
Bài đăng này đã không được cập nhật trong 4 năm
If someone who has spent many hours with servers and network part may be familiar with the term load-balancing. However, applying load-balancing into reality 's never an easy task because it requires deep knowledge about systems and network traffic. This post will introduce tool to support load balancing for HTTP traffic named HaProxy and provide a small lab based on MacOS and Virtualbox.
Glance at HaProxy
HAProxy standing for High Availability Proxy is a open source software which is built for load balancing purpose from Layer 4 to Layer 7. HAProxy works almost based on Linux, Solaris and FreeBSD. The main role of HAProxy is increasing performance of distributed system over numerous server. Today, there’re many sites use HAProxy as an load balancer such as Github, Imgur, Instagram and Twitter.
HAProxy’s integrated many useful features but I just want to concentrate on three keys function which are background of HAProxy
Access Control List (ACL)
Access Control List defines rules for switch server based on some characters of incoming traffic. ACL can help the system to divide the main application with bundle of function into different kinds of services which are served in separated servers. An ACL contains two crucial parts:
*Define criterion with sets of values
*Perform actions accompany with sets of values when its valid
To make an ACL, we need to follow their syntax:
acl <aclname> <criterion> [flags] [operator] <value> ...
-
acl: keyword for access control list
-
<aclname>: name specific for each ACL and using case-sensitive to distinguish others
-
<criterion>: define the portion need to match with request/response
-
<flags>: the main action when matching. (I)
-iignore case during matching, (II)-fload matching pattern from file and (III)—force end of flags, use when a string’s similar to one of the flag -
<operators>: comparing operaters, depend on type of matching (Integers, String, Regex, network and IP address). E.g:
eqtrue if equal with value,getrue of value is greater or equal at least one value -
<value>: The name has revealed everything
For more detail about Access Control List, let visit documentation page of HAProxy
Frontend
Frontend is a postion receiving incoming request then forward it to suitable backends. In HAProxy configuration, Frontend has to contains three components:
-
a set of IP address and port (e.g 10.1.2.3:80, *:22, etc.)
-
ACLs
-
use_backend rules which define backends for each ACLs condition if it’s matched or use default_backend for remaining case
We can set configuration in Frontend to be suitable with various kind of network traffic from Layer 4 to Layer 7 of OSI model.
Backend
Backend contains list of server for forwarded requests. Fundamentally, Backend defined by:
-
Load balancing algorithm
-
List of servers and ports
For example, here is a sample of backend configuration:
backend web-backend
   balance roundrobin
   server web-1 web1domain.com:80 check
   server web-2 web2domain.com:80 check
About algorithms, there’re roughly different types:
-
Round Robin: The most common one, the servers will resolve forwarded request follow turns and server list will be ordered based on their weights, suitable for HTTP
-
Least Connections: The server with lowest connection number will be chosen. Recommend for request of long session such as LDAP, SQL, TSE...
-
Source: the request will be served based on their original IP address.
-
URI/URL: similar to source but input params are URI or URL partern
Laboratory
Experiencing infrastructure’s never easy for everyone, especially with high performance devices like servers. This part I will introduce how to create a small lab using HAProxy using VirtualBox on OSX Elcapital
Setup environment
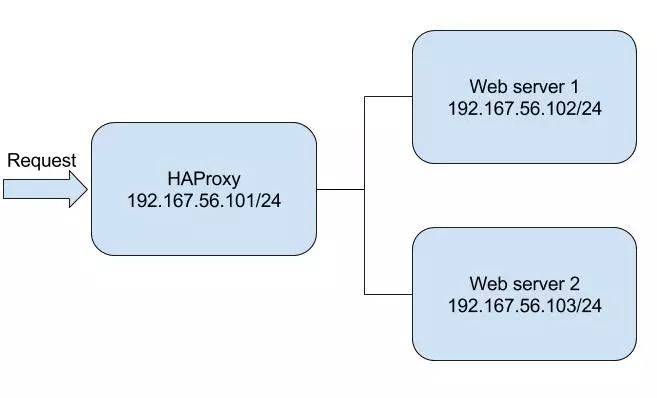
To implement HAProxy system, I need to have at least 3 servers: 2 HTTP servers and 1 HAProxy with connections like this

All of servers in here are running Ubuntu 14.04 server and the IP address should be statically config like above diagram. For someone doesn’t familiar with Virtualbox on OSX, I recommend to install at least 2 network interfaces/each servers:
-
An interface running NAT: to connect the Internet, for installing packages
-
An interface connected to internal or host-only network: connect to 192.168.56.0/24 network, just for private of HAProxy. For more detail about setup internal network of Virtualbox, let refer this link
Web servers
Assign IP address
auto eth0
iface eth0 inet dhcp

# The host only network interface

auto eth2
iface eth2 inet static
address 192.168.56.102

# For server 2: 192.168.56.103

netmask 255.255.255.0
Install Apache2
sudo apt-get install apache2
To distinguish two web server, let do some modification in /var/www/html/index.html
  <body>
    <div class="main_page">
      <div class="page_header floating_element">
        <img src="/icons/ubuntu-logo.png" alt="Ubuntu Logo" class="floating_element"/>
        <span class="floating_element">
          Web server 1(2)
        </span>
      </div>
      <div class="content_section floating_element">
      </div>
    </div>
  </body>
This html code is content for web page when accessing HTTP service of each servers and we need to mark the pages from each of them.
HAProxy server
Install HAProxy’s so simple with
apt-get install haproxy
To enable service, we need to set a flag in /etc/default/haproxy and set ENABLED to 1
Configuration
The crucial part of HAProxy places in /etc/haproxy/haproxy.cfg where define behaviors of HAProxy. This is the main configuration of HAProxy
global
  log     127.0.0.1 local2
  chroot /var/lib/haproxy
  stats socket /run/haproxy/admin.sock mode 660 level admin
  stats timeout 30s
  user haproxy
  group haproxy
  daemon

# Default SSL material locations

  ca-base /etc/ssl/certs
  crt-base /etc/ssl/private

# Default ciphers to use on SSL-enabled listening sockets

# For more information, see ciphers(1SSL)

  ssl-default-bind-ciphers kEECDH+aRSA+AES:kRSA+AES:+AES256:RC4-SHA:!kEDH:!LOW:!EXP:!MD5:!aNULL:!eNULL

defaults
    mode                    http
    log                     global
    option                  httplog
    option                  dontlognull
    option http-server-close
    option forwardfor       except 127.0.0.0/8
    option                  redispatch
    retries                 3
    timeout http-request    20
    timeout queue           86400
    timeout connect         86400
    timeout client          86400
    timeout server          86400
    timeout http-keep-alive 30
    timeout check           20
    maxconn                 50000

frontend LB
   bind 192.168.56.101:80
   reqadd X-Forwarded-Proto:\ http
   default_backend LB

backend LB 192.168.56.101:80
   mode http
   stats enable
   stats hide-version
   stats uri /stats
   stats realm Haproxy\ Statistics
   stats auth haproxy:admin    # Credentials for HAProxy Statistic report page.
   balance roundrobin     # Load balancing will work in round-robin process.
   option httpchk
   option httpclose
   option forwardfor
   cookie LB insert
   server web1-srv 192.168.56.102:80 cookie web1-srv check   # backend server.
   server web2-srv 192.168.56.103:80 cookie web2-srv check   # backend server.
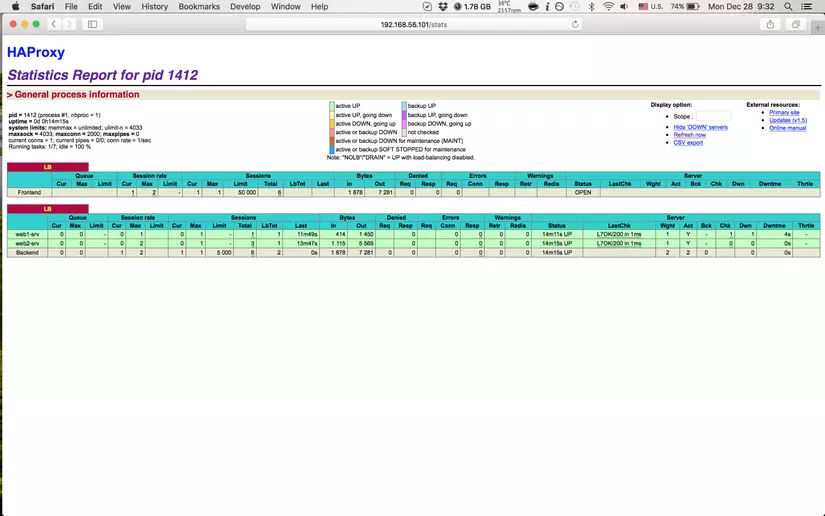
The global and defaults part contains some basic configuration for incoming traffic and request. We can easily detect some rule define for fronted and backend that we mentioned above. However, there’s another tool of HAProxy to monitor and tracking the system is statistics. The stats ’s enabled and the portal to access through a web page with credentials haproxy/admin. We can see detail information of request comming and forwarding to the backend

Now everything’s done, let try by access the frontend IP address 192.168.56.101 by different browsers and we can see the web pages comming from different servers
Safari

Firefox

The bottom line
It’s very hard to compare HAProxy with others methods because it depends on abilities of administrators as well as the strength of system. However, HAProxy has soften the challenges for us when scaling the large application and now, we can forget all the nightmares about server configuration when adding/removing new one.
All rights reserved