Info argument in graphql resolver
Bài đăng này đã không được cập nhật trong 8 năm
Bài viết dành cho những bạn nào đã từng làm việc với Graphql resolver, nếu chưa biết nó thì nên tìm hiểu qua về Graphql. Nếu đã từng làm việc với graphql thì ta thường thấy có 2 biến context và info trong resolver mà không biết nó để làm gì cả. Ngay trong 1 ứng dụng boilerplate của Graphql cũng có sự xuất hiện của nó. Thật ra ban đầu là mình tìm hiểu về boilerplate của Prisma, trong đó có 1 type như AuthPayload được định nghĩa resolver mà thực tế là bỏ resolver của nó đi thì vẫn có thể chạy bình thường.
    const AuthPayload = {
      user: async ({ user: { id } }, args, ctx, info) => {
        return ctx.db.query.user({ where: { id } }, info)
      },
    }
Theo issue của Prisma https://github.com/graphcool/prisma/issues/1737 thì nó có đề cập đến vai trò của Info argument trong resolver.
Cách 1 query được thực thi trong Graphql
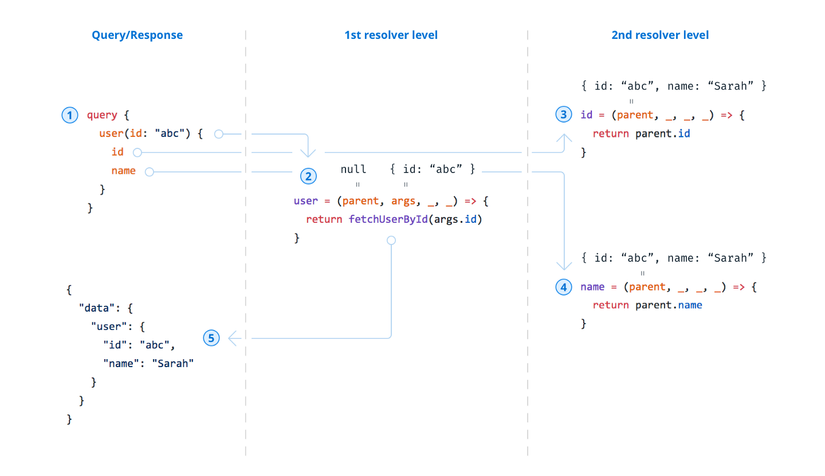 Theo mình hiểu thì Graphql query khi được thực thi sẽ run theo dạng nest. Theo hình trên thì nó sẽ chạy như sau:
- Tìm resolver của user
- Tìm resolver của id
- Tìm resolver của name Tuy nhiên thì thực tế là ta chả bao giờ phải định nghĩa resolver cho id, name cả vì nó là field của object được trả về nên Graphql tự động trả về field của object đó. Tuy nhiên nếu không phải là field của object nữa thì bạn sẽ cần để ý đến việc viết resolver cho chúng.
Hiểu thêm về biến info
Theo definition thì biến info có cấu tạo như sau
    export type GraphQLResolveInfo = {
      fieldName: string;
      fieldNodes: Array<FieldNode>;
      returnType: GraphQLOutputType;
      parentType: GraphQLCompositeType;
      path: ResponsePath;
      schema: GraphQLSchema;
      fragments: { [fragmentName: string]: FragmentDefinitionNode };
      rootValue: mixed;
      operation: OperationDefinitionNode;
      variableValues: { [variableName: string]: mixed };
    };
Mình sẽ không đi sâu vào từng field là gì mà chỉ tập trung vào một số field chính, nếu muốn biết bạn có thể đọc thêm tại https://blog.graph.cool/graphql-server-basics-demystifying-the-info-argument-in-graphql-resolvers-6f26249f613a fieldName: Tên của resolver query đang được thực thi(VD: khi đang trong resolver "user" ở ví dụ trên thì fieldName sẽ là "user")
operation: Chứa thông tin của query, từ root resolver(VD: khi đang trong resolver "id" thì operation chứa cả thông tin của query tính từ "user")
fieldNodes: Chứa 1 phần thông tin của resolver query hiện tại, chỉ là 1 phần của operation (VD: khi trong resolver id thì fieldNodes chỉ chứa từ id trở xuống)
Hiểu về vai trò của info
Mình sẽ show 1 ví dụ bằng cách query qua graphql để thấy được sự quan trọng của info. VD gần giống trên issue https://github.com/graphcool/prisma/issues/1737 Đầu tiên mình có schema như sau
type User {
  id: ID! @unique
  createdAt: DateTime!
  updatedAt: DateTime!
  email: String! @unique
  password: String!
  posts: [Post!]!
}

type Post {
  id: ID! @unique
  title: String!
  author: User!
}

type Mutation {
  signup(email: String!, password: String!): AuthPayload!
  login(email: String!, password: String!): AuthPayload!
}

type AuthPayload {
  token: String!
  user: User!
}
- Thường thì chúng ta sẽ implement resolver như sau:
async function login(parent, { email, password }, ctx, info) {
  const user = await ctx.db.query.user({ where: { email } })
  if (!user) {
    throw new Error(`No user found for email: ${email}`)
  }

  const valid = await bcrypt.compare(password, user.password)
  if (!valid) {
    throw new Error('Invalid password')
  }

  return {
    token: jwt.sign({ userId: user.id }, APP_SECRET),
    user
  }
}
Với cách implement trên thì với query đơn giản như sau có thể pass vì nó chỉ lấy ra các thuộc tính là field của **user **
    mutation {
      login(
        email: "thong123456@gmail.com",
        password: "12345678"
      ){
        token,
        user {
          id,
          email
        }
      }
    }
Tuy nhiên với query như sau sẽ fail vì nó lấy ra cả post của user.
    mutation {
      login(
        email: "thong123456@gmail.com",
        password: "12345678"
      ){
        token,
        user {
          id,
          email,
          posts {
              id,
              title
          }
        }
      }
    }
Khi này sẽ raise lên lỗi "Error: Cannot return null for non-nullable field User.posts" bởi vì theo cách run query của Graphql mình đã nói ở trên thì khi chạy tới resolver của posts thì nó không tìm thấy resolvers cho posts nên mặc định lấy user.posts, mà posts không phải 1 field của User nên trả về null -> fail.
- Giờ mình sẽ thử pass info vào resolver xem thế nào nhé Implement như sau
    async function login(parent, { email, password }, ctx, info) {
      //Thêm info vào khi query user
      const user = await ctx.db.query.user({ where: { email } }, info)
      if (!user) {
        throw new Error(`No user found for email: ${email}`)
      }

      const valid = await bcrypt.compare(password, user.password)
      if (!valid) {
        throw new Error('Invalid password')
      }

      return {
        token: jwt.sign({ userId: user.id }, APP_SECRET),
        user
      }
    }
Ồ có lỗi xảy ra
    {
      "data": null,
      "errors": [
        {
          "message": "Field 'user' of type 'User' must have a sub selection. (line 2, column 3):\n  user(where: $_where)\n  ^",
          "locations": [
            {
              "line": 2,
              "column": 3
            }
          ],
          "path": [
            "login"
          ]
        }
      ]
    }
Khi Graphql chạy đến resolver login, biến info là tập Selection set bắt đầu từ root query là login, vì vậy khi pass vào query user ( const user = await ctx.db.query.user({ where: { email } }, info) )nó sẽ không thể hiểu được. Cách giải quyết có thể là bóc tách info ra tuy nhiên khá phức tạp về cấu trúc.
- Cách giải quyết dễ dàng hơn Mình định nghĩa resolver cho AuthPayload, ở 2 cách implement trên thì không cần định nghĩa resolver AuthPayload vẫn có thể chạy được bình thường
const AuthPayload = {
  user: async ({ user: { id } }, args, ctx, info) => {
    return ctx.db.query.user({ where: { id } }, info)
  },
}
Giờ query thử
mutation {
  login(
    email: "thong123456@gmail.com",
    password: "12345678"
  ){
    token,
    user {
      id,
      email,
      posts {
        id,
        title,
        author {
          id,
          email
        }
      }
    }
  }
}
Giờ đã có kết quả
{
  "data": {
    "login": {
      "token": "eyJhbGciOiJIUzI1NiIsInR5cCI6IkpXVCJ9.eyJ1c2VySWQiOiJjamdpenRtbTQwMDNuMDEzOXRuZmYwZGk2IiwiaWF0IjoxNTI0ODk5MDQ1fQ.zHEz_kfaoHBmtww5Twbqd2lBsJUF-U6mtDpJi7w2Vjo",
      "user": {
        "id": "cjgiztmm4003n0139tnff0di6",
        "email": "thong123456@gmail.com",
        "posts": [
          {
            "id": "cjgizu2rx00400139jb0bwpd6",
            "title": "post1",
            "author": {
              "id": "cjgiztmm4003n0139tnff0di6",
              "email": "thong123456@gmail.com"
            }
          }
        ]
      }
    }
  }
}
Demo
Các bạn có thể xem và làm theo hướng dẫn demo đơn giản của AuthPayload tại đây https://github.com/thonglhuet/Info_argument
Summary
Qua bài viết mình mong các bạn nắm được
- Cách một graphql Query đươc thực hiện
- Hiểu được tác dụng của argument info
Bài viết có tham khảo tại https://blog.graph.cool/graphql-server-basics-demystifying-the-info-argument-in-graphql-resolvers-6f26249f613a https://github.com/graphcool/prisma/issues/1737
All rights reserved
