Implement an Application using Express + Node.js, starting from Zero
Bài đăng này đã không được cập nhật trong 4 năm
What is Express ?
No more explanation needed for Node.js - an execution environment of server-side Javascript.
Express is a framework for speeding up the main development by Node.js
There is a detail example of REST API showing how Express can improve your development efficiency. If you develop a web service that provide REST API, you need to analyze URI as well as Body and differentiate the request content and data
For example you are developing a photo sharing service, you need to provide a REST API for the returning photo. This API will be looking like the format below:
https://your.hostname.com/api/photo/YOUR_PHOTO_ID
The server that provides this API needs to analyze the request content below from the above URI
- This request is requesting 1 photo
- The
IDof the being requested photo isYOUR_PHOTO_ID
You can analyze URI by using "Pattern Matching" of Regular Expression for example, but you can also do that by using Express like the code below:
node.js
// API that provides a photo
app.get("/api/photo/:photoId", function(req, res, next){
    // Can differentiate a specific photo by user by req.params.photoId
    console.log(req.params.photoId);
});
Let's prepare a real environment of Express + Node.js.
Environment:
- OS: Mac OS X El Capitan
- Node.js: 5.3.0
- Express: 4.13.3
Setup Express
Node.js can be set up easily by downloading from the site below. This installation will create the Node.js main body and package manager NPM
Next, open your terminal, create a blank directory for new project, run the command npm init in that directory and your project will be created, The npm init command makes several questions and generates a package.json file according to the user's response.
$ mkdir new_project
$ cd new_project/
$ npm init
# We will response for prompt

$ ls
package.json
package.json is the project name, overview, and a configuration file that defines package dependencies.
Next, we install Express. Express is being provided as a NPM pakage, you can install by running the command npm install
$ npm install express --save
If you confirm the package.json file here, you can see that the Express is added to dependency. You can add --save into the previous npm install for registering automatically the dependency
package.json
{
  "name": "new_project",
  "version": "1.0.0",
  "description": "New Project",
  "main": "app.js",
  "scripts": {
    "test": "echo \"Error: no test specified\" && exit 1"
  },
  "author": "Kazuki Nakajima",
  "license": "MIT",
  "dependencies": {
    "express": "^4.13.3"
  }
}
Create API
We prepared the environment needed, next step we have to create the process for server site. For this time we will create a process assuming a photo sharing service that was explained at the beginning
The following describes how to use Express in details
Load module and install Set port number and start listening Description for application process below Based on this, we will create the main file. we will leave it as app.js here
app.js
/* 1. Load express module, instantiate and assign to app。*/
var express = require("express");
var app = express();

/* 2. Run the listen() method, listen on number 3000 port */
var server = app.listen(3000, function(){
    console.log("Node.js is listening to PORT:" + server.address().port);
});

/* 3. Lastly, process application specific */

// Sample data of photo
var photoList = [
    {
        id: "001",
        name: "photo001.jpg",
        type: "jpg",
        dataUrl: "http://localhost:3000/data/photo001.jpg"
    },{
        id: "002",
        name: "photo002.jpg",
        type: "jpg",
        dataUrl: "http://localhost:3000/data/photo002.jpg"
    }
]

// API to get photo list
app.get("/api/photo/list", function(req, res, next){
    res.json(photoList);
});
This time we use port 3000 for listening, we can set listening IP address but we simplify it and let all the IP address to access
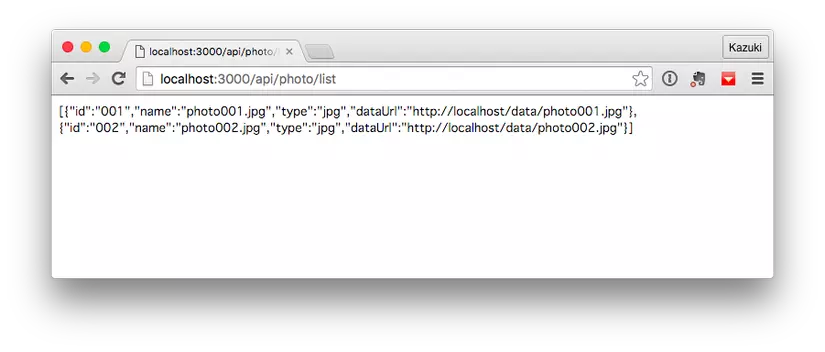
After that i will describe the processing for the request according to the purpose. In the example above we describe an API that provides a photo list. When accessing with the following URL, it is specification to return all the sample data of the photo in JSON format.
http://localhost:3000/api/photo/list
Let's have a closer look at the source code
At the get method of app object, we can describe the processing when a GET request is made to an arbitrary URI. This time, when you make a GET request to the above URL, you will be running res.json (photoList).
Res is an object with a set of functions related to response. With the json () method you are using this time, you can send data to the client in JSON format. Since the response of the REST API is often used in the JSON format, it is a handy method when creating APIs.
You can check other methods provided by res in the Express official document below. http://expressjs.com/en/4x/api.html#res
Start the server process
Well, it is now ready to start the server. To start the server process simply specify the app.js file you just created as the argument of the node command and execute it.
$ node app.js
Node.js is listening to PORT:3000
If you launch the browser and access the above URL, the sample data should be displayed in JSON format.
If this result is returned, you can cook as much as you like with Javascript on the client side.
Create automatic API
We created an API whose URI is completely fixed. Next, the client creates an API that allows you to specify arbitrary photos and retrieve that information. Add the following code to the end of app.js.
app.js
app.get("/api/photo/:photoId", function(req, res, next){
    var photo;
    for (i = 0; i < photoList.length; i++){
        if (photoList[i].id == req.params.photoId){
            var photo = photoList[i];
        }
    }
    res.json(photo);
});
It is an API that accepts GET requests again this time, but URI contains a semicolon-added: photoId character string. This part is handled as a variable, and the photoId specified by the client can be referred to as req.params.photoId on the server side.
In actual processing, we retrieve data of photoId specified by client from photoList and send hit data to client.
In this way, the req object contains the function of processing requests from clients. For other functions, please refer to the Express official document below. http://expressjs.com/en/4x/api.html#req
Create UI
When developing only the back end of the Web service, it is okay to enrich the processing on the server side more and more, but when providing the UI on the client side, we can develop it using Express's View Engine (template engine)
In Express, you can select template engine from Jade and EJS modules.
In this time, I select EJS that can use by HTML. Since EJS is also provided as an NPM package, it can be installed using the npm install command.
$ npm install ejs --save
Next, I will create a file that makes up the actual UI. When using EJS, create a file with extension .ejs. By default, this .ejs file is placed in the views directory. Therefore, I first create the views directory under the project.
$ mkdir views
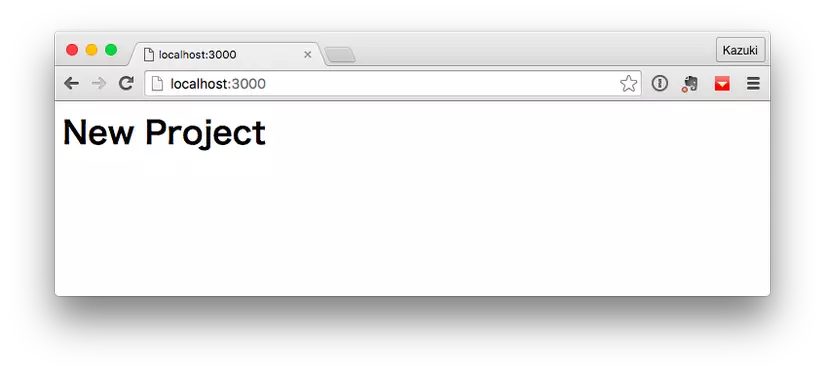
Create a file as index.ejs directly under this views directory. This file is content displayed when the client accesses http://localhost:3000/
index.ejs
<html>
<body>
    <h1>New Project</h1>
</body>
</html>
Next, edit app.js on the server side and set up about 2 things. The first is to specify EJS on View Engine. And the other is to display the index.ejs created earlier by GET request to http://localhost:3000/ . For this setting add the following code to the end of app.js.
app.js
// Set EJS to View Engine
app.set('view engine', 'ejs');

// Display index.ejs at get request to "/". Note that the extension (. Ejs) is omitted.
app.get("/", function(req, res, next){
    res.render("index", {});
});
Just now we used the res.json () method, but this time we are using the res.render () method. This is a method for displaying an arbitrary template. For this time, we specified the index.ejs we created earlier. The second argument allows you to set the object to be passed to the template engine, but this time it is not necessary, so we set an empty object.
This will restart the server process to reflect the changes in app.js. To reboot, exit the node app.js process you just executed and try again.
After restarting the server process, please access the following URL. The index.ejs created earlier should be displayed.
Now we have a mechanism on the client side. Finally, by calling the API on the server side from Javascript on the client side, the basic configuration can be completed.
Call API from client
There is no mechanism specialized for Express, Node.js in this part. Just put in the Javascript code that makes an API call to index.ejs making up the UI.
index.ejs
<html> <body>New Project
<script> var xhr = new XMLHttpRequest(); xhr.open("GET","/api/photo/list"); xhr.addEventListener("load", function(e){ var photoList = JSON.parse(xhr.responseText); console.log(photoList); }); xhr.send(); </script> </body> </html> Just now, you can access http://localhost:3000/ in the browser and check the result with the Javascript console etc. It will be as shown below and you can see that acquiring the data of the photo list from the API.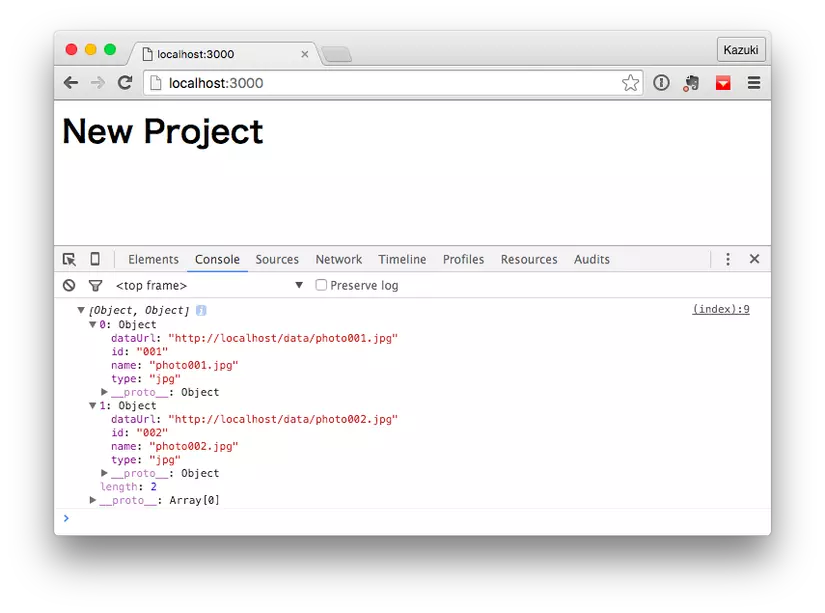
Summary
This time it started from scratch and I tried collecting with the minimum necessary code to the last. The source code introduced this time in Github is released.
All rights reserved
