Hướng dẫn xây dựng web java với maven + wicket + spring
Bài đăng này đã không được cập nhật trong 4 năm
Trong bài viết này hướng dẫn tích hợp Apache Wicket với Spring Framework để tạo website
Thư viện sẽ sử dụng trong bài viết này:
- Wicket phiên bản: 1.4.17
- Wicket-Spring phiên bản: 1.4.17
- Spring Framework phiên bản 3.05 RELEASE
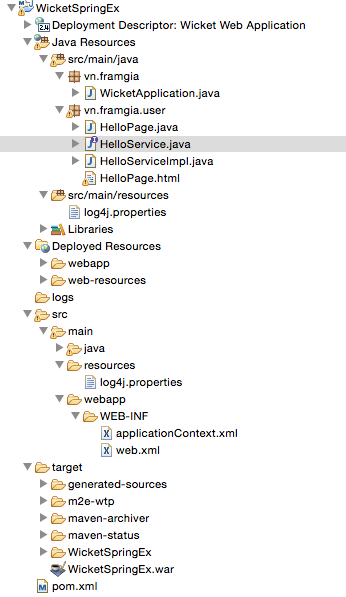
- Project Structure: Cấu trúc thư mục dự án không có gì đặc biệt, chỉ là 1 dự án theo cấu trúc Maven chuẩn

- Project Dependency
    <dependencies>

            <dependency>
                <groupId>org.apache.wicket</groupId>
                <artifactId>wicket</artifactId>
                <version>1.4.17</version>
            </dependency>

            <dependency>
                <groupId>org.apache.wicket</groupId>
                <artifactId>wicket-spring</artifactId>
                <version>1.4.17</version>
            </dependency>

            <dependency>
                <groupId>org.springframework</groupId>
                <artifactId>spring-core</artifactId>
                <version>3.0.5.RELEASE</version>
            </dependency>

            <dependency>
                <groupId>org.springframework</groupId>
                <artifactId>spring-context</artifactId>
                <version>3.0.5.RELEASE</version>
            </dependency>

            <dependency>
                <groupId>org.springframework</groupId>
                <artifactId>spring-web</artifactId>
                <version>3.0.5.RELEASE</version>
            </dependency>

            <dependency>
                <groupId>org.slf4j</groupId>
                <artifactId>slf4j-log4j12</artifactId>
                <version>1.5.6</version>
            </dependency>

        </dependencies>
-
Spring Bean
Tạo Spring bean, sử dụng annotate @Service
package vn.framgia.user;

    public interface HelloService {

        String getHelloWorldMsg();

	}
	package vn.framgia.user;

    import org.springframework.stereotype.Service;

    @Service
    public class HelloServiceImpl implements HelloService {

        public String getHelloWorldMsg() {
            return "Spring : hello world!!!!";
        }

    }
-
Tiêm khởi tạo service trong Spring container
Tạo file applicationContext.xml, thêm tính năng tự động tìm kiếm khởi tạo các component của spring
File : applicationContext.xml
    <beans xmlns="http://www.springframework.org/schema/beans"
        xmlns:xsi="http://www.w3.org/2001/XMLSchema-instance" xmlns:context="http://www.springframework.org/schema/context"
        xsi:schemaLocation="http://www.springframework.org/schema/beans
    http://www.springframework.org/schema/beans/spring-beans-3.0.xsd
    http://www.springframework.org/schema/context
    http://www.springframework.org/schema/context/spring-context-3.0.xsd">

        <!-- Điền package vào đây để tự động được khởi tạo -->
        <context:component-scan base-package="vn.framgia.user" />

    </beans>
-
Tích hợp giữa wicket và Spring
Viết lại phương thức init() của WebApplicaion Và thêm phương thức lắng nghe SpringComponent
addComponentInstantiationListener(new SpringComponentInjector(this));
Tạo file WicketApplication.java:
        package vn.framgia;

        import org.apache.wicket.protocol.http.WebApplication;
        import org.apache.wicket.spring.injection.annot.SpringComponentInjector;

        import vn.framgia.user.HelloPage;

        public class WicketApplication extends WebApplication {

            @Override
            public Class<HelloPage> getHomePage() {

                // return default page
                return HelloPage.class;
            }

            @Override
            protected void init() {

                super.init();
                addComponentInstantiationListener(new SpringComponentInjector(this));
            }
        }
-
Tạo một page wicket: một page wicket sẽ bao gồm 1 file java và 1 file html trùng tên
Tạo file HelloPage.java
    package vn.framgia.user;

    import org.apache.wicket.PageParameters;
    import org.apache.wicket.markup.html.basic.Label;
    import org.apache.wicket.markup.html.WebPage;
    import org.apache.wicket.spring.injection.annot.SpringBean;

    public class HelloPage extends WebPage {

        // Sử dụng spring jnject.
        @SpringBean
        private HelloService helloService;

        public SimplePage(final PageParameters parameters) {

            add(new Label("msg", helloService.getHelloWorldMsg()));
        }
    }
Tạo file HelloPage.html
    <html>
    <body>
        <h1>Wicket + Spring integration example</h1>

        <h2 wicket:id="msg"></h2>

    </body>
    </html>
- web.xml : Bước cuối cùng cần phải định nghĩa wicket và spring trong file web.xml
    <?xml version="1.0" encoding="ISO-8859-1"?>
    <web-app xmlns="http://java.sun.com/xml/ns/j2ee" xmlns:xsi="http://www.w3.org/2001/XMLSchema-instance"
        xsi:schemaLocation="http://java.sun.com/xml/ns/j2ee http://java.sun.com/xml/ns/j2ee/web-app_2_4.xsd"
        version="2.4">
        <display-name>Wicket Web Application</display-name>

        <filter>
            <filter-name>wicket.wicketTest</filter-name>
            <filter-class>org.apache.wicket.protocol.http.WicketFilter</filter-class>
            <init-param>
                <param-name>applicationClassName</param-name>
                <param-value>vn.framgia.WicketApplication</param-value>
            </init-param>
        </filter>

        <filter-mapping>
            <filter-name>wicket.wicketTest</filter-name>
            <url-pattern>/*</url-pattern>
        </filter-mapping>

        <listener>
            <listener-class>org.springframework.web.context.ContextLoaderListener</listener-class>
        </listener>

    </web-app>
-
Thực hiện deploy lên server Tomcat
- vào thư mục chứa source code
- Dùng lệnh maven sau để tạo file war:
-
mvn install -DskipTests
4. Copy file WicketSpringEx.war vào thư mục webapp của Tomcat
5. Vào thư bin của tomcat khởi động tomcat
- window: run file startup.bat
- linux or mac: run file startup.sh
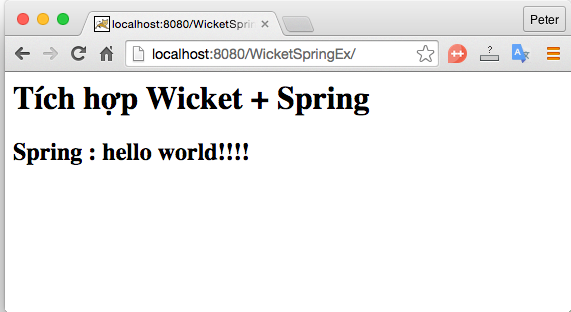
9. Vào trình duyệt start web: http://localhost:8080/WicketSpringEx/

Source code example: https://github.com/ngocitbk/WicketSpringEx
Tài liệu tham khảo:
1. https://maven.apache.org/
2. http://projects.spring.io/spring-framework/
3. https://wicket.apache.org/
All rights reserved