Hướng dẫn tự tạo một theme WordPress
Bài đăng này đã không được cập nhật trong 7 năm
Mở đầu
Bài viết này mình xin được hướng dẫn các bạn các bước cơ bản để tạo nên một theme WordPress của riêng mình  .
.
Tạo một WordPress Theme "zin"
1. WordPress Theme Structure
Về cơ bản, bất cứ WordPress theme nào cũng cần có 5 file chính:
style.css
index.php
header.php
sidebar.php
footer.php
2. style.css & screenshot.png
Trong file style.css, ngoài việc căn chỉnh thuộc tính cho các thẻ HTML, chúng ta có thể khai báo các mô tả cho theme.
Ví dụ, ở đầu file style.css:
/*
Theme Name: Vuzic
Theme URI: http://www.vuzic.com
Description: I built this theme based on Nick Vuzic spirit.
Author: Hoang Viet An
Author URI: https://hoangvietan96.github.io
Version: 1.0
*/
Ngoài những mô tả chính như ở trên cho theme, chúng ta có thể thêm các options khác để mô tả theme chi tiết hơn:
Ví dụ:
/*
Theme Name:
Theme URI:
Author:
Author URI:
Description:
Version:
License:
License URI:
Tags:
Text Domain:
...
*/
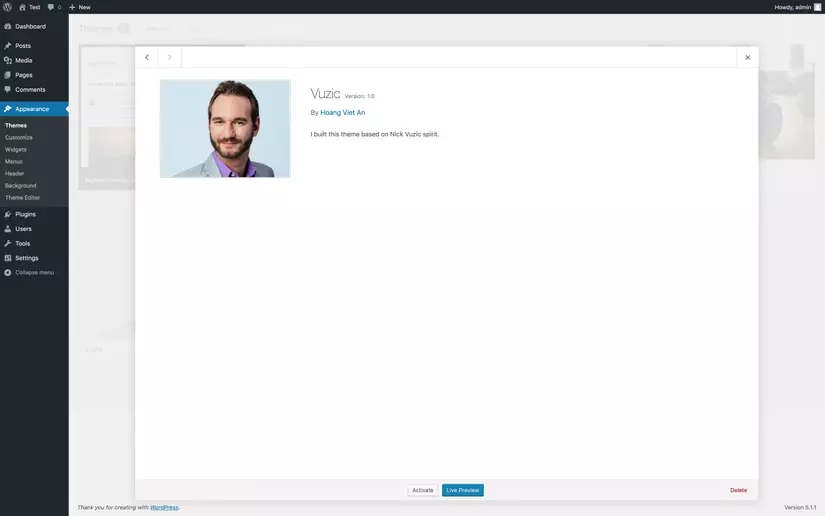
Ngoài ra, WordPress cho phép người dùng đặt ảnh đại diện cho theme thông qua file screenshot.png.
Kết quả:
3. header.php
Trước khi viết phần header cho theme, chúng ta cần tìm hiểu qua một số các template tags (hiểu là các functions được WordPress hỗ trợ cho đơn giản ):
language_attributes(): In ra thuộc tính ngôn ngữ cho thẻ<html> của website sau khi được thiết lập trong General Settings:
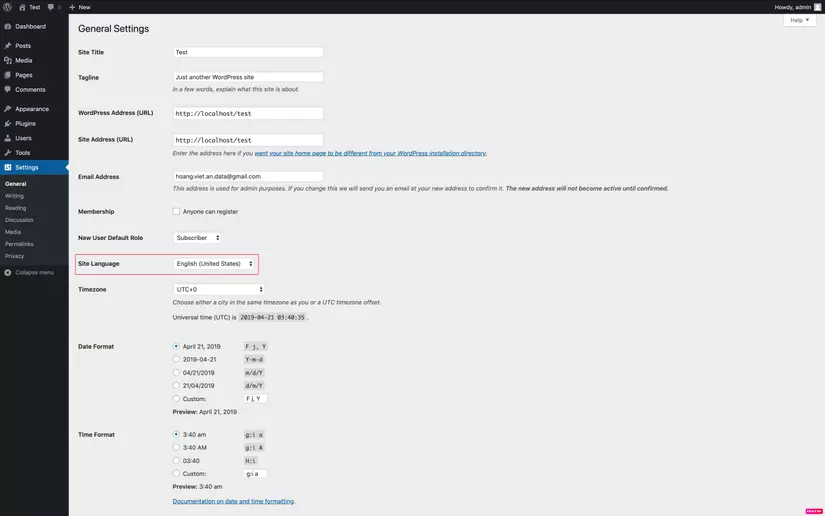 Output sẽ là:
<!DOCTYPE html>
<html lang="en-US">
...
bloginfo(): Trả về những thông tin cơ bản của website. Ví dụ:
bloginfo('charset')` => UTF-8
bloginfo('stylesheet_url') => http://localhost/test/wp-content/themes/theme_name/style.css
Chúng ta có thể tham khảo thêm các thuộc tính của bloginfo() tại đây.
body_class(): Template tag này sẽ thêm các class cho thẻ<body> tuỳ thuộc vào trang hiện tại được truy cập.
Ví dụ, khi ở một page:
<body class="page-template-default page page-id-1 page-parent logged-in admin-bar no-customize-support">
Về cơ bản, một header của theme nên có những thành phần sau:
<!DOCTYPE html>
<html <?php language_attributes(); ?>>
<head>
    <meta charset="<?php bloginfo('charset'); ?>"/>
    <title>Vuzic Title</title>
    <link rel="shortcut icon" href="/favicon.ico"/>
    <link rel="stylesheet" href="<?php bloginfo('stylesheet_url'); ?>"/>
    <?php wp_head(); ?>
</head>
<body <?php body_class(); ?>>
...
Chú ý: Trước khi đóng thẻ <head>, chúng ta cần thêm template tag wp_head() để WordPress hiểu được chúng ta đang set phần header cho theme.
4. footer.php
Tương tự như header.php:
...
<footer>
<div class="container">
<p>
Design by <a href="https://hoangvietan96.github.io/" target="blank">Hoang Viet An
© <?php echo date('Y'); ?>
</a>
</p>
</div>
</footer>
<?php wp_footer(); ?>
</body>
</html>
Chú ý: Trước khi đóng thẻ <body>, chúng ta cần thêm template tag wp_footer() để WordPress hiểu được chúng ta đang set phần footer cho theme.
5. sidebar.php
Ở phần sidebar, chúng ta có thể đặt các quảng cáo hay menu cho website cũng được
<aside>
  <h3>Sidebar</h3>
  <p>Lorem ipsum dolor sit amet, consectetur adipiscing elit. Aliquam sodales urna non odio egestas tempor. Nunc vel vehicula ante. Etiam bibendum iaculis libero, eget molestie nisl pharetra in. In semper consequat est, eu porta velit mollis nec. Curabitur posuere enim eget turpis feugiat tempor. Etiam ullamcorper lorem dapibus velit suscipit ultrices.</p>
</aside>
Chú ý: sidebar.php không cần template tag như wp_head() và wp_footer() để hiển thị.
6. index.php
Sau khi đã setup xong header, footer và sidebar, file index.php sẽ được viết như sau:
<?php get_header(); ?>

<div id="main-content">
    <!-- Chỗ này để hiển thị posts hoặc page. -->
   ...
</div>

<?php get_sidebar(); ?>

<?php get_footer(); ?>
7. Loops
Trước khi tìm hiểu cách hiển thị các posts hoặc page trong main-content, chúng ta cần tìm hiểu các cách hiển thị posts thông qua loop của WordPress.
Cách 1: Loop mặc định của WordPress.
if (have_posts()) : while (have_posts()) : the_post();
// ...
endwhile;
else:
// ...
endif;
Cách 2: Sử dụng query_posts() để sửa lại cấu trúc mặc định của loop.
query_posts('posts_per_page=5&cat=3&orderby=rand');

if (have_posts()) : while (have_posts()) : the_post();
    //...
endwhile;
else:
    //...
endif;

wp_reset_query(); // Sau khi sửa cấu trúc của loop, cần reset lại loop về ban đầu để các loop sau không bị conflict.
Cách 3: Sử dụng $query_string.
global $query_string;

$posts = query_posts($query_string . 'posts_per_page=5&cat=3&orderby=rand');

if (have_posts()) : while (have_posts()) : the_post();
    //...
endwhile;
else:
    //...
endif;

wp_reset_query();
?>
Cách 4: Sử dụng class WP_Query().
$featured = new WP_Query('posts_per_page=5&cat=3&orderby=rand');

while ($featured->have_posts()) : $featured->the_post();
    //....
endwhile;

wp_reset_postdata();
Cách 5: Sử dụng get_posts().
Cá nhân mình đánh giá thì đây là cách an toàn nhất để tạo một loop riêng biệt hay nhiều loop trên một trang.
global $post;

$args = array('numberposts' => 3, 'category' => 5, 6, 7, 'orderby' => 'rand');

$custom_posts = get_posts($args);
foreach ($custom_posts as $post) : setup_postdata($post);
    //...
endforeach;

wp_reset_postdata();
8. Hiển thị các posts & page
Dựa vào các cách sử dụng loop để hiển thị posts và page, file index.php có thể được viết lại như thế này:
<?php get_header();?>

<div id="main-content">
    <div class="post">
        <?php if (have_posts()) : while (have_posts()) : the_post(); ?>
		<div <?php post_class() ?> id="post-<?php the_ID(); ?>">
			<div class="entry">
				<?php the_content(); ?>
			</div>
		</div>
	<?php endwhile; endif; ?>
    </div><
</div>

<?php get_sidebar(); ?>

<?php get_footer(); ?>
WordPress đã hỗ trợ cho chúng ta những template tags như the_ID(), the_content(), etc. để hiển thị nội dung của một post.
Ngoài ra, nếu người dùng muốn set "avatar" cho các posts, chúng ta có thể sử dụng template tag the_post_thumbnail().
Ví dụ:
<a href="<?php the_permalink(); ?>">
    <?php the_post_thumbnail(); ?>
</a>
Chú ý: Cần bật tính năng hiển thị thumbnail cho các posts bằng cách thêm đoạn code:
if (function_exists('add_theme_support')) {
    add_theme_support('post-thumbnails');
}
vào file functions.php (sẽ nói ở dưới ạ ).
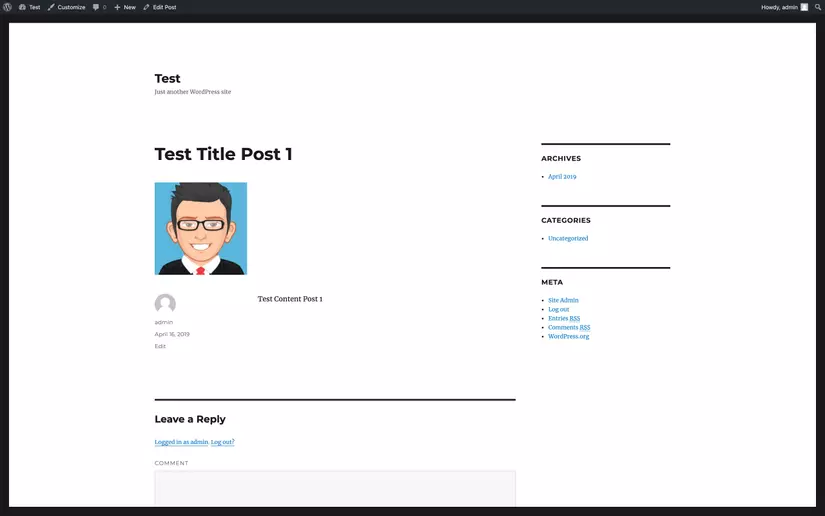
Kết quả: (Mình lười quá nên sử dụng theme Twenty Sixteen có sẵn của WordPress để test hihi )
=>
9. Hook, Action & Filter
Hook
Hiểu đơn giản nhất thì Hook là tên gọi cho các functions mặc định của WordPress.
Hook được chia ra làm 2 loại: Action (về mặt event) và Filter (về mặt nội dung).
Chúng ta dùng function add_action() và add_filter để override lại các hook của WordPress.
Action
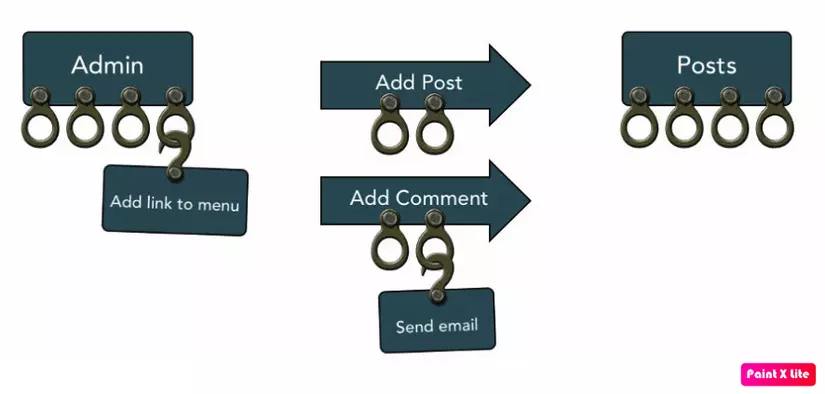
Ví dụ, nếu muốn tính năng thêm avatar cho các posts sau khi theme được khởi taọ, chúng ta có thể móc thêm function của mình vào hook init:
if (!function_exists('setup_vuzic_theme')) {
    function setup_vuzic_theme()
    {
        add_theme_support('post-thumbnails');
    }
}
add_action('init', 'setup_vuzic_theme');
Filter
Ví dụ thông qua code cho dễ hiểu ạ
function custom_excerpt_length()
{
    return 40;
}
add_filter('excerpt_length', 'custom_excerpt_length');
Cụ thể thì hook excerpt_length có tác dụng làm cho nội dung đoạn văn được lấy ra từ database chỉ hiển thị ở view max 50 kí tự, sau đó Load more....
Sau khi được override lại bằng function custom_excerpt_length(), đến kí tự thứ 40 sẽ Load more... thay vì 50 như trước (trong database không thay đổi, chỉ thay đổi ở view).
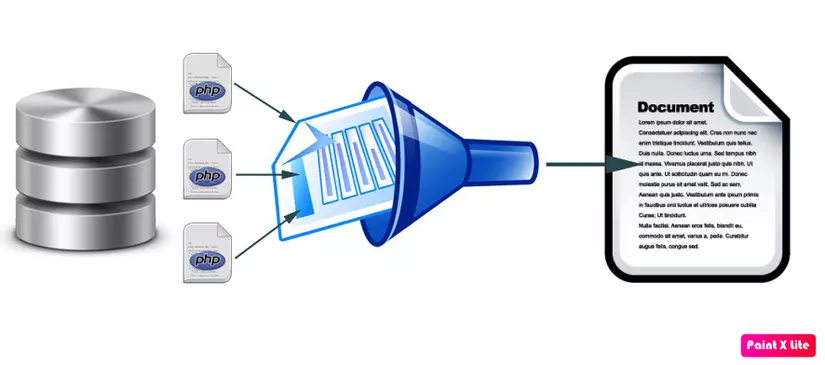
10. functions.php
functions.php là file quan trọng nhất khi viết một theme WordPress. Bất cứ khi nào load trang, WordPress sẽ tìm đến file functions.php đầu tiên, xử lý các tác vụ rồi mới xuất ra cho người dùng.
Mình có viết một file core functions.php cơ bản như sau:
<?php

/**
 * Declare:
 * Theme name.
 * Theme path.
 * "core" folder path.
 * Content width.
 */
define('THEME_NAME', 'vuzic');
define('THEME_URL', get_stylesheet_directory());
define('CORE_URL', THEME_URL . "/core");
define('CONTENT_WIDTH', 620);

/**
 * Embed file "init.php" file.
 *
 */
require_once(CORE_URL . "/init.php");

/**
 * Set content width.
 */
if (!isset($content_width)) {
    $content_width = CONTENT_WIDTH;
}

/**
 * Declare theme functions.
 */
if (!function_exists('setup_vuzic_theme')) {
    function setup_vuzic_theme()
    {
        /* Declare text domain. */
        $languages_folder = THEME_URL . "/languages";
        load_theme_textdomain(THEME_NAME, $languages_folder);

        /* Automatically add RSS feed links to <head> tag. */
        add_theme_support('automatic-feed-links');

        /* Add featured image for post. */
        add_theme_support('post-thumbnails');

        /* Add post formats. */
        add_theme_support('post-formats', [
            'image',
            'video',
            'gallery',
            'quote',
            'link'
        ]);

        /* Automatically add website_name | website_description to <title> tag. */
        add_theme_support('title-tag');

        /* Add custom background. */
        $default_background = [
            'default-color' => '#e8e8e8',
        ];
        add_theme_support('custom-background', $default_background);

        /* Register menu. */
        register_nav_menu('primary-menu', __('Primary Menu', THEME_NAME));

        /* Register sidebar. */
        $sidebar = [
            'name' => __('Main Sidebar', THEME_NAME),
            'id' => 'main-sidebar',
            'description' => __('Default Sidebar'),
            'class' => 'main-sidebar',
            'before_title' => '',
            'after_title' => '',
        ];
        register_sidebar($sidebar);
    }
}
add_action('init', 'setup_vuzic_theme');

/**
 * Create menu.
 */
if (!function_exists('create_vuzic_menu')) {
    function create_vuzic_menu($menu, $tag, $class, $id)
    {
        $menu = [
            'theme_location' => $menu,
            'container' => $tag,
            'container_class' => $class,
            'container_id' => $id,
        ];
        wp_nav_menu($menu);
    }
}

/**
 * To be continued.
 */
Đôi khi, functions.php cũng có tác dụng như là một helper.
Ví dụ, chúng ta muốn tạo một hàm dd() giống như trong Laravel, bên trong functions.php, chúng ta viết như sau:
/**
 * Dump data.
 */
if (!function_exists('dd')) {
    function dd()
    {
        $args = func_get_args();
        foreach ($args as $arg) {
            echo '<pre>';
            var_dump($arg);
            echo '</pre>';
            echo '<br>';
        }
        die();
    }
}
Như vậy, chúng ta có thể sử dụng cú pháp <?php dd($data); ?> ở bất kỳ file .php thay vì phải
<?php

echo '<pre>';
var_dump($data);
echo '</pre>';
echo '<br>';

die();
?>
như mọi khi
Kết thúc
Trên đây mình đã hướng dẫn các bước cơ bản để tạo một core theme WordPress. Hi vọng bài viết giúp ích cho các bạn. Hẹn gặp lại mọi người trong các bài viết sau
Tham khảo
All rights reserved
