HƯỚNG DẪN TÍCH HỢP GEMINI API VÀO WEBSITE LARAVEL
Chuẩn bị nguyên liệu
Trước khi bắt đầu, hãy đảm bảo bạn đã có sẵn:
- Một dự án Laravel đang chạy (Phiên bản 10.x hoặc 11.x được khuyến nghị).
- Tài khoản Google để tạo khóa truy cập API.
Bước 1: Khởi tạo Gemini API Key:
- Truy cập vào trang Google AI Studio.
- Đăng nhập bằng tài khoản Google của bạn.
- Tại giao diện chính, nhấn vào nút Get API key (hoặc Create API Key).
- Chọn tạo khóa mới trong một dự án mới.
- Quan trọng: Sao chép (Copy) chuỗi ký tự API Key vừa được tạo và lưu lại cẩn thận.
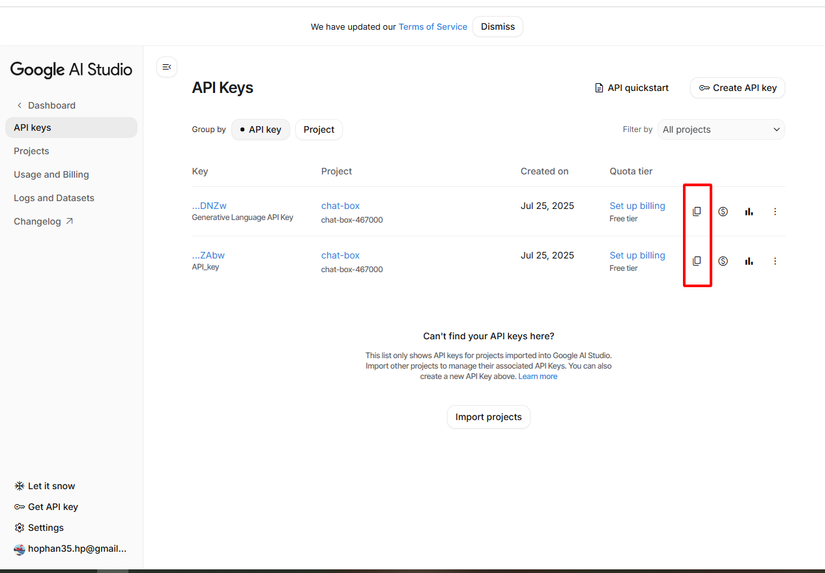 Hình 1: Giao diện quản lý API Key trên Google AI Studio.
Bước 2: Cấu hình môi trường bảo mật (.env)
GEMINI_API_KEY=Paste_API_Key_Cua_Ban_Vao_Day
GEMINI_BASE_URL=https://generativelanguage.googleapis.com/v1beta/models/gemini-2.5-flash:generateContent
Lưu ý: Trong hướng dẫn này, chúng tôi sử dụng model gemini-2.5-flash vì nó có tốc độ phản hồi rất nhanh và tối ưu chi phí cho các tác vụ chatbot cơ bản.
Bước 3: Xây dựng Controller xử lý logic
Tiếp theo, chúng ta cần tạo một Controller đóng vai trò là cầu nối: nhận câu hỏi từ người dùng, gửi sang Google, và trả về kết quả.
Chạy lệnh artisan sau trong terminal:
php artisan make:controller GeminiController
Sau đó, mở file app/Http/Controllers/GeminiController.php vừa tạo và cập nhật toàn bộ nội dung mã nguồn sau:
<?php

namespace App\Http\Controllers;

use Illuminate\Http\Request;
use Illuminate\Support\Facades\Http; // Sử dụng HTTP Client có sẵn của Laravel

class GeminiController extends Controller
{
    // Phương thức hiển thị giao diện nhập câu hỏi
    public function index()
    {
        return view('gemini');
    }

    // Phương thức xử lý gửi yêu cầu sang Google Gemini
    public function ask(Request $request)
    {
        // 1. Validate dữ liệu đầu vào nhẹ nhàng
        $request->validate([
            'question' => 'required|string|max:2000',
        ]);

        $question = $request->input('question');
        $apiKey = env('GEMINI_API_KEY');
        $apiUrl = env('GEMINI_BASE_URL') . '?key=' . $apiKey;

        // 2. Cấu trúc dữ liệu (Payload) theo yêu cầu của Gemini API
        $payload = [
            'contents' => [
                [
                    'parts' => [
                        ['text' => $question]
                    ]
                ]
            ]
        ];

        try {
            // 3. Sử dụng Laravel HTTP Client để gửi Request POST
            $response = Http::withHeaders([
                'Content-Type' => 'application/json'
            ])->post($apiUrl, $payload);

            // 4. Xử lý kết quả trả về
            if ($response->successful()) {
                $data = $response->json();
                // Trích xuất câu trả lời text từ cấu trúc JSON phức tạp của Google
                $answer = $data['candidates'][0]['content']['parts'][0]['text'] ?? 'Không tìm thấy câu trả lời phù hợp.';

                // Trả về view kèm theo câu hỏi và câu trả lời
                return view('gemini', compact('question', 'answer'));
            } else {
                // Xử lý trường hợp API trả về lỗi (ví dụ: sai key, hết quota)
                return view('gemini', ['error' => 'Lỗi kết nối API: ' . $response->status() . ' - ' . $response->body()]);
            }

        } catch (\Exception $e) {
            // Xử lý lỗi hệ thống (ví dụ: mất mạng, lỗi SSL)
            return view('gemini', ['error' => 'Đã xảy ra lỗi hệ thống: ' . $e->getMessage()]);
        }
    }
}
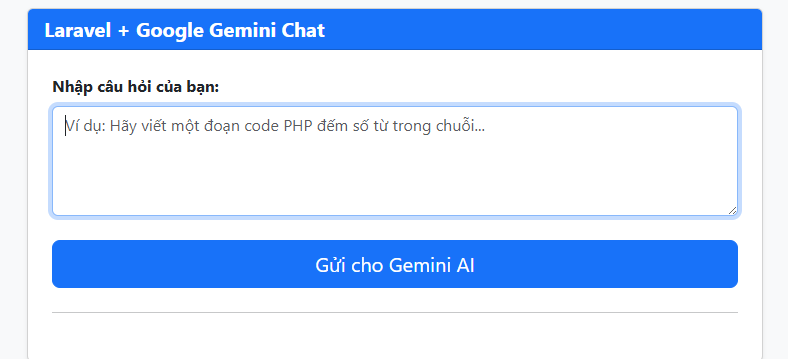
Bước 4: Thiết kế giao diện người dùng (Blade View)
Chúng ta cần một giao diện đơn giản để người dùng nhập câu hỏi. Hãy tạo file mới tại đường dẫn resources/views/gemini.blade.php.
Để giao diện trông hiện đại và gọn gàng, tôi sẽ sử dụng CSS của Bootstrap 5 thông qua CDN.
<!DOCTYPE html>
<html lang="vi">
<head>
    <meta charset="UTF-8">
    <meta name="viewport" content="width=device-width, initial-scale=1.0">
    <title>Tích hợp Gemini AI vào Laravel</title>
    <link href="https://cdn.jsdelivr.net/npm/bootstrap@5.3.0/dist/css/bootstrap.min.css" rel="stylesheet">
</head>
<body class="bg-light py-5">
    <div class="container">
        <div class="row justify-content-center">
            <div class="col-md-8">
                <div class="card shadow-sm">
                    <div class="card-header bg-primary text-white">
                        <h5 class="mb-0 fw-bold">Laravel + Google Gemini Chat</h5>
                    </div>
                    <div class="card-body p-4">
                        <form action="{{ route('gemini.ask') }}" method="POST">
                            @csrf
                            <div class="mb-4">
                                <label for="question" class="form-label fw-bold">Nhập câu hỏi của bạn:</label>
                                <textarea class="form-control" id="question" name="question" rows="4" placeholder="Ví dụ: Hãy viết một đoạn code PHP đếm số từ trong chuỗi...">{{ $question ?? '' }}</textarea>
                                @error('question')
                                    <div class="text-danger mt-2 small">{{ $message }}</div>
                                @enderror
                            </div>
                            <div class="d-grid">
                                <button type="submit" class="btn btn-primary btn-lg">Gửi cho Gemini AI</button>
                            </div>
                        </form>

                        <hr class="my-4">

                        @if(isset($answer))
                            <div class="alert alert-success">
                                <h6 class="alert-heading fw-bold"><i class="bi bi-robot"></i> Gemini trả lời:</h6>
                                <div class="mt-3 bg-white p-3 rounded border" style="white-space: pre-wrap;">{!! nl2br(e($answer)) !!}</div>
                            </div>
                        @endif

                        @if(isset($error))
                            <div class="alert alert-danger fw-bold">
                                {{ $error }}
                            </div>
                        @endif
                    </div>
                </div>
            </div>
        </div>
    </div>
</body>
</html>
Bước 5: Khai báo Route
Cuối cùng, hãy mở file routes/web.php và đăng ký các đường dẫn (route) để truy cập vào tính năng chúng ta vừa tạo.
use Illuminate\Support\Facades\Route;
// Import Controller vừa tạo
use App\Http\Controllers\GeminiController;

// Route hiển thị form (GET)
Route::get('/chat-gemini', [GeminiController::class, 'index'])->name('gemini.index');

// Route xử lý gửi câu hỏi (POST)
Route::post('/chat-gemini', [GeminiController::class, 'ask'])->name('gemini.ask');
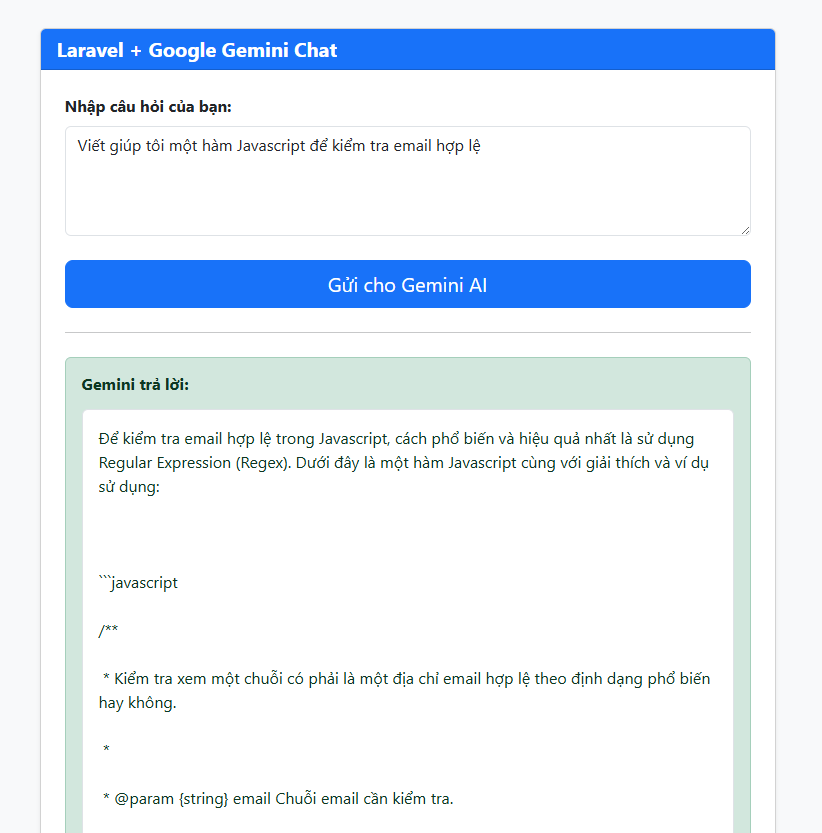
Thành quả và Kiểm thử
Vậy là quá trình tích hợp đã hoàn tất! Hãy khởi chạy development server của Laravel:
php artisan serve
Chỉ sau vài giây, kết quả từ Google Gemini sẽ xuất hiện ngay trên website của bạn.
Lời kết
All rights reserved
