Hướng dẫn Spring Security + Jpa Hibernate
Bài đăng này đã không được cập nhật trong 7 năm
Nguồn: loda.me
Giới thiệu
Trong bài trước, tôi đã hướng dẫn với các bạn về cách để sử dụng Spring Security cơ bản, cách kích hoạt, tạo user và phân quyền.
Trong bài này, chúng sẽ tìm hiểu cách để kiểm tra một User ở bên trong csdl.
Trong bài viết giả định bạn đã có các kiến thức sau:
Cài đặt
Chúng ta sử dụng Maven, Cài đặt file pom.xml của bạn như sau.
Khác với project trước đó, lần này chúng ta sử dụng thêm database com.h2database. Đây là một in memory database. Đại khái là mọi thứ bạn lưu trên database chỉ tồn tại trong bộ nhớ, khi tắt ứng dụng, database sẽ mất sạch, thích hợp cho việc demo.
<?xml version="1.0" encoding="UTF-8"?>
<project xmlns="http://maven.apache.org/POM/4.0.0" xmlns:xsi="http://www.w3.org/2001/XMLSchema-instance"
    xsi:schemaLocation="http://maven.apache.org/POM/4.0.0 http://maven.apache.org/xsd/maven-4.0.0.xsd">
    <modelVersion>4.0.0</modelVersion>

    <groupId>org.springframework</groupId>
    <artifactId>spring-security-hibernate</artifactId>
    <version>0.1.0</version>

    <parent>
        <groupId>org.springframework.boot</groupId>
        <artifactId>spring-boot-starter-parent</artifactId>
        <version>2.0.5.RELEASE</version>
    </parent>

    <dependencies>
        <dependency>
            <groupId>org.springframework.boot</groupId>
            <artifactId>spring-boot-starter-thymeleaf</artifactId>
        </dependency>
        <dependency>
            <groupId>org.springframework.boot</groupId>
            <artifactId>spring-boot-starter-web</artifactId>
        </dependency>
        <dependency>
            <groupId>com.h2database</groupId>
            <artifactId>h2</artifactId>
            <scope>runtime</scope>
        </dependency>
    </dependencies>

    <properties>
        <java.version>1.8</java.version>
    </properties>


    <build>
        <plugins>
            <plugin>
                <groupId>org.springframework.boot</groupId>
                <artifactId>spring-boot-maven-plugin</artifactId>
            </plugin>
        </plugins>
    </build>

</project>
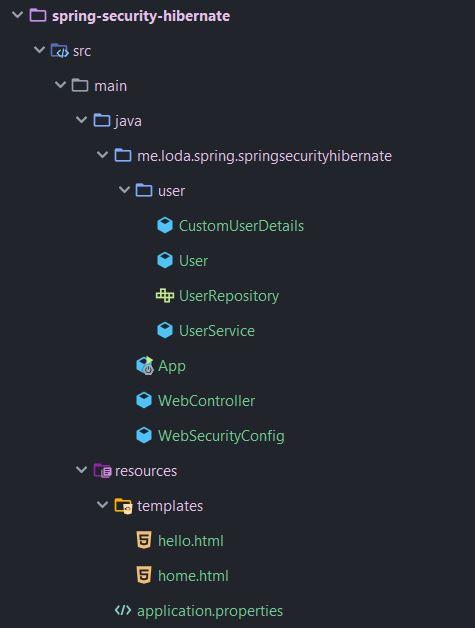
Thư mục code gồm có:
Implement
Tạo User
Tạo ra class User tham chiếu với database.
import javax.persistence.Column;
import javax.persistence.Entity;
import javax.persistence.GeneratedValue;
import javax.persistence.Id;
import javax.persistence.Table;

import lombok.Data;

@Entity
@Table(name = "user")
@Data // lombok
public class User {
    @Id
    @GeneratedValue
    private Long id;

    @Column(nullable = false, unique = true)
    private String username;
    private String password;
}
Tạo UserRepository kế thừa JpaRepository để truy xuất thông tin từ database.
import org.springframework.data.jpa.repository.JpaRepository;
import org.springframework.stereotype.Repository;

@Repository
public interface UserRepository extends JpaRepository<User, Long> {
    User findByUsername(String username);
}
Tham chiếu User với UserDetails
Mặc định Spring Security sử dụng một đối tượng UserDetails để chứa toàn bộ thông tin về người dùng. Vì vậy, chúng ta cần tạo ra một class mới giúp chuyển các thông tin của User thành UserDetails
CustomUserDetails.java
import org.springframework.security.core.GrantedAuthority;
import org.springframework.security.core.authority.SimpleGrantedAuthority;
import org.springframework.security.core.userdetails.UserDetails;

import lombok.AllArgsConstructor;
import lombok.Data;

@Data
@AllArgsConstructor
public class CustomUserDetails implements UserDetails {
    User user;

    @Override
    public Collection<? extends GrantedAuthority> getAuthorities() {
        // Mặc định mình sẽ để tất cả là ROLE_USER. Để demo cho đơn giản.
        return Collections.singleton(new SimpleGrantedAuthority("ROLE_USER"));
    }

    @Override
    public String getPassword() {
        return user.getPassword();
    }

    @Override
    public String getUsername() {
        return user.getUsername();
    }

    @Override
    public boolean isAccountNonExpired() {
        return true;
    }

    @Override
    public boolean isAccountNonLocked() {
        return true;
    }

    @Override
    public boolean isCredentialsNonExpired() {
        return true;
    }

    @Override
    public boolean isEnabled() {
        return true;
    }
}
Khi người dùng đăng nhập thì Spring Security sẽ cần lấy các thông tin UserDetails hiện có để kiểm tra. Vì vậy, bạn cần tạo ra một class kế thừa lớp UserDetailsService mà Spring Security cung cấp để làm nhiệm vụ này.
UserService.java
import org.springframework.beans.factory.annotation.Autowired;
import org.springframework.security.core.userdetails.UserDetails;
import org.springframework.security.core.userdetails.UserDetailsService;
import org.springframework.security.core.userdetails.UsernameNotFoundException;
import org.springframework.stereotype.Service;

@Service
public class UserService implements UserDetailsService {

    @Autowired
    private UserRepository userRepository;

    @Override
    public UserDetails loadUserByUsername(String username) {
        // Kiểm tra xem user có tồn tại trong database không?
        User user = userRepository.findByUsername(username);
        if (user == null) {
            throw new UsernameNotFoundException(username);
        }
        return new CustomUserDetails(user);
    }


}
Cấu hình và phân quyền
Giống với bài trước, chúng ta cần kích hoạt Spring Security và phân quyền người dùng.
import org.springframework.beans.factory.annotation.Autowired;
import org.springframework.context.annotation.Bean;
import org.springframework.security.config.annotation.authentication.builders.AuthenticationManagerBuilder;
import org.springframework.security.config.annotation.web.builders.HttpSecurity;
import org.springframework.security.config.annotation.web.configuration.EnableWebSecurity;
import org.springframework.security.config.annotation.web.configuration.WebSecurityConfigurerAdapter;
import org.springframework.security.crypto.bcrypt.BCryptPasswordEncoder;
import org.springframework.security.crypto.password.PasswordEncoder;

import me.loda.spring.springsecurityhibernate.user.UserService;

@EnableWebSecurity
public class WebSecurityConfig extends WebSecurityConfigurerAdapter {

    @Autowired
    UserService userService;

    @Bean
    public PasswordEncoder passwordEncoder() {
        // Password encoder, để Spring Security sử dụng mã hóa mật khẩu người dùng
        return new BCryptPasswordEncoder();
    }

    @Override
    protected void configure(AuthenticationManagerBuilder auth)
            throws Exception {
        auth.userDetailsService(userService) // Cung cáp userservice cho spring security
            .passwordEncoder(passwordEncoder()); // cung cấp password encoder
    }

    @Override
    protected void configure(HttpSecurity http) throws Exception {
        http
                .authorizeRequests()
                .antMatchers("/", "/home").permitAll() // Cho phép tất cả mọi người truy cập vào 2 địa chỉ này
                .anyRequest().authenticated() // Tất cả các request khác đều cần phải xác thực mới được truy cập
                .and()
                .formLogin() // Cho phép người dùng xác thực bằng form login
                .defaultSuccessUrl("/hello")
                .permitAll() // Tất cả đều được truy cập vào địa chỉ này
                .and()
                .logout() // Cho phép logout
                .permitAll();
    }
}
Tạo Controller và webpage
Chúng ta tạo ra trang web của mình gồm có trang homepage và trang hello.
- Trang
homepagethì ai cũng truy cập được. - Trang
hellothì phải xác thực mới được truy cập.
Mặc định /login và /logout Spring Security đã tạo cho chúng ta rồi.
@Controller
public class WebController {

    @GetMapping(value = {"/", "/home"})
    public String homepage() {
        return "home";
    }

    @GetMapping("/hello")
    public String hello() {
        return "hello";
    }

}
hello.html
<!DOCTYPE html>
<html lang="en" xmlns:th="http://www.thymeleaf.org">
<head>
  <title>Hello</title>
</head>
<body>
<h1>Chỉ những ai đăng nhập mới truy cập được trang này!</h1>

<form th:action="@{/logout}" method="post">
  <input type="submit" value="Sign Out"/>
</form>

</body>
</html>
Cú pháp th:action="@{/logout}" là của thymeleaf, có tác dụng request tới địa chỉ /logout
home.html
<!DOCTYPE html>
<html lang="en" xmlns:th="http://www.thymeleaf.org">
<head>
<title>Spring Security Example</title>
</head>
<body>
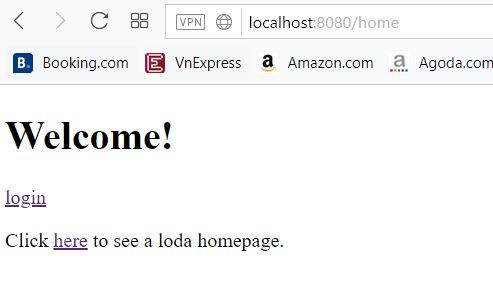
<h1>Welcome!</h1>
<p><a href="/login">login</a></p>
<p>Click <a href="https://loda.me">here</a> to see a loda homepage.</p>
</body>
</html>
Tạo thông tin User trong database
Trước hết bạn cần cấu hình cho hibernate kết tới tới h2 database trong file resources/appication.properties
spring.datasource.url=jdbc:h2:mem:testdb
spring.datasource.driverClassName=org.h2.Driver
spring.datasource.username=sa
spring.datasource.password=

spring.jpa.database-platform=org.hibernate.dialect.H2Dialect
# Enabling H2 Console
spring.h2.console.enabled=true
Để phục vụ demo, mỗi khi chạy chương trình, chúng ta cần insert một User vào database.
Có thể làm việc này bằng cách sử dụng CommandLineRunner. Một interface của Spring cung cấp, có tác dụng thực hiện một nhiệm vụ khi Spring khởi chạy lần đầu.
@SpringBootApplication
public class App implements CommandLineRunner {
    public static void main(String[] args) {
        SpringApplication.run(App.class, args);
    }

    @Autowired
    UserRepository userRepository;
    @Autowired
    PasswordEncoder passwordEncoder;

    @Override
    public void run(String... args) throws Exception {
        // Khi chương trình chạy
        // Insert vào csdl một user.
        User user = new User();
        user.setUsername("loda");
        user.setPassword(passwordEncoder.encode("loda"));
        userRepository.save(user);
        System.out.println(user);
    }
}
Chạy thử
Truy cập vào đường dẫn http://localhost:8080/home để vào trang chủ.
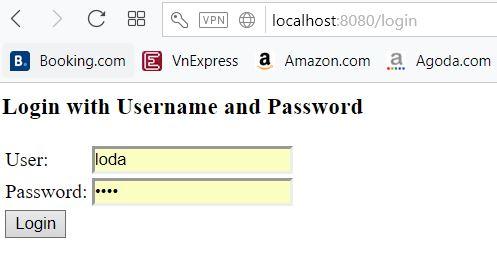
Khi chưa đăng nhập, chúng ta truy cập vào đường dẫn /hello. Thì nó sẽ tự redirect sang trang /login.
Khi đã đăng nhập thành công, chúng ta sẽ có thể vào trang /hello như bình thường.

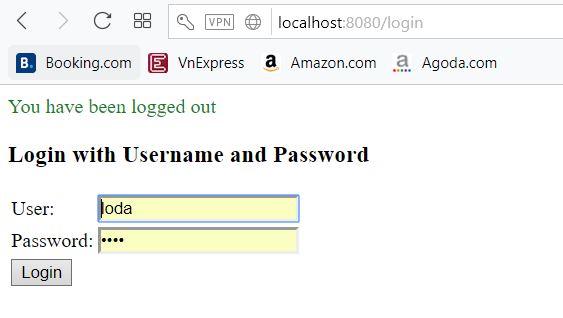
Khi click vào Sign Out thì sẽ đăng xuất.
Kết
Trong bài này, chúng ta đã tìm hiểu cách sử dụng Spring Security kết hợp với Hibernate để có thể xác thực người dùng trong cơ sở dữ liệu. Chúng ta sẽ tìm hiểu các cách xác thực OAuth 2.0 ở các bài sau.
Như mọi khi, code bài viết được up tại Github
<i class="fab fa-github"></i>All rights reserved
