Hướng dẫn làm circle menu
Bài đăng này đã không được cập nhật trong 4 năm
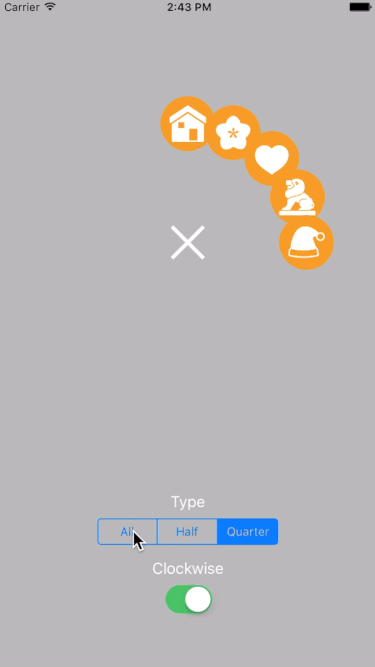
Bài viết này mình xin hướng dẫn viết 1 custom control là circle menu. Các bạn có thể tham khảo theo hình dưới đây
 Đây là 1 control mình mới viết cách đây không lâu bằng Swift 3. Bây giờ mình sẽ hướng dẫn các bạn cách viết và custom nó theo ý muốn
Yêu cầu của menu
- Menu có thể cho phép người dùng tạo được nhiều button.
- Customize được cách hiển thị theo chiều kim đồng hồ hoặc ngược lại.
- Customize được animation.
- Customize được kích thước của các button
Bắt đầu thực hiện
1.Menu Button
Đầu tiên, chúng ta sẽ viết 1 base class cho button home và các button con có tên là CPMenuButton. Trong class sẽ bao gồm các thuộc tính như size, image, offset. Và đặc biệt có thêm delagate dùng để handler khi click vào button.
public class CPMenuButton: UIView {
   private lazy var menuImageView: UIImageView = {
       let imageView = UIImageView(frame: CGRect(origin: CGPoint.zero, size: self.frame.size))
       imageView.contentMode = .scaleAspectFit
       return imageView
   }()

   weak var delegate: CPMenuButtonDelegate?


   var image: UIImage? {
       didSet {
           setUpImageView()
       }
   }

   var size: CGSize? {
       didSet {
           if let size = size {
               frame.size = size
           }
       }
   }

   var offset: CGFloat = 0 {
       didSet {
           let sizeImage = CGSize(width: frame.size.width - offset , height: frame.size.height - offset)
           menuImageView.frame.size = sizeImage
           menuImageView.center = center
       }
   }


   init(image: UIImage, size: CGSize? = nil) {
       super.init(frame: CGRect.zero)
       self.image = image
       self.size = size
       if let size = size {
           frame.size = size
       } else {
           frame.size = CGSize(width: 50, height: 50)
       }
       menuImageView.image = image
              let tapGesture = UITapGestureRecognizer(target: self, action: #selector(CPMenuButton.tap(gesture:)))
       addGestureRecognizer(tapGesture)
       addSubview(menuImageView)
   }

   required public init?(coder aDecoder: NSCoder) {
       fatalError("init(coder:) has not been implemented")
   }

   private func setUpImageView() {
       menuImageView.image = image
   }

   func tap(gesture: UITapGestureRecognizer) {
       delegate?.didSelectButton(sender: gesture.view as! CPMenuButton)
   }
}
Định nghĩa delegate cho menu button
protocol CPMenuButtonDelegate: class {
   func didSelectButton(sender: CPMenuButton)
}
Tiếp theo, chúng ta sẽ tạo 1 protocol dùng để định nghĩa các thuộc tính cần có trong 1 button con. Trong protol sẽ gồm có index ( vị trí của button), startPosition (vị trí bắt đầu của button), endPosition (vị trí khi button sẽ di chuyển khi animation).
protocol CPSubMenuButtonProtocol {
   var index: Int { get set }
   var startPosition: CGPoint? { get set }
   var endPosition: CGPoint? { get set }
}
Tiếp tục với việc tạo 2 class cho home và child button cho menu. Khi này 2 class sẽ extend base class CPMenuButton. Trong class HomeMenuButton sẽ có thêm 2 thuộc tính là pressedImage và notPressedImage.
public class SubMenuButton: CPMenuButton, CPSubMenuButtonProtocol {
   var index = 0
   var startPosition: CGPoint?
   var endPosition: CGPoint?
}

public class HomeMenuButton: CPMenuButton {
   var pressedImage: UIImage?
   var notPressedImage: UIImage?

   func markAsPressed(_ pressed: Bool) {
       notPressedImage = notPressedImage ?? image
       image = pressed ? pressedImage : notPressedImage
   }
}
2.Menu Animator
Ở đây, chúng ta sẽ control về animation cho menu. Đầu tiên, cần định nghĩa 1 protocol cho các method cần thiết cho anitimation:
public protocol CPMenuAnimationProtocol {
    func animationHomeButton(homeButton: HomeMenuButton, state: CPMenuViewState, completion: (() -> Void)?)
    func animationShowSubMenuButton(subButtons: [SubMenuButton], completion: (() -> Void)?)
    func animationHideSubMenuButton(subButtons: [SubMenuButton], completion: (() -> Void)?)
}
animationHomeButton: Animation khi touch home buttonanimationShowSubMenuButton: Animation hiển thị các child buttonanimationHideSubMenuButton: Animation ẩn các child button
Định nghĩa struct để quản lý các property and method của animation:
struct CPMenuAnimator {
    var commonDuration: TimeInterval = 0.5
    var commonSpringWithDamping: CGFloat = 0.5
    var commonSpringVelocity:CGFloat = 0

    func animation(delay: TimeInterval,animation: @escaping () -> Void, completion: @escaping (Bool) -> Void) {
        UIView.animate(withDuration: commonDuration, delay: delay, usingSpringWithDamping: commonSpringWithDamping, initialSpringVelocity: commonSpringVelocity, options: UIViewAnimationOptions.curveEaseInOut, animations: animation, completion: completion)
commonDuration: Thời gian thực hiện animation.commonSpringWithDamping: hệ số suy giảm. Damping có giá trị từ 0 đến 1, giá trị càng gần 0 sẽ tạo ra dao động càng mạnh.commonSpringVelocity: tốc độ bắt đầu giao động. Sử dụngextensionđể conformstructvớiprotocolanimation. Và viết code thực hiện animation cho các method đã được conform:
extension CPMenuAnimator: CPMenuAnimationProtocol {
  public func animationShowSubMenuButton(subButtons: [SubMenuButton], completion: (() -> Void)?) {
       var delay: TimeInterval = 0
       for button in subButtons {
           let completionBlock = button.isEqual(subButtons.last) ? completion : nil
           animation(delay:delay, animation: {
               button.center = button.endPosition!
               button.alpha = 1
           }, completion: { (finish) in
               completionBlock?()
           })
           delay += 0.2
       }
   }

  public func animationHideSubMenuButton(subButtons: [SubMenuButton], completion: (() -> Void)?) {
       var delay: TimeInterval = 0
       for button in subButtons.reversed() {
           let completionBlock = button.isEqual(subButtons.last) ? completion : nil
           animation(delay:delay, animation: {
               button.center = button.startPosition!
               button.alpha = 0
           }, completion: { (finish) in
               completionBlock?()
           })
           delay += 0.2
       }
   }

  public func animationHomeButton(homeButton: HomeMenuButton, state: CPMenuViewState, completion: (() -> Void)?) {
       let scale: CGFloat = state == .expand ? 1.0 : 0.9
       let transform = CGAffineTransform(scaleX: scale, y: scale)
       animation(delay: 0, animation: {
           homeButton.transform = transform
       }, completion: { finish in
           completion?()
       })

   }
}
Ở đây, mình chỉ sử dụng 1 số animation đơn giản như scale, alpha cho các button. Các bạn có thể customize thêm cho nó bằng các hiệu ứng khác. 
3. Menu View
Đây là phần cuối cùng cũng là phần quan trọng nhất. Ở class này sẽ quản lý và thực hiện các hành động để tạo ra circle menu. Đầu tiên, cần tạo ra 2 protocol là datasource và delegate cho menu view. Với 2 protocol này sẽ định nghĩa các phương thức để nhận dữ liệu vào và trả các hành động của menu view
protocol CPMenuViewDelegate: class {
    func menuView(_ menuView: CPMenuView, didSelectButtonAtIndex index: Int)
    func menuView(_ menuView: CPMenuView, didSelectHomeButtonState state: CPMenuViewState)
}

protocol CPMenuViewDataSource: class {
    func menuViewNumberOfItems() -> Int
    func menuView(_ : CPMenuView, buttonAtIndex index: Int) -> SubMenuButton
}
Ở trong menu, chúng ta sẽ có 2 trạng thái là none và expand. Sử dụng enum để define cho 2 trạng thái đó
public enum CPMenuViewState {
    case none
    case expand
}
Điều cần quan tâm tiếp theo là công thức để tính toán position cho các child button. Dữ liệu đầu vào chúng ta có thể lấy được bao gồm
- numberItem ( Số child button)
- theta = PI * 2 / numberItem (Góc)
- center (Position của home button gồm x và y)
- index ( Chạy từ 0 -> numberItem - 1)
- radius (Khoảng cách từ home button đến child button) Ta sẽ được công thức x = center.x + sin(index * theta) * radius y = center.y - cos(index * theta) * radius
Kết luận
Mình đã hướng dẫn các bạn tạo 1 circle menu 1 cách đơn giản.Các bạn có thể vào đây để tại example về. Cảm ơn các bạn đã theo dõi
All rights reserved
