How to integrate custom bootstrap theme in Rails
Bài đăng này đã không được cập nhật trong 4 năm

Nowadays, there are so many paid/free web templates/themes are available in the market. Once in awhile, a developer may needs to use them for their web apps. But most of the bootstrap themes that are available in the market don’t follow the Rails structure. I found a very few Rails theme in the market which surely not enough.
In this tutorial, I’ll pick a free bootstrap theme and give you a step by step walkthrough to integrate the theme in rails.
Full code/Github Repo: https://github.com/mmkarim/custom-theme-rails
Theme: A free one page responsive bootstrap theme from Start Bootstrap. You can download it from here: http://startbootstrap.com/template-overviews/grayscale/
Create a new project
At first I’ll create a new rails app by,
rails new custom_theme_rails -O
For this project I don’t need anything to store in database. I append -O after my command so that Rails doesn’t include any database or ActiveRecord support for this project.
The Gemfile will automatically initialized with some basic gems. Let’s keep them unchanged for now. After removing the comments it should look something like this,
source 'https://rubygems.org'

gem 'rails', '4.2.6'
gem 'sass-rails', '~> 5.0'
gem 'uglifier', '>= 1.3.0'
gem 'coffee-rails', '~> 4.1.0'
gem 'jquery-rails'
gem 'turbolinks'
gem 'jbuilder', '~> 2.0'
gem 'sdoc', '~> 0.4.0', group: :doc

group :development do
  gem 'web-console', '~> 2.0'
  gem 'spring'
end
Now I’ll make a controller with a index method. Let’s just named the controller “Pages”.
rails g controller pages index
It’ll make a controller and a view files along with some other files.
Let’s initialize our project root for the index method.
Rails.application.routes.draw do
  root "pages#index"
end
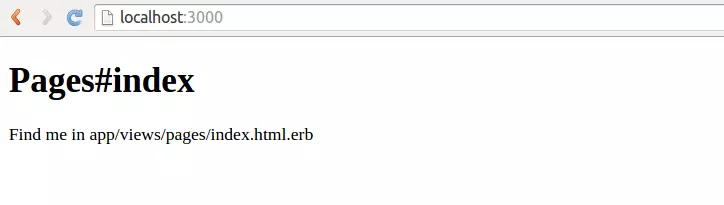
Run the “bundle install” command and run the rails server by “rails s”.
It should show the index page.
I’ll commit up to this as “Base Commit” and push it in the master branch. I’ll move to a new branch named integrate_index_file so that you can see the changes clearly once integrate the html file.
Integrating html files
Now, I’ll unzip the custom theme package. It has so many folders and one index.html file. The first task is to copy the html code from this file into our app/views/layout/application.html.erb file. Copy the full index.html codes and replace all in our application.html.erb file.
Inside the <head> tag,
I’ll only change the content of <title> as “CustomThemeRails”. Just below this line, I’ll add this 3 ruby lines.
 <%= stylesheet_link_tag    'application', media: 'all', 'data-turbolinks-track' => true %>
 <%= javascript_include_tag 'application', 'data-turbolinks-track' => true %>
 <%= csrf_meta_tags %>
The first 2 lines are the default javascript and stylesheet reference tags which will ensure our turbolink support. And the last line is for the digital signature of the page.
Inside the <body> tag,
Let’s cut all the content inside the <body> </body> tags and paste them in the app/views/pages/index.html.erb file. Inside the <body></body> tags, I’ll just add this line, <%= yield %> This will automatically yield all the content from the index.html.erb when this method will be called.
The primary works almost done. I’ll commit up to this as “Integrate Index file”. For better understanding you can check the difference between my last two commits here:
https://github.com/mmkarim/custom-theme-rails/pull/1/files
Now, if I reload our localhost it should look something like this,
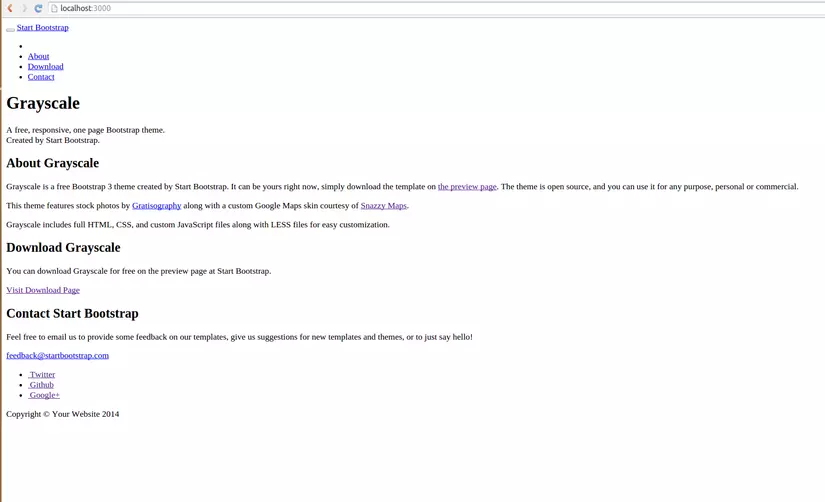
Don’t get scared. We are not ready yet. We still need to add the custom stylesheet and javascript sources to our project.
Resolving the CSS and Javascript
Let’s find out all the stylesheet and javascript references that are mentioned in the html files first. Mostly they found in the <head> and at the end of the <body>.
The CSS references found in the <head> are,
    <!-- Bootstrap Core CSS -->
    <link href="css/bootstrap.min.css" rel="stylesheet">

    <!-- Custom CSS -->
    <link href="css/grayscale.css" rel="stylesheet">

    <!-- Custom Fonts -->
    <link href="font-awesome/css/font-awesome.min.css" rel="stylesheet" type="text/css">
    <link href="http://fonts.googleapis.com/css?family=Lora:400,700,400italic,700italic" rel="stylesheet" type="text/css">
    <link href="http://fonts.googleapis.com/css?family=Montserrat:400,700" rel="stylesheet" type="text/css">
And javascript references I found in the index.html.erb (bottom part):
<!-- jQuery -->
<script src="js/jquery.js"></script>

<!-- Bootstrap Core JavaScript -->
<script src="js/bootstrap.min.js"></script>

<!-- Plugin JavaScript -->
<script src="js/jquery.easing.min.js"></script>

<!-- Google Maps API Key - Use your own API key to enable the map feature. More information on the Google Maps API can be found at https://developers.google.com/maps/ -->
<script type="text/javascript" src="https://maps.googleapis.com/maps/api/js?key=AIzaSyCRngKslUGJTlibkQ3FkfTxj3Xss1UlZDA&sensor=false"></script>

<!-- Custom Theme JavaScript -->
<script src="js/grayscale.js"></script>
Most of the references here we can solve by some gems. Let’s see how.
- For bootstrap.min.css let’s use 'less-rails-bootstrap'. This gem has some dependency. It needs another gem 'therubyracer'. So add both gems in Gemfile.
	gem 'therubyracer'
	gem 'less-rails-bootstrap'
According to the documentation of this gem, I need to specify about this at app/assets/javascripts/application.js just after jquery_ujs reference.
//= require twitter/bootstrap
And also specify in app/assets/stylesheets/application.css before require_tree .
*= require twitter/bootstrap
- For font-awesome.min.css we can use gem "font-awesome-rails". So let’s add this in Gemfile.
gem "font-awesome-rails"
And specify it in the application.css before require_tree .
*= require font-awesome
- For jquery.easing.min.js we’ll use the gem 'jquery-easing-rails'. Add this in Gemfile too.
gem 'jquery-easing-rails'
And specify this at application.js
//= require jquery.easing
So finally application.js will looks like,
//= require jquery
//= require jquery_ujs
//= require jquery.easing
//= require twitter/bootstrap
//= require turbolinks
//= require_tree .
And application.css will looks like,
 *= require twitter/bootstrap
 *= require font-awesome
 *= require_tree .
 *= require_self
 */
Now there are some custom js, css and image files for this theme. Normally it’s good to keep external files in the vendor folder. It’ll keep you hassle free in the future, But for now, let’s keep it simple and use our assets folder.
-
For grayscale.js, copy it from the js folder of the theme and paste it in the app/assets/javascripts folder.
-
For grayscale.css, copy it from the css folder of the theme and paste it in the app/assets/stylesheets folder.
-
For the google map api, we can use javascript_include_tag. we need to place it before our javascript_include_tag for turbolink. In this way, it will load before grayscale.js can load.
<%= javascript_include_tag "https://maps.googleapis.com/maps/api/js?key=AIzaSyCRngKslUGJTlibkQ3FkfTxj3Xss1UlZDA&sensor=false" %>
- For the two font references, we can make another css files and add them there. For now, let’s not change anything else.
The last thing we need to do is place the images in the right places. Copy all the images from the img folder of the theme and paste them in the app/assets/images folder.
Next task is to find all the image references used in the css, js and view files.
One of the good way is to find them using the global search tool of your Editor. For SublimeText 2 or 3, Press Ctrl+Shift+f and search for “img/” (As the images were in the img folder). Try to skip the log or any unnecessary files from the search.
I found 2 references in the grayscale.css in line 150 and 268. Let’s change the url
“../img/intro-bg.jpg” will change into “intro-bg.jpg”
And
“../img/downloads-bg.jpg” will change into “downloads-bg.jpg”
1 more reference found in the grayscale.js files in line 180.
To load the image from asset pipeline we need some ruby code to inject here. So we will rename the grayscale.js files into grayscale.js.erb.
The image path 'img/map-marker.png' will change into "<%= asset_path('map-marker.png') %>"
I’ll commit up to this. You can see the differences between my last two commits here for better understanding: https://github.com/mmkarim/custom-theme-rails/pull/2/files
Update: Small modifications if you are going to deploy in production server. https://github.com/mmkarim/custom-theme-rails/compare/91690ad...506a2f4
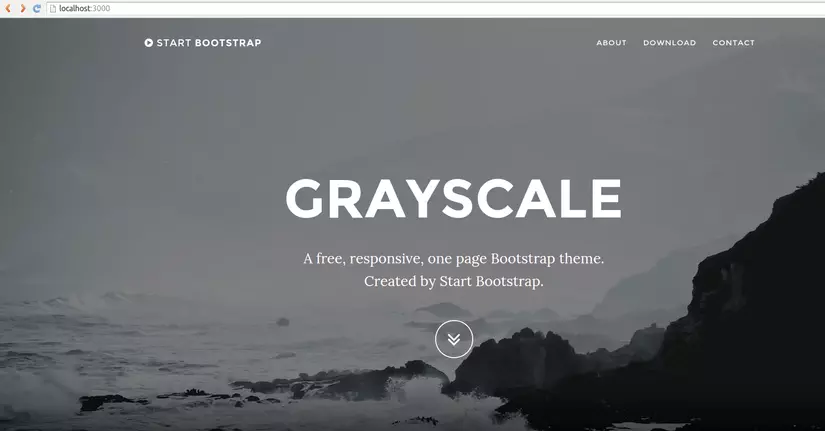
We’re almost done. Let’s “bundle install” again and restart the server. If you refresh the localhost page in the browser it should works fine now. 
We’re done for now. But remember, for different theme there will be different dependencies. And you have to debug the issues as required. Try to keep the external js or css files in the vendor folder of your project and replace the raw html forms/navigations with rails syntax. Let’s talk about them in future. Till then, keep coding.
All rights reserved
