How to Create Events in Google Calendar from Ruby On Rails Application?
Bài đăng này đã không được cập nhật trong 6 năm
Trong nhiều trường hợp, chúng ta cần tạo 1 sự kiện trên Google Calendar từ web app để thuận tiện cho việc quản lý lịch của mình. Google Calendar là ứng dụng được sử dụng nhiều nhất để lên lịch và nó rất phổ biến. Trong bài viết này, mình sẽ xây dựng 1 ứng dụng tích hợp Google Calendar bằng cách sử dụng gem omniauth-google-oauth2 và google-api-client.
Ta sẽ sử dụng Google client_id và client_secret để xác thực an toàn tất cả các yêu cầu API từ ứng dụng của mình đến Google Calendar.
Setup Google API Project
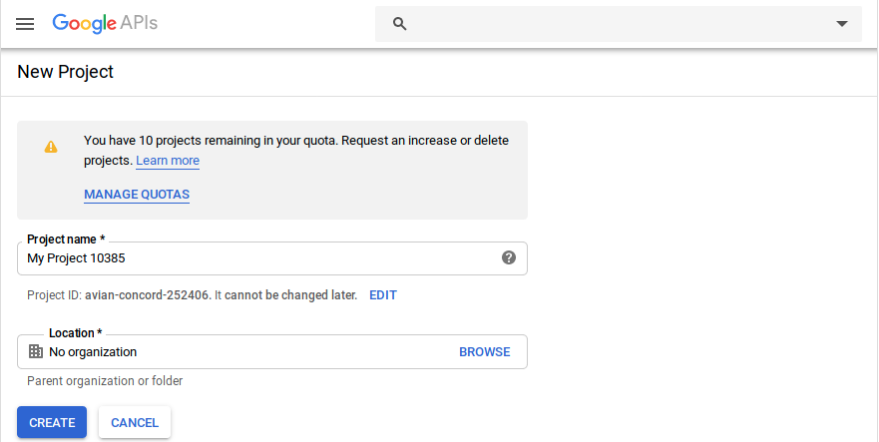
Bước 1: Tạo project trên google
- Đăng nhập vào Google API console.
- Chọn "Create a new project" và nhập tên project
![]()
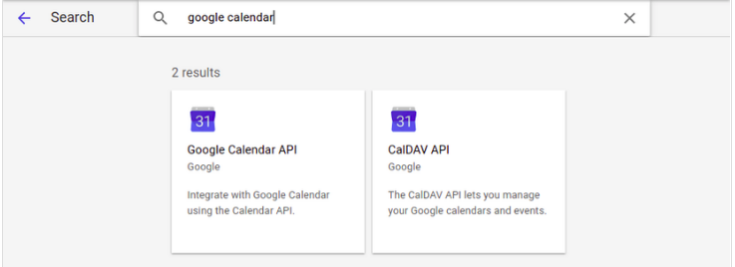
- Search "Google Calendar API", sau đó click nút "Enable"
![]()
Bước 2: Tạo client credentials (client_id and client_secret)
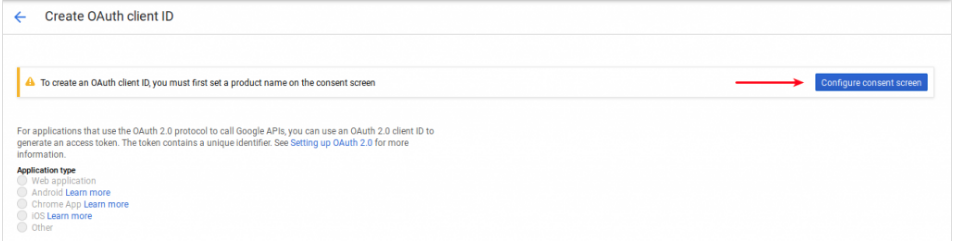
Click chọn ‘Credentials’. Chọn "Oauth client ID" như hình sau:
 Google sẽ nhắc bạn cấu hình lại consent screen, click chọn ‘Configure consent screen’ và điền các thông tin liên quan:

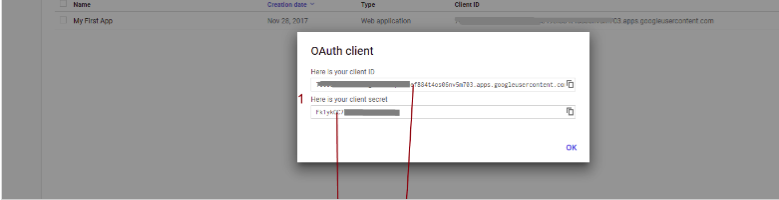
Click "Save" để lưu lại các thông tin đã cấu hình.
Google sẽ hiển thị popup trả về client id và client secret. Copy lại 2 thông số này để phục vụ cho việc xác thực ứng dụng của bạn
Bước 3: Cấu hình lại Redirect URL (Call back URL)
Authorized JavaScript origins: https://YOUR_NAMESPACE
Authorized redirect URI: https://YOUR_NAMESPACE/users/google_oauth2/callback
 Vậy là đã hoàn thành các bước config google app. Bước tiếp theo sẽ là bước tích hợp vào web app của mình.
Tích hợp Google Calendar vào rails app
Bước 1: Install gems
- Thêm 2 gem sau vào gem file và bunle:
gem ‘devise’
gem ‘omniauth-google-oauth2’
Bước 2: Configure OAuth credentials
- Khai báo client id và client secret đã copy lại ở phần trên vào biến môi trường.
- Cấu hình trong file
config/initializers/devise.rb:
config.omniauth :google_oauth2, ENV['GOOGLE_CLIENT_ID'], ENV['GOOGLE_CLIENT_SECRET'],

{

    access_type: "offline",

    prompt: "consent",

    select_account: true,

    scope: 'userinfo.email, calendar'

}
Có 2 thông số quan trọng ở đây đó là access_type: "offline", prompt: "consent" để Google cung cấp cho ta access_token, refresh_token và expires_at. Và scope: calendar cho phép ứng dụng yêu cầu người dùng cấp quyền truy cập vào Calendar của họ.
Bước 3: Add User Authentication and Callback
Khi chạy rails g devise:install nó sẽ tự động thêm vào routes.rb:
Rails.application.routes.draw do
    devise_for :users
end
Nhưng chúng ta cần custom lại một chút vì ở đây chúng ta mới chỉ cần sử dụng tới callback controller:
Rails.application.routes.draw do
    devise_for :users, :controllers => { :omniauth_callbacks => "callbacks" }
End
Bước 4: Định nghĩa call back controller:
Callback controller sẽ được kế thừa từ Devise::OmniauthCallbacksController:
class Users::OmniauthCallbacksController < Devise::OmniauthCallbacksController
  def google_oauth2
    @user = User.from_omniauth(request.env["omniauth.auth"])
    if @user.persisted?
      flash[:notice] = I18n.t "devise.omniauth_callbacks.success", :kind => "Google"
      auth = request.env["omniauth.auth"]
      @user.access_token = auth.credentials.token
      @user.expires_at = auth.credentials.expires_at
      @user.refresh_token = auth.credentials.refresh_token
      @user.save!
      sign_in(@user)
      redirect_to tasks_path
    else
      session["devise.google_data"] = request.env["omniauth.auth"]
      redirect_to new_user_registration_url
    end
  end
end
- User Model:
class User < ApplicationRecord
  # Include default devise modules. Others available are:
  # :confirmable, :lockable, :timeoutable, :trackable and :omniauthable
  devise :omniauthable, :omniauth_providers => [:google_oauth2]
  has_many :tasks

  def self.from_omniauth(access_token)
    data = access_token.info
    user = User.where(:email => data["email"]).first

    unless user
      user = User.create(
            name: data["name"],
            email: data["email"],
            encrypted_password: Devise.friendly_token[0,20]
      )
    end
    user
  end
end
Bước 5: Thêm thuộc tính vào bảng user: Thêm các thuộc tính dưới đây để lưu trữ thông tin chi tiết xác thực user khi login vào web app sử dụng token API calls.
class AddColumnsToUsers < ActiveRecord::Migration[5.2]
  def change
    add_column :users, :name, :string
    add_column :users, :access_token, :string
    add_column :users, :expires_at, :datetime
    add_column :users, :refresh_token, :string
  end
end
Bước 6: Add the Google API Ruby Client gem
Chúng ta sẽ thêm gem google-api-client vào gemfile:
gem ‘google-api-client’, require: ‘google/apis/calendar_v3’
Bước 7: Add ‘Task’ model Tạo modal Task để lưu lại các thông tin của event gồm các thuộc tính sau:
class CreateTasks < ActiveRecord::Migration[5.2]
  def change
    create_table :tasks do |t|
      t.string :title
      t.string :description
      t.datetime :start_date
      t.datetime :end_date
      t.string :event
      t.string :members
      t.references :user, foreign_key: true

      t.timestamps
    end
  end
end
Run rake db:migrate để tạo bảng.
Thêm vào routes: resources :tasks
Bước 8: Handle calendar event creation in Controller
Để add event vào Google Calendar ta thực thi đoạn code sau:
require "google/apis/calendar_v3"
require "google/api_client/client_secrets.rb"

class TasksController < ApplicationController
  CALENDAR_ID = 'primary'

  # GET /tasks/new
  def new
    @task = Task.new
  end

  def create
    client = get_google_calendar_client current_user
    task = params[:task]
    event = get_event task
    client.insert_event('primary', event)
    flash[:notice] = 'Task was successfully added.'
    redirect_to tasks_path
  end

  def get_google_calendar_client current_user
    client = Google::Apis::CalendarV3::CalendarService.new
    return unless (current_user.present? && current_user.access_token.present? && current_user.refresh_token.present?)
    secrets = Google::APIClient::ClientSecrets.new({
      "web" => {
        "access_token" => current_user.access_token,
        "refresh_token" => current_user.refresh_token,
        "client_id" => ENV["GOOGLE_API_KEY"],
        "client_secret" => ENV["GOOGLE_API_SECRET"]
      }
    })
    begin
      client.authorization = secrets.to_authorization
      client.authorization.grant_type = "refresh_token"

      if !current_user.present?
        client.authorization.refresh!
        current_user.update_attributes(
          access_token: client.authorization.access_token,
          refresh_token: client.authorization.refresh_token,
          expires_at: client.authorization.expires_at.to_i
        )
      end
    rescue => e
      flash[:error] = 'Your token has been expired. Please login again with google.'
      redirect_to :back
    end
    client
  end

  private

  def get_event task
    attendees = task[:members].split(',').map{ |t| {email: t.strip} }
    event = Google::Apis::CalendarV3::Event.new({
      summary: task[:title],
      location: '800 Howard St., San Francisco, CA 94103',
      description: task[:description],
      start: {
        date_time: Time.new(task['start_date(1i)'],task['start_date(2i)'],task['start_date(3i)'],task['start_date(4i)'],task['start_date(5i)']).to_datetime.rfc3339,
        time_zone: "Asia/Kolkata"
        # date_time: '2019-09-07T09:00:00-07:00',
        # time_zone: 'Asia/Kolkata',
      },
      end: {
        date_time: Time.new(task['end_date(1i)'],task['end_date(2i)'],task['end_date(3i)'],task['end_date(4i)'],task['end_date(5i)']).to_datetime.rfc3339,
        time_zone: "Asia/Kolkata"
      },
      attendees: attendees,
      reminders: {
        use_default: false,
        overrides: [
          Google::Apis::CalendarV3::EventReminder.new(reminder_method:"popup", minutes: 10),
          Google::Apis::CalendarV3::EventReminder.new(reminder_method:"email", minutes: 20)
        ]
      },
      notification_settings: {
        notifications: [
                        {type: 'event_creation', method: 'email'},
                        {type: 'event_change', method: 'email'},
                        {type: 'event_cancellation', method: 'email'},
                        {type: 'event_response', method: 'email'}
                       ]
      }, 'primary': true
    })
  end
end
Bước 9: Tạo view cho new task:
Thêm file new.html.erb để tạo mới event:
<%= form_for @task do |form| %>
  <div class="field">
    <%= form.label :title %>
    <%= form.text_field :title %>
  </div>

  <div class="field">
    <%= form.label :description %>
    <%= form.text_field :description %>
  </div>

  <div class="field">
    <%= form.label :start_date %>
    <%= form.datetime_select :start_date %>
  </div>

  <div class="field">
    <%= form.label :end_date %>
    <%= form.datetime_select :end_date %>
  </div>

  <div class="field">
    <%= form.label :event %>
    <%= form.text_field :event %>
  </div>

  <div class="field">
    <%= form.label :members %>
    <%= form.text_field :members %>
  </div>

  <div class="actions">
    <%= form.submit %>
  </div>
<% end %>
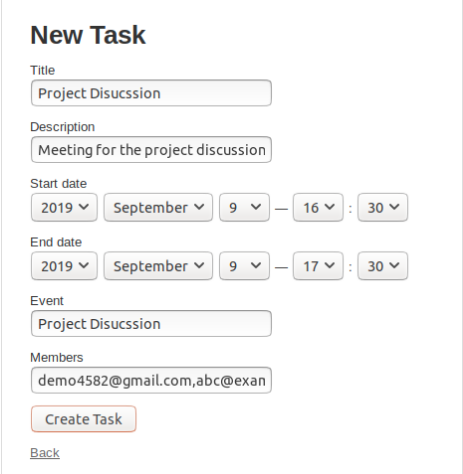
Giao diện hiển thị để demo:
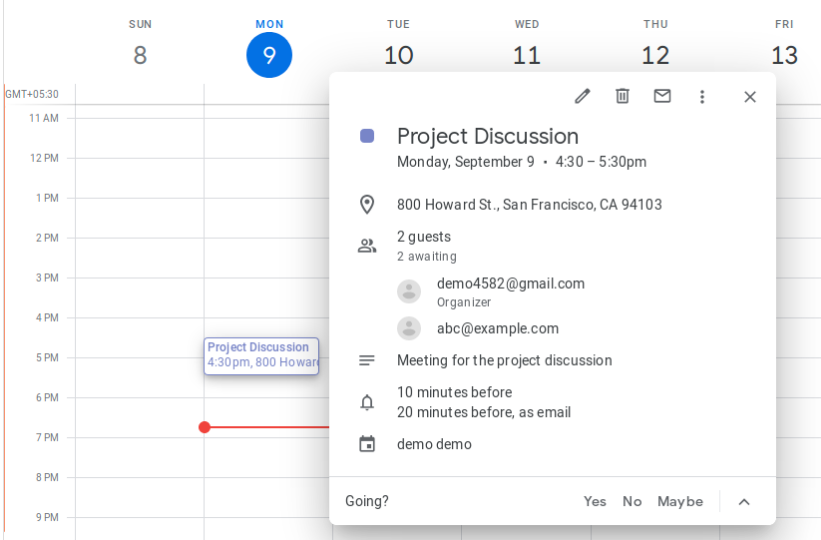
Sau khi tạo mới 1 event:
Vậy là mình đã tích hợp được Google Calendar vào rails app, hi vọng bài viết của mình sẽ hữu ích đối với mọi người ạ.
Tài liệu tham khảo
https://www.thegreatcodeadventure.com/using-the-google-api-ruby-client-with-google-calendar-api/
All rights reserved
