How to authenticate OpenVPN with Active Directory
Bài đăng này đã không được cập nhật trong 5 năm
Hôm nay mình sẽ trình bày bài viết về việc config Open VPN xác thực qua Active Directory.
1. Mô hình.
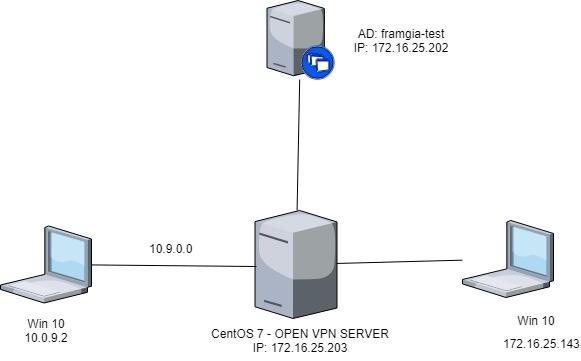
2. Chuẩn bị
- 1 Server CentOS (Open VPN)
- 1 Server AD.
- 1 PC để test.
3. Config
- Đầu tiên update phần mềm, sau đó cài "epel-release"
"epel-release": Kiểu như kho chứa các source phần mềm opensource
                 #sudo yum update -y
                 #sudo yum install epel-release -y
                 #sudo yum update -y
- Cài đặt các package: openvpn, easyrsa, iptables
"easyrsa" -> Đây là tool để tạo ra các Keys and Certificates
Tạo key và build file .ca
                #cd ~
                # /usr/share/easy-rsa/3/easyrsa init-pki
                # /usr/share/easy-rsa/3/easyrsa build-ca nopass
                # /usr/share/easy-rsa/3/easyrsa gen-dh
                # /usr/share/easy-rsa/3/easyrsa build-client-full vpn-client-01 nopass
                # /usr/share/easy-rsa/3/easyrsa gen-crl
                # openvpn --genkey --secret pki/ta.key
Lưu ý: dòng bên dưới, dòng này dùng để tạo key cho phía client.
`# /usr/share/easy-rsa/3/easyrsa build-client-full vpn-client-01 nopass
Trong đó: vpn-client-01, mình nên đặt tên thành user của người dùng để dể phân biệt.
- Copy các file như ca, pem, key... vào thư mục /etc/openvpn
         #sudo cp pki/ca.crt /etc/openvpn/ca.crt
         #sudo cp pki/ca.crt /etc/openvpn/ca.crt
         #sudo cp pki/dh.pem /etc/openvpn/dh.pem
         #sudo cp pki/issued/vpn-server.crt /etc/openvpn/server.crt
         #sudo cp pki/private/vpn-server.key /etc/openvpn/server.key
         #sudo cp pki/ta.key /etc/openvpn/ta.key
         #sudo cp pki/crl.pem /etc/openvpn/crl.pem
- Start Services
        #sudo systemctl -f enable openvpn@server.service
        #sudo systemctl start openvpn@server.service
- Check log # sudo tail -f /var/log/openvpn.log
- Enable IPv4 Forwarding
            vi /etc/sysctl.conf
            #Packet forwarding
            net.ipv4.ip_forward = 1
- Configure IPTables
            Create an iptables rule to allow proper routing of our VPN subnet.
            #iptables -t nat -A POSTROUTING -s 10.9.0.0/24 -o eth0 -j MASQUERADE
            Need forward traffic from tunnel to ethernet and ethernet to tunnel by command:
            #iptables -I FORWARD 1 -i tun0 -j ACCEPT
            #iptables -I FORWARD 2 -i tun0 -o eth0 -j ACCEPT
            #iptables -I FORWARD 3 -i eth0 -o tun0 -j ACCEPT
            #iptables -I INPUT -p udp -m udp --dport 1194 -j ACCEPT
            #service iptables save
- Restart Services iptables
            sudo systemctl enable iptables
            sudo systemctl start iptables
            sudo service iptables save
' - Update lại file config của server VPN cho phù hợp
Đường dẫn: /etc/openvpn/server.conf
Nội dung file config như bên dưới:
               port 1194
               proto udp
               dev tun
               sndbuf 0
               rcvbuf 0
               ca ca.crt
               cert server.crt
               key server.key
               dh dh.pem
               topology subnet
               server 10.9.0.0 255.255.255.0
               ifconfig-pool-persist ipp.txt
               push "redirect-gateway def1 bypass-dhcp"
               keepalive 10 120
               comp-lzo
               persist-key
               persist-tun
               status openvpn-status.log
               verb 3
               crl-verify crl.pem
               user nobody
               group nobody
               cipher AES-256-CBC
               auth SHA512
               plugin /usr/lib64/openvpn/plugin/lib/openvpn-auth-ldap.so "/etc/openvpn/server/ldap.conf"
               client-cert-not-required
               #plugin /usr/lib64/openvpn/plugins/openvpn-plugin-auth-pam.so login
               log-append /var/log/openvpn.log
Lưu ý các dòng này:
(1) server 10.9.0.0 255.255.255.0
-> Đây là dãy mạng cung cấp cho phía client
-> ta không đặt trùng với dãy IP local trong công ty.
(2) plugin /usr/lib64/openvpn/plugin/lib/openvpn-auth-ldap.so "/etc/openvpn/server/ldap.conf"
-> Authen sẽ được thông qua file ldap.conf
(3) plugin /usr/lib64/openvpn/plugins/openvpn-plugin-auth-pam.so login
-> Authen sẽ được thông qua user local.
- Setting để client có thể connect tới Server..
Tạo folder chứa key.
     # cd ~
     # mkdir vpn-client-01-config
Copy các file đã được gen, sau đó chuyển vào trong folder này.
        # cp pki/ca.crt vpn-client-01-config/ca.crt
		# cp pki/issued/vpn-client-01.crt vpn-client-01-config/client.crt
		# cp pki/private/vpn-client-01.key vpn-client-01-config/client.key
		# cp pki/ta.key vpn-client-01-config/ta.key
Tạo user local để vpn
        # useradd -m -s /sbin/nologin [username]
		# passwd [username]
File config phía client
        client
        dev tun
        proto udp
        sndbuf 0
        rcvbuf 0
        remote 172.16.25.203 1194
        resolv-retry infinite
        nobind
        persist-key
        persist-tun
        comp-lzo
        verb 3
        auth-user-pass
        auth-nocache
        ca ca.crt
        cert client.crt
        key client.key
        remote-cert-tls server
4. Config authen với ldap
Cài đặt package openvpn-auth-ldap
#yum install openvpn openvpn-auth-ldap y
Create file "ldap.conf"
```
        <LDAP>
            # LDAP server URL
            URL        ldap://172.16.25.202
            # Bind DN (If your LDAP server doesn't support anonymous binds)
            BindDN        "CN=Administrator,CN=Users,DC=framgia-test,DC=com"
            # Bind Password
            Password    Fpd12XXXXXX
            # Network timeout (in seconds)
            Timeout        15
            # Enable Start TLS
            TLSEnable    no
            # Follow LDAP Referrals (anonymously)
            FollowReferrals yes
            # TLS CA Certificate File
            #TLSCACertFile    /usr/local/etc/ssl/ca.pem
            # TLS CA Certificate Directory
            #TLSCACertDir    /etc/ssl/certs
            # Client Certificate and key
            # If TLS client authentication is required
            #TLSCertFile    /usr/local/etc/ssl/client-cert.pem
            #TLSKeyFile    /usr/local/etc/ssl/client-key.pem
            # Cipher Suite
            # The defaults are usually fine here
            # TLSCipherSuite    ALL:!ADH:@STRENGTH
        </LDAP>
        <Authorization>
            # Base DN
            BaseDN        "OU=VPN,DC=framgia-test,DC=com"
            # User Search Filter
            SearchFilter    "(sAMAccountName=%u)"
            # Require Group Membership
            RequireGroup    false
            # Add non-group members to a PF table (disabled)
            #PFTable    ips_vpn_users
        </Authorization>
        ```
Giải thích một số thông tin:
URL ldap://172.16.25.202 : Địa chỉ IP của Server LDAP.
BindDN "CN=Administrator,CN=Users,DC=framgia-test,DC=com"
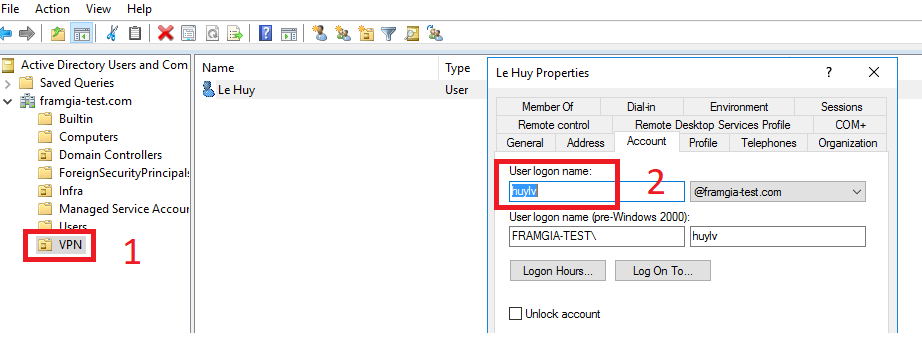
Cách để lấy BindDN, login vào AD -> vào cmd -> dsquery user
        C:\Users\Administrator\Desktop>dsquery user
		CN=Administrator,CN=Users,DC=framgia-test,DC=com
		CN=Guest,CN=Users,DC=framgia-test,DC=com
		CN=DefaultAccount,CN=Users,DC=framgia-test,DC=com
		CN=krbtgt,CN=Users,DC=framgia-test,DC=com
		CN=Le Huy,OU=Infra,DC=framgia-test,DC=com
		CN=Tran Van Quyet,OU=Infra,DC=framgia-test,DC=com
		CN=Truong Thanh Trung,OU=Infra,DC=framgia-test,DC=com
		CN=Truong Thanh Trung,OU=Infra,DC=framgia-test,DC=com
Password Fpd12XXXX: Mật khẩu tài khoản admin login vào AD.
BaseDN "OU=VPN,DC=framgia-test,DC=com": Domain framgia-test.com được phân giải thành thế này.
SearchFilter "(sAMAccountName=%u)" : Cứ để default như vậy.
5. Test
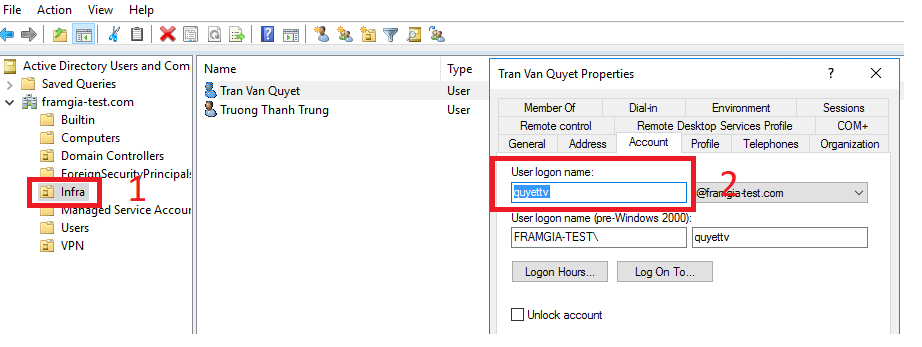
Trên AD, tiến hành tạo OU đặt tên: VPN -> sau đó tạo các user nằm trong OU này.
- Mục đích, chỉ những user trong OU VPN mới connect OK.
-
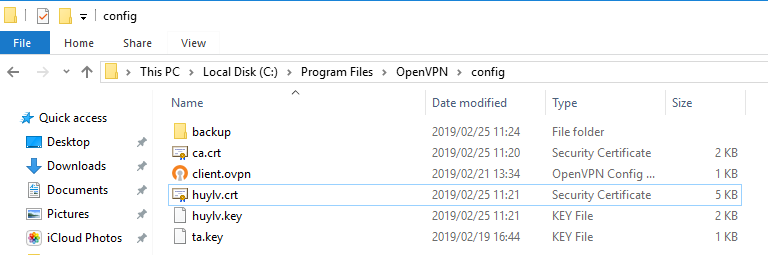
Trên Client, copy các file ca, key, ... bỏ vào folder config.
-
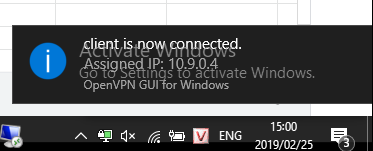
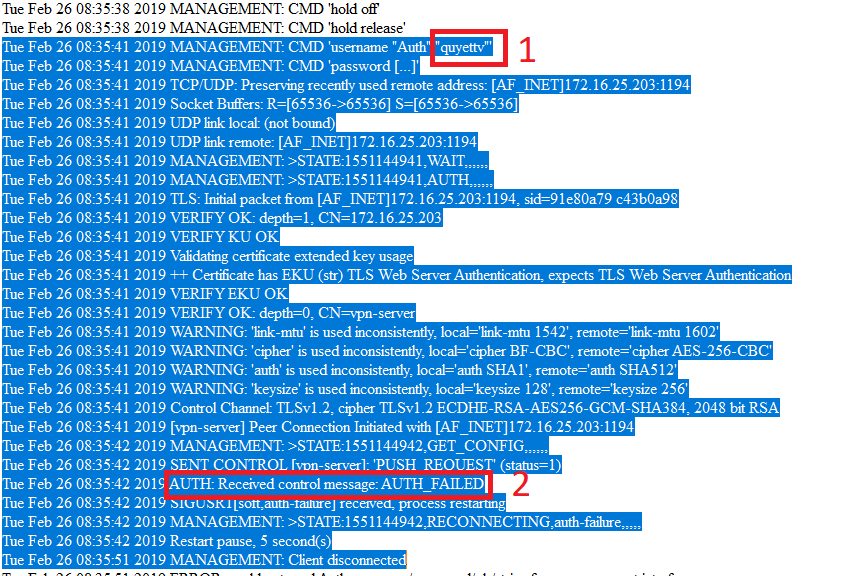
Test thử connect được chưa :-?
-
Những user khác, không thuộc OU-VPN -> connect sẽ fail.
![]()
-
Kết quả:
![]()
Cảm ơn các bạn, anh (chị) đã đọc bài - bài viết còn basic, nếu có sai sót có thể góp ý để em(mình) cải thiện.
Nguồn tham khảo:
https://www.rosehosting.com/blog/how-to-install-openvpn-on-centos-7/
http://www.startupcto.com/server-tech/centos/setting-up-openvpn-server-on-centos
https://www.youtube.com/watch?v=V6DGD4QRXVU
All rights reserved
