HỌC REACTJS THÔNG QUA VÍ DỤ PHẦN 1
Bài đăng này đã không được cập nhật trong 6 năm
1. Mở đầu.
Xin chào các bạn, hôm nay mình xin quay trở lại với loạt bài học reactsjs cơ bản thông qua những ứng dụng thực tế gần gũi và đơn giản. Chắc hẳn một ứng dụng nhỏ không thể không nhắc đến đó là CRUD, chính xác là như vậy - mình sẽ cùng các bạn đi xây dựng một ứng dụng như vậy có tên là TODO LIST. Bài viết của mình sẽ được chia thành các phần nhỏ như sau ( các bạn có thể tiện theo dõi các bài viết tiếp theo sau).
- Bài 1: Xây dựng giao diên và phân tách thành các component.
- Bài 2: Tạo mockData và render data lên các component.
- Bài 3: Add Item.
- Bài 4: Delete Item.
- Bài 5: Update Item.
- Bài 6: Filter và Search.
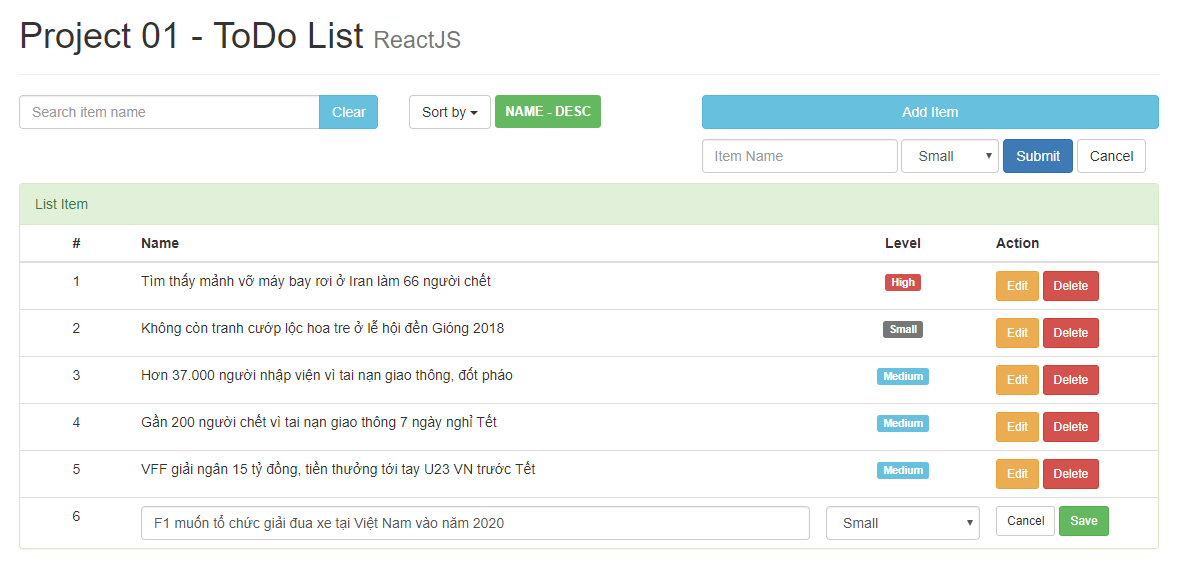
Và cuối cùng mà sản phẩm chúng ta sẽ đạt được như sau :
Lưu ý: Trong loạt bài này mình sẽ không đề cập đến việc thiết kế giao diện (html,css) mà chúng ta sẽ sử dụng luôn 1 template mà mình đã xây dựng. Các bạn có thể tải template theo link sau đây Template. Bài viết này tập chung chủ yếu với việc từ giao diện có sẵn phân tách thành các component trong reactjs.. Để có thể hoàn thành được bài chia sẻ này, bạn cũng cần phải có một số khái niệm cơ bản về reactjs, nếu cần bạn có tham khảo 1 số bài viết sau để có những kiến thức cơ bản trước nhé.
2. Thực hiện theo từng bước.
Bước 1: Tạo cấu trúc thư mục.
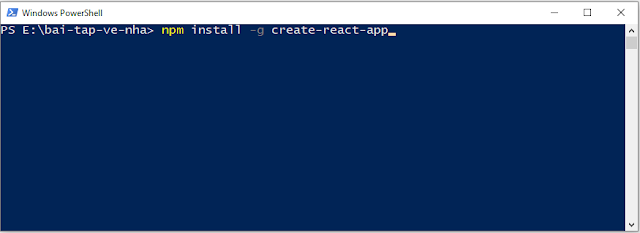
- Bước 1.1: Trong folder bai-tap-ve-nha, vì máy tính của mình là win 10 nên các bạn ấn tổ hợp phím Shift + chuột phải và chọn Open PowerShell window here để mở cmd lên.
Sau đó bạn gõ dòng code sau npm install -g create-react-app như hình bên dưới và ấn enter.
![]() .
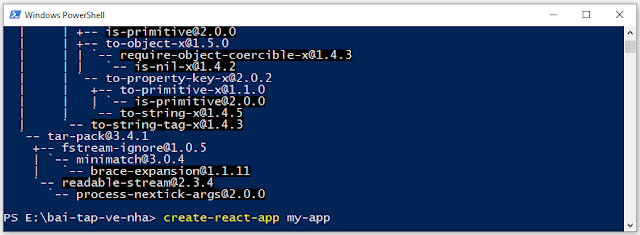
. - Bước 1.2: Sau khi cài đặt xong các bạn gõ tiếp câu lệnh create-react-app my-app như hình bên dưới và ấn enter.
![]() .
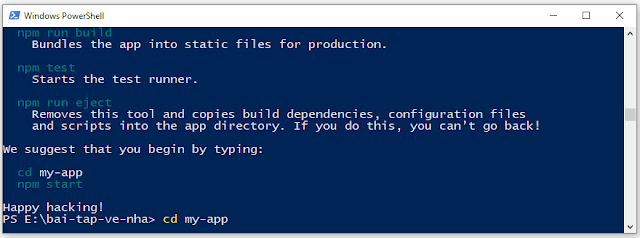
. - Bước 1.3: Sau khi tạo được xong project với tên là my-app các bạn gõ tiếp câu lệnh này cd my-app như hình bên dưới và ấn enter.
![]() .
. - Bước 1.4: Sau khi chuyển cmd vào trong folder my-app các bạn gõ tiếp câu lệnh npm start như hình bên dưới và ấn enter để bắt đầu chạy project.
![]() .
.
![]() .
. - Bước 1.5: Nếu các bước trên các bạn làm thành công thì trình duyệt web sẽ tự động bật lên và mở một trang web có địa chỉ là http://localhost:3000 giao diện trang web sẽ có thể như hình bên dưới (hoặc khác chút xíu ^^).
![]() .
.

**Mình cũng xin nói qua một chút về cấu trúc thư mục trong Reactjs. Sau khi bạn thực hiện xong câu lệnh create-react-app my-app thì cấu trúc thư mục sẽ như sau:
 .
.
Bước 2: Copy giao diện đã xây dựng sẵn.
Sau khi các bạn đã tải template và giải nén thì kết quả chúng ta sẽ được các file như sau:
 .
Chúng ta sẽ tiến hàng copy toàn bộ template mà mình đã xây dựng vào reactjs app để cho chạy nên giao diện tổng thể đã nhé. rồi chúng ta mới tiền hành đi phân chia thành các component nhỏ hơn.
.
Chúng ta sẽ tiến hàng copy toàn bộ template mà mình đã xây dựng vào reactjs app để cho chạy nên giao diện tổng thể đã nhé. rồi chúng ta mới tiền hành đi phân chia thành các component nhỏ hơn.
 .
.
- Bước 2.1: Với file index.html ở trên ta phải thêm các đường dẫn tới các file css cần thiết. Code file này sẽ như hình bên dưới. Lưu ý là khi làm sang react mình hạn chế sử dụng jquery nên sẽ add nó vào trong file html.
<html lang="en">
<head>
    <!--
      manifest.json provides metadata used when your web app is added to the
      homescreen on Android. See https://developers.google.com/web/fundamentals/engage-and-retain/web-app-manifest/
    -->
    <link href="%PUBLIC_URL%/manifest.json" rel="manifest">
    <link href="%PUBLIC_URL%/favicon.ico" rel="shortcut icon">
    <!--
      Notice the use of %PUBLIC_URL% in the tags above.
      It will be replaced with the URL of the `public` folder during the build.
      Only files inside the `public` folder can be referenced from the HTML.

      Unlike "/favicon.ico" or "favicon.ico", "%PUBLIC_URL%/favicon.ico" will
      work correctly both with client-side routing and a non-root public URL.
      Learn how to configure a non-root public URL by running `npm run build`.
    -->
    <title>React App</title>
    <link href="%PUBLIC_URL%/css/bootstrap.min.css" rel="stylesheet">
    <link href="%PUBLIC_URL%/css/style.css" rel="stylesheet">
</head>

<body>
    <noscript>
        You need to enable JavaScript to run this app.
    </noscript>
    <div id="root"></div>
    <!--
      This HTML file is a template.
      If you open it directly in the browser, you will see an empty page.

      You can add webfonts, meta tags, or analytics to this file.
      The build step will place the bundled scripts into the  tag.

      To begin the development, run `npm start` or `yarn start`.
      To create a production bundle, use `npm run build` or `yarn build`.
    -->
</body>

</html>
- Bước 2.2: Bước tiếp theo ta phải chuyển toàn bộ code HTML sang JSX, để làm được điều này ta nên vào trang https://magic.reactjs.net/htmltojsx.htm để chuyển tự động, các bạn vào trang giao diện của html và copy toàn bộ div với class là container để chuyển.Sau khi convert nó sang JSX giờ ta mở file App.js nằm trong folder src và paste code giao diện đó vào bên trong như sau.
import React, { Component } from 'react';

class App extends Component {
    render() {
        return (
            <div className="container">
                <div className="page-header">
                    <h1>Project 01 - ToDo List <small>ReactJS</small></h1>
                </div>
                <div className="row">
                    <div className="col-xs-4 col-sm-4 col-md-4 col-lg-4">
                        <div className="input-group">
                            <input type="text" className="form-control" placeholder="Search item name" />
                            <span className="input-group-btn">
                                <button className="btn btn-info" type="button">Clear</button>
                            </span>
                        </div>
                    </div>
                    <div className="col-xs-3 col-sm-3 col-md-3 col-lg-3">
                        <div className="dropdown">
                            <button className="btn btn-default dropdown-toggle" type="button" data-toggle="dropdown" aria-haspopup="true" aria-expanded="true">
                                Sort by <span className="caret" />
                            </button>
                            <ul className="dropdown-menu">
                                <li><a role="button">Name ASC</a></li>
                                <li><a role="button">Name DESC</a></li>
                                <li role="separator" className="divider" />
                                <li><a role="button">Level ASC</a></li>
                                <li><a role="button">Level DESC</a></li>
                            </ul>
                            <span className="label label-success label-medium">NAME - DESC</span>
                        </div>
                    </div>
                    <div className="col-xs-5 col-sm-5 col-md-5 col-lg-5">
                        <button type="button" className="btn btn-info btn-block marginB10">Add Item</button>
                    </div>
                </div>
                <div className="row marginB10">
                    <div className="col-md-offset-7 col-md-5">
                        <form className="form-inline">
                            <div className="form-group">
                                <input type="text" className="form-control" placeholder="Item Name" />
                            </div>
                            <div className="form-group">
                                <select className="form-control">
                                    <option value={0}>Small</option>
                                    <option value={1}>Medium</option>
                                    <option value={2}>High</option>
                                </select>
                            </div>
                            <button type="button" className="btn btn-primary">Submit</button>
                            <button type="button" className="btn btn-default">Cancel</button>
                        </form>
                    </div>
                </div>
                <div className="panel panel-success">
                    <div className="panel-heading">List Item</div>
                    <table className="table table-hover">
                        <thead>
                            <tr>
                                <th style={{ width: '10%' }} className="text-center">#</th>
                                <th>Name</th>
                                <th style={{ width: '15%' }} className="text-center">Level</th>
                                <th style={{ width: '15%' }}>Action</th>
                            </tr>
                        </thead>
                        <tbody>
                            <tr>
                                <td className="text-center">1</td>
                                <td>Tìm thấy mảnh vỡ máy bay rơi ở Iran làm 66 người chết</td>
                                <td className="text-center"><span className="label label-danger">High</span></td>
                                <td>
                                    <button type="button" className="btn btn-warning btn-sm">Edit</button>
                                    <button type="button" className="btn btn-danger btn-sm">Delete</button>
                                </td>
                            </tr>
                            <tr>
                                <td className="text-center">2</td>
                                <td>Không còn tranh cướp lộc hoa tre ở lễ hội đền Gióng 2018</td>
                                <td className="text-center"><span className="label label-default">Small</span></td>
                                <td>
                                    <button type="button" className="btn btn-warning btn-sm">Edit</button>
                                    <button type="button" className="btn btn-danger btn-sm">Delete</button>
                                </td>
                            </tr>
                            <tr>
                                <td className="text-center">3</td>
                                <td>Hơn 37.000 người nhập viện vì tai nạn giao thông, đốt pháo</td>
                                <td className="text-center"><span className="label label-info">Medium</span></td>
                                <td>
                                    <button type="button" className="btn btn-warning btn-sm">Edit</button>
                                    <button type="button" className="btn btn-danger btn-sm">Delete</button>
                                </td>
                            </tr>
                            <tr>
                                <td className="text-center">4</td>
                                <td>Gần 200 người chết vì tai nạn giao thông 7 ngày nghỉ Tết</td>
                                <td className="text-center"><span className="label label-info">Medium</span></td>
                                <td>
                                    <button type="button" className="btn btn-warning btn-sm">Edit</button>
                                    <button type="button" className="btn btn-danger btn-sm">Delete</button>
                                </td>
                            </tr>
                            <tr>
                                <td className="text-center">5</td>
                                <td>VFF giải ngân 15 tỷ đồng, tiền thưởng tới tay U23 VN trước Tết</td>
                                <td className="text-center"><span className="label label-info">Medium</span></td>
                                <td>
                                    <button type="button" className="btn btn-warning btn-sm">Edit</button>
                                    <button type="button" className="btn btn-danger btn-sm">Delete</button>
                                </td>
                            </tr>
                            <tr>
                                <td className="text-center">6</td>
                                <td><input type="text" className="form-control" defaultValue="F1 muốn tổ chức giải đua xe tại Việt Nam vào năm 2020" /></td>
                                <td className="text-center">
                                    <select className="form-control">
                                        <option>Small</option>
                                        <option>Medium</option>
                                        <option>High</option>
                                    </select>
                                </td>
                                <td>
                                    <button type="button" className="btn btn-default btn-sm">Cancel</button>
                                    <button type="button" className="btn btn-success btn-sm">Save</button>
                                </td>
                            </tr>
                        </tbody>
                    </table>
                </div>
            </div>
        );
    }
}

export default App;
Nếu các bước làm chính xác thì khi ta quay lại trang web của mình http://localhost:3000 sẽ có giao diện mới như hình bên dưới.
.
Bước 3: Phân tách thành các component (đây là phần quan trọng nhất).
Việc phân chia Component giúp project của chúng ta được tách ra làm các phần khác nhau, thuận tiện và dễ dàng chỉnh sửa nâng cấp, tránh xung đột...
Tùy vào cách phân chia Component của mỗi người mà việc tách sẽ khác nhau, ở đây mình chỉ tách với một lớp Component và gọi nó vào trong App.js
Để gom các Component vào một chỗ cho dễ quản lí, ta vào bên trong folder src vào tạo folder components
Các Component tạo sau này sẽ đều để bên trong folder này. Các bạn có thể thấy từ giao diện ban đầu mình đã chia thành các component như hình vẽ và đánh số thứ tự.
 .
Các component sẽ theo thứ tự có tên như sau:
.
Các component sẽ theo thứ tự có tên như sau:
- Component Title.
- Component Search.
- Component Sort.
- Component Form.
- Component Item.
- Component Item Edit.
- Component ListItem.
- Bước 3.1: Tạo Component Title. Tạo ra 1 file mới tên là Title.js và code bên trong chỉ đơn giản là chứa tiêu đề của project.
import React, {Component} from 'react';

class Title extends Component {
    render() {
        return(
            <div className="page-header">
                <h1>Project 01 - ToDo List <small>ReactJS</small></h1>
            </div>
        )
    }
}

export default Title;
- Bước 3.2: Tạo Component Search. Tạo file mới tên là Search.js để chứa giao diện tìm kiếm của trang.
import React, {Component} from 'react';

class Search extends Component {
    render() {
        return(
            <div className="input-group">
                <input type="text" className="form-control" placeholder="Search item name" />
                <span className="input-group-btn">
                    <button className="btn btn-info" type="button">Clear</button>
                </span>
            </div>
        )
    }
}

export default Search;
- Bước 3.3: Tạo Component Sort. Tạo file mới tên là Sort.js để chứa giao diện sắp xếp của trang.
import React, {Component} from 'react';

class Sort extends Component {
    render() {
        return(
            <div className="dropdown">
                <button className="btn btn-default dropdown-toggle" type="button" data-toggle="dropdown" aria-haspopup="true" aria-expanded="true">
                    Sort by <span className="caret" />
                </button>
                <ul className="dropdown-menu">
                    <li><a role="button">Name ASC</a></li>
                    <li><a role="button">Name DESC</a></li>
                    <li role="separator" className="divider" />
                    <li><a role="button">Level ASC</a></li>
                    <li><a role="button">Level DESC</a></li>
                </ul>
                <span className="label label-success label-medium">NAME - DESC</span>
            </div>
        )
    }
}

export default Sort;
- Bước 3.4: Tạo Component Form. Tạo file mới tên là Form.js để chứa giao diện form thêm sản phẩm.
import React, {Component} from 'react';

class Form extends Component {
    render() {
        return(
            <form className="form-inline">
                <div className="form-group">
                    <input type="text" className="form-control" placeholder="Item Name" />
                </div>
                <div className="form-group">
                    <select className="form-control">
                        <option value={0}>Small</option>
                        <option value={1}>Medium</option>
                        <option value={2}>High</option>
                    </select>
                </div>
                <button type="button" className="btn btn-primary">Submit</button>
                <button type="button" className="btn btn-default">Cancel</button>
            </form>
        )
    }
}

export default Form;
- Bước 3.5: Tạo Component Item Tạo file mới tên là Item.js để chứa giao diện một dòng sản phẩm.
import React, {Component} from 'react';

class Item extends Component {
    render() {
        return(
            <tr>
                <td className="text-center">1</td>
                <td>Tìm thấy mảnh vỡ máy bay rơi ở Iran làm 66 người chết</td>
                <td className="text-center"><span className="label label-danger">High</span></td>
                <td>
                    <button type="button" className="btn btn-warning btn-sm">Edit</button>
                    <button type="button" className="btn btn-danger btn-sm">Delete</button>
                </td>
            </tr>
        )
    }
}

export default Item;
- Bước 3.6: Tạo Component Item Edit Tạo file mới tên là ItemEdit.js để chứa giao diện khi sửa sản phẩm.
import React, {Component} from 'react';

class ItemEdit extends Component {
    render() {
        return(
            <tr>
                <td className="text-center">6</td>
                <td><input type="text" className="form-control" defaultValue="F1 muốn tổ chức giải đua xe tại Việt Nam vào năm 2020" /></td>
                <td className="text-center">
                    <select className="form-control">
                        <option>Small</option>
                        <option>Medium</option>
                        <option>High</option>
                    </select>
                </td>
                <td>
                    <button type="button" className="btn btn-default btn-sm">Cancel</button>
                    <button type="button" className="btn btn-success btn-sm">Save</button>
                </td>
            </tr>
        )
    }
}

export default ItemEdit;
- Bước 3.7: Tạo Component ListItem
import React, {Component} from 'react';

class ListItem extends Component {
    render() {
        return(
                <div className="panel panel-success">
                    <div className="panel-heading">List Item</div>
                    <table className="table table-hover">
                        <thead>
                            <tr>
                                <th style={{ width: '10%' }} className="text-center">#</th>
                                <th>Name</th>
                                <th style={{ width: '15%' }} className="text-center">Level</th>
                                <th style={{ width: '15%' }}>Action</th>
                            </tr>
                        </thead>
                        <tbody>

                        </tbody>
                    </table>
                </div>
                )
               }
           }
      export default ListItem;
- Bước 3.8: Ghép các component . Import Component vào App.js Sau khi đã tách ra các Component riêng biệt, giờ ta chỉ việc import chúng vào lại file App.js và gắn chúng vào vị trí tương ứng trong giao diện. Lưu ý là 2 Component Item và ItemEdit chúng ta chưa import vào vì hiện tại chưa dùng đến.
import React, { Component } from 'react';
import Title from './components/Title';
import Search from './components/Search';
import Sort from './components/Sort';
import Form from './components/Form';
import ListItem from './components/ListItem';

class App extends Component {
    render() {
        return (
            <div className="container">
                <Title />
                <div className="row">
                    <div className="col-xs-4 col-sm-4 col-md-4 col-lg-4">
                        <Search />
                    </div>
                    <div className="col-xs-3 col-sm-3 col-md-3 col-lg-3">
                        <Sort />
                    </div>
                    <div className="col-xs-5 col-sm-5 col-md-5 col-lg-5">
                        <button type="button" className="btn btn-info btn-block marginB10">Add Item</button>
                    </div>
                </div>
                <div className="row marginB10">
                    <div className="col-md-offset-7 col-md-5">
                        <Form />
                    </div>
                </div>
                <ListItem/>
            </div>
        );
    }
}

export default App;
Và kết quả chúng ta đạt được sau khi phân tách thành các component.
 .
.
3. Tạm Kết.
Thưa các bạn, mình đã cùng các bạn bước đầu hình thành cấu trúc thư mục của 1 app trong reatjs, sử dụng 1 template có sẵn rồi phân tách thành các component để dễ quản lý cũng như tránh xung đột. Bài viết cũng khá dài, nên hẹn gặp lại các bạn trong những bài viết tiếp theo của mình. Thân ái, chào tạm biệt các bạn.
All rights reserved
