Hỗ trợ thêm nhiều UI frameworks cho kiến trúc Microfrontend
Hello các bạn lại là mình đâyyyyy 👋
Hôm nay nhân một ngày cuối tuần tươi đẹp ta tiếp tục quay trở lại với series Chập chững làm quen với Microfrontend nhé. Không biết sao dạo này tinh thần viết bài của mình lên cao lắm, đi làm về rảnh là lại muốn tuôn trào 🤣🤣
Ở bài hôm nay ta sẽ cùng nhau tìm hiểu cách để tích hợp thêm nhiều UI Frameworks vào kiến trúc Microfrontend nhé
Vỡ lòng
Như mình có đề cập xuyên suốt series này, một trong những điểm cốt yếu của kiến trúc microfrontend đấy là cần có khả năng cho phép các team dev MFE có sự tự do trong việc chọn tech stack mà họ mạnh nhất, thuần thục nhất, cụ thể là được chọn UI framework mà họ muốn (React, Vue, Angular, ....)
Bên cạnh đó việc support được thêm nhiều framework cũng sẽ giúp cho chúng ta dễ dàng đưa các app sẵn có từ community lên thẳng kiến trúc microfrontend với chỉ vài bước setup (cái này mình thấy khá hay nè, sẽ có ở các bài sau nhé 😉)
Những gì ta sẽ làm: ở bài này ta sẽ bắt đầu với 1 app shell và 3 MFE (react, vue, angular), sau đó ta sẽ thêm support cho 3 UI Frameworks + 1 UI Function nhé
Cầm chèo và lên thuyền với mình thôiiiiii ⛵⛵⛵⛵⛵
Setup
Đầu tiên các bạn clone source code của mình ở đây nhé: https://github.com/maitrungduc1410/viblo-mfe-multi-frameworks
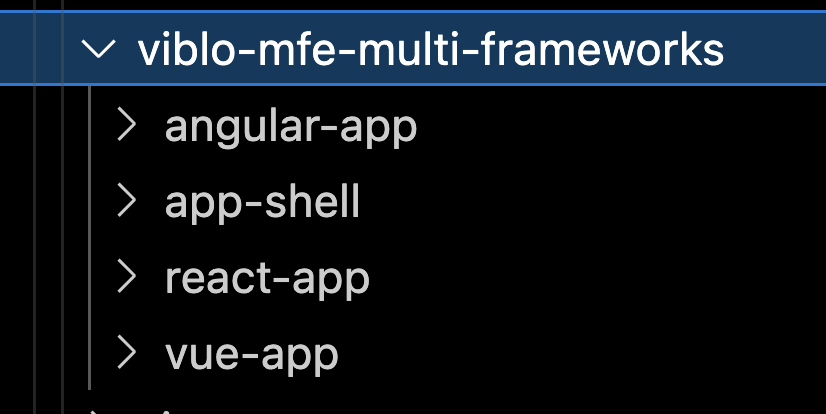
Sau khi clone về ta có như sau:
Tiếp đó các bạn chạy npm install ở từng folder. Oke thì ta start tất cả chúng lên nhé:
# angular-app
npm start

# app-shell
npm start

# react-app
npm run dev

# vue-app (chạy 2 command sau lần lượt)
npm run build
npm run preview
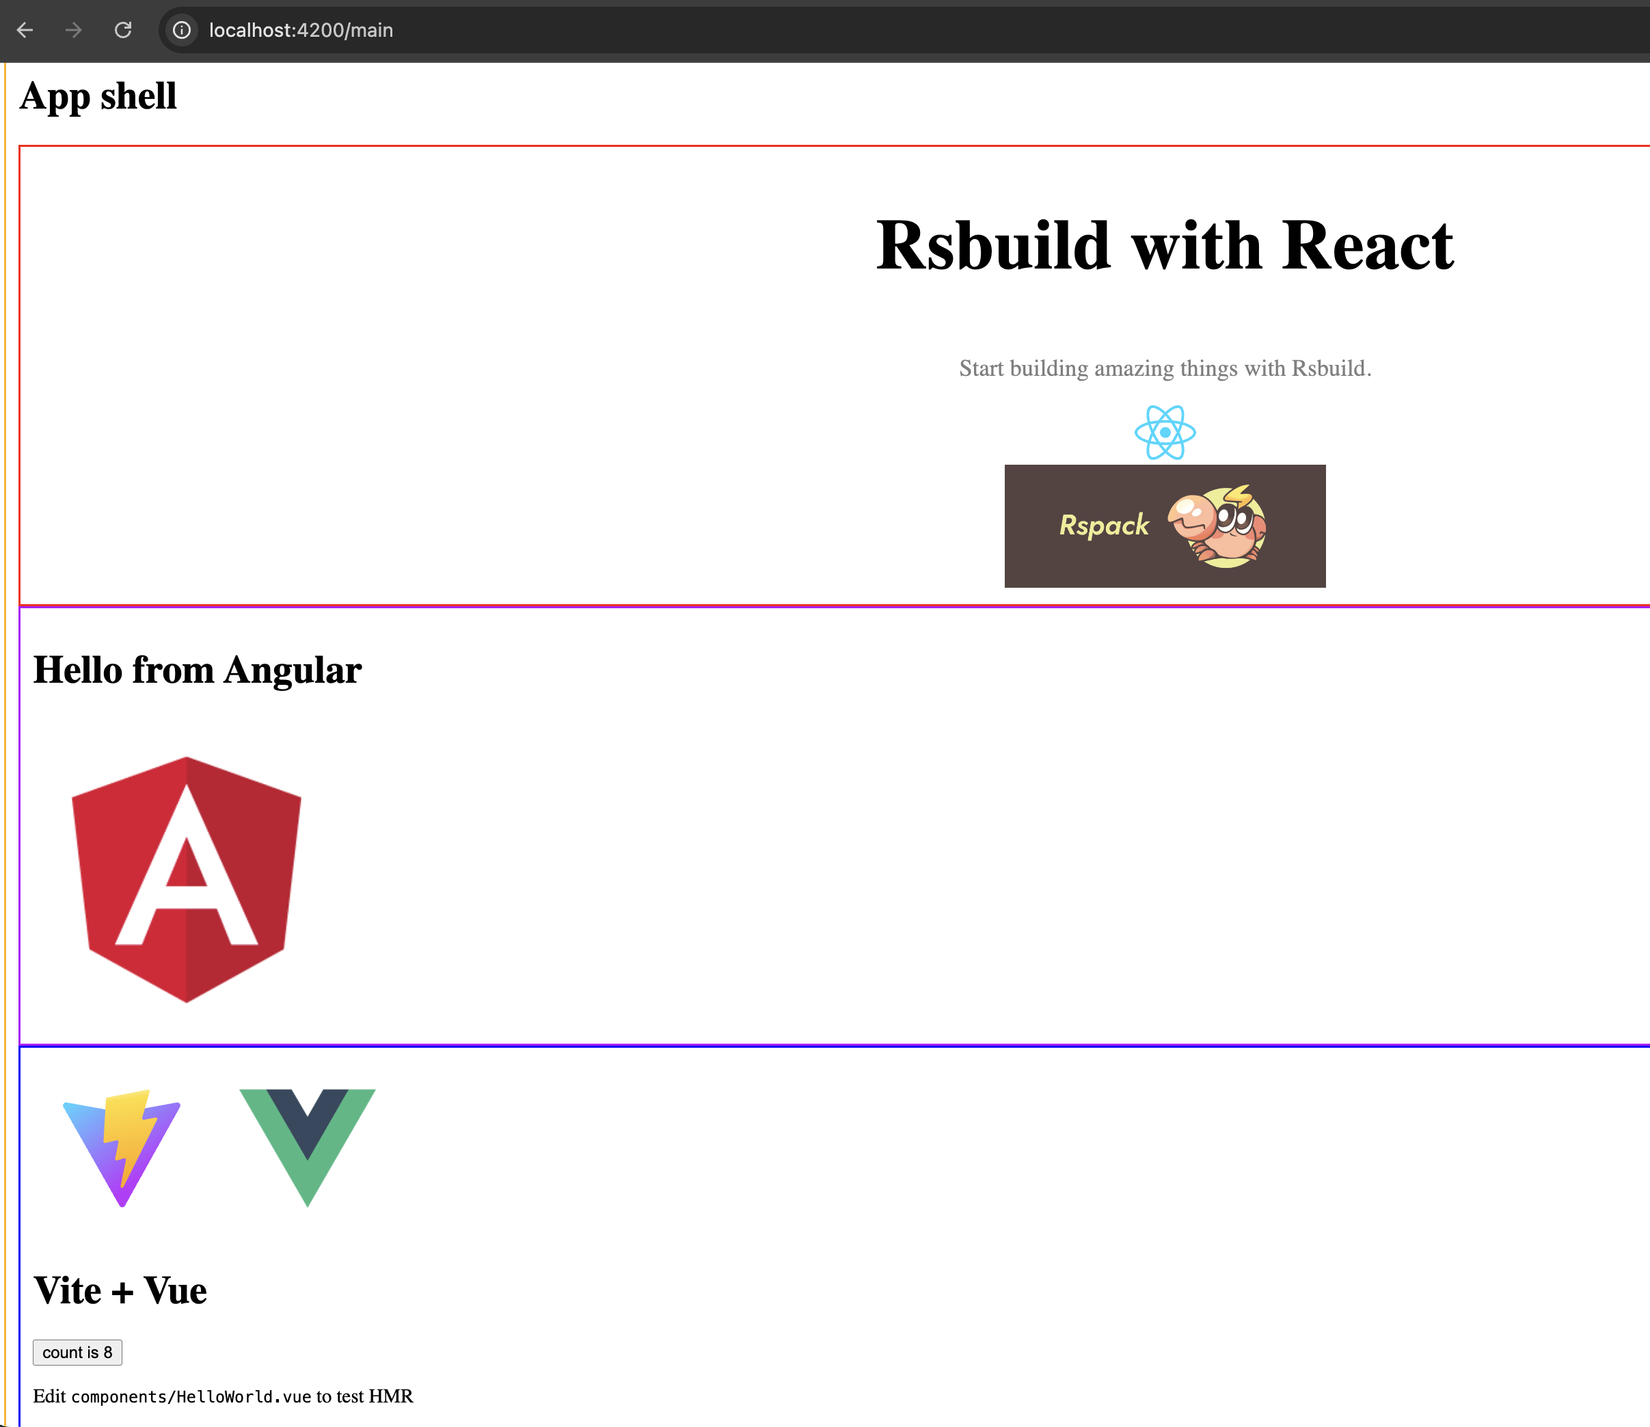
Cuối cùng là ta mở app-shell ở địa chỉ http://localhost:4200, login với user user/user, kiểm tra xem cả 3 MFE đã lên chưa nhé:
Giờ ta vô phần chính thôi nàoooooo 😎
Preact
Đầu tiên ta sẽ làm với Preact nhé, giới thiệu qua chút, thì Preact (https://preactjs.com/) là bản "minify" của React, cực nhẹ nhưng vẫn có đầy đủ các tính năng cơ bản (state, hook, context,...) 👍️👍️
Ở đây ta sẽ chọn https://module-federation.io/ cho tiện nhé (bên dưới nó dùng rsbuild/rspack làm bundler). Làm theo Getting started của họ ta tạo project mới nha.
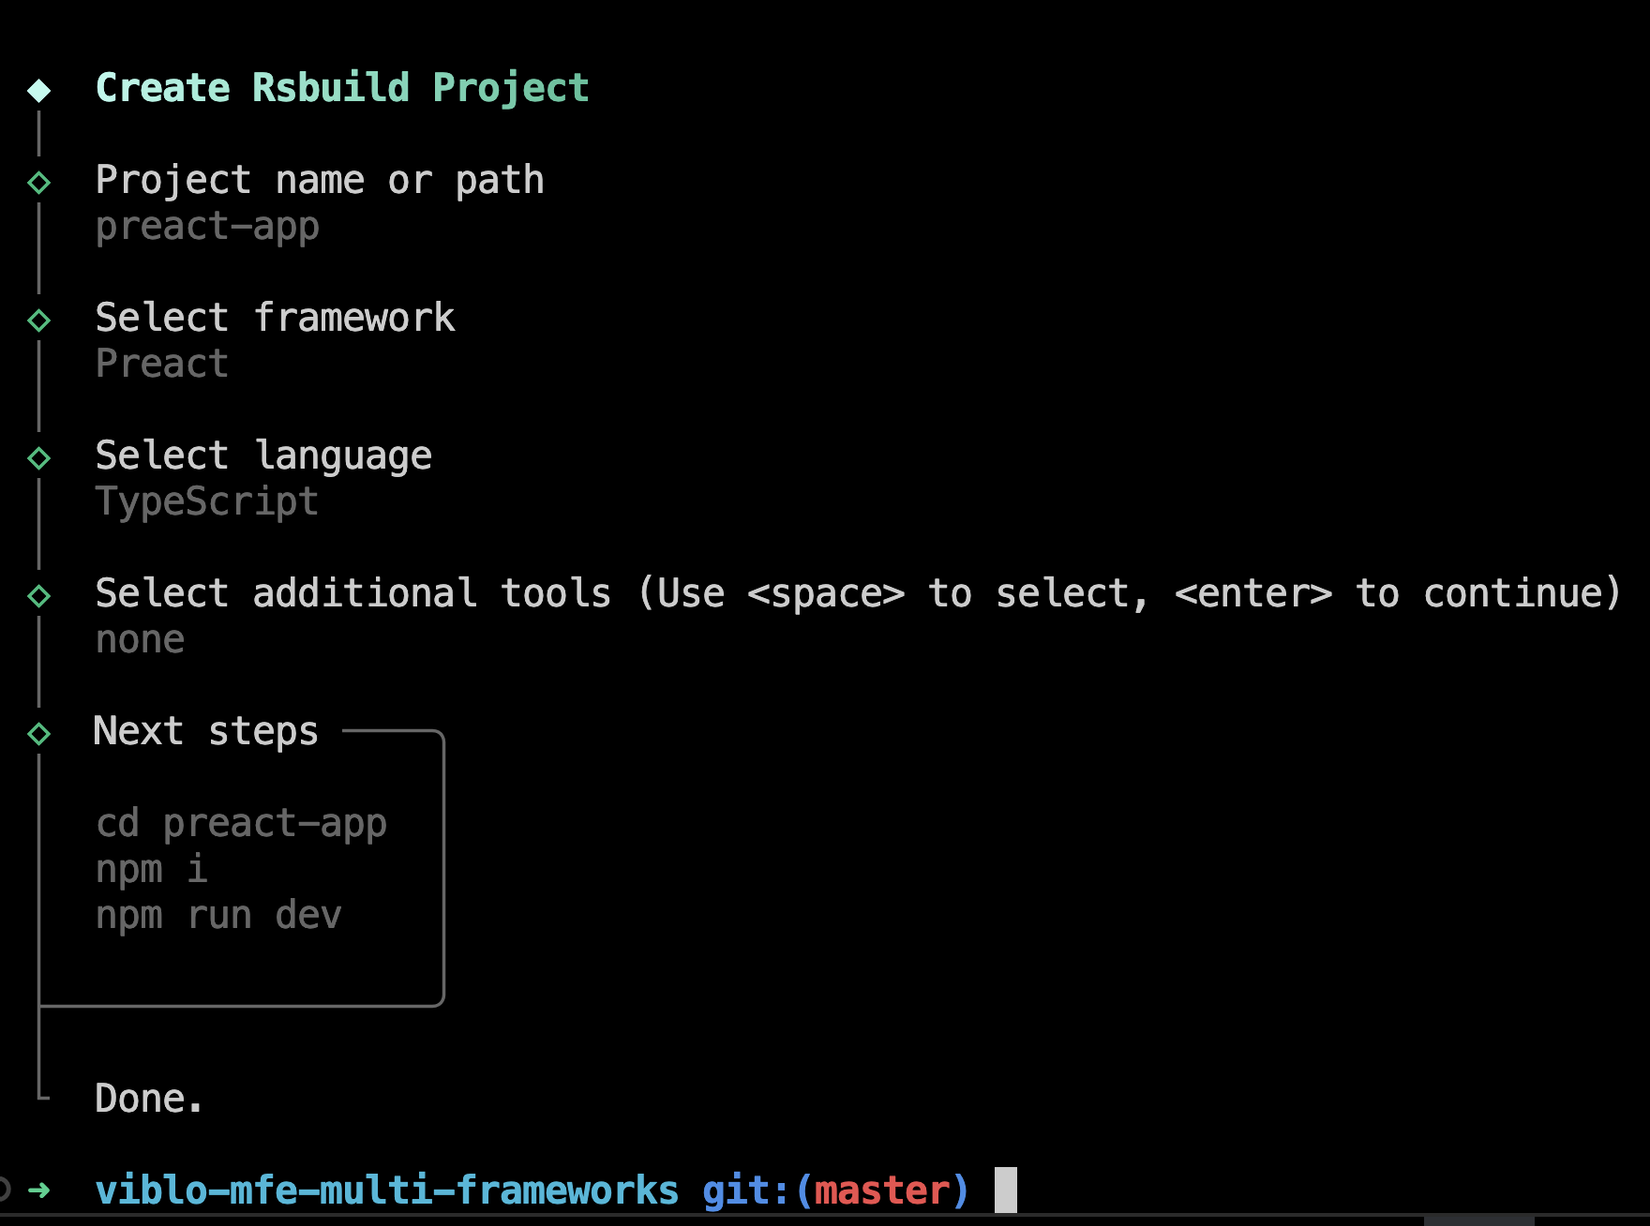
Ở trong folder làm việc hiện tại viblo-mfe-multi-frameworks, các bạn chạy command sau (đặt tên project là preact-app nhé):
npm create rsbuild@latest
Các options ta chọn như sau:
Tạo xong thì ta chạy npm install ở folder mới tạo preact-app nhé:
npm i
Tiếp theo ta cài package này để build app preact thành MFE nhé:
npm add @module-federation/enhanced
Tiếp theo ta tạo file preact-app/src/bootstrap.tsx, copy content từ file index.tsx sang:
import { render } from 'preact';
import App from './App';

const root = document.getElementById('root');
if (root) {
  render(<App />, root);
}
Sau đó ở file index.tsx ta update thành:
import('./bootstrap');
Tiếp theo, như các framework khác, ta tạo file preact-app/src/loader.ts:
import App from './App.tsx';

export default {
  framework: 'preact',
  component: App
}
Cuối cùng là ta update file rsbuild.config.ts để cấu hình module federation nha:
import { defineConfig } from '@rsbuild/core';
import { pluginPreact } from '@rsbuild/plugin-preact';
import { ModuleFederationPlugin } from "@module-federation/enhanced/rspack";

export default defineConfig({
  plugins: [pluginPreact()],
  server: {
    port: 3004,
  },
  dev: {
    assetPrefix: true,
  },
  tools: {
    rspack: {
      output: {
        uniqueName: "preact_mfe_app", // cái này phải unique cho mỗi mfe nhé
      },
      plugins: [
        new ModuleFederationPlugin({
          name: "preact_mfe_app",
          exposes: {
            PreactAppLoader: "./src/loader.ts",
          },
          shared: {
            preact: {
              singleton: true,
            },
          },
          filename: "remoteEntry.js",
        }),
      ],
    },
  },
});
Âu cây, tiếp theo giờ tới phần code thêm để support cho Preact ở phía app-shell
Nếu ta để ý, thì cứ với mỗi 1 framework mà app-shell support, thì ta cần có 1 "wrapper component" để ở app-shell:
Bên trong mỗi 1 wrapper component thì ta sẽ dùng API của framework đó, ví dụ React, để render ra cái component đó, thực hiện mounting/unmounting
Ta cùng phân tích những gì ta đang làm với 1 wrapper hiện tại nha, ví dụ React nhé:
import { Component, ElementRef, Input } from '@angular/core';
import { createElement } from 'react';
import { Root, createRoot } from 'react-dom/client';

@Component({
  selector: 'app-react-wrapper',
  templateUrl: './react-wrapper.component.html',
  styleUrls: ['./react-wrapper.component.scss'],
})
export class ReactWrapperComponent {
  @Input() component: any;
  root!: Root;

  constructor(private readonly host: ElementRef) {}

  ngAfterViewInit() {
    this.root = createRoot(this.host.nativeElement);
    this.root.render(createElement(this.component));
  }

  ngOnDestroy() {
    this.root.unmount()
  }
}
Ở đây, wrapper component của ta là ReactWrapperComponent (code Angular), khi render thì nó sẽ cho ra thẻ app-react-wrapper, file view html rỗng, vì ta không cần gì ở đây cả, toàn bộ view sẽ là của component
Ta cần chú ý tới cái host.nativeElement nó trỏ về thẻ app-react-wrapper, và ta sẽ dùng cái thẻ này như kiểu cái <div id="root"> ấy:
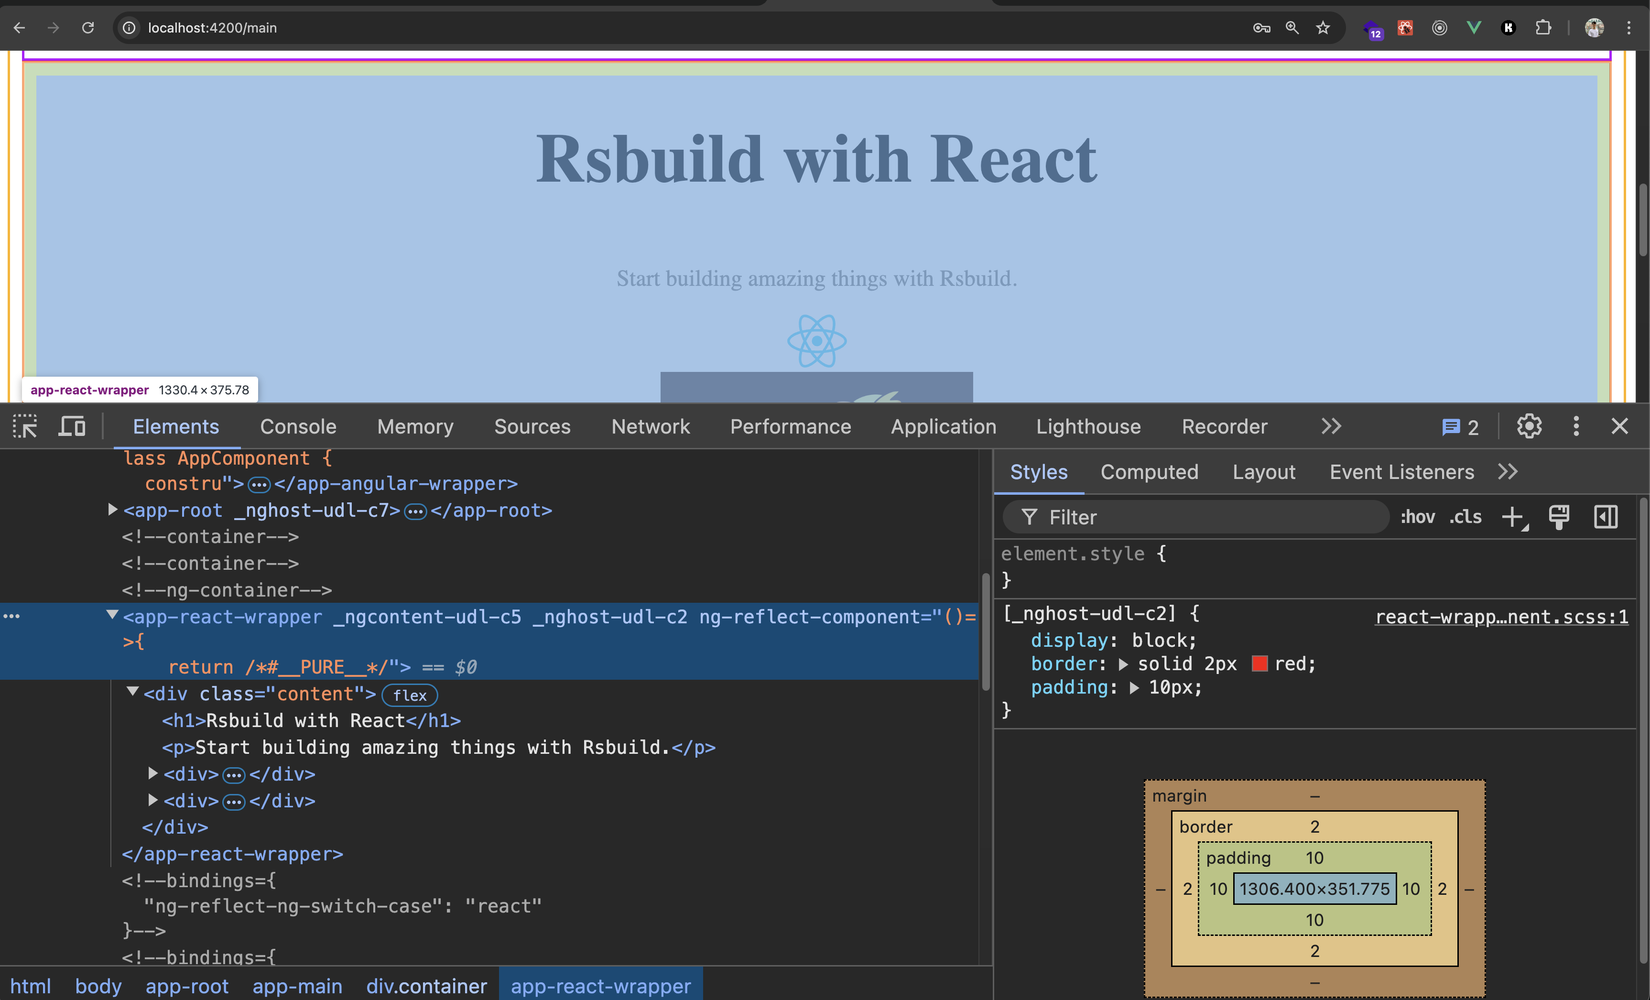
Ở ngAfterViewInit (lifecycle hook gọi khi view .html của Angular component được init xong), ở đó ta dùng API của React như bình thường, và phía ngOnDestroy thì ta unmount
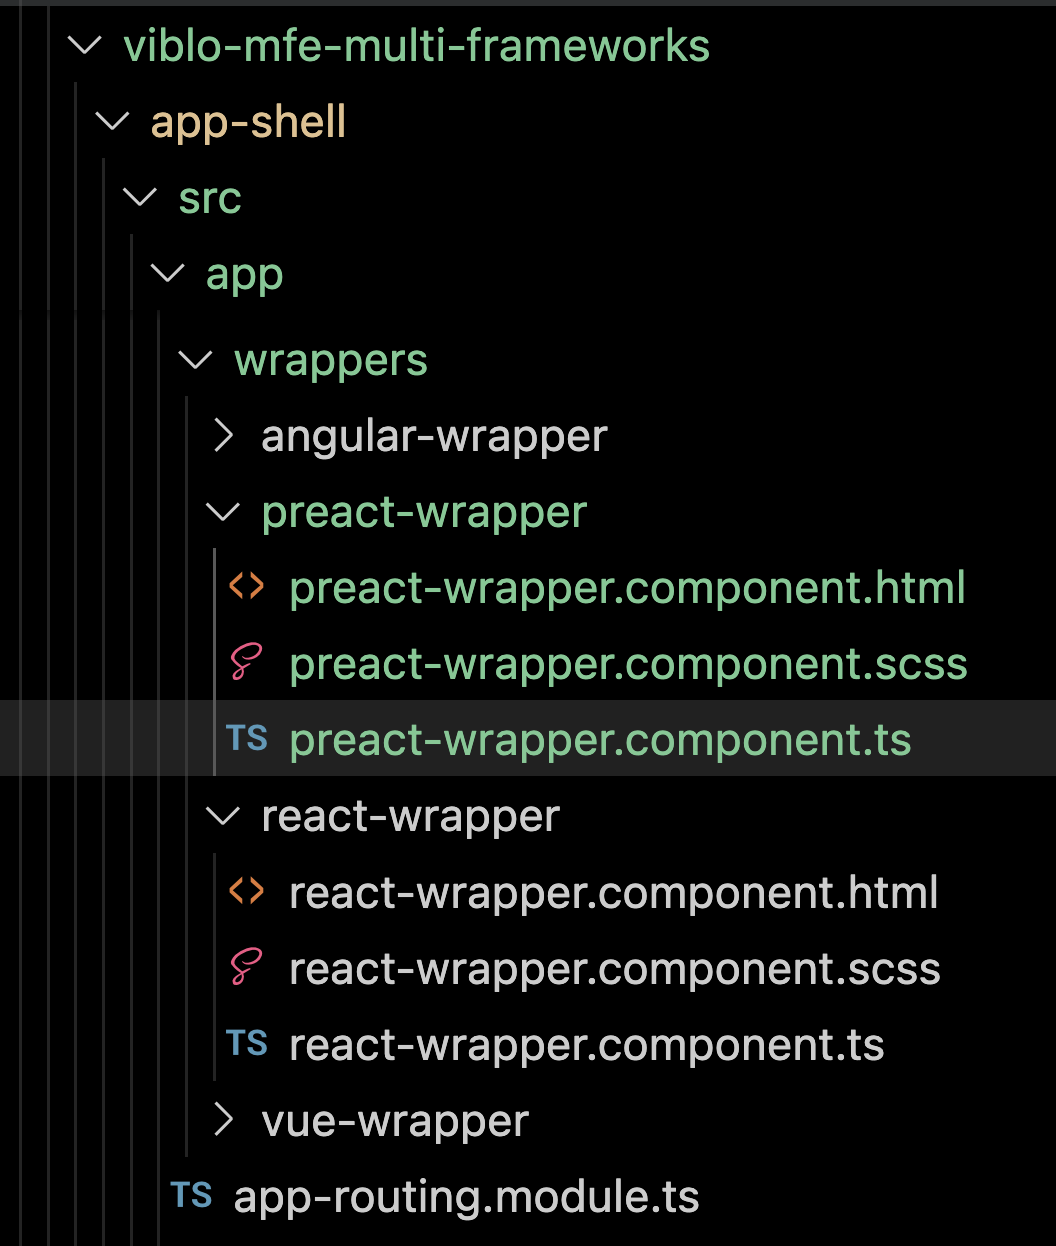
Với ý tưởng tương tự ta cũng sẽ tạo 1 cái wrapper cho Preact nhé, trong folder wrappers các bạn tạo thêm cho mình 1 folder preact-wrapper, trong đó ta có 3 file: react-wrapper.component.html, react-wrapper.component.ts, react-wrapper.component.scss
File .html thì ta không cần làm gì nên để trống, file .scss thì sửa như sau:
:host {
  display: block;
  border: solid 2px green;
  padding: 10px;
}
File .ts thì ta làm như bên React, nhưng dùng API của Preact, cụ thể ý tưởng thì chính là lấy từ file preact-app/src/bootstrap.tsx, có sửa đôi chút:
import { Component, ElementRef, Input } from '@angular/core';
import { render } from 'preact';

@Component({
  selector: 'app-preact-wrapper',
  templateUrl: './preact-wrapper.component.html',
  styleUrls: ['./preact-wrapper.component.scss'],
})
export class PreactWrapperComponent {
  @Input() component: any;

  constructor(private readonly host: ElementRef) {}

  ngAfterViewInit() {
    render(this.component, this.host.nativeElement);
  }

  ngOnDestroy() {
    render(null, this.host.nativeElement);
  }
}
Code cực đơn giản, mình lấy từ API của Preact hết nhé: https://preactjs.com/guide/v10/api-reference/
Tiếp theo ta cần install preact vào app-shell
npm i preact
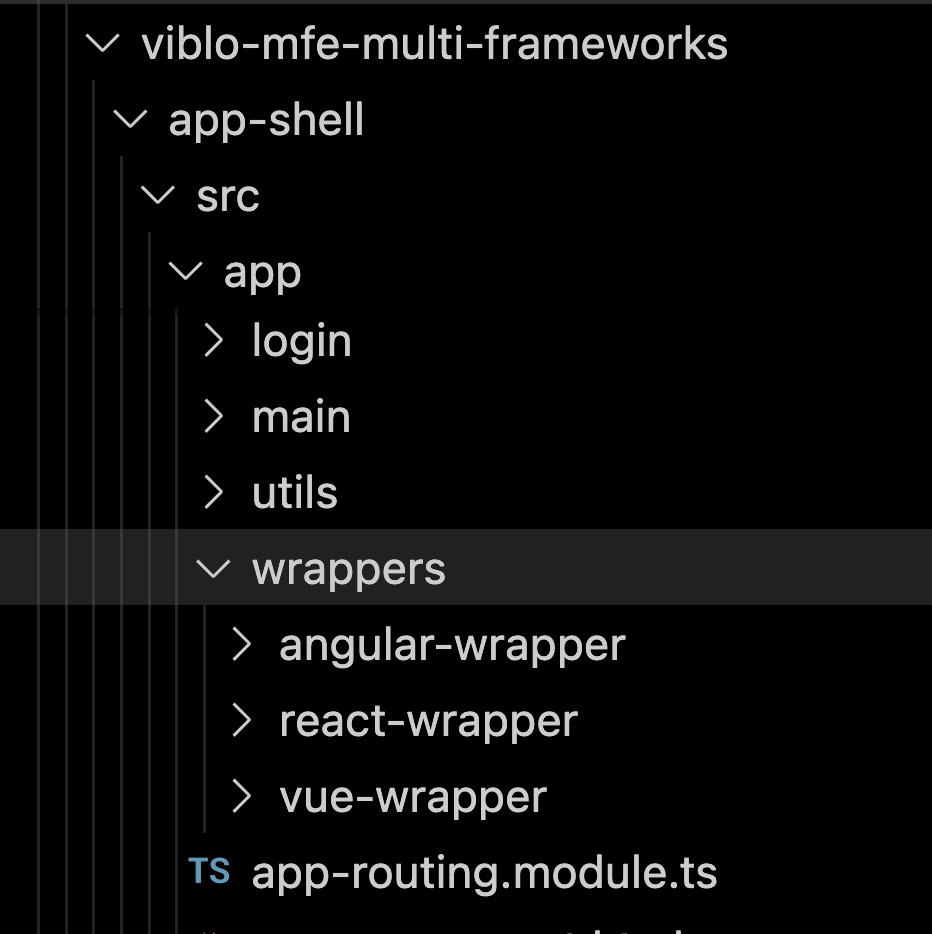
Sau khi làm xong các bước trên thì folder wrappers của ta trông như sau:
Giờ ta quay trở lại file app-shell/src/app/app.module.ts và khai báo cái wrapper mới này vào declarations nhé (cái này nó là quy chuẩn của Angular 😁)
import { NgModule } from '@angular/core';
import { BrowserModule } from '@angular/platform-browser';

import { AppRoutingModule } from './app-routing.module';
import { AppComponent } from './app.component';
import { LoginComponent } from './login/login.component';
import { FormsModule } from '@angular/forms';
import { MainComponent } from './main/main.component';
import { ReactWrapperComponent } from './wrappers/react-wrapper/react-wrapper.component';
import { VueWrapperComponent } from './wrappers/vue-wrapper/vue-wrapper.component';
import { AngularWrapperComponent } from './wrappers/angular-wrapper/angular-wrapper.component';
import { PreactWrapperComponent } from './wrappers/preact-wrapper/preact-wrapper.component';

@NgModule({
  declarations: [
    AppComponent,
    LoginComponent,
    MainComponent,
    ReactWrapperComponent,
    VueWrapperComponent,
    AngularWrapperComponent,
    PreactWrapperComponent
  ],
  imports: [
    BrowserModule,
    AppRoutingModule,
    FormsModule
  ],
  providers: [],
  bootstrap: [AppComponent]
})
export class AppModule { }
Tiếp theo ở file app-shell/webpack.config.js, ta khai báo thêm preact vào shared dependencies nhé:
//........

     shared: {
        '@angular/core': { eager: true, singleton: true },
        '@angular/common': { eager: true, singleton: true },
        '@angular/router': { eager: true, singleton: true },
        vue: {
          eager: true,
          singleton: true,
        },
        react: {
          eager: true,
          singleton: true,
          requiredVersion: deps.react,
        },
        'react-dom/client': {
          eager: true,
          singleton: true,
          requiredVersion: deps['react-dom'],
        },
        preact: { // Thêm vào đây <<<<--------
          eager: true,
          singleton: true,
        },
      },
Chỗ này này ý của ta là app-shell và các MFE sẽ dùng chung share 1 phiên bản preact (đề phòng trường hợp app shell 1 version, MFE lại nhiều version), và ta eager load luôn, tức là khi app-shell nó chạy lên thì preact cũng sẽ được load sẵn ở đó
Mấy cái này mình sẽ nói cụ thể ở các bài sau nhé 😉
Sửa xong thì ta cần restart lại app-shell nhé, các bạn đóng terminal và chạy lại:
npm start
Cuối cùng là ta sửa file app-shell/src/app/main/main.component.html thêm vào 1 cái case nữa cho preact:
Login as: {{ appService.loggedUser?.username }}
<button (click)="logout()">Logout</button>
<hr />
<div class="container">
  <h1>App shell</h1>
  <ng-container #comp *ngFor="let item of loaders" [ngSwitch]="item.framework">
    <app-react-wrapper
      *ngSwitchCase="'react'"
      [component]="item.component"
    ></app-react-wrapper>
    <app-vue-wrapper
      *ngSwitchCase="'vue'"
      [component]="item.component"
    ></app-vue-wrapper>
    <app-preact-wrapper
      *ngSwitchCase="'preact'"
      [component]="item.component"
    ></app-preact-wrapper>
    <app-angular-wrapper
      *ngSwitchDefault
      [component]="item.component"
    ></app-angular-wrapper>
  </ng-container>
</div>
À ta còn cần khai báo thêm địa chỉ của preact ở app-shell/src/app/app.service.ts nữa nhỉ 😝:
const remoteModules = [
  {
    remoteEntry: 'http://localhost:3001/remoteEntry.js',
    remoteName: 'angular_mfe_app',
    exposedModule: 'AngularAppLoader',
  },
  {
    remoteEntry: 'http://localhost:3002/remoteEntry.js',
    remoteName: 'react_mfe_app',
    exposedModule: 'ReactAppLoader',
  },
  {
    remoteEntry: 'vite:http://localhost:3003/assets/remoteEntry.js',
    remoteName: 'vue_mfe_app',
    exposedModule: 'VueAppLoader',
  },
  {
    remoteEntry: 'http://localhost:3004/remoteEntry.js',
    remoteName: 'preact_mfe_app',
    exposedModule: 'PreactAppLoader',
  },
];
Âu cây ngon rồi, ta F5 lại app-shell rồi login nhé:
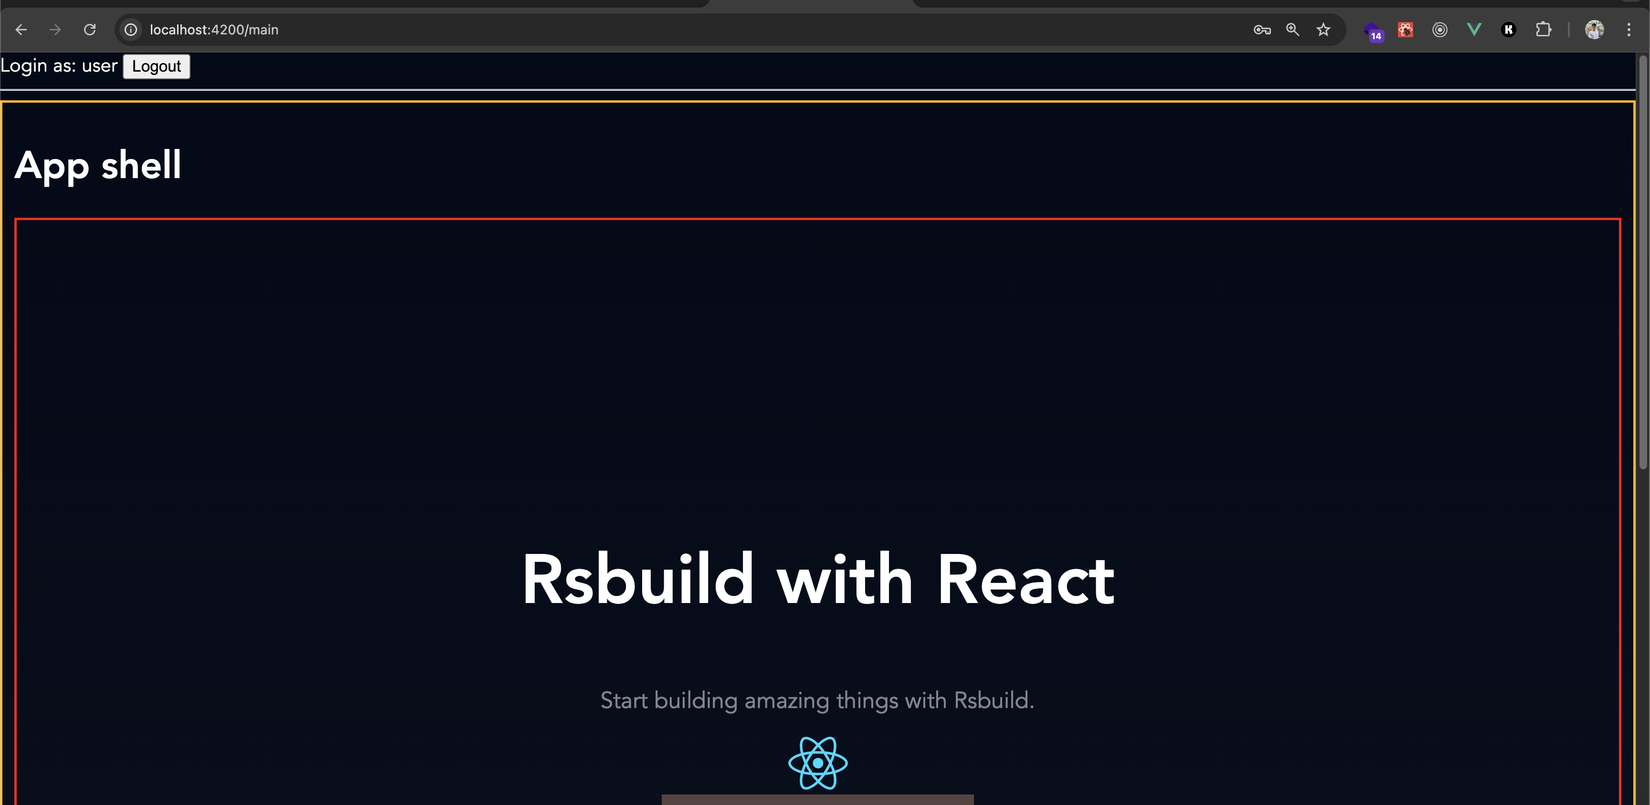
Ầu, cả cái app-shell màu đen kịt, lý do là vì ở Preact ta có CSS global, ta update file preact-app/src/App.css như sau nhé:
/* body {
  margin: 0;
  color: #fff;
  font-family: Inter, Avenir, Helvetica, Arial, sans-serif;
  background-image: linear-gradient(to bottom, #020917, #101725);
} */

.content {
  display: flex;
  /* min-height: 100vh; */
  line-height: 1.1;
  text-align: center;
  flex-direction: column;
  justify-content: center;
}

.content h1 {
  font-size: 3.6rem;
  font-weight: 700;
}

.content p {
  font-size: 1.2rem;
  font-weight: 400;
  opacity: 0.5;
}
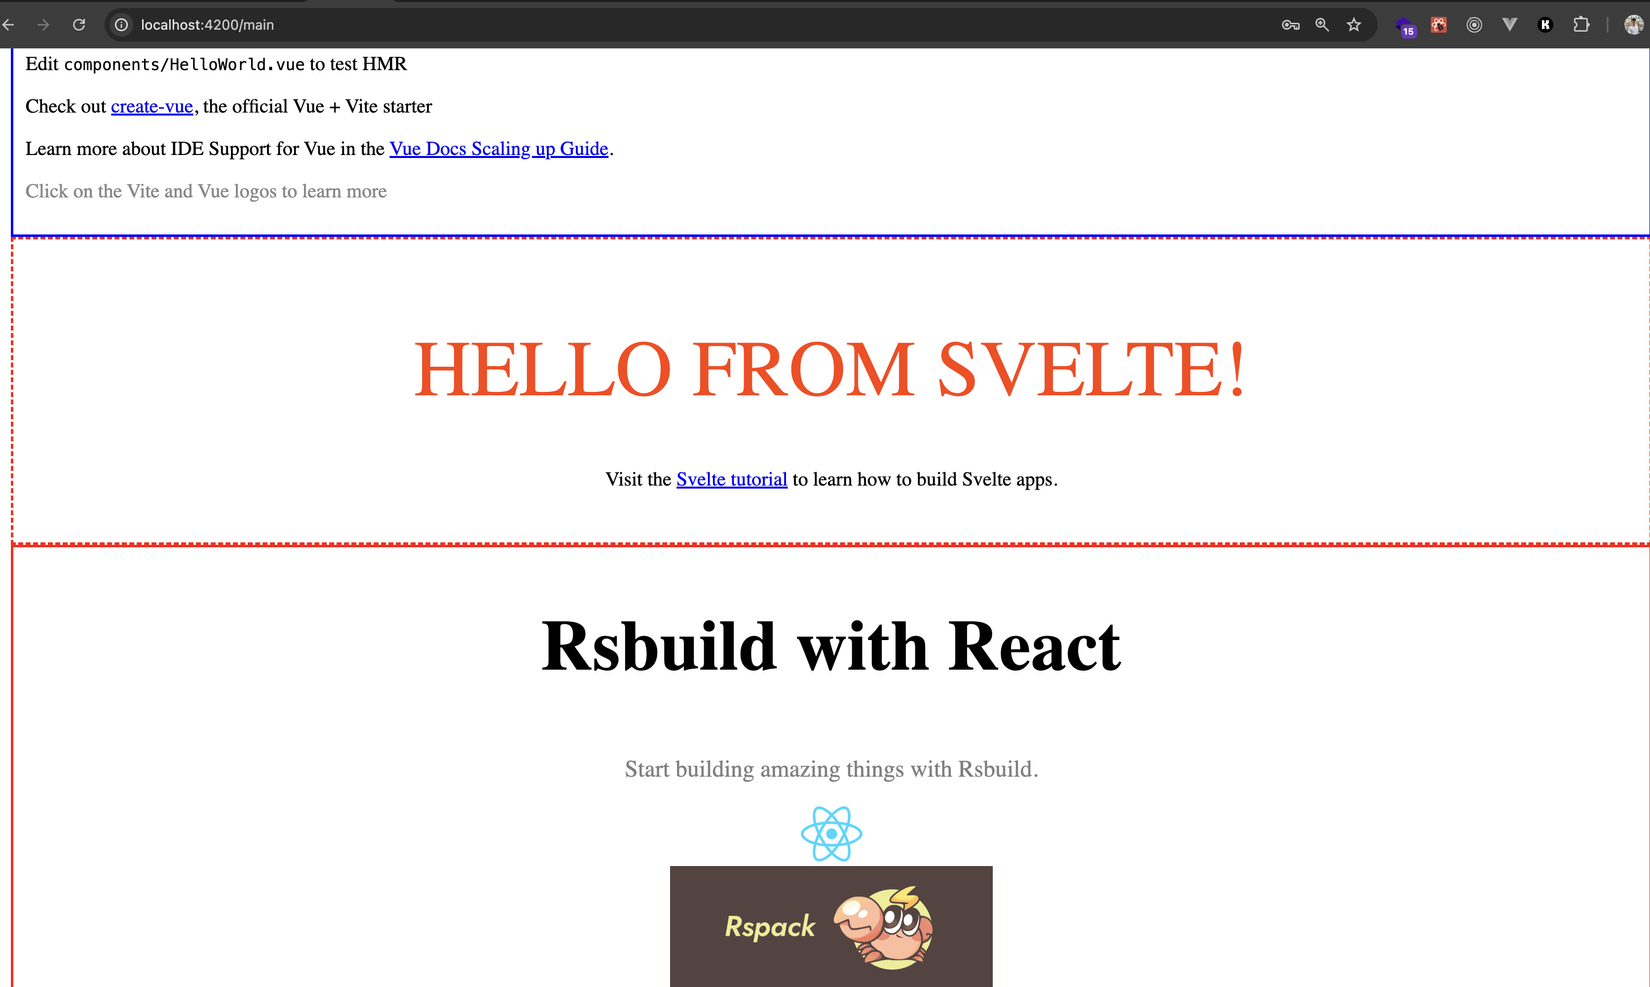
Sau đó quay lại app-shell F5 lần nữa xem nha:
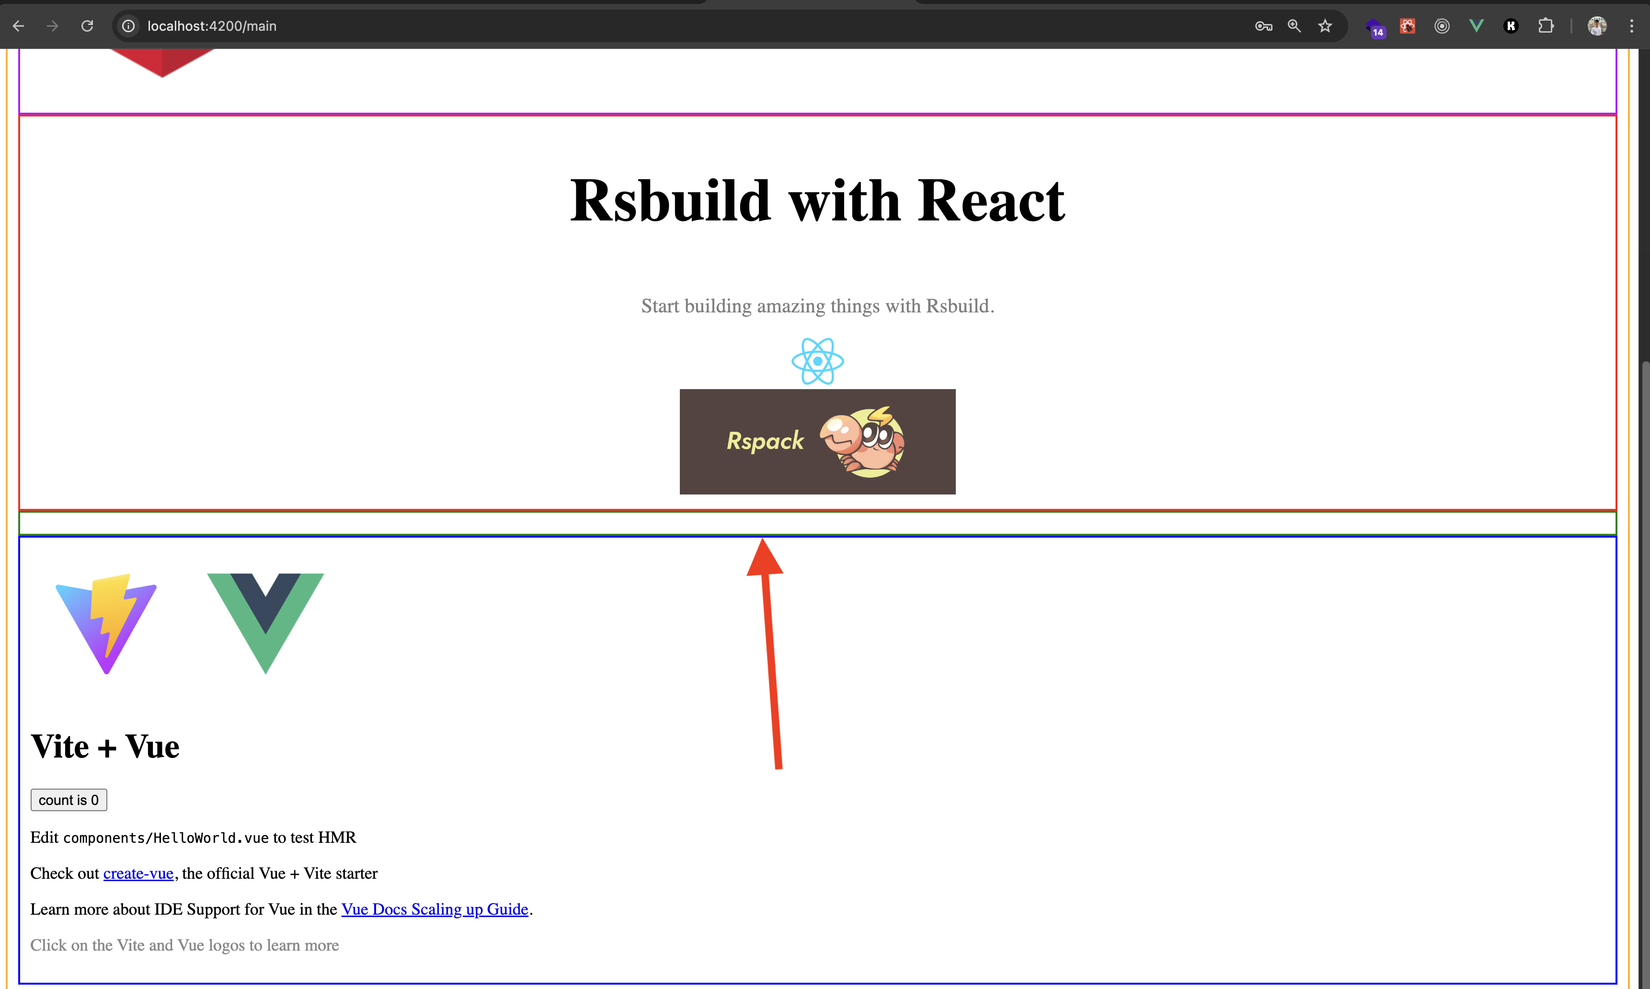
Ủa ủa?????? Preact đâu??????? thấy cái green border lên rồi hây mà sao lại không thấy đâu????? 🧐🧐
Nếu ta kiểm tra lại bên React ReactWrapperComponent thì các bạn để ý rằng mình đang dùng createElement, lí do là vì hiện tại app-shell của ta (dùng Webpack) có cấu hình Babel để nó transform code từ dạng mà ta hay thấy trong các project thường:
// code ta hay thấy
this.root.render(this.component);

// Sau khi Babel transform
this.root.render(createElement(this.component));
Và vì với app-shell nó chỉ quan tâm mỗi cái root component nên mình cũng ko muốn cài và cấu hình babel vào làm chi cho nặng + rắc rối thêm mà dùng trực tiếp API của React
Vậy giờ ta cũng làm tương tự cho phía Preact nhé ta update lại PreactWrapperComponent như sau nha:
import { Component, ElementRef, Input } from '@angular/core';
import { render, h } from 'preact';

@Component({
  selector: 'app-preact-wrapper',
  templateUrl: './preact-wrapper.component.html',
  styleUrls: ['./preact-wrapper.component.scss'],
})
export class PreactWrapperComponent {
  @Input() component: any;

  constructor(private readonly host: ElementRef) {}

  ngAfterViewInit() {
    render(h(this.component, {}), this.host.nativeElement);
  }

  ngOnDestroy() {
    render(null, this.host.nativeElement);
  }
}
Ở trên thì ý tưởng + cách gọi là y như bên React, chỉ khác cái là ta dùng h (Preact nó cũng có createElement hoạt động y hệt nhưng docs lại hay dùng h hơn nên ta follow thôi 😂)
Cái tham số thứ 2 của
hlà rootProps, cái này hiện tại ta để empty object nhé, sẽ nói kĩ hơn ở bài giao tiếp trong kiến trúc MFE nhé
Giờ ta lưu lại app-shell, F5 login vàaaaaaaaaa:
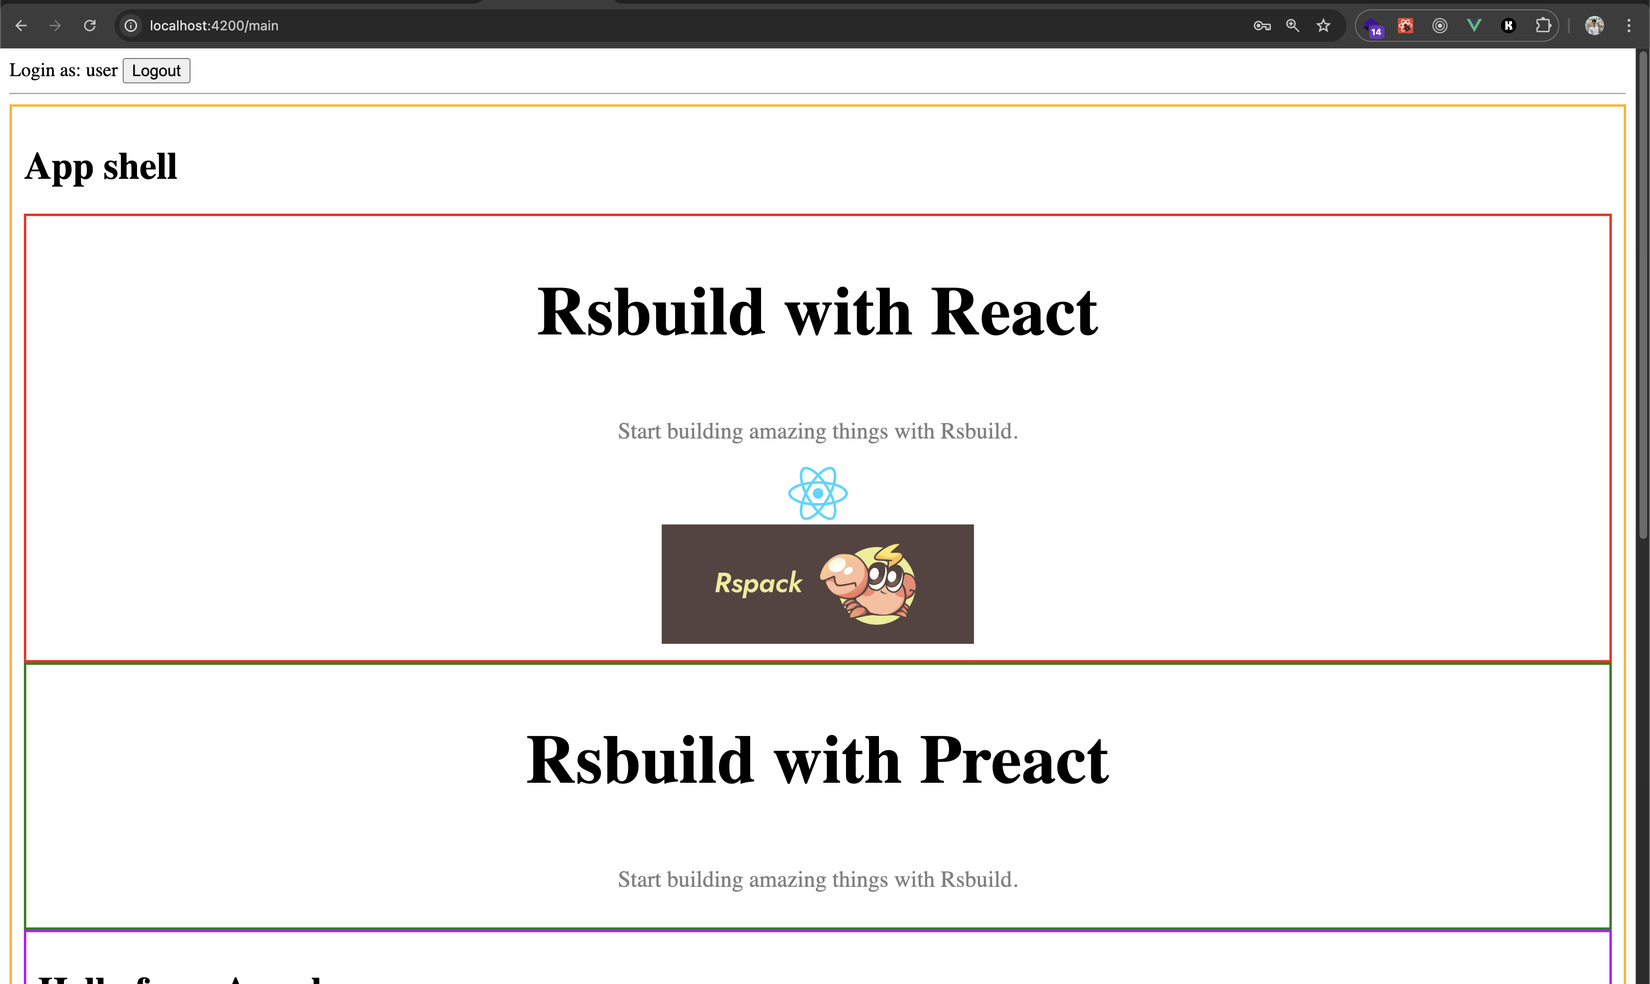
Pòm pòm chíu chíu 🎉🎉 Lên roàiiiiiii
Nếu các bạn để ý thì việc support thêm framework cho kiến trúc MFE cũng không quá khó nhỉ, tổ chức theo kiểu wrapper này thì ta cứ thế scale lên, thêm framework thì thêm wrapper
Ta đi tiếp xem với những framework khác bundler khác thì có gì khác không nha 💪
Svelte
Ở đây mình biết là hiện tại có thể chạy Svelte với Vite/Rsbuild, nhưng ta sẽ thử config nó với Webpack xem nhé. Và để cho đơn giản ta dùng luôn cái template này của Svelte nha: https://github.com/sveltejs/template-webpack
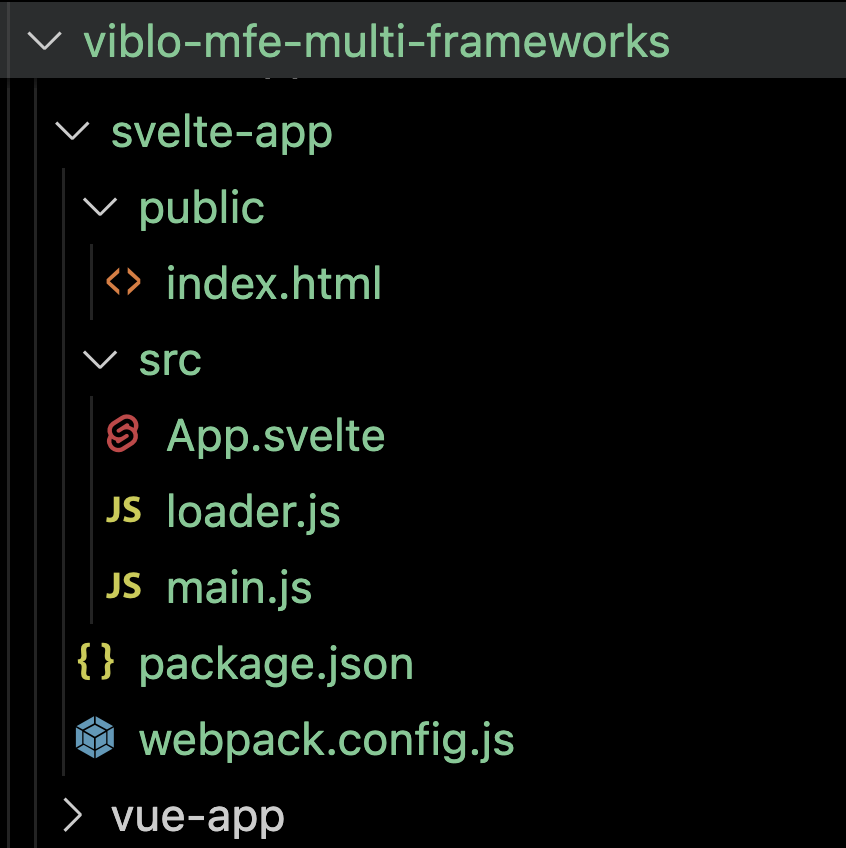
Mình sẽ tạo từng bước một cho các bạn dễ hiểu nhé. Đầu tiên là ta thêm 1 folder nữa ở root folder project svelte-app
Bên trong đó ta tạo folder public và để ở đó file index.html:
<!DOCTYPE html>
<html lang="en">
<head>
	<meta charset='utf-8'>
	<meta name='viewport' content='width=device-width,initial-scale=1'>

	<title>Svelte app</title>

	<script defer src='/build/bundle.js'></script>
</head>

<body>
</body>
</html>
Tiếp đó vẫn ở svelte-app ta tạo folder src, trong đó ta tạo lần lượt 3 file: App.svelte, main.js, loader.js, với nội dung như sau:
<script>
	export let name = "Svelte";
</script>

<main>
	<h1>Hello from {name}!</h1>
	<p>Visit the <a href="https://svelte.dev/tutorial">Svelte tutorial</a> to learn how to build Svelte apps.</p>
</main>

<style>
	main {
		text-align: center;
		padding: 1em;
		max-width: 240px;
		margin: 0 auto;
	}

	h1 {
		color: #ff3e00;
		text-transform: uppercase;
		font-size: 4em;
		font-weight: 100;
	}

	@media (min-width: 640px) {
		main {
			max-width: none;
		}
	}
</style>
import App from "./App.svelte";

const app = new App({
  target: document.body,
});

export default app;
import App from './App.svelte';

export default {
  framework: 'svelte',
  component: App
}
Và vẫn ở svelte-app ta tạo 2 file package.json, webpack.config.js với nội dung như sau:
{
  "name": "svelte-app",
  "version": "1.0.0",
  "devDependencies": {
    "cross-env": "^7.0.3",
    "svelte": "^4.0.0",
    "svelte-loader": "^3.1.9",
    "webpack": "^5.70.0",
    "webpack-cli": "^5.1.4",
    "webpack-dev-server": "^4.15.1"
  },
  "scripts": {
    "build": "cross-env NODE_ENV=production webpack",
    "dev": "webpack serve"
  }
}
const path = require("path");
const { ModuleFederationPlugin } = require("webpack").container;

const mode = process.env.NODE_ENV || "development";
const prod = mode === "production";

/** @type {import('webpack').Configuration} */
module.exports = {
  entry: {
    "build/bundle": ["./src/main.js"],
  },
  resolve: {
    alias: {
      svelte: path.resolve("node_modules", "svelte/src/runtime"),
    },
    extensions: [".mjs", ".js", ".svelte"],
    mainFields: ["svelte", "browser", "module", "main"],
    conditionNames: ["svelte", "browser"],
  },
  output: {
    path: path.join(__dirname, "/public"),
    filename: "[name].js",
    chunkFilename: "[name].[id].js",
  },
  module: {
    rules: [
      {
        test: /\.svelte$/,
        use: {
          loader: "svelte-loader",
          options: {
            compilerOptions: {
              dev: !prod,
            },
            emitCss: prod,
            hotReload: !prod,
          },
        },
      },
    ],
  },
  mode,
  devtool: prod ? false : "source-map",
  devServer: {
    hot: true,
    static: {
      directory: path.join(__dirname, "public"),
    },
    port: 3005,
  },
  plugins: [
    new ModuleFederationPlugin({
      name: "svelte_mfe_app",
      filename: "remoteEntry.js",
      exposes: {
        SvelteAppLoader: "./src/loader.js",
      },
      shared: {
        svelte: { singleton: true },
      },
    }),
  ],
};
Xong xuôi hết thì ta có như sau:
Giờ ta install dependencies cho svelte-app nhé:
npm i
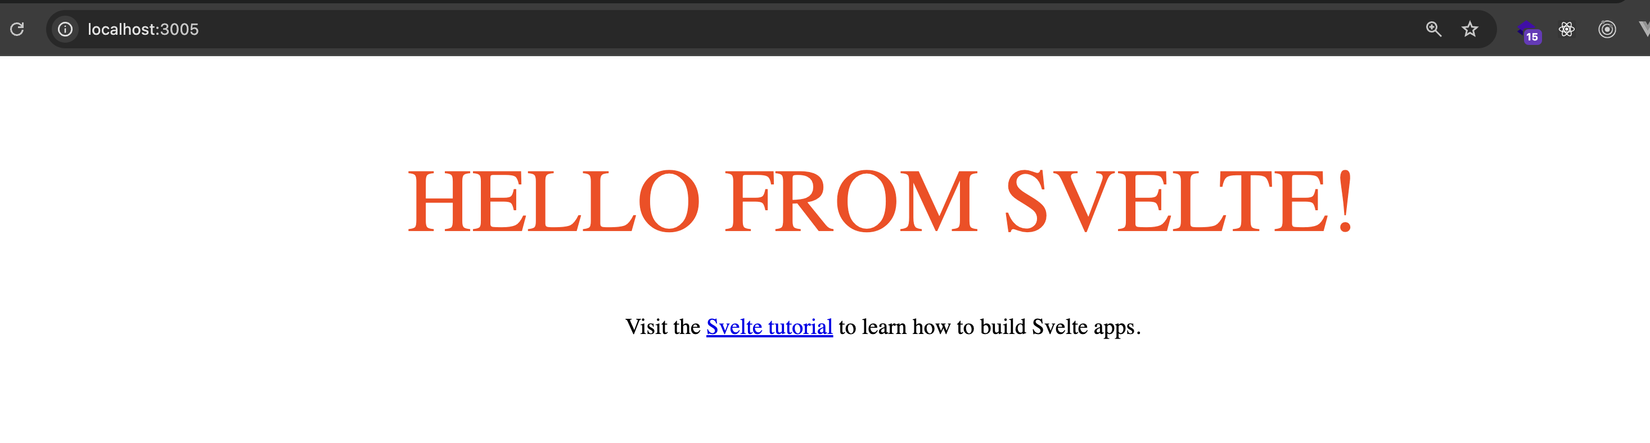
Sau đó ta start svelte lên:
npm run dev
Sau đó mở trình duyệt ở http://localhost:3005 và thấy như sau là oke nhé:
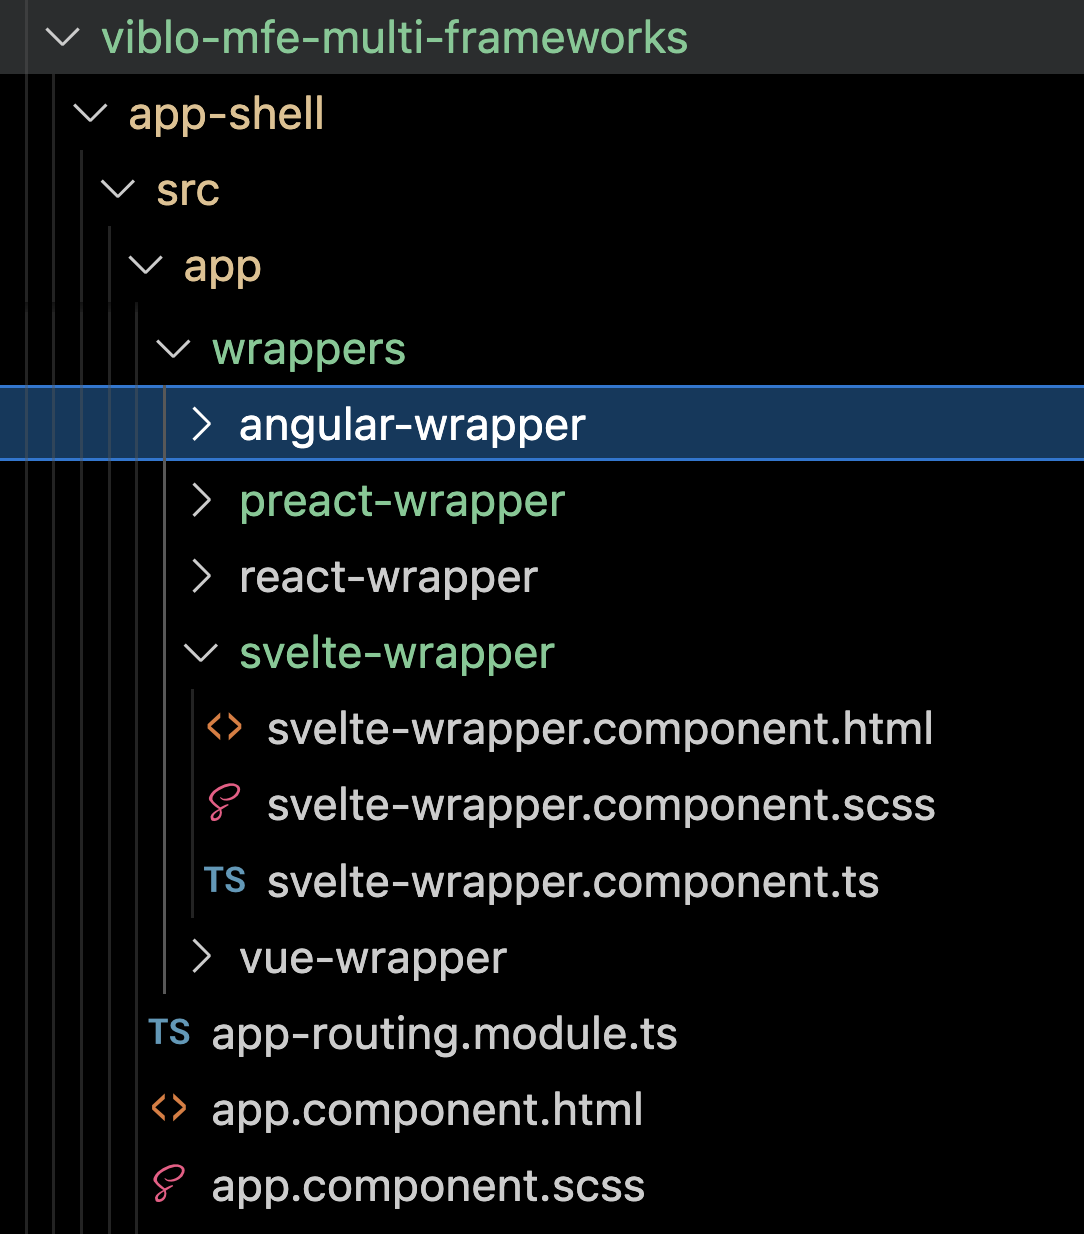
Giờ việc của ta là quay lại app-shell và viết thêm 1 cái wrapper cho Svelte thôi, vẫn như khi nãy ta làm ta tạo thêm 1 folder svelte-wrapper bên trong có 3 file .ts, .html, .scss với nội dung như sau:
:host {
  display: block;
  border: dashed 2px red;
  padding: 10px;
}
import { Component, ElementRef, Input } from '@angular/core';

@Component({
  selector: 'app-svelte-wrapper',
  templateUrl: './svelte-wrapper.component.html',
  styleUrls: ['./svelte-wrapper.component.scss'],
})
export class SvelteWrapperComponent {
  @Input() component: any;
  root!: any;

  constructor(private readonly host: ElementRef) {}

  ngAfterViewInit() {
    this.root = new this.component({
      target: this.host.nativeElement,
      props: {},
    });
  }

  ngOnDestroy() {
    this.root.$destroy()
  }
}
svelte-wrapper.component.html vẫn bỏ trống
Tạo các file xong thì ta có như sau:
Sau đó ta quay trở lại app-shell/src/app/app.module.ts và declare SvelteWrapperComponent:
import { SvelteWrapperComponent } from './wrappers/svelte-wrapper/svelte-wrapper.component';

declarations: [
//....
  SvelteWrapperComponent
]
Tiếp đó update app-shell/src/app/main/main.component.html thêm 1. case cho Svelte:
Login as: {{ appService.loggedUser?.username }}
<button (click)="logout()">Logout</button>
<hr />
<div class="container">
  <h1>App shell</h1>
  <ng-container #comp *ngFor="let item of loaders" [ngSwitch]="item.framework">
    <app-react-wrapper
      *ngSwitchCase="'react'"
      [component]="item.component"
    ></app-react-wrapper>
    <app-vue-wrapper
      *ngSwitchCase="'vue'"
      [component]="item.component"
    ></app-vue-wrapper>
    <app-preact-wrapper
      *ngSwitchCase="'preact'"
      [component]="item.component"
    ></app-preact-wrapper>
    <app-svelte-wrapper
      *ngSwitchCase="'svelte'"
      [component]="item.component"
    ></app-svelte-wrapper>
    <app-angular-wrapper
      *ngSwitchDefault
      [component]="item.component"
    ></app-angular-wrapper>
  </ng-container>
</div>
Cuối cùng là update app-shell/src/app/app.service.ts và thêm địa chỉ của Svelte MFE vào:
const remoteModules = [
  {
    remoteEntry: 'http://localhost:3001/remoteEntry.js',
    remoteName: 'angular_mfe_app',
    exposedModule: 'AngularAppLoader',
  },
  {
    remoteEntry: 'http://localhost:3002/remoteEntry.js',
    remoteName: 'react_mfe_app',
    exposedModule: 'ReactAppLoader',
  },
  {
    remoteEntry: 'vite:http://localhost:3003/assets/remoteEntry.js',
    remoteName: 'vue_mfe_app',
    exposedModule: 'VueAppLoader',
  },
  {
    remoteEntry: 'http://localhost:3004/remoteEntry.js',
    remoteName: 'preact_mfe_app',
    exposedModule: 'PreactAppLoader',
  },
  {
    remoteEntry: 'http://localhost:3005/remoteEntry.js',
    remoteName: 'svelte_mfe_app',
    exposedModule: 'SvelteAppLoader',
  },
];
Lưu tất cả lại sau đó ta quay trở lại trình duyệt, F5 login và sẽ thấy Svelte lên ngon luôn 🎉🎉🎉
Ầu, mà sao không cần install svelte vào app-shell như khi nãy ta làm với preact ta?? cũng không cần khai báo shared dependencies ở webpack.config.js nữa, thế mà nó vẫn chạy???
Thực tế là do cách Svelte được bundle, nếu các bạn để ý ở SvelteWrapperComponent, ta không có import gì từ svelte hết trơn á, chỉ đơn giản là new ... như kiểu JS thường, tức là code Svelte được build ra thì nó có thể chạy ở bất kì đâu luôn, tính tương thích cực cao 👍️👍️
Tiếp tục đến với thử thách tiếp theo nhé anh em 💪💪
Web component
Sẽ có những lúc có những team muốn dev web-component, bởi vì tính chất của web component cho phép nó chạy ở mọi trình duyệt mà không cần setup gì thêm, một khi build xong là cứ vậy đem cùng 1 code đi và sử dụng, do vậy đây cũng là 1 use case thích hợp để ta đưa vào kiến trúc MFE 😍
Vẫn như với các MFE khác, ta tạo thêm 1 project nữa ở root folder, dùng Rsbuild nhé:
npm create rsbuild@latest
Ta đặt tên project là web-comp-app, framework chọn Lit:
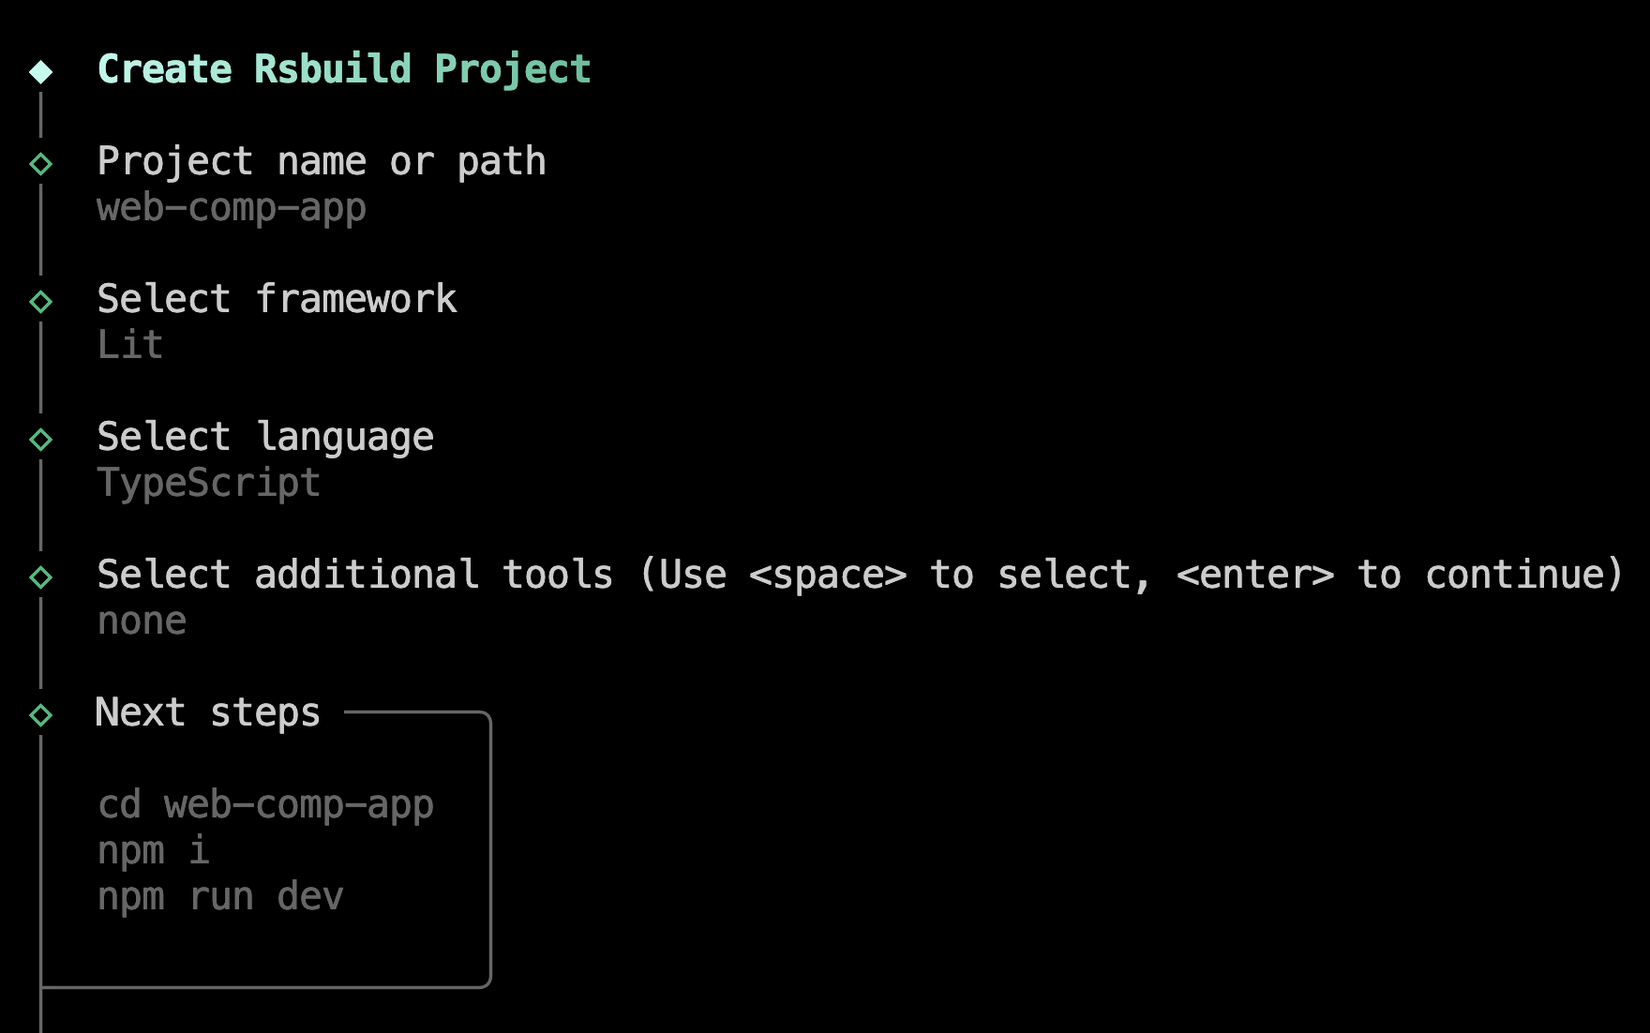
Lit nó là 1 cái library cho web component
Tiếp là ta chạy npm install cho web-comp-app nha:
npm i
Và ta cũng cài module-federation cho web-comp-app luôn:
npm add @module-federation/enhanced
Sau đó ta tạo file web-comp-app/src/loader.ts:
import { MyElement } from './my-element';

export default {
  framework: 'web-comp',
  component: MyElement,
  elementName: 'my-element',
}
chú ý rằng ở đây ta thêm 1 thuộc tính
elementNamevì web-component được register global, lát nữa app-shell sẽ register nó với tên đó
Và với rsbuild ta cần tạo async boundary như với react vậy, ta tạo file bootstrap.ts ở trong src với content copy từ index.ts nhé:
import './index.css';
import { MyElement } from './my-element';

customElements.define('my-element', MyElement);
Ở index.ts thì ta update lại:
import('./bootstrap')
Tiếp đó ta update lại file rsbuild.config.ts của web-comp-app:
import { defineConfig } from '@rsbuild/core';
import { ModuleFederationPlugin } from "@module-federation/enhanced/rspack";

export default defineConfig({
  html: {
    template: './src/index.html',
  },
  server: {
    port: 3006,
  },
  dev: {
    assetPrefix: true,
  },
  tools: {
    rspack: {
      output: {
        uniqueName: "web_comp_mfe_app", // cái này phải unique cho mỗi mfe nhé
      },
      plugins: [
        new ModuleFederationPlugin({
          name: "web_comp_mfe_app",
          exposes: {
            WebCompAppLoader: "./src/loader.ts",
          },
          shared: {
            lit: {
              singleton: true,
            },
          },
          filename: "remoteEntry.js",
        }),
      ],
    },
  },
});
Cuối cùng là ta start web-comp-app cái cho nó tươi trẻ nhỉ 🤣:
npm run dev
Và lại như với các MFE khác, ta cần tạo thêm wrapper cho web component nhé, ta quay trở lại app-shell, trong folder wrappers ta tạo thêm 1 folder nữa web-comp-wrapper, lại với 3 file .ts, .html, .scss với nội dung như sau:
:host {
  display: block;
  border: dashed 2px blue;
  padding: 10px;
}
import { Component, ElementRef, Input } from '@angular/core';

@Component({
  selector: 'app-web-comp-wrapper',
  templateUrl: './web-comp-wrapper.component.html',
  styleUrls: ['./web-comp-wrapper.component.scss'],
})
export class WebCompWrapperComponent {
  @Input() component: any;
  @Input() elementName!: string;

  constructor(private readonly host: ElementRef) {}

  ngAfterViewInit() {
    customElements.define(this.elementName, this.component);

    this.host.nativeElement.innerHTML = `<${this.elementName}></${this.elementName}>`;
  }
}
Ở đây ta dùng customElements và define 1 cái custom element mới, đây là API global của trình duyệt luôn nhé các bạn.
Sau đó ta append thẻ này vào view của WebCompWrapperComponent, chú ý rằng ở đây ta không cần xử lý onDestroy vì web component nó hoạt động như kiểu native component của trình duyệt (div/span...), nó sẽ tự được destroy khi wrapper destroy
Sau đó ta phải declare WebCompWrapperComponent vào app.module.ts:
import { WebCompWrapperComponent } from './wrappers/web-comp-wrapper/web-comp-wrapper.component';

declarations: [
  //...
  WebCompWrapperComponent
],
Rồi bước tiếp là thêm 1 cái case vào main.component.html
Login as: {{ appService.loggedUser?.username }}
<button (click)="logout()">Logout</button>
<hr />
<div class="container">
  <h1>App shell</h1>
  <ng-container #comp *ngFor="let item of loaders" [ngSwitch]="item.framework">
    <app-react-wrapper
      *ngSwitchCase="'react'"
      [component]="item.component"
    ></app-react-wrapper>
    <app-vue-wrapper
      *ngSwitchCase="'vue'"
      [component]="item.component"
    ></app-vue-wrapper>
    <app-preact-wrapper
      *ngSwitchCase="'preact'"
      [component]="item.component"
    ></app-preact-wrapper>
    <app-svelte-wrapper
      *ngSwitchCase="'svelte'"
      [component]="item.component"
    ></app-svelte-wrapper>
    <app-web-comp-wrapper
      *ngSwitchCase="'web-comp'"
      [component]="item.component"
      [elementName]="item.elementName"
    ></app-web-comp-wrapper>
    <app-angular-wrapper
      *ngSwitchDefault
      [component]="item.component"
    ></app-angular-wrapper>
  </ng-container>
</div>
Cuối cùng là khai báo thêm địa chỉ của web-comp-app vào app.service.ts nha:
const remoteModules = [
  {
    remoteEntry: 'http://localhost:3001/remoteEntry.js',
    remoteName: 'angular_mfe_app',
    exposedModule: 'AngularAppLoader',
  },
  {
    remoteEntry: 'http://localhost:3002/remoteEntry.js',
    remoteName: 'react_mfe_app',
    exposedModule: 'ReactAppLoader',
  },
  {
    remoteEntry: 'vite:http://localhost:3003/assets/remoteEntry.js',
    remoteName: 'vue_mfe_app',
    exposedModule: 'VueAppLoader',
  },
  {
    remoteEntry: 'http://localhost:3004/remoteEntry.js',
    remoteName: 'preact_mfe_app',
    exposedModule: 'PreactAppLoader',
  },
  {
    remoteEntry: 'http://localhost:3005/remoteEntry.js',
    remoteName: 'svelte_mfe_app',
    exposedModule: 'SvelteAppLoader',
  },
  {
    remoteEntry: 'http://localhost:3006/remoteEntry.js',
    remoteName: 'web_comp_mfe_app',
    exposedModule: 'WebCompAppLoader',
  },
];
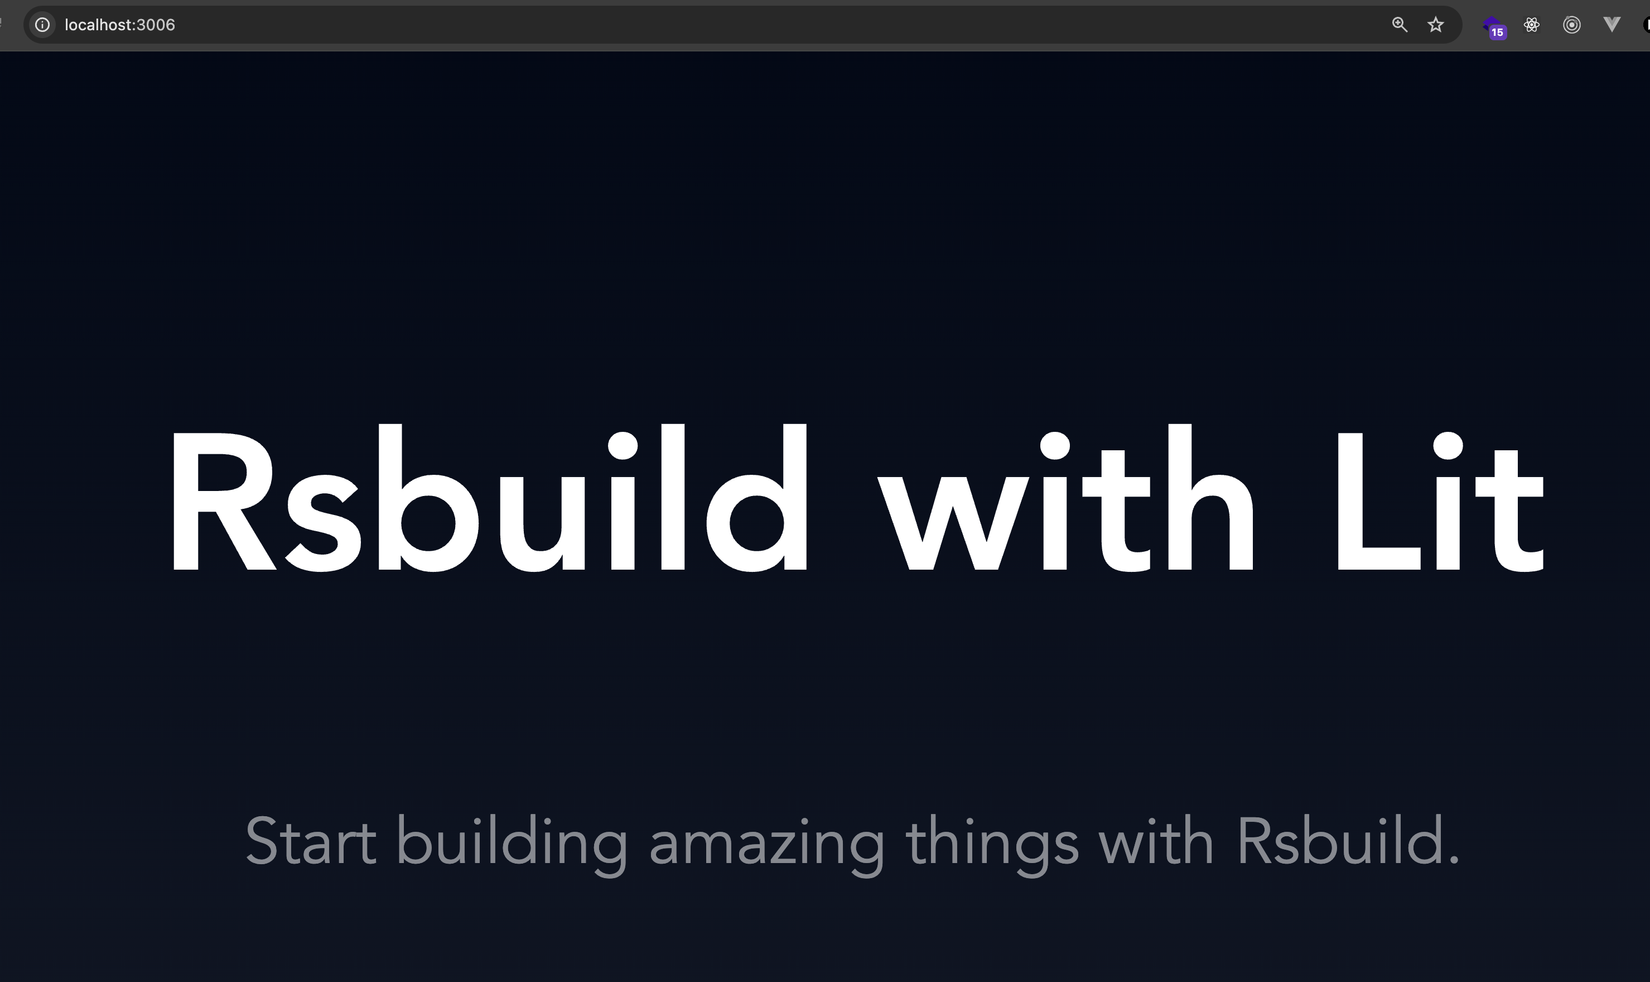
À trước khi chạy thì ta update chút css của my-element không tí nữa là nó display to đùng chiếm cả màn hình nhé, ta sửa file web-comp-app/src/my-element.ts:
import { html, css, LitElement } from 'lit';

export class MyElement extends LitElement {
  static styles = css`
    .content {
      display: flex;
      line-height: 1.1;
      text-align: center;
      flex-direction: column;
      justify-content: center;
    }

    .content h1 {
      font-size: 3.6rem;
      font-weight: 700;
    }

    .content p {
      font-size: 1.2rem;
      font-weight: 400;
      opacity: 0.5;
    }
  `;

  render() {
    return html`
      <div class="content">
        <h1>Rsbuild with Lit</h1>
        <p>Start building amazing things with Rsbuild.</p>
      </div>
    `;
  }
}
Cuối cùng là lưu lại tất cả và ta quay lại app-shell F5 login nha:
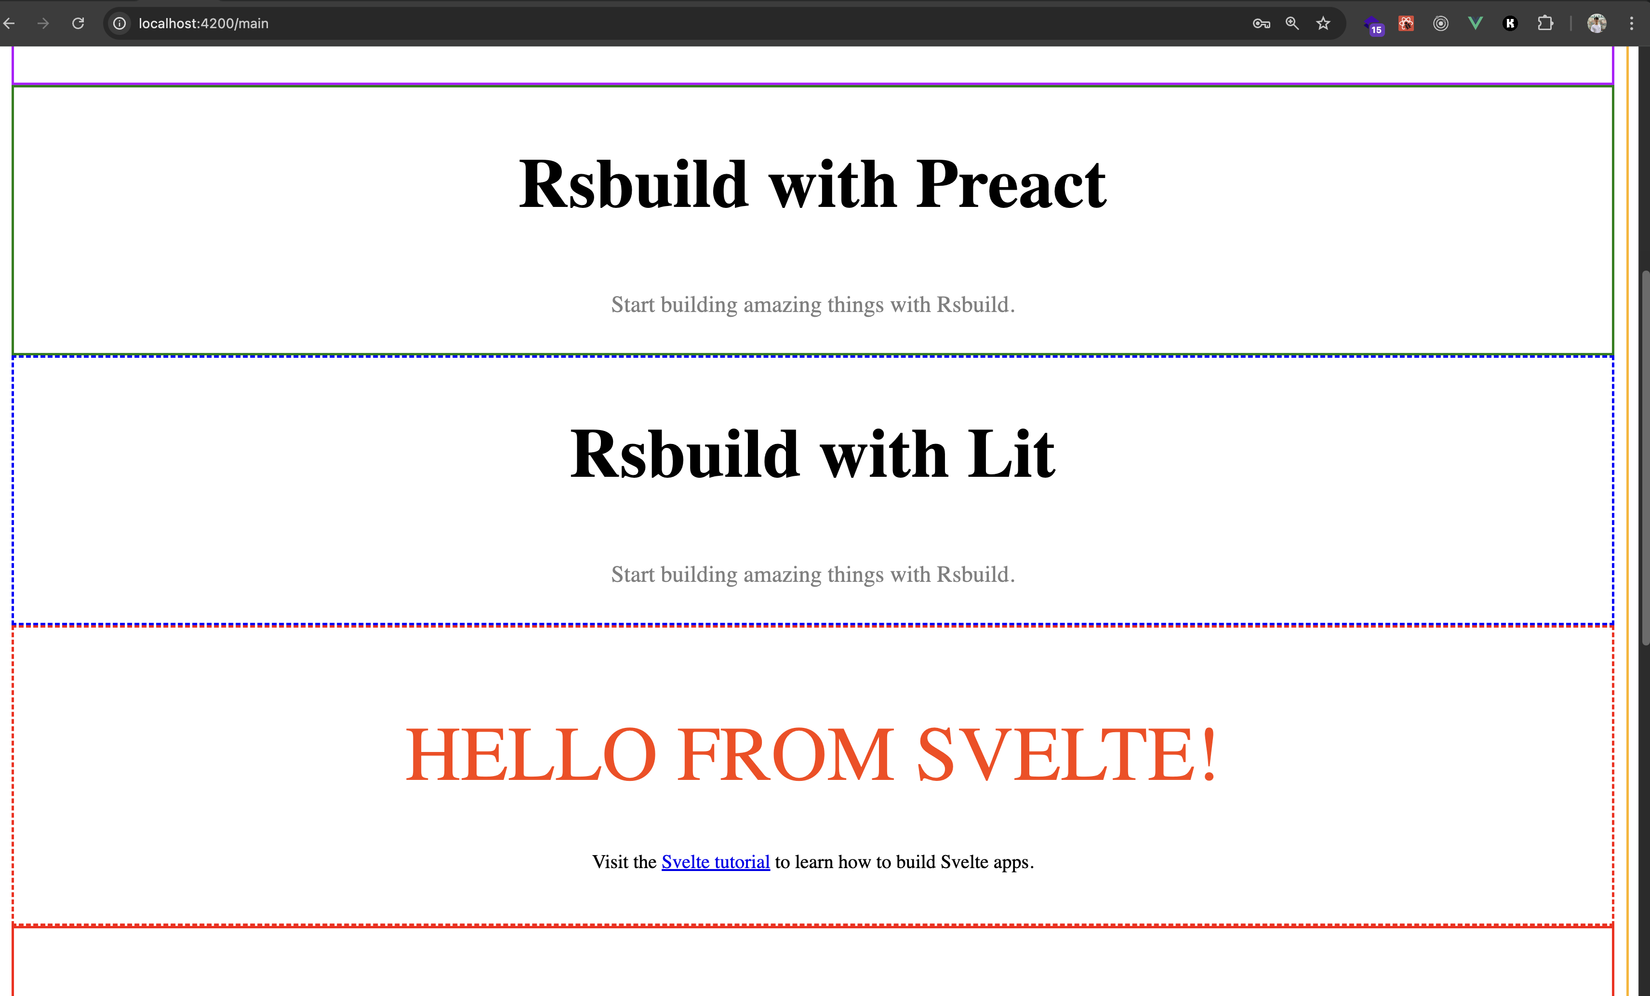
Pòm pòm chíu chíu, lên luôn, rất mượt 😎😎
Ta chú ý rằng ta cũng không cần cài thêm lit vào app-shell hay khai báo shared dependencies, vì my-element khi build nó đã ra code JS có thể sử dụng được luôn rồi
Ta tới với thử thách cuối cùng trong bài nha
Self-run
Có những trường hợp mà team dev MFE muốn có sự linh hoạt trong việc switch giữa các framework chỉ trong 1 MFE, hoặc không muốn dùng bất kì framework nào cả, hoặc là đây là 1 framework mới và chưa được support bởi app-shell.
Trường hợp này thì ta cần thêm support cho self-run function: phía MFE đơn giản là export ra functions để mount và unmount, app-shell chỉ việc gọi, còn phía MFE làm cái gì trong đó thì app-shell không quan tâm.
Do vậy ta mới có cái tên
self-run- bản thân nó tự thực hiện công việc rendering
Ta bắt đầu bằng cách tạo thêm 1 project ở root folder, lần này ta dùng Vite nhé:
npm create vite@latest
Đặt tên là self-run-app, framework chọn Vanilla (JS thuần):

Sau đó ta chạy npm install cho self-run-app:
npm i
Tiếp theo ta cài package sau vào self-run-app cho module federation nha:
npm i @originjs/vite-plugin-federation
Sau đó ở trong self-run-app/src các bạn tạo cho mình App.ts, với nội dung như sau:
const viteLogo = new URL("./vite.svg", import.meta.url).href;
const typescriptLogo = new URL("./typescript.svg", import.meta.url).href;

export default function App(rootEl: HTMLElement) {
  return {
    mount: () => {
      rootEl.innerHTML = `
      <div>
        <a href="https://vitejs.dev" target="_blank">
          <img src="${viteLogo}" class="logo" alt="Vite logo" />
        </a>
        <a href="https://www.typescriptlang.org/" target="_blank">
          <img src="${typescriptLogo}" class="logo vanilla" alt="TypeScript logo" />
        </a>
        <h1>Vite + TypeScript</h1>
      </div>
    `;

      return {
        unmount: () => {
          console.log("unmounting...");
          rootEl.innerHTML = "";
        },
      };
    },
  };
}
Như các bạn thấy ở đây function App của ta nhận vào rootEl là nơi mà nó sẽ mount bất kì content gì vào. App() trả về mount(), khi gọi mount thì nó trả về cho ta 1 object để về sau ta có thể unmount tuỳ ý
Tiếp theo vẫn trong src ta tạo loader.ts:
import App from './App';

export default {
  framework: 'self-run',
  component: App
}
Ta update lại main.ts như sau:
import './style.css'
import App from './App.ts'

const root = App(document.querySelector<HTMLDivElement>('#app')!).mount()
console.log(root)
// root.unmount()
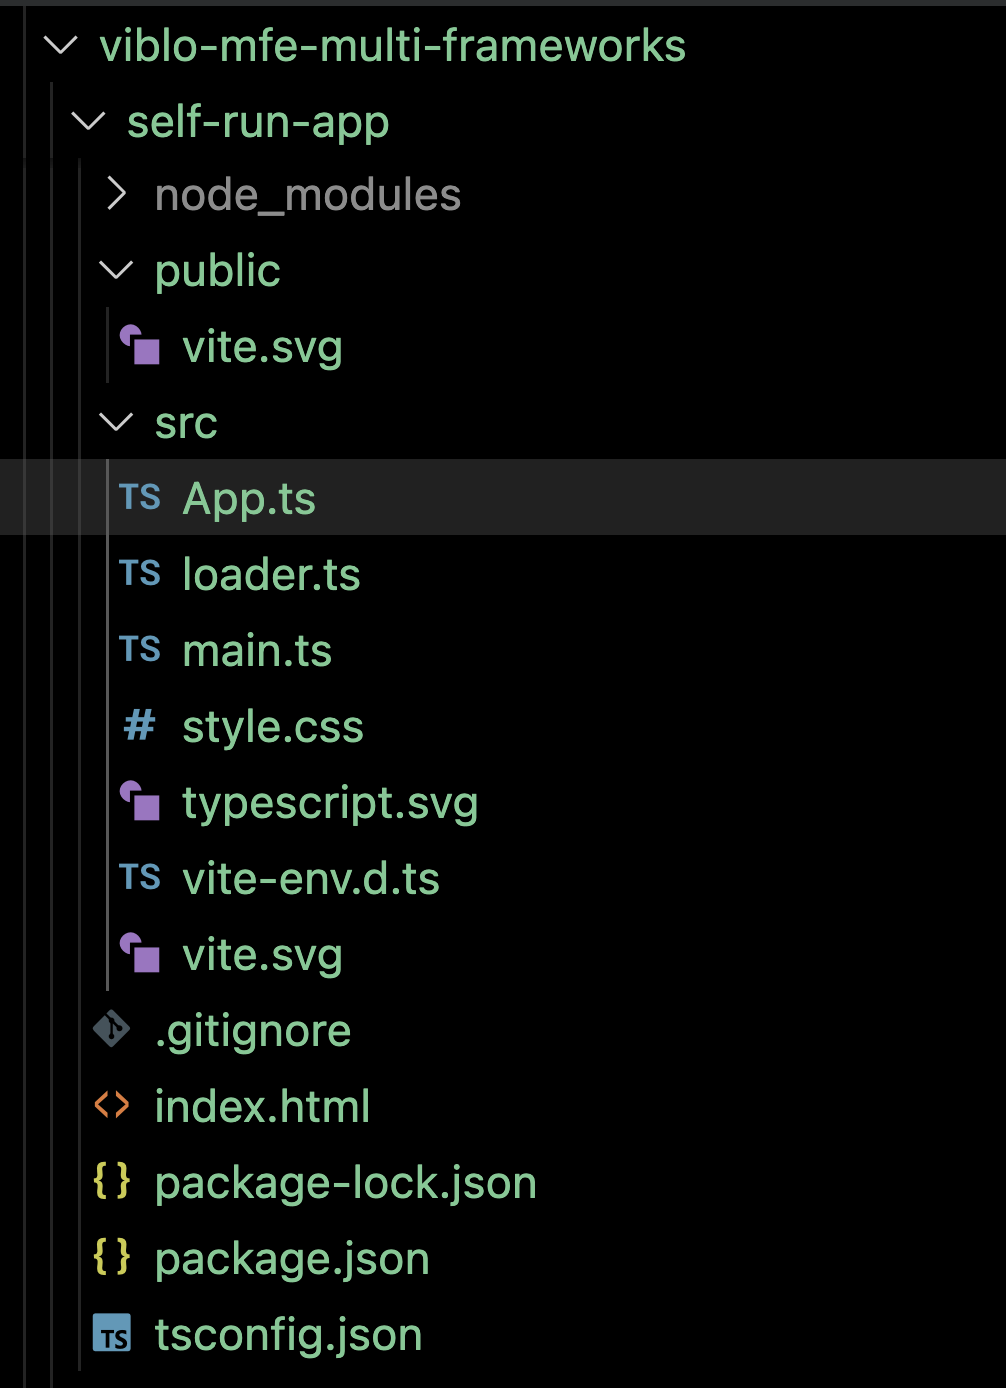
Ta copy cả icon vite.svg từ public sang src nữa nhé. Sau tất cả thì folder self-run-app trông như sau:
Ta để ý rằng vì project này ta chọn Vanilla JS nên nó không đi kèm với vite.config.ts, ta tạo file đó ở self-run-app nha:
import { defineConfig } from "vite";
import federation from "@originjs/vite-plugin-federation";

// https://vitejs.dev/config/
export default defineConfig({
  build: {
    target: "esnext",
  },
  preview: {
    port: 3007,
  },
  plugins: [
    federation({
      name: "self_run_mfe_app",
      filename: "remoteEntry.js",
      exposes: {
        "SelfRunAppLoader": "./src/loader.ts",
      },
    }),
  ],
});
Cấu hình thì y như mình đã nói ở bài Xử lý bài toán multi bundlers khi làm việc với Microfrontend nha
Cuối cùng là ta build và preview nhé, ta chạy lần lượt từng command sau ở self-run-app
npm run build

npm run preview
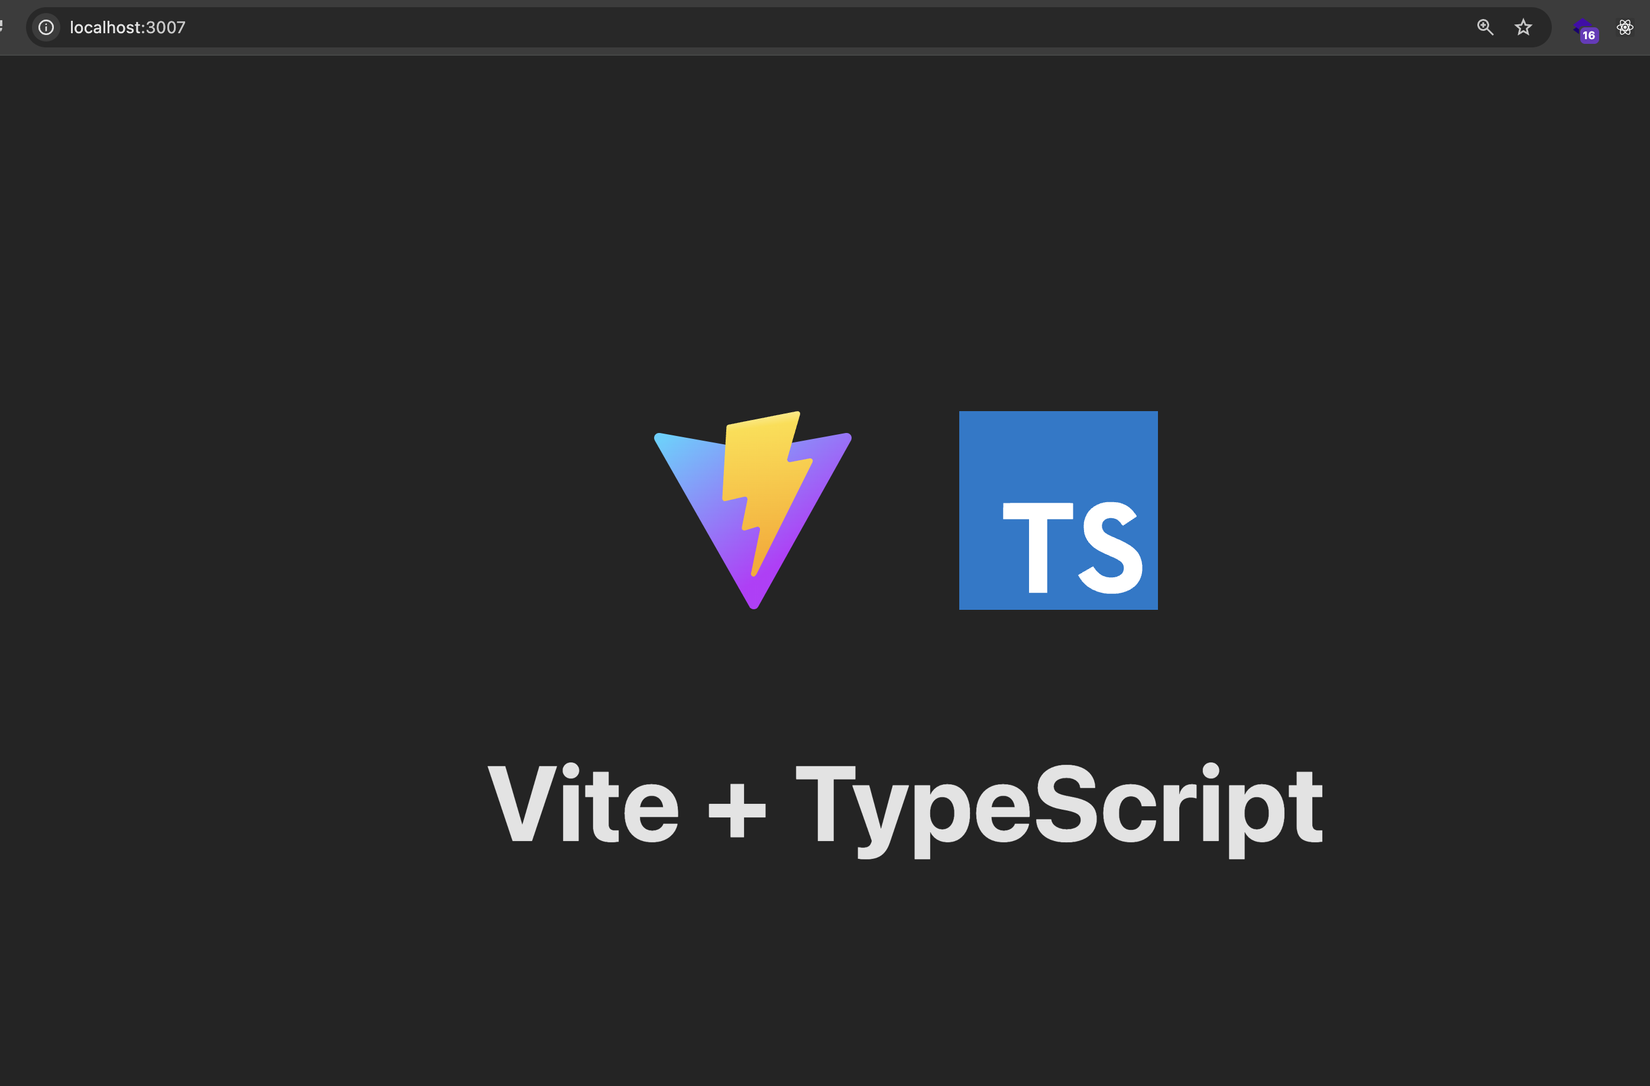
Thành công thì mở trình duyệt ở địa chỉ http://localhost:3007 sẽ thấy như sau:
Giờ ta quay lại app-shell và tạo thêm 1 wrapper nữa nha, ta gọi nó là self-run-wrapper, với lần lượt các file bên trong là .ts, .html, .scss với nội dung như sau:
:host {
  display: block;
  border: dashed 2px yellow;
  padding: 10px;
}
import { Component, ElementRef, Input } from '@angular/core';

type Root = {
  unmount: () => void;
};

@Component({
  selector: 'app-self-run-wrapper',
  templateUrl: './self-run-wrapper.component.html',
  styleUrls: ['./self-run-wrapper.component.scss'],
})
export class SelfRunWrapperComponent {
  @Input() component!: (element: HTMLElement) => { mount: () => Root };
  root!: Root;
  constructor(private readonly host: ElementRef) {}

  ngAfterViewInit() {
    this.root = this.component(this.host.nativeElement).mount();
  }

  ngOnDestroy() {
    this.root.unmount();
  }
}
file .html ta để trống nhé
Tiếp đó ta nhớ khai báo SelfRunWrapperComponent vào declarations ở app.module.ts nha
Rồi ta thêm 1 case nữa cho self-run ở main.component.html:
Login as: {{ appService.loggedUser?.username }}
<button (click)="logout()">Logout</button>
<hr />
<div class="container">
  <h1>App shell</h1>
  <ng-container #comp *ngFor="let item of loaders" [ngSwitch]="item.framework">
    <app-react-wrapper
      *ngSwitchCase="'react'"
      [component]="item.component"
    ></app-react-wrapper>
    <app-vue-wrapper
      *ngSwitchCase="'vue'"
      [component]="item.component"
    ></app-vue-wrapper>
    <app-preact-wrapper
      *ngSwitchCase="'preact'"
      [component]="item.component"
    ></app-preact-wrapper>
    <app-svelte-wrapper
      *ngSwitchCase="'svelte'"
      [component]="item.component"
    ></app-svelte-wrapper>
    <app-web-comp-wrapper
      *ngSwitchCase="'web-comp'"
      [component]="item.component"
      [elementName]="item.elementName"
    ></app-web-comp-wrapper>
    <app-self-run-wrapper
      *ngSwitchCase="'self-run'"
      [component]="item.component"
    ></app-self-run-wrapper>
    <app-angular-wrapper
      *ngSwitchDefault
      [component]="item.component"
    ></app-angular-wrapper>
  </ng-container>
</div>
Cuối cùng là ở app.service.ts ta khai báo thêm địa chỉ của self-run-app nhé:
const remoteModules = [
  {
    remoteEntry: 'http://localhost:3001/remoteEntry.js',
    remoteName: 'angular_mfe_app',
    exposedModule: 'AngularAppLoader',
  },
  {
    remoteEntry: 'http://localhost:3002/remoteEntry.js',
    remoteName: 'react_mfe_app',
    exposedModule: 'ReactAppLoader',
  },
  {
    remoteEntry: 'vite:http://localhost:3003/assets/remoteEntry.js',
    remoteName: 'vue_mfe_app',
    exposedModule: 'VueAppLoader',
  },
  {
    remoteEntry: 'http://localhost:3004/remoteEntry.js',
    remoteName: 'preact_mfe_app',
    exposedModule: 'PreactAppLoader',
  },
  {
    remoteEntry: 'http://localhost:3005/remoteEntry.js',
    remoteName: 'svelte_mfe_app',
    exposedModule: 'SvelteAppLoader',
  },
  {
    remoteEntry: 'http://localhost:3006/remoteEntry.js',
    remoteName: 'web_comp_mfe_app',
    exposedModule: 'WebCompAppLoader',
  },
  {
    remoteEntry: 'vite:http://localhost:3007/assets/remoteEntry.js',
    remoteName: 'self_run_mfe_app',
    exposedModule: 'SelfRunAppLoader',
  },
];
Chú ý ta phải có tiền tố vite: như ta làm với vue-app nhé
Lưu tất cả lại, ta F5 lại app-shell, login vàaaaaaa:
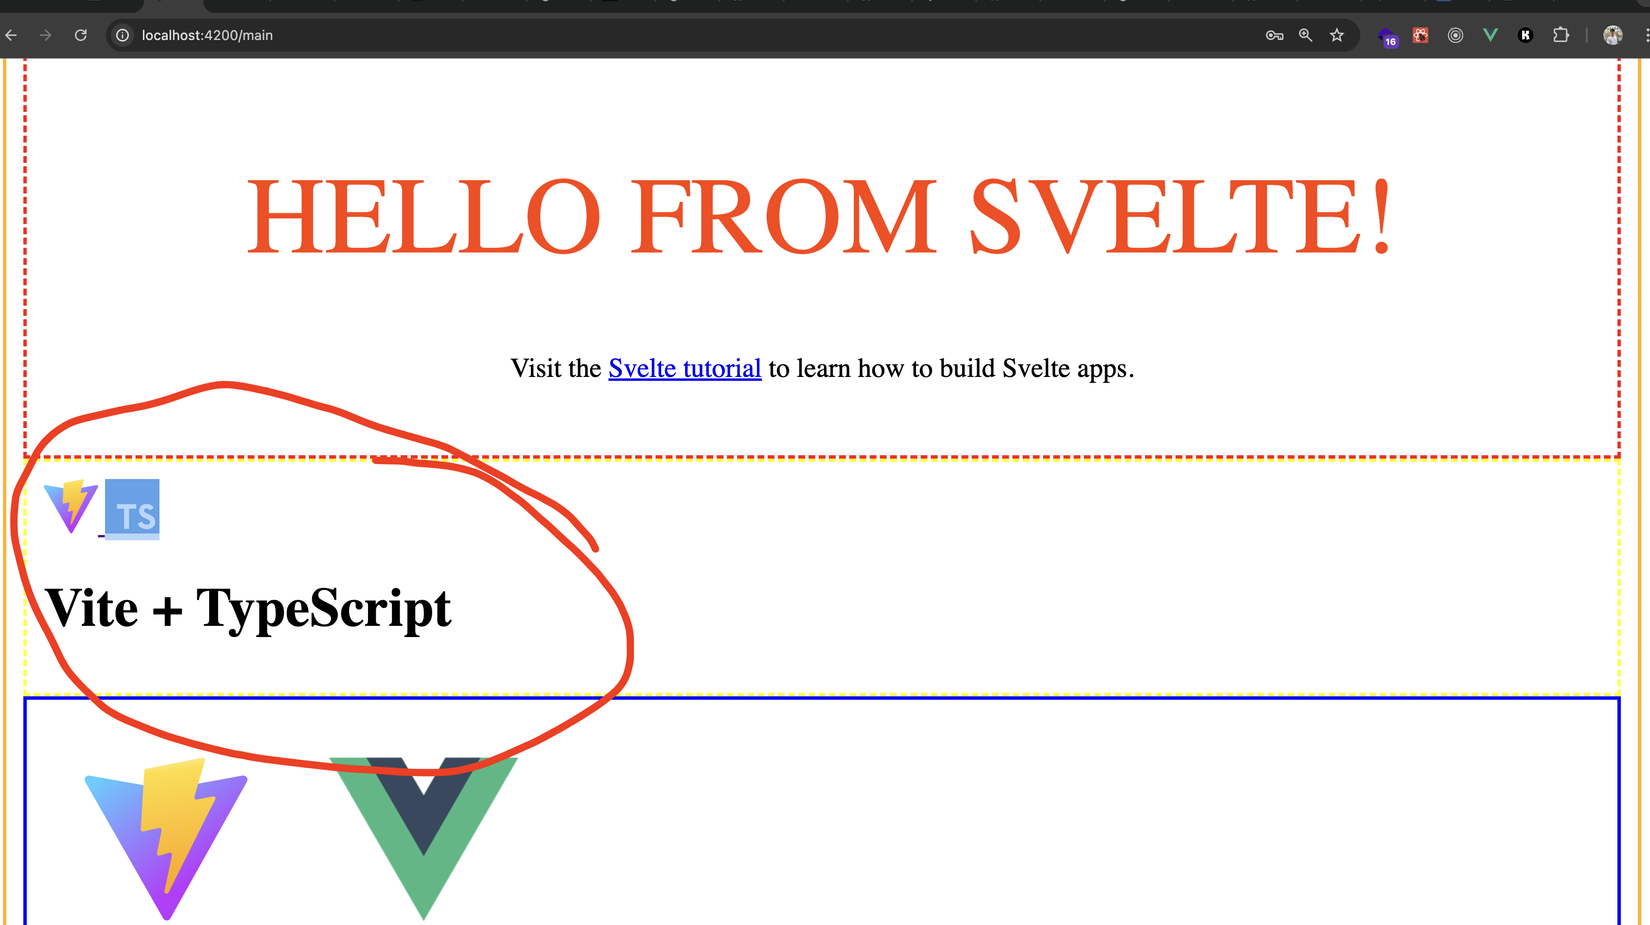
Mission completed 😎😎😎
Vài dòng suy ngẫm
Như các bạn thấy việc support thêm nhiều UI framework cũng không hề khó, giải pháp ta chọn là viết các wrapper cho từng framework cũng scale tốt, cứ thêm framework thì thêm wrapper. Kết thúc bài này kiến trúc của ta support đc tới tận 7 framework/library lận (kể cả self-run), cover gần như các hot frameworks bây giờ rồi (2024) 🎉🎉
Support được càng nhiều framework thì kiến trúc MFE của ta càng linh hoạt, cho phép các team dev MFE có thêm nhiều sự lựa chọn về tech stack của họ.
Nhưng điều này đòi hỏi ta cần phải biết thêm về từng framework để có thể tích hợp sao cho mượt nhất, tránh gây lỗi cho MFE trong quá trình sử dụng. Cái này ta cần phải thực chiến nhiều để hiểu hơn vì MFE nó rất là tuỳ vào cách vận hành của từng người nữa.
Chúc các bạn cuối tuần vui vẻ, hẹn gặp lại các bạn vào những bài sau 👋👋
All rights reserved
