GUI with Kivy Python
Bài đăng này đã không được cập nhật trong 5 năm
Kivy
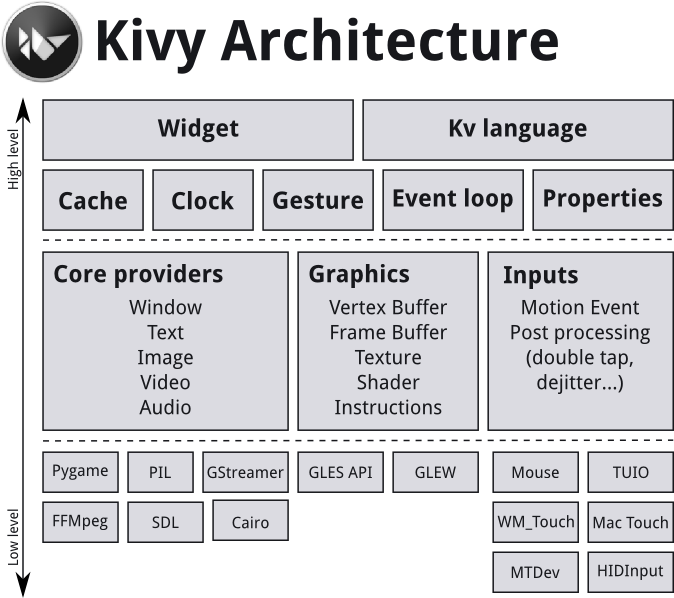
Đối với mọi ngôn ngữ lập trình đi kèm với nó là một framework hỗ trợ cho việc xây dựng GUI (Graphic User Interface) - Lập trình giao diện đồ họa. Với Python thì cũng có một số framework như: Qt, Thinker, WxWidgets, Kivy,.....bài viết này mình sẽ sử dụng Kivy. Điểm nổi bật của Kivy này là có thể run trên Linux, Windows, OS X, Android, iOS, and Raspberry Pi hay nói cách khác là đa nền tảng (nhạc nào cũng chơi được  ), với cùng code thì có thể run trên các nền tảng khác. Có thể hiện tại mọi người thường chủ yếu tập trung vào Web, App và tập trung vào hai thứ đó, nhưng với app trên Desktop không hẳn là nó biến mất mà vẫn có những ứng dụng cần làm việc trên Desktop. Và mình cũng chỉ hướng dẫn sơ qua, đơn giản thôi, còn chi tiết thì mn nghiên cứu thêm.
Khi mình lướt qua Gallery của Kivy thì thấy một vài app được xây dựng trông cũng xịn, và có cả Game trên Desktop và một số Game được đưa lên hẳn trên Google Play. Mọi người cũng có thể xem thêm Docummentation của nó.
Dưới đây là một vài video về ứng dụng của Kivy :
Và cả làm Game nữa :
Dạo này thời tiết có chút thay đổi
đâm ra câu cú có vẻ không được mượt mà, mong mn cảm thông
:
Cài đặt
Hiện mình đang sử dụng HĐH Linux có sử dụng Anaconda để create env cho từng project nên mình sẽ install Kivy theo Anaconda và làm một số demo nho nhỏ. Mọi người cũng có thể tuỳ chọn theo platform phù hợp với mục đích sử dụng như dưới đây.
| Platform | Installation | Packaging |
|---|---|---|
| Windows | pip | PyInstaller |
| OS X | pip, Kivy.app | Kivy.app, PyInstaller |
| Linux | pip, PPA | --- |
| Ras-Pi | pip | ---- |
| Android | python-for-android | python-for-android |
| iOS | kivy-ios | kivy-ios |
| Anaconda | conda | --- |
Với Anaconda thì có thể install một trong các lệnh sau:
conda install -c conda-forge kivy
conda install -c conda-forge/label/cf201901 kivy
conda install -c conda-forge/label/cf202003 kivy
Check version Kivy đã install:
import kivy
print(kivy.__version__)
# 2.0.0rc4
Ok như thế đã install xong môi trường, bây giờ là một vài demo nho nhỏ.
Cấu trúc
Về cơ bản để tạo một Appicaltion thì sẽ gồm 3 phần :
- Tạo một class kế thừa class App
- implement phương thức build()
- tạo instance class và gọi phương thức run()
import kivy
from kivy.app import App
from kivy.uix.label import Label

class MyApp(App):

    def build(self):
        return Label(text='Hello world')

if __name__ == '__main__':
    MyApp().run()
Save file và run thử python name_file.py.
API Graphic của Kivy được base trên lib OpenGL. Lib OpenGL thì được viết bằng C và nó hỗ trợ cho việc xây dựng giao diện như Canvas, Rectangle,...
Về Widgets & Layouts, trong bất cứ một ứng dụng nào thì ta sẽ luôn thao tác với Widgets & Layouts (như các button, list, action touch,...), tùy thuộc vào mục đích sử dụng mà ta sẽ xây dựng Layout hợp lý.
Một số widget cơ bản
Trong demo đầu tiên này mình sex làm quen đơn giản với UI trước. Việc đàu tiên là ta sẽ phải import các Interface của Kivy.
from kivy.app import App

from kivy.uix.label import Label
#from kivy.uix.button import Button

class FirstKivy(App):

    def build(self):

        return Label(text="Hello Kivy!")

FirstKivy().run()
Button
from kivy.app import App
from kivy.uix.button import Button


class SimpleApp(App):
    def build(self):
        def a(instance,value):
            print("welcome to edureka")
        btn = Button(text="Kivy-Clicked!",font_size=150)
        btn.bind(state=a)
        return btn


if __name__ == "__main__":
    SimpleApp().run()
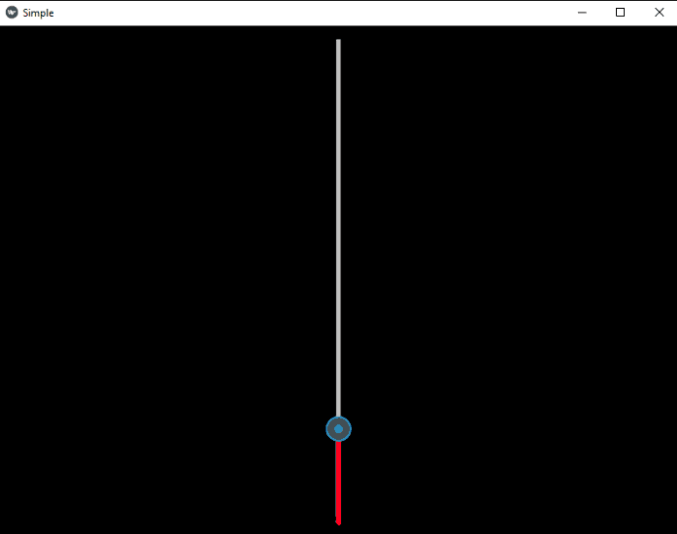
Slider
from kivy.app import App
from kivy.uix.slider import Slider

class SimpleApp(App):
    def build(self):
        slide = Slider(orientation='vertical', value_track=True, value_track_color=(1,0,0,1))
        return slide


if __name__ == "__main__":
    SimpleApp().run()
Progress Bar
from kivy.app import App
from kivy.uix.progressbar import ProgressBar


class SimpleApp(App):
    def build(self):
        Progress  = ProgressBar(max=1000)
        Progress.value = 650
        return Progress


if __name__ == "__main__":
    SimpleApp().run()
Image sau kết quả :
Relative Layout
from kivy.app import App
from kivy.uix.relativelayout import RelativeLayout
from kivy.uix.boxlayout import BoxLayout
from kivy.uix.button import Button
from kivy.uix.label import Label
from kivy.lang import Builder

res = Builder.load_string('''BoxLayout:
    Label:
        text: 'Left'
    Button:
        text: 'Middle'
        on_touch_down: print('Middle: {}'.format(args[1].pos))
    RelativeLayout:
        on_touch_down: print('Relative: {}'.format(args[1].pos))
        Button:
            text: 'Right'
            on_touch_down: print('Right: {}'.format(args[1].pos))''')


class SimpleApp(App):
    def build(self):
        return res

if __name__ == "__main__":
    SimpleApp().run()
Image kết quả :
Các bạn run và xem thử kết quả. Và còn vô vàn những thứ khác nữa, các bạn có thể search thêm.
Demo App
Trong demo này mình sẽ làm một app nhận diện giới tính đơn giản. Sẽ có 2 cách để nhận diện, một là dùng hình ảnh để predict, hai là sẽ dùng camera real-time để dự đoán. Về dữ liệu thì ta sẽ sử dụng tập data UTKFace, tập data này với hơn 20k ảnh đã được annotation với labels là độ tuổi (từ 0-116), giới tính (male, female), màu da. Để đơn giản mình sẽ sử dụng opencv để detec ra khuôn mặt trong bức ảnh đó, rồi ta sẽ crop mặt đưa vào model để classification xem đang là giới tính gì. Về model và weights thì các bạn có thể tải và dùng luôn. Về giao diện, mình sẽ tạo 2 button với hai chức năng, một là lấy hình ảnh trực tiếp từ máy pc, hai là sử dụng Camera của máy tính.
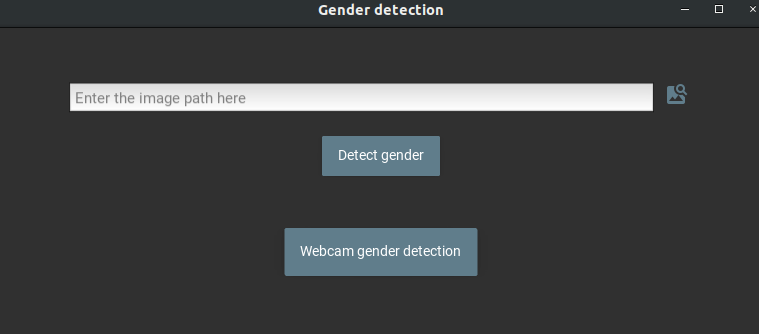
Để dựng được UI như trên thì ta cần import các class App, Label, Window,...Để dựng được giao diện thì Kivy có một cách là tạo file .kv (file này cùng cấp thư mục với file main.py chính, sẽ định nghĩa UI cho App), như bên dưới đây.
<MyGrid>:
    img_path: img_path

    GridLayout:
        cols:1
        size: root.width, root.height

        FloatLayout:
            MDTextFieldRect:
                id: img_path
                hint_text: "Enter the image path here"
                multiline:False
                pos_hint: {"x":0.1, "top":0.83}
                size_hint: 0.75, 0.093
                readonly: False
                on_text_validate: root.addBtn()

            MDIconButton:
                icon: 'image-search'
                theme_text_color: 'Custom'
                text_color: app.theme_cls.primary_color
                size_hint: None, None
                size: 1 * dp(48), dp(48)
                text: ''
                opposite_colors: True
                pos_hint: {'center_x': .88, 'center_y': .794}
                on_release: root.file_manager_open()

            MDRaisedButton:
                size_hint: None, None
                size: 3 * dp(48), dp(40)
                text: 'Detect gender'
                opposite_colors: True
                pos_hint: {'center_x': .5, 'center_y': .6}
                on_release: root.process_button_click(1)

            MDRaisedButton:
                size_hint: None, None
                size: 3 * dp(48), dp(48)
                text: 'Webcam gender detection'
                opposite_colors: True
                pos_hint: {'center_x': .5, 'center_y': .3}
                on_release: root.process_button_click(2)
Với UI như trên hình trên thì ta sẽ tạo một GridLayout bọc bên trong là các trường Text, Button. Để set sự kiện cho từng Button thì ta khai báo trong on_release : root.name_action với name_action tương ứng với funtion trong class MyGrid.
def process_button_click(self, index):
        if index == 1:
            mythread = threading.Thread(target=self.gender_detection())
            mythread.start()

        if index == 2:
            mythread = threading.Thread(target=self.gender_detection_video())
            mythread.start()
Như bên trên thì ta sẽ phải import các class cần thiết.
from kivy.app import App
from kivy.uix.label import Label
from kivy.uix.popup import Popup
from kivy.uix.widget import Widget
from kivymd.theming import ThemeManager
from kivy.properties import ObjectProperty
from kivy.uix.modalview import ModalView
from kivy.core.window import Window
Để có thể lấy được file image từ máy thì ta sử dụng MDFileManager:
 def file_manager_open(self):
        from kivymd.uix.filemanager import MDFileManager

        self.manager = ModalView(size_hint=(1, 1), auto_dismiss=False)
        self.file_manager = MDFileManager(
                exit_manager=self.exit_manager,
                select_path=self.select_path,
                previous="",
            )
        self.manager.add_widget(self.file_manager)
        self.file_manager.show(os.path.expanduser("~/Desktop"))
        self.manager_open = True
        self.manager.open()
Sau khi chọn xong file ảnh thì ta sẽ show lên (Toast) thông báo cho người sử dụng biết (mình sẽ show ra với nội dung là path của ảnh đó ).
 def select_path(self, path):
        self.exit_manager()
        toast(path)
        self.img_path.text = path

 def toast(text):
    from kivymd.toast.kivytoast import toast
    toast(text)

 def exit_manager(self, *args):
        self.manager.dismiss()
        self.manager_open = False
Tiếp theo là ta sẽ implement button của 2 button mà ta đã nói ở trên.
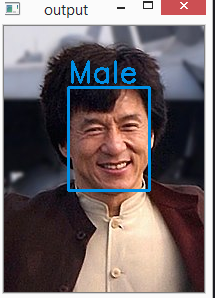
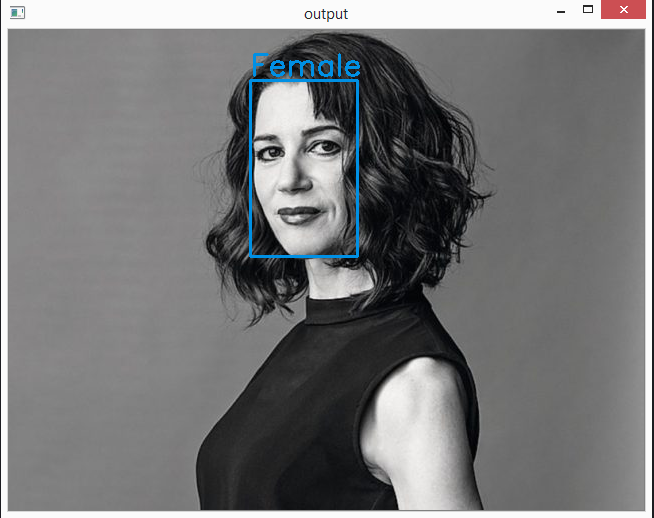
def gender_detection(self):
        image_path = self.img_path.text
        # Path of the gender detection model
        model_path = "model.h5"
        model_weights_path = "weights.h5"

        im = cv2.imread(image_path)
        if im is None:
            print("Could not read input image")
            popup = Popup(title='No image found',
                          content=Label(text="Could not read input image.\nMake sure you selected an image."),
                          size_hint=(None, None), size=(400, 200))
            popup.open()
            return

        # Load the trained model
        model = load_model(model_path)
        model.load_weights(model_weights_path)

        faces, confidences = cv.detect_face(im)

        # loop through detected faces and add bounding box
        for face in faces:
            (startX,startY) = face[0],face[1]
            (endX,endY) = face[2],face[3]

            # draw rectangle over face
            cv2.rectangle(im, (startX,startY), (endX,endY), (232, 145,15), 2)

            # Preprocessing for the detection
            cropped_face = im[startY:endY,startX:endX]
            cropped_face = cv2.resize(cropped_face, (150,150))
            cropped_face = cropped_face.astype("float32") / 255
            cropped_face = img_to_array(cropped_face)
            cropped_face = np.expand_dims(cropped_face, axis=0)

            # Apply prediction to the cropped face
            conf = model.predict(cropped_face)[0]

            if conf[0] > conf[1]:
                label = "Male"
            else:
                label = "Female"

            #print(conf)

            # Print label above the rectangle
            cv2.putText(im, label, (startX, startY-5),  cv2.FONT_HERSHEY_SIMPLEX,1, (232, 145,15), 2)

        # Display output
        cv2.namedWindow("output", cv2.WINDOW_AUTOSIZE)
        cv2.imshow("output", im)
        cv2.waitKey()
Như đã nói từ ban đầu là mình sẽ sử dụng lib cv để detec được face trong image, xong crop face ra. Sau đó load model rồi predict face mà ta đã crop ở trước, khi có kết quả sẽ show text lên hình ảnh đó. Và tương tự đối với Button Camera thì ta sẽ code xử lý tương tự như thế với đầu vào là video.
 def gender_detection_video(self):
        model_path = "model.h5"
        model_weights_path = "weights.h5"

        model = load_model(model_path)
        model.load_weights(model_weights_path)
        video_capture = cv2.VideoCapture(0)

        while True:
            # Capture frame-by-frame
            ret, frame = video_capture.read()
            gray = cv2.cvtColor(frame, cv2.COLOR_BGR2GRAY)
            # TODO...
Cuối cùng là gọi phương thức run().
class GenderDetectionApp(App):
    title = "Gender detection"
    theme_cls = ThemeManager()
    theme_cls.theme_style = "Dark"
    theme_cls.primary_palette = "BlueGray"

    Window.size = (780, 320)

    def build(self):
        return MyGrid()

if __name__ == "__main__":
    GenderDetectionApp().run()
Và vài kết quả nhận được :
Còn video thì các bạn có thể thử .
.
Bên cạnh đó ta cũng có thể CRUD với database với Kivy. Các bạn có thể xem thêm tại đây.
Ngoài ra thì thằng này còn có thể code thành app Android các bạn có thể xem thêm (tất nhiên là ko bằng Android Studio hàng ngon, nhưng các bạn có thể thử  ).Bên dưới mình cũng đưa một vài link hướng dẫn code thành App Android.
Tạm thời mình hướng dẫn đến đây, hẹn mọi người trong bài viết tiếp theo 
Tài liệu tham khảo
All rights reserved
