Gửi email với Thymeleaf template trong Spring
Bài đăng này đã không được cập nhật trong 6 năm
Mở đầu
Khi phát triển một ứng dụng web, có những chức năng liên quan đến gửi và nhận email, ví dụ như: Gửi mã xác nhận người dùng để đăng nhập hệ thống, thông báo cho người dùng sử dụng hệ thống thông qua email... Những lúc như thế này, chúng ta thường cần 1 template sẵn để gửi nội dung email đi, chỉ thay đổi một vài thông số trong nội dung email. Trong trường hợp này, sử dụng Thymeleaf template là một sự lựa chọn không hề tồi. Hôm nay, mình sẽ hướng dẫn các bạn sử dụng Thymeleaf template để biên soạn nội dung mail và gửi mail thông qua Spring.
Với việc sử dụng Thymeleaf template, bạn có thể tùy chỉnh hình ảnh, link, css… trong email được gửi đi, không những thế chúng ta còn có thể tùy biến và sử dụng các chức năng của Thymeleaf mà file HTML bình thường không làm được. Bài viết này mình sẽ giới thiệu một ví dụ cụ thể việc sử dụng Thymeleaf template để biên soạn nội dung email và gửi mail thông qua ứng dụng Spring boot.
Xây dựng ứng dụng Spring boot app-web demo sử dụng Thymeleaf template
Trước hết chúng ta cùng tạo một ứng dụng spring cơ bản sử dụng maven, để tạo ứng dụng cơ bản chúng ta truy cập vào Spring Initializr để generate ra một ứng dụng spring cơ bản.
Các thông tin lần lượt như sau:
- Project:
Maven Project - Language:
Java - Spring Boot:
2.2.0(đây là phiên bản spring, bạn có thể tùy chọn version của spring tương ứng. Ở đây mình chọn spring 2.2.0) - Project Metadata: Group:
com.example - Artifact:
spring-email-with-thymeleaf - Dependencies:
Spring Web- đây là defendency dùng để build ứng dụng RestFul web service sử dụng Spring MVC
Đến đây, chúng ta đã tạo được một ứng dụng spring boot đơn giản. Bước đầu đã hoàn thành, bước tiếp theo chúng ta sẽ tìm hiểu source demo:
Cấu trúc thư mục dự án:

Giải thích các file:
pom.xml: để cấu hình các thư viện sẽ sử dụng. Chúng ta sẽ thêm 2 dependency dùng cho chức năng gửi mail và dependency của Thymeleaf
		<dependency>
			<groupId>org.springframework.boot</groupId>
			<artifactId>spring-boot-starter-mail</artifactId>
		</dependency>

		<dependency>
			<groupId>org.thymeleaf</groupId>
			<artifactId>thymeleaf-spring5</artifactId>
			<version>3.0.11.RELEASE</version>
		</dependency>
application.properties: FIle config các properties của project.
config.mail.host=smtp.gmail.com
config.mail.port=587
config.mail.username=sender_email@gmail.com
config.mail.password=password
Trong ví dụ này mình sẽ gửi mail thông qua gmail, sử sụng smtp host smtp.gmail.com. Phần username và password các bạn chỉ cần điền email và password của bạn thôi.
=> Lưu ý: để gửi được mail thông qua ứng dụng, email của bạn phải được thiết lập bật chế độ cho phép ứng dụng bên thứ 3 truy cập. Nếu là gmail, bạn có thể bật chế độ này thông qua việc setting trong tài khoản Google như sau:
Truy cập vào Google Account để chọn thiết lập cho tài khoản.
Tiếp theo, chọn tab Security -> Less secure app access -> Turn on access.
mail-template.html: File HTML chứa template nội dung mail cần gửi
<!DOCTYPE html>
<html xmlns:th="http://www.thymeleaf.org">
<body>
<p style="color: red; font-weight: bold" th:text="'Dear ' + ${name} + ','"></p>
<p th:text="'This is ' + ${project_name} + ' project.'"></p>
<p>Thanks!</p>
</body>
</html>
Trong file này ngoài nội dung tĩnh của template chúng ta cho phép truyền vào 2 nội dung ${name} và ${project_name} động để có thể tùy biến truyền vào.
DemoController: Controller của ứng dụng. Tại đây, chúng ta sẽ khai báo 1 API có method là POST dùng để implement chức năng gửi mail.
package com.example.springemailwiththymeleaf.controller;

import com.example.springemailwiththymeleaf.service.MailService;
import org.springframework.beans.factory.annotation.Autowired;
import org.springframework.web.bind.annotation.PostMapping;
import org.springframework.web.bind.annotation.RestController;

@RestController
public class DemoController {
    @Autowired
    MailService mailService;

    @PostMapping
    public void sendMail() {
        mailService.sendMail();
    }
}
MailService: Service hỗ trợ thi hành chức năng gửi email
package com.example.springemailwiththymeleaf.service;

import org.springframework.beans.factory.annotation.Autowired;
import org.springframework.beans.factory.annotation.Value;
import org.springframework.stereotype.Service;

import javax.mail.Authenticator;
import javax.mail.Message;
import javax.mail.MessagingException;
import javax.mail.PasswordAuthentication;
import javax.mail.Session;
import javax.mail.Transport;
import javax.mail.internet.InternetAddress;
import javax.mail.internet.MimeMessage;
import java.util.Properties;

@Service
public class MailService {
    private static final String CONTENT_TYPE_TEXT_HTML = "text/html;charset=\"utf-8\"";

    @Value("${config.mail.host}")
    private String host;
    @Value("${config.mail.port}")
    private String port;
    @Value("${config.mail.username}")
    private String email;
    @Value("${config.mail.password}")
    private String password;

    @Autowired
    ThymeleafService thymeleafService;

    public void sendMail() {
        Properties props = new Properties();
        props.put("mail.smtp.host", host);
        props.put("mail.smtp.starttls.enable", "true");
        props.put("mail.smtp.auth", "true");
        props.put("mail.smtp.port", port);

        Session session = Session.getInstance(props,
                new Authenticator() {
                    @Override
                    protected PasswordAuthentication getPasswordAuthentication() {
                        return new PasswordAuthentication(email, password);
                    }
                });
        Message message = new MimeMessage(session);
        try {
            message.setRecipients(Message.RecipientType.TO, new InternetAddress[]{new InternetAddress("received_mail@domain.com")});

            message.setFrom(new InternetAddress(email));
            message.setSubject("Spring-email-with-thymeleaf subject");
            message.setContent(thymeleafService.getContent(), CONTENT_TYPE_TEXT_HTML);
            Transport.send(message);
        } catch (MessagingException e) {
            e.printStackTrace();
        }
    }
}
Ở đây, các bạn có thể thay thế địa chỉ nhân bằng cách thay đổi email received_mail@domain.com, cũng có thể truyền vào 1 mảng InternetAddress các địa chỉ email để hộ trợ việc gửi mail đồng loạt. Các cấu hình về SMTP host, port, username, password đã được config trong file property. Thêm nữa, để nội dung mail hỗ trợ định dạng file HTML chúng ta cần setting thêm Content Type là CONTENT_TYPE_TEXT_HTML = "text/html;charset=\"utf-8\"" cho message gửi đi.
Phần nội dung mail sẽ được Service có tên thymeleafService thi hành để get nội dung mail từ file HTML template.
ThymeleafService: Service dùng để hỗ trợ get content template mail từ file html.
package com.example.springemailwiththymeleaf.service;

import org.springframework.context.support.ResourceBundleMessageSource;
import org.springframework.stereotype.Service;
import org.thymeleaf.TemplateEngine;
import org.thymeleaf.context.Context;
import org.thymeleaf.spring5.SpringTemplateEngine;
import org.thymeleaf.templatemode.TemplateMode;
import org.thymeleaf.templateresolver.ClassLoaderTemplateResolver;
import org.thymeleaf.templateresolver.ITemplateResolver;

@Service
public class ThymeleafService {
    private static final String MAIL_TEMPLATE_BASE_NAME = "mail/MailMessages";
    private static final String MAIL_TEMPLATE_PREFIX = "/templates/";
    private static final String MAIL_TEMPLATE_SUFFIX = ".html";
    private static final String UTF_8 = "UTF-8";

    private static final String TEMPLATE_NAME = "mail-template";

    private static TemplateEngine templateEngine;

    static {
        templateEngine = emailTemplateEngine();
    }

    private static TemplateEngine emailTemplateEngine() {
        final SpringTemplateEngine templateEngine = new SpringTemplateEngine();
        templateEngine.setTemplateResolver(htmlTemplateResolver());
        templateEngine.setTemplateEngineMessageSource(emailMessageSource());
        return templateEngine;
    }

    private static ResourceBundleMessageSource emailMessageSource() {
        final ResourceBundleMessageSource messageSource = new ResourceBundleMessageSource();
        messageSource.setBasename(MAIL_TEMPLATE_BASE_NAME);
        return messageSource;
    }

    private static ITemplateResolver htmlTemplateResolver() {
        final ClassLoaderTemplateResolver templateResolver = new ClassLoaderTemplateResolver();
        templateResolver.setPrefix(MAIL_TEMPLATE_PREFIX);
        templateResolver.setSuffix(MAIL_TEMPLATE_SUFFIX);
        templateResolver.setTemplateMode(TemplateMode.HTML);
        templateResolver.setCharacterEncoding(UTF_8);
        templateResolver.setCacheable(false);
        return templateResolver;
    }

    public String getContent() {
        final Context context = new Context();

        context.setVariable("name", "Messi");
        context.setVariable("project_name", "spring-email-with-thymeleaf Demo");

        return templateEngine.process(TEMPLATE_NAME, context);
    }
}
Config các cấu hình chính:
String MAIL_TEMPLATE_PREFIX = "/templates/"vàString MAIL_TEMPLATE_SUFFIX = ".html": ứng dụng sẽ truy cập vào thư mụctemplatestrong resources và quét tất các những file.htmlđể sử dụng cho việc get template.TEMPLATE_NAME = "mail-template": Tên của file HTML template. Có nghĩa là chúng ta phải cấu hình 1 file HTML có tênmail-template.htmltrong thư mụcresources/templates.context.setVariable("name", "Messi")vàcontext.setVariable("project_name", "spring-email-with-thymeleaf Demo"): tùy biến truyền vào trong file template.
Nào, bây giờ chúng ta cùng start ứng dụng lên xem sao. Nhưng trước hết, bạn cần setting biến môi trường JAVA_HOME cho máy của bạn để có thể chạy được ứng dụng này. Không cần phải cài đặt maven bới khi chúng ta generate ứng dụng spring bởi Spring Initializr thì nó tự động thêm file mvnw và thư mục .mvn để hỗ trợ run ứng dụng bằng maven mà không cần cài đặt. Giờ chúng ta có thể clean, install bằng maven bằng lệnh ./mvnw clean install và start spring app-web bằng lệnh ./mvnw spring-boot:run.
Khi app được start, hãy thử truy cập API send mail bằng lệnh curl -X POST http://localhost:8080/
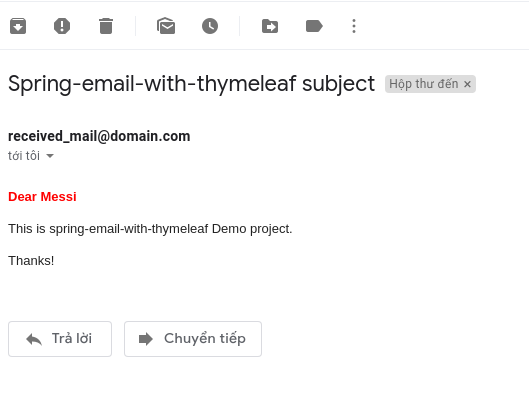
Nào hãy cũng vào hộp thư đến của email nhận và kiểm tra:
Kết luận
Trên đây, mình đã giới thiệu cho các bạn 1 demo nhỏ sử dụng Thymeleaf template bằng Spring boot. Với cách này, ta có thể tùy chỉnh nội dung mail trong file html không giới hạn với Thymeleaf template. Cảm ơn các bạn đã theo dõi.
All rights reserved
