Google Translate Integration with Rails
Bài đăng này đã không được cập nhật trong 6 năm
Google Translate
Google Translate is probably one of the most popular services among people in multilingual settings. It has received a lot of attention before and gaining more and more traction since it was introduced as a built in add on with many Google products like (Chrome, Android and more). It is often required to translate text in applications in an autonomous way, for various reasons. Google Translate API at rescue. In this article we'll focus on Google Translate API implementation for Ruby based (specifically Rails) applications.
Features
The API supports 103 languages. With over 500 million daily users, it's a widely recognized service. The accuracy is increasing over time, although, not as accurate as human translation as of 2019. The service has a large potential to be used in many applications. Although unfortunately Google stopped offering translation API for free, it requires a payment method to be utilized now, with a monthly free limit of first 500,000 characters. Let's move on to see how it is integrated with a Rails application.
Integration
Google Cloud Configuration
In order to configure the Translate API, we need a Google account and a payment method. Once both of these are in hand, we're ready to go.
First, let's head to Google Cloud Console.
From the console, create a new project.
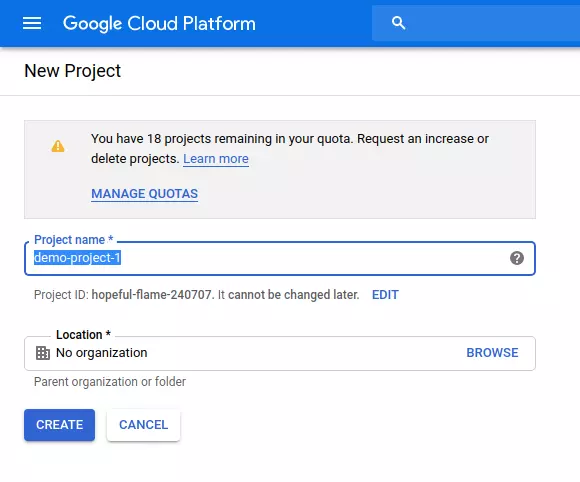
Once the project is created, go to "Navigation Menu > APIs & Services > Dashboard", and select "ENABLE APIS AND SERVICES". Search for "cloud translate api", and select the service.
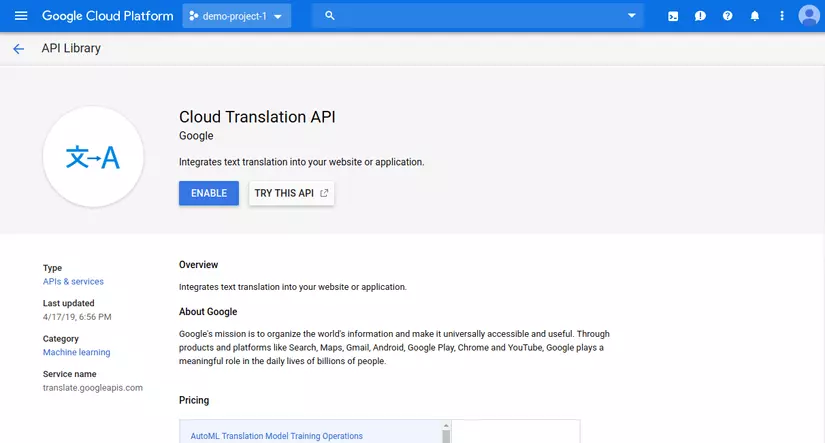
Now "Enable" the service.
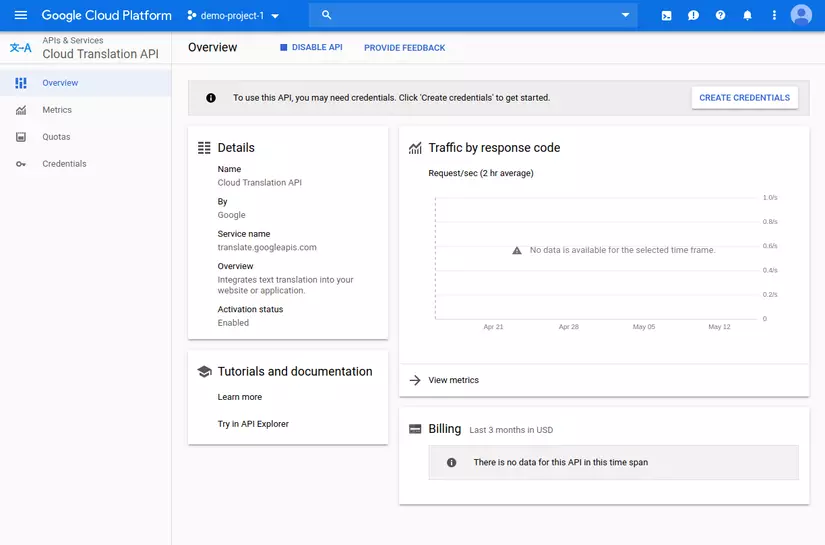
We still need the API credentials to access. it. From the "Cloud Translation API" dashboard, use "Create Credentials" link, which will redirect to a credential creation wizard.
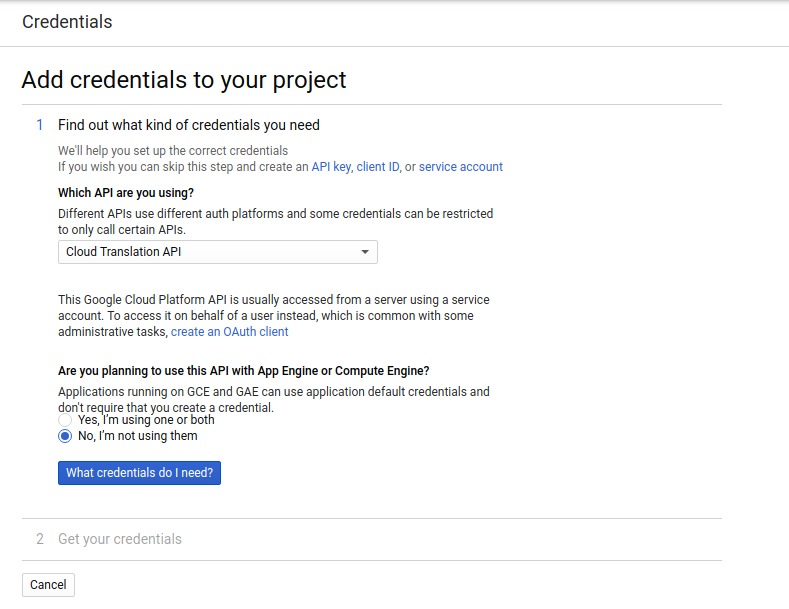
Choose, "what credentials do I need".
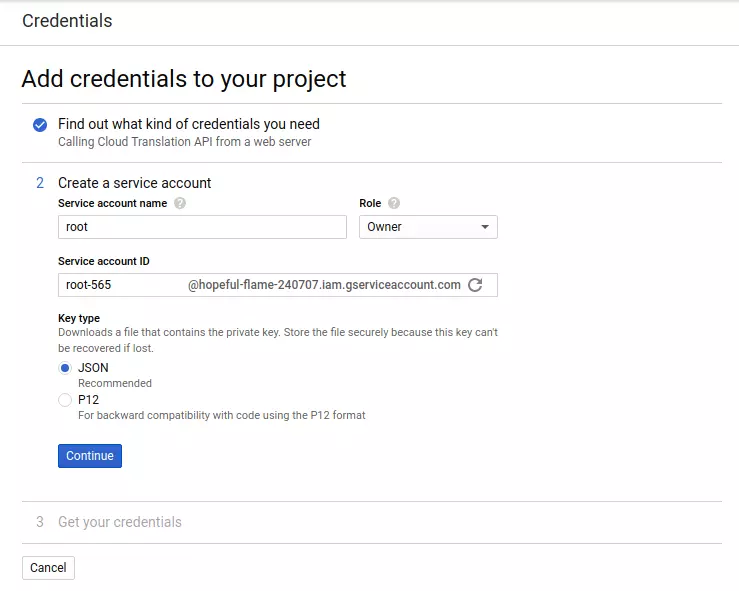
Fill up the information. Select the role "Project > Owner" and "Continue". A JSON credential file will be downloaded. We are gonna use this credential in the next section.
The JSON credential will look as follows.
{
  "type": "service_account",
  "project_id": "hopeful-flame-21536",
  "private_key_id": "1ba86b210a719bddc7ea6a24193fa8b93c586c5f",
  "private_key": "-----BEGIN PRIVATE KEY-----\nMIIEvQIBADANBgkqhkiG9w0BAQEFAASCBKcwggSjAgEAAoIBAQDFOnKIQSYYKRez\nH6n2RpFx0/DCJFje3X4NyPqGQ/f5sDmXxM8yRaoBC1EEiuY8LGvg2lEkJD3HpXMW\neeLtvQq9uN/eoWUXV+t818mQ4lvf2IMV3C1UkiE2i74ARq9L8ILuA60cU4FAf4bJ\nMidUCoqt/YSe3hSiWGf6JpJ9eH9sSFLpHGAE9sRwp1OOWCjkxk3DT47Ww8ZoyVpR\nuJ2PE8b+Fdeha3Hl+alk+2kCuW2GB1INtkkP418dkJqXgoewct5x6FrzkPM3PCn+\nDuQ4P9IjiFdUAFl6ZqkzxzL1bX9nBln9RdsNoSOANBLQ60jIYptEeZ7tM/PCWTSf\nZ7BNTvmrAgMBAAECggEANTLyQNF94od3BpB0amMXiUIXT265cAgDn9lFxiCgSz/f\nERJ7pv5GgHiadmS2/KUoxiJtP5fs+CSnGflvnhvfQVSUQjt7hqAm96pHCucbzBHd\nLfDRY131Sn7AFdf7IbsyvdvM/naBxzF+3FdEZ3VeedcHxkh1/WJmTYHJAsIVcNHK\nG9V255+0KvxuDfpkNadQV+xmYYiC3Yboz2RqbszLrAnzeSh9aGK4I6m4CUIlN/Zp\nC+1266Acw/uGj77GJdsIPAOU3MsUEZZI954tq9aJC783Ez28SvNYyEh1zLjb72kU\njXNeCmqZqvyAnIkpKt8L4gRvYnPZMxVnEuDN+GVsRQKBgQDj76CFNRIaK/PorO3k\nzrg52s1OVWhcV0y8SwZRAmB7juUaQTmgXc3qoVKCrsQ8nYXaiU36/vwUEQGRIZL6\nWQ90fV3gJ8OTJrgaU1xKL17Ioml5bIvYgLCFpSgt1o4ZdTOs2LQfVH5qPhCFrkcq\n08sJKAVuDhuSE8cIEKVDLZBD3wKBgQDdgu+H7p8tgYIOW74gbnywXWxUXFQ36RJY\nhjCh7jWhV5ODDJelP6x49trFkhpyDXXXMkn0GsAkvIOlfzax596YA3lmeuiNWKpt\n/McahBYT9ptRWHOBC47iBo4TQmL9s5hNG2sCZ3ir1v5gGp1ByjcvKChfmwXXqdOm\nlWEeZ+ijtQKBgByjPL2/vzh+kTSIlZMLzeWm8eiHnocLiN6XZoHDFLAxceNsknrt\njjOOdTlqD8m12I0Fd0CzzKQQxuufFkJR8jkmjybcmBvi33qfQpcngHcgwLO6yY84\nC/WenH+110CnkwiCaY8OJJvglF7XWKWu2nGaD6SWLSybQ4Rl4v2fueJtAoGAFbdV\ndlUdg9+TeYbi/9j1HnE6Qpb+prCR3N3i/K0W0ud8Dbf5UfkJFp7U2dO2BgJttv82\nItlQhwl4OoxbN1vNBcgpabOZAupzYu8KMf5LD8/4cCQkxrz0WBJecWLrw4WM49pR\nRl4QhYBBVfil/CIwAM6GDsFqiYzbtBQm/k0fkJUCgYEAm5bDaXHa1mAj2K7xCe1n\nfSw6SSLkw7fkP7MqRFfUdUoUwlv+iJaw6cSDXQmfG6zLrZHsqWMVzsI7B7/VdSOz\nCmtBUigLdTOij16bGObO5bywX+lO32bCiGwvNFZjOrS2oQ/gR3a6VvdV+/eOmBtm\nPUwbVqp1naQ+uCLubF0yBf4=\n-----END PRIVATE KEY-----\n",
  "client_email": "root-565@hopeful-flame-21536.iam.gserviceaccount.com",
  "client_id": "101743723146221348410",
  "auth_uri": "https://accounts.google.com/o/oauth2/auth",
  "token_uri": "https://oauth2.googleapis.com/token",
  "auth_provider_x509_cert_url": "https://www.googleapis.com/oauth2/v1/certs",
  "client_x509_cert_url": "https://www.googleapis.com/robot/v1/metadata/x509/root-565%40hopeful-flame-21536.iam.gserviceaccount.com"
}
Rails Application Configuration
First, we need to generate a Rails project scaffold. Once the scaffold is ready, we'll add the following gems to
Gemfile.
# Gemfile
gem "google-cloud"
gem "google-cloud-translate"
And, finally run bundle install to install the dependencies.
We need to import the google translate gem in order to use it. This is done by,
# application.rb
require "google/cloud/translate"
Now, that the library is set, we it's time to set up authentication. Regardless of what environment management gem we are using, let's
set up the following environment variables, so that the client library ( google-cloud-translate and google-cloud ) can authenticate
using it.
# <ENVFILE>
CLOUD_PROJECT_ID: '<PROJECT_ID>'
GOOGLE_APPLICATION_CREDENTIALS: 'config/<CREDENTIAL_JSON>'
Here, CREDENTIAL_JSON is the JSON key file we downloaded in the Google Cloud Configuration section. We need to put the file in
Rails.root.join("config") directory.
Don't forget to add the JSON key file to .gitignore file to avoid the credential from accidentally being added to the source control.
And, now we are ready to utilize the API. The first step is to initiate a Google translate instance.
# source.rb
translate = Google::Cloud::Translate.new project: ENV["CLOUD_PROJECT_ID"]
Now, a translation can be performed using,
# source.rb
translation = translate.translate "Hello world!", from: "en", to: "vi" #=> Chào thế giới!
The translation response is simply a string. It is also possible to omit the from field, in which case, the API will utilize the Detect Language feature.
Alternative to the google-cloud-translate Gem
Other than using the gem, there's also a convenient REST API which can be utilized in order to have a better control on the internals. 
A simple API invocation looks like the following.
curl -X POST \
     -H "Authorization: Bearer "<ACCESS_TOKEN> \
     -H 'Content-Type: application/json' --data "{
     source_language_code: 'en',
     target_language_code: 'ru',
     contents: ['Hello world!']
}" "https://translation.googleapis.com/v3beta1/projects/<PROJECT_ID>/locations/global:translateText"
A response format is identical to the following.
{
  "translations": [
    {
      "translatedText": "Chào thế giới!"
    }
  ]
}
An access token can be extracted by utilizing the Google Cloud SDK (or google-cloud gem).
Google Translate API is available for a number of languages other than Ruby, including Java, Python and several others. It's a very convenient API to use. Although it was free earlier, Google recently turned it into a paid service which is a bit shocking. A version 3 API is currently in beta. We'll have another post in the future on the differences introduced in the new API. That's all for now. Happy hacking!
References
- Homepage: https://cloud.google.com/translate/
- Documentation: https://cloud.google.com/translate/docs/apis
- Pricing: https://cloud.google.com/translate/pricing
- Ruby Env Setup: https://cloud.google.com/ruby/docs/setup
- Authentication: https://cloud.google.com/docs/authentication/production#auth-cloud-implicit-ruby
All rights reserved