Google Cloud for Data Science: Beginner's Guide
Bài đăng này đã không được cập nhật trong 4 năm
Learn to set up a data science environment on Google Cloud: create an instance on Google Compute Engine, install Anaconda and run Jupyter notebooks! While AWS EC2 is the leader in cloud computing, Google Cloud has developed a very compelling and competitive Cloud Computing platform.
In this tutorial, you will learn how to:
- Create an instance on Google Compute Engine (GCE),
- Install a data science environment based on the Anaconda Python distribution, and
- Run Jupyter notebooks accessible online.
Working in the cloud instead of on your own machine has two main advantages for data science projects:
-
Scalability: you can tailor the power (RAM, CPU, GPU) of your instance to your immediate needs. Starting with a small and cheap instance and adding memory, storage, CPUs or GPUs as your project evolves.
-
Reproducibility: a key condition of any data science project. Allowing other data scientists to review your models and reproduce your research is a necessary condition of a successful implementation. By setting up a working environment on a virtual instance, you make sure your work can easily be shared, reproduced, and vetted by other team members.
Google Compute Engine
Although built around the same concepts and elements (instances, images and snapshots), EC2 and GCE differ on both access and resources organization.
A key aspect of the Google Cloud Platform (GCP) is its project-centered organization. All billing, permissions, resources and settings are grouped within a user-defined project which basically acts as a global namespace. This not only simplifies the interconnected mapping of the resources you use (storage, databases, instances, ...) but also access management from role-based permissions to actual ssh keys and security. When it comes to user friendliness and access and role management, I find that working on the GCP is easier than working with AWS especially using multiple services.
The GCP also offers certain services which are particularly relevant for data science, including but not limited to:
- Dataprep to build data processing pipelines,
- Datalab for data exploration,
- The Google Machine Learning Engine built on TensorFlow
- BigQuery a data warehouse solution that holds many fascinating Big Data datasets.
A low learning curve and data friendly services make the GCP a must have in your data scientist toolbox.
Before you start launching instances and installing Python packages, let's spend a few moments to review some of the common vocabulary used in Cloud Computing.
VMs, Disks, Images and Snapshots
A Virtual Machine (VM) also called "an instance" is an on-demand server that you activate as needed. The underlying hardware is shared among other users in a transparent way and as such becomes entirely virtual to you. You only choose a global geographic location of the instance hosted in one of Google's data center.
Getting Started with Your First VM on GCP
Create an Account and Project
You will first use the web console to define and launch a Debian-based instance and then switch to the web-based shell terminal to install all the necessary packages for your data science stack.
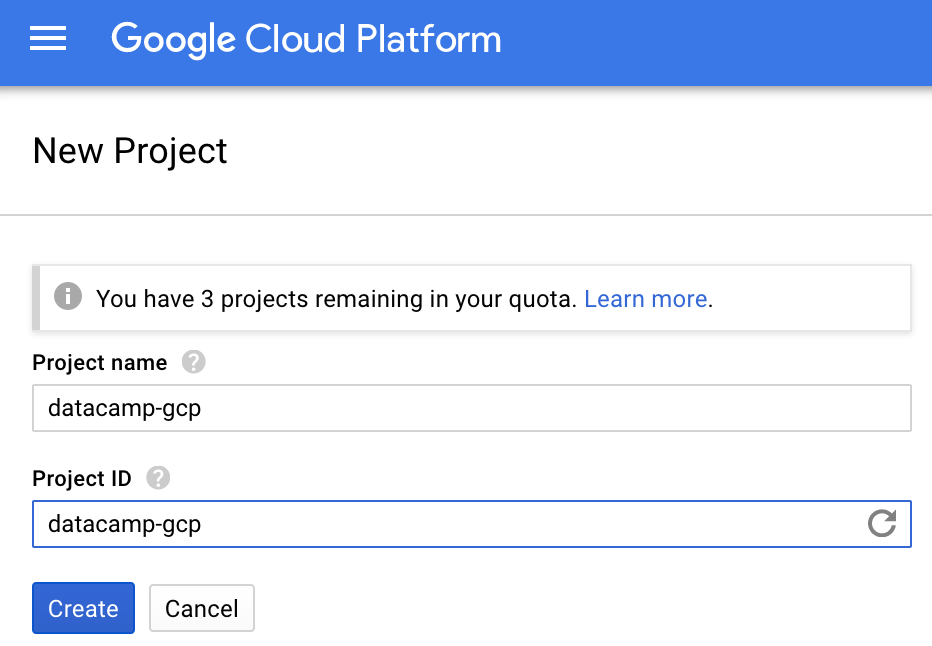
But first you need to create a new project:
- Go to the Resource Management page,
- Click on "Create a new project",
- Specify your project's title and notice how Google generates a project ID on the fly.
- Edit the project ID as needed and click on "Create".
The project ID has to be unique across the GCP naming space, while the project title can be anything you want. I name my project datacamp-gcp as shown below:
By default, when you create a new project, your Google account is set as the owner of the project with full permissions and access across all the project's resources and billing.
In the roles section of the IAM page, you can add people with specific roles to your project. For the purpose of this tutorial, you will skip that part and keep you as the sole user and admin of the project.
Create an instance
To create your first VM, you just go through the following steps:
-
Go to your dashboard at https://console.cloud.google.com/home/dashboard and select the project that you just created.
-
In the top left menu select "Compute Engine" and click on "VM instances".
-
In the dialog, click on the "Create" button.
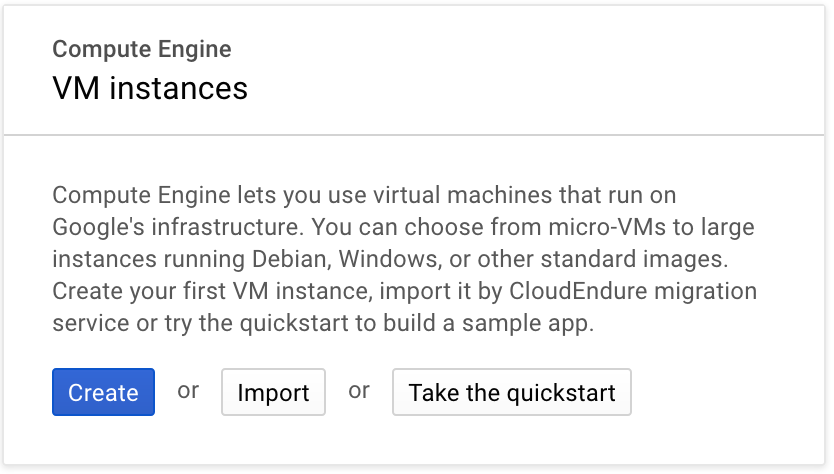
You are now on the "Create an Instance" page.
-
Name the instance: you can choose any name you want. I name my instance starling.
-
Select the region: the rule of thumb is to select the cheapest region closest to you to minimize latency. I choose east-d. Note that prices vary significantly by region.
-
Select the memory, storage and CPU you need. You can use one of several presets or customize your own instance. Here, I choose the default setup n1-standard-1 with 3.75 Gb RAM and 1vCPU for an estimated price of $24.67 per month.
-
Select the boot disk and go with the default Debian GNU/Linux 9 (stretch) OS with 10 Gb. If you prefer using Ubuntu or any other linux distribution, click on the "Change" button and make the appropriate selection. Since Ubuntu is a close derivation of Debian, either distributions will work for this tutorial.

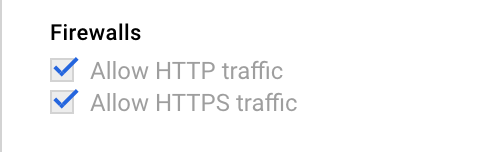
- Make sure you can access the VM from the internet by allowing http and https traffic.

- (Optional) Enable a persistent disk for backup purposes: Click on the "Management, Disks, networking, SSH keys" link. This displays a set of tabs, select the "Disks" tab and unselect the "Deletion Rule". This way, when you delete your instance, the disk will not be deleted and can be used later on to spin up a new instance.

- Finally, click on "Create". Your instance will be ready in a few minutes.
Notice the link "Equivalent command line" link below the Create button. This link shows the equivalent command line needed to create the same instance from scratch. This is a truly smart feature that facilitates learning the syntax of gcloud SDK.
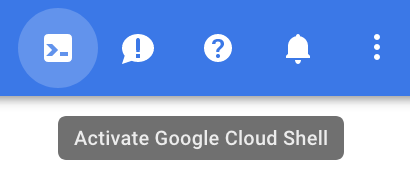
At this point, you have a running instance which is pretty much empty. There are 2 ways you can access the instance. Either by installing the gcloud SDK on your local machine or by using Google's Cloud Shell.
Google's Cloud Shell
Google's Cloud Shell is a stand alone terminal in your browser from which you can access and manage your resources. You activate the google shell by clicking the >_ icon in the upper right part of the console page. The lower part of your browser becomes a shell terminal.
This terminal runs on a f1-micro Google Compute Engine virtual machine with a Debian operating system and 5Gb storage. It is created on a per-user, per-session basis. It persists while your cloud shell session is active and is deleted after 20 minutes of inactivity. Since the associated disk is persistent across sessions, your content (files, configurations, ...) will be available from session to session. The cloud shell instance comes pre-installed with the gcloud SDK and vim.

It is important to make the distinction between the Cloud shell instance, which is user-based, and the instance you just created. The instance underlying the cloud shell is just a convenient way to have a resource management environment and store your configurations on an ephemeral instance. The VM instance that you just created, named starling in the above example, is the instance where you want to install your data science environment.
Instead of using the Google Cloud shell, you can also install the gcloud SDK on your local machine and manage everything from your local environment.
Here are a few useful commands to manage your instances.
- List your instances:
gcloud compute instances list
- Stop the instance (takes a few seconds):
gcloud compute instances stop <instance name>
- Start the instance (also takes a few seconds):
gcloud compute instances start <instance name>
- and ssh into the starling instance:
gcloud compute ssh <instance name>
Setting up the VM
Run that last command in your Google Shell window to log in your instance. The next steps will consists in:
-
Installing a few Debian packages with apt-get install.
-
Installing the Anaconda or Miniconda distribution.
-
Setting up the instance to make Jupyter notebooks securely accessible online.
Debian packages
Let's start by installing the Debian packages:
- bzip2, which is required to install Mini/Anaconda,
- git, which is always useful to have, and
- libxml2-dev, which is not required at this point but you will often need it when installing further Python libraries.
Run the following commands, which work for both Ubuntu and Debian, in the terminal:
$ sudo apt-get update
$ sudo apt-get install bzip2 git libxml2-dev
Anaconda / Miniconda
Once the above packages are installed, turn your attention to installing the Anaconda distribution for Python 3. You have the choice between installing the full Anaconda version which includes many scientific Python libraries, some of which you may not actually need or installing the lighter Miniconda version which requires you to manually install the Jupyter libraries. The process is very similar in both cases.
To install the lighter Miniconda distribution, run
$ wget https://repo.continuum.io/miniconda/Miniconda3-latest-Linux-x86_64.sh
$ bash Miniconda3-latest-Linux-x86_64.sh
$ rm Miniconda3-latest-Linux-x86_64.sh
$ source .bashrc
$ conda install scikit-learn pandas jupyter ipython
The install shell script is downloaded and run with the first 2 lines. You should accept the license and default location. In line 3, the no longer needed shell file is removed. Sourcing .bashrc on line 4, adds the conda command to your $PATH without having to open a new terminal.
And finally, the last line installs the required python libraries: scikit-learn pandas jupyter ipython.
The commands to install the full Anaconda distribution are very similar. Make sure to check the download page to get the latest version of the shell script file:
$ wget https://repo.continuum.io/archive/Anaconda3-5.0.1-Linux-x86_64.sh
$ bash Anaconda3-5.0.1-Linux-x86_64.sh
$ rm Anaconda3-5.0.1-Linux-x86_64.sh
$ source .bahsrc
To verify that everything is installed properly, check your python version with python --version and verify that the right python is called by default with the command which python. You should be getting something similar to

You now have a working Python environment with the standard data science libraries installed (sklearn, pandas) .
Allowing Web Access
The third and final step is to configure your VM to allow web access to your Jupyter notebooks.
You first need to make the VM accessible from the web. To do that, you will create a firewall rule via the Google Cloud console. Go back to your Instances dashboard and in the top left menu, select "VPC Network > Firewall rules". Click on the "CREATE FIREWAL RULE" link and fill out the following values:
- Name: jupyter-rule (you can choose any name)
- Source IP ranges: 0.0.0.0/0
- Specified protocols and ports: tcp:8888
- And leave all the other variables to their default values.
The form should look like:
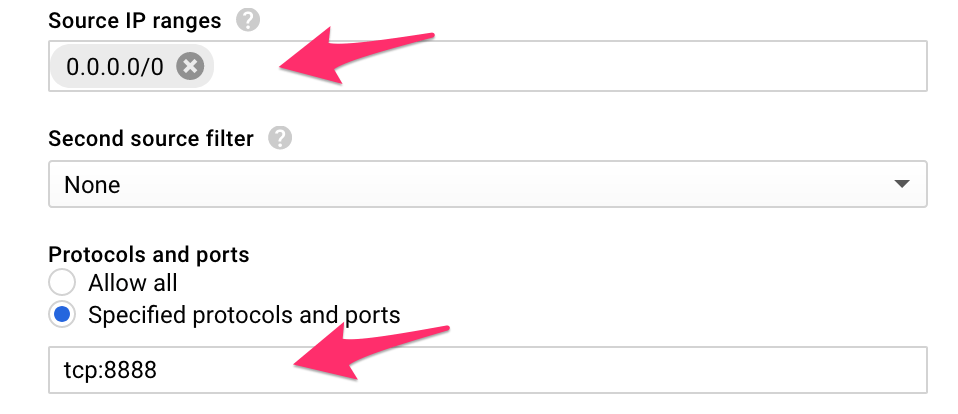
This firewall rule allows all incoming traffic (from all IPs) to hit the port 8888.
Using the "Equivalent command line link", you can see that firewall rule can also be created from the terminal with the following command line:
$ gcloud compute --project=datacamp-gcp firewall-rules create jupyter-rule --direction=INGRESS --priority=1000 --network=default --action=ALLOW --rules=tcp:8888 --source-ranges=0.0.0.0/0
Now go back to the VM page (top left menu > Compute Engine > VM instances), click on your VM name.
Make a note of your VM IP address. This is the IP address that you will use in your browser to access your Jupyter environment. In my example, the IP address is: 35.196.81.49, yours will be different.

and make sure the Firewall rules are checked:
Jupyter Configuration
Jupyter notebooks come with a configuration file that needs to be generated and edited in order to setup online access to your notebooks. In the terminal, run jupyter notebook --generate-config to generate the configuration file. And jupyter notebook password to generate a password.
Tip: make sure that this is a strong password!
Now edit the configuration file you just created with vim .jupyter/jupyter_notebook_config.py and add the following line at the top of the file
c.NotebookApp.ip = '*'
(to switch to edit mode in vim, just type the i character). Quit and save with the following sequence ESC:wq.
This will allow the notebook to be available for all IP addresses on your VM and not just the http://localhost:8888 URL you may be familiar with when working on your local machine.
Launch
You are now ready to launch your Jupyter notebook with the command line:
$ jupyter-notebook --no-browser --port=8888
And you should see something like that in the terminal:

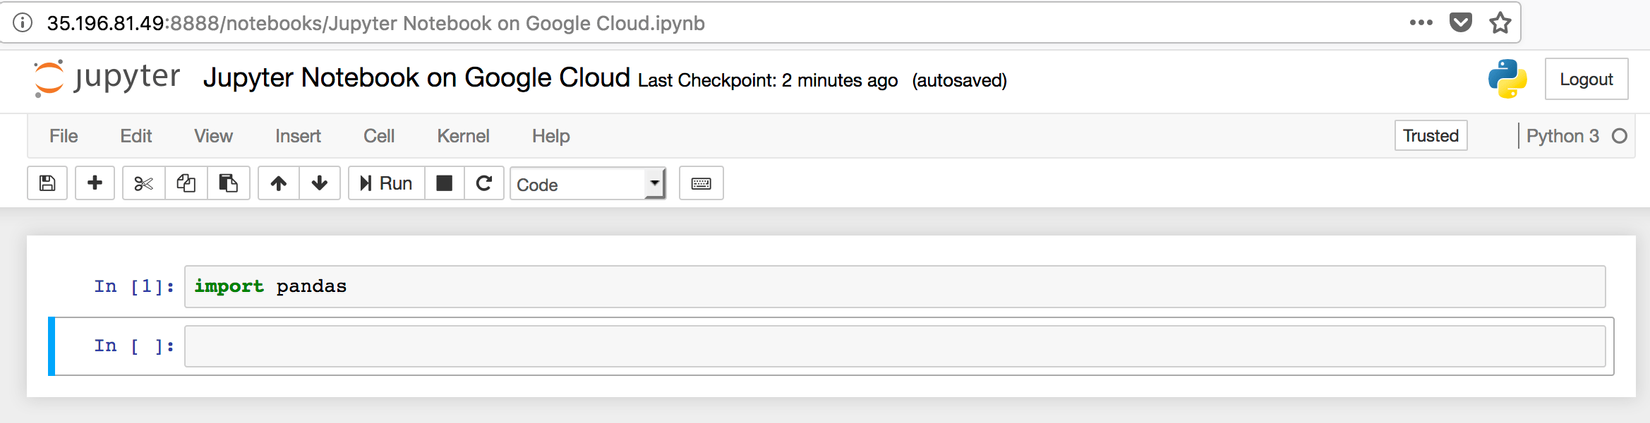
In your browser go to the URL: http://<your_VM_IP>:8888/ to access your newly operational Jupyter notebook.
To check that everything is working as expected, create a new Python 3 notebook, and import pandas
Intermezzo
A few notes on your current setup:
- The IP address you used in your browser is ephemeral. Which means that every time you restart your VM, your notebooks will have a different URL. You can make that IP static by going to: Top left menu > VPC Network > External IP addresses and select "static" in the drop down menu

-
The security of your current setup relies on the strength of the Jupyter notebook password that you defined previously. Anyone on the internet can access your Jupyter environment at the same URL you use (and bots will absolutely try). One powerful but very unsecure core feature of Jupyter notebooks is that you can launch a terminal with sudo access directly from the notebook. This means that anyone accessing your notebook could take control of your VM after cracking your notebook password and potentially run anything that would send your bills through the roof. The first level measures to prevent that from happening includes
-
Making sure your Jupyter password is a strong one
-
Remember to stop your VM when you're not working on it
You are also currently running the server over http and not https which is not secure enough. Let’s Encrypt provides free SSL/TLS certificates and is the encryption solution recommended in the jupyter documentation. For more information on security issues related to running a public Jupyter notebook, read this.
IPython
Jupyter notebooks are very convenient for online collaborative work. But you can also run an IPython session from your terminal simply with the ipython command. That will open an IPython session which has all the bells and whistles of a Jupyter notebook such as magic commands (%paste, %run, ...) but without the web interface.
R
It's easy to set up your VM to be enable R notebooks in your Jupyter console. The instructions for enabling R Markdown are available from this great DataCamp tutorial: Jupyter And R Markdown: Notebooks With R by Karlijn Willems.
Conclusion
Google Cloud offers many interesting services for data science and powerful yet easy to setup VM instances alongside a very attractive free trial offer. The web console is easy to navigate and often displays the command line equivalent to current configuration pages, thus lowering the barrier to using the gcloud SDK.
All rights reserved
