GMAIL LIKE CHAT APPLICATION IN RUBY ON RAILS
Bài đăng này đã không được cập nhật trong 4 năm
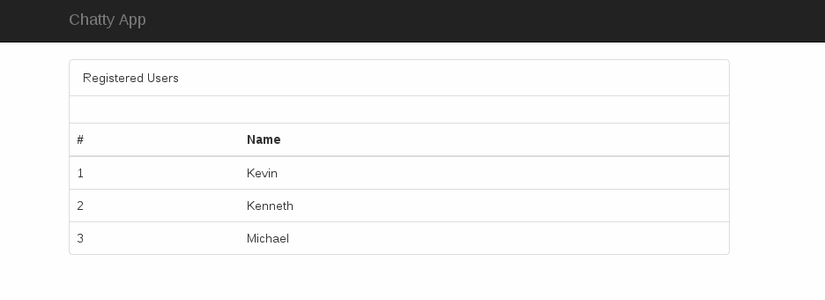
Chúng ta sẽ đi tìm hiểu cách thêm tính năng nhắn tin vào một ứng dụng rails đã có sẵn. Dưới đây là màn hình của một ứng dụng rails đơn giản mà sử dụng Devise để xác thực người dùng. Trên trang chủ hiển thị các user khác ngoài user đang đăng nhập
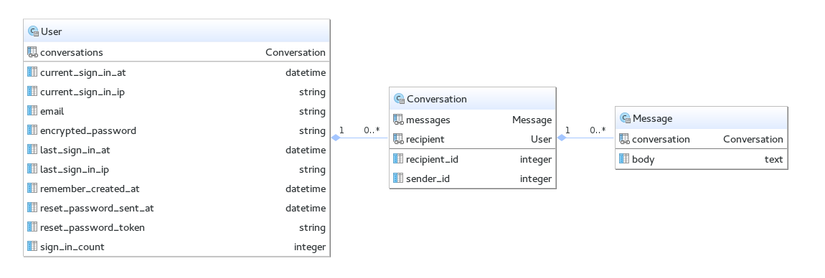
Để các user có chat với những người dùng khác. Chúng ta sẽ thiết lập logic cho ứng dụng đơn giản. Một User có nhiều conversations và một conversation có nhiều messages. Sau đây là biều đồ mối quan hệ
- CONVERSATION MODEL
Chúng ta sẽ đi tạo modle Conversation. Một conversation có chứa sender_id và recipient_id, chúng là instances của User. sender_id sẽ chứa id của user bắt đầu cuộc hội thoại và recipient_id sẽ chứa id của user khác. Bạn có thế sử dụng lệnh sau để tạo model một cách tự động:
$ rails g model Conversation sender_id:integer recipient_id:integer
Chúng ta nên add thêm index cho sender_id và recipient_id. File model Conversation sẽ có dạng;
class CreateConversations < ActiveRecord::Migration
  def change
    create_table :conversations do |t|
      t.integer :sender_id
      t.integer :recipient_id

      t.timestamps
    end

    add_index :conversations, :sender_id
    add_index :conversations, :recipient_id
  end
end
Bây giờ trong model Conversation không có cột user_id, vì thế chúng ta cần chỉnh sửa lại model User. Cần thêm vào foreign_key như sau:
class User < ActiveRecord::Base
  devise :database_authenticatable, :registerable,
         :recoverable, :rememberable, :trackable, :validatable

  has_many :conversations, foreign_key: :sender_id
end
Tiếp theo cần phải sửa trong model Conversation. Một conversation sẽ belongs_to cả sender và recipient. cả hai là instances của user.
class Conversation < ActiveRecord::Base
  belongs_to :sender, foreign_key: :sender_id, class_name: 'User'
  belongs_to :recipient, foreign_key: :recipient_id, class_name: 'User'

  has_many :messages, dependent: :destroy

  validates_uniqueness_of :sender_id, scope: :recipient_id

  scope :involving, -> (user) do
    where("conversations.sender_id =? OR conversations.recipient_id =?",user.id,user.id)
  end

  scope :between, -> (sender_id,recipient_id) do
    where("(conversations.sender_id = ? AND conversations.recipient_id =?) OR (conversations.sender_id = ? AND conversations.recipient_id =?)", sender_id,recipient_id, recipient_id, sender_id)
  end
end
Trong model Conversation ở trên có thiết lập conversation có nhiều messages. Chúng ta cũng cần validate uniqueness cho sender_id và bao gồm cả recipient_id. Điều này đảm bảo rằng sender_id và recipient_id là luôn luôn duy nhất. ví dụ: một conversation với (sender_id: 1, recipient_id: 2) và cái khác với (sender_id: 2, and recipient_id: 1) sẽ không thể xảy ra một các cuộc hội thoại giống nhau giữa các user giống nhau.
Scope involving sẽ giúp ta lấy tất cả các conversations của user hiện thời.
Scope between sẽ giúp ta kiểm tra nếu conversation tồn tại giữa bất kỳ 2 user trước khi tạo conversation.
- Message Model
Chúng ta cần tạo thêm model message. Sử dụng lệnh sau để tạo model message tự động:
$ rails g model Message body:text conversation:references user:references
sau đó, chạy lệnh sau để tạo database:
$ rake db:migrate
Model message có 3 thuộc tính body, conversation_id, user_id. Để chúng không nil thì chúng ta cần thêm vào validate luôn tồn tại cho 3 thuộc tính:
class Message < ActiveRecord::Base
  belongs_to :conversation
  belongs_to :user

  validates_presence_of :body, :conversation_id, :user_id
end
- Adding the message button
Ở trên chúng ta đã tạo xong model. Tiếp theo, trên trang chủ chúng ta sẽ thêm vào một nút gửi tin nhắn bên cạnh tên của mỗi user. Mỗi nút sẽ lưu trữ 2 dữ liệu id của người dùng hiện thời và id của người nhận khác. Khi user click vào button chúng ta sễ gửi một yêu cầu không đồng bộ đến ứng dụng với 2 params đó. Nếu cuộc trò chuyện tồn tại, ta sẽ trả về id của conversation ngay, nếu không thì chúng ta sẽ tạo một conversation mới và trả về id của conversation vừa tạo.
<% @users.each_with_index do |user, index| %>
    <tr>
      <td><%= index +=1 %></td>
      <td><%= user.name %></td>
      <td>
        <%= link_to "Send Message", "#", class: "btn btn-success btn-xs start-conversation",
                    "data-sid" => current_user.id, "data-rip" => user.id %>
      </td>
    </tr>
<% end %>
Ở trên thuộc tính data-sid sẽ lưu lại id của user hiện thời và data-rip lưu id của user nhận meseage. Chúng ta sẽ gửi các giá trị thông qua ajax đến server để tạo conversation nếu cần thiết. Hãy tạo file chat.js trong folder javascripts của bạn và thêm nội dụng của chat.js. Đây là file chứa tất cả các hàm chúng ta sẽ cần khi tạo chatbox. Bạn cần thêm cả require đến file vừa tạo:
//= require chat
user.js
var ready = function () {

    /**
     * When the send message link on our home page is clicked
     * send an ajax request to our rails app with the sender_id and
     * recipient_id
     */

    $('.start-conversation').click(function (e) {
        e.preventDefault();

        var sender_id = $(this).data('sid');
        var recipient_id = $(this).data('rip');

        $.post("/conversations", { sender_id: sender_id, recipient_id: recipient_id }, function (data) {
            chatBox.chatWith(data.conversation_id);
        });
    });

    /**
     * Used to minimize the chatbox
     */

    $(document).on('click', '.toggleChatBox', function (e) {
        e.preventDefault();

        var id = $(this).data('cid');
        chatBox.toggleChatBoxGrowth(id);
    });

    /**
     * Used to close the chatbox
     */

    $(document).on('click', '.closeChat', function (e) {
        e.preventDefault();

        var id = $(this).data('cid');
        chatBox.close(id);
    });

    /**
     * Listen on keypress' in our chat textarea and call the
     * chatInputKey in chat.js for inspection
     */

    $(document).on('keydown', '.chatboxtextarea', function (event) {

        var id = $(this).data('cid');
        chatBox.checkInputKey(event, $(this), id);
    });

    /**
     * When a conversation link is clicked show up the respective
     * conversation chatbox
     */

    $('a.conversation').click(function (e) {
        e.preventDefault();

        var conversation_id = $(this).data('cid');
        chatBox.chatWith(conversation_id);
    });

}

$(document).ready(ready);
$(document).on("page:load", ready);
Trong users.js chúng ta sẽ lắng nghe các sự kiện trong trang home và gọi các phương thức tương ứng trong file chat.js
- Creating Controllers
Để xử lý các yêu cầu trong file js chúng ta cần tạo các controller. Tạo tự động controller conversations bằng lệnh sau:
$ rails g controller conversations
Controller conversation chỉ có 2 action là create và show:
class ConversationsController < ApplicationController
  before_filter :authenticate_user!

  layout false

  def create
    if Conversation.between(params[:sender_id],params[:recipient_id]).present?
      @conversation = Conversation.between(params[:sender_id],params[:recipient_id]).first
    else
      @conversation = Conversation.create!(conversation_params)
    end

    render json: { conversation_id: @conversation.id }
  end

  def show
    @conversation = Conversation.find(params[:id])
    @reciever = interlocutor(@conversation)
    @messages = @conversation.messages
    @message = Message.new
  end

  private
  def conversation_params
    params.permit(:sender_id, :recipient_id)
  end

  def interlocutor(conversation)
    current_user == conversation.recipient ? conversation.sender : conversation.recipient
  end
end
- Installing private_pub
Nó sẽ tốt hơn nếu chúng ta cài đặt thêm private_pub, chúng ta sẽ được sử dụng các chức năng của gem. Thêm gem vào Gemfile và chạy bundle để cài đặt nó:
gem 'private_pub'
gem 'thin'
Chạy lệnh sau để sinh cấu hình cho private_pub
rails g private_pub:install
Chúng ta bắt đầu Rack server bằng lệnh sau:
rackup private_pub.ru -s thin -E production
Bươc cuối cùng là thêm require private_pub vào file application.js
//= require private_pub
Chúng ta có thể tạo view đầu tiên sử dụng chức năng private_pub:
views/conversations/show.html.erb
<div class="chatboxhead">
  <div class="chatboxtitle">
    <i class="fa fa-comments"></i>

    <h1><%= @reciever.name %> </h1>
  </div>
  <div class="chatboxoptions">
    <%= link_to "<i class='fa  fa-minus'></i> ".html_safe, "#", class: "toggleChatBox", "data-cid" => @conversation.id %>

    <%= link_to "<i class='fa  fa-times'></i> ".html_safe, "#", class: "closeChat", "data-cid" => @conversation.id %>
  </div>
  <br clear="all"/>
</div>
<div class="chatboxcontent">
  <% if @messages.any? %>
      <%= render @messages %>
  <% end %>
</div>
<div class="chatboxinput">
  <%= form_for([@conversation, @message], :remote => true, :html => {id: "conversation_form_#{@conversation.id}"}) do |f| %>
      <%= f.text_area :body, class: "chatboxtextarea", "data-cid" => @conversation.id %>
  <% end %>
</div>

<%= subscribe_to conversation_path(@conversation) %>
- Message controller
Chúng ta sẽ tạo controller cho message:
rails g controller messages
messages_controller.rb
class MessagesController < ApplicationController
  before_filter :authenticate_user!

  def create
    @conversation = Conversation.find(params[:conversation_id])
    @message = @conversation.messages.build(message_params)
    @message.user_id = current_user.id
    @message.save!

    @path = conversation_path(@conversation)
  end

  private

  def message_params
    params.require(:message).permit(:body)
  end
end
Controller message chỉ có một hành động create. Chúng ta sẽ lưu lại đường dẫn của conversation vào biến @path. Nó sẽ được dùng để đẩy cac thông báo lên view.
Hành động create sẽ render ra một javascript template. Chúng ta sẽ tạo nó trong folder messages:
create.js.erb
<% publish_to @path do %>
    var id = "<%= @conversation.id %>";
    var chatbox = $("#chatbox_" + id + " .chatboxcontent");
    var sender_id = "<%= @message.user.id %>";
    var reciever_id = $('meta[name=user-id]').attr("content");

    chatbox.append("<%= j render( partial: @message ) %>");
    chatbox.scrollTop(chatbox[0].scrollHeight);

    if(sender_id != reciever_id){
    	chatBox.chatWith(id);
        chatbox.children().last().removeClass("self").addClass("other");
    	chatbox.scrollTop(chatbox[0].scrollHeight);
        chatBox.notify();
    }
<% end %>
Tiếp theo cần tạo file partial message trong folder messages:
_message.html.erb
<li class="<%=  self_or_other(message) %>">
  <div class="avatar">
    <img src="http://placehold.it/50x50" />
  </div>
  <div class="chatboxmessagecontent">
    <p><%= message.body %></p>
    <time datetime="<%= message.created_at %>" title="<%= message.created_at.strftime("%d %b  %Y at %I:%M%p") %>">
      <%= message_interlocutor(message).name %> • <%= message.created_at.strftime("%H:%M %p") %>
    </time>
  </div>
</li>
Chúng ta cũng cần định nghĩa 2 method self_or_other và message_interlocutor với tham số đưa vào là message. Chúng ta sẽ viết nó trong helper:
messages_helper.rb
module MessagesHelper
  def self_or_other(message)
    message.user == current_user ? "self" : "other"
  end

  def message_interlocutor(message)
    message.user == message.conversation.sender ? message.conversation.sender : message.conversation.recipient
  end
end
Cuối cùng chúng ta cần tạo đường dẫn cho các controller:
routes.rb
Rails.application.routes.draw do

  devise_for :users

  authenticated :user do
    root 'users#index'
  end

  unauthenticated :user do
    devise_scope :user do
      get "/" => "devise/sessions#new"
    end
  end

  resources :conversations do
    resources :messages
  end
end
Tạo file chat.css trong thư mục stylesheets và paste nội dung của chat.css vào. Sau đó thêm một số font vào trong application.html:
application.html
<!DOCTYPE html>
<html lang="en">
<head>
  <meta charset="utf-8">
  <meta http-equiv="X-UA-Compatible" content="IE=edge">
  <meta name="viewport" content="width=device-width, initial-scale=1">
  <meta name="description" content="">
  <meta name="author" content="">
  <meta content='<%= user_signed_in? ? current_user.id : "" %>' name='user-id'/>

  <title>Chatty</title>
  <%= stylesheet_link_tag    'application', media: 'all', 'data-turbolinks-track' => true %>
  <%= stylesheet_link_tag '//maxcdn.bootstrapcdn.com/font-awesome/4.1.0/css/font-awesome.min.css' %>
  <%= javascript_include_tag 'application', 'data-turbolinks-track' => true %>
  <%= csrf_meta_tags %>

  <!-- shiv here -->

</head>

<body>

<%= render 'layouts/nav' %>

<div class="container">
  <!-- flash messages here -->
  <%= yield %>
</div>
<audio id="chatAudio"><source src="/sounds/notification.mp3" type="audio/mpeg"></audio>
</body>

</html>
Bạn có thể thay đổi css cho đẹp hơn tùy theo ý mình.
Kết Luận:
Trên đây là toàn bộ quá trình để tạo một ứng dụng chat với ruby on rails. Cảm ơn bạn đã theo dõi bài viết.
Tham khảo:
http://josephndungu.com/tutorials/gmail-like-chat-application-in-ruby-on-rails
https://www.sitepoint.com/create-a-chat-app-with-rails-5-actioncable-and-devise/
All rights reserved
