Giới thiệu về State management với vuex trong Vuejs
Bài đăng này đã không được cập nhật trong 4 năm
Nếu như bạn đã từng làm việc với ReactJS thì chắc hẳn cũng đã từng nghe tới Redux, một thư viện giúp bạn quản lí trạng thái (state) của application. Nó được thiết kế dựa trên Flux, nhưng giảm bớt những đau khổ thường gặp phải khi viết một ứng dụng Flux. Và Vuex là một thư viện của Vuejs có chức năng cũng tương tự như Redux.
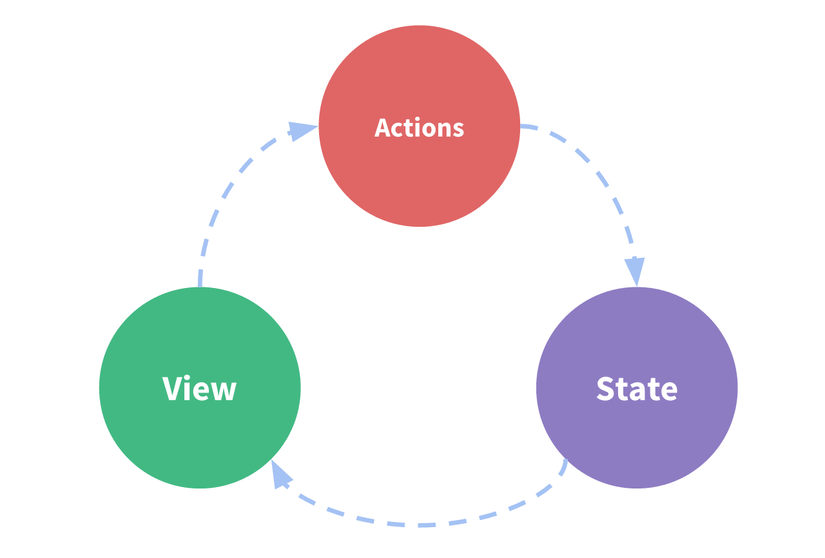
Chúng ta cùng nói qua về one-way data binding trước kia nhé:
 Flow của nó gồm các thành phần chính sau:
Statelà dữ liệu bắt đầu của ứng dụng.Viewmapping với state.Actionlà cách mà thay đổi state dựa vào tương tác người dùng từ view. Tuy nhiên, mô hình này bị phá vỡ khi chúng ta có rất nhiều cáccomponentcùng dùng chung, chia sẻstate. Đó là lý dovuexxuất hiện
State management
Khi project của bạn sử dụng Vuejs mà có chứa nhiều components sẽ gặp phải vấn đề là việc chia sẻ dữ liệu giữa các component và việc dùng chung dữ liệu của các component phải được cập nhật khi có dữ liệu thay đổi. Vuex đóng vai trò là một centralized state management. Vuex quản lý các state thông qua việc implement:
State: một object chứa dữ liệuGetter: giống như một bộ lọc cho phép truy cập và sàng lọc dữ liệuMutation: nơi chúng ta thực hiện các thay đổi stateAction: dùng để fire mutation, commit các thay đổi.
Ngoài ra ta cũng nên chú ý tới store: nó là một đối tượng global, nó không thể truy cập và thay đổi trực tiếp được để đảm bảo consistent state và dễ dàng trong việc tracking những thay đổi.
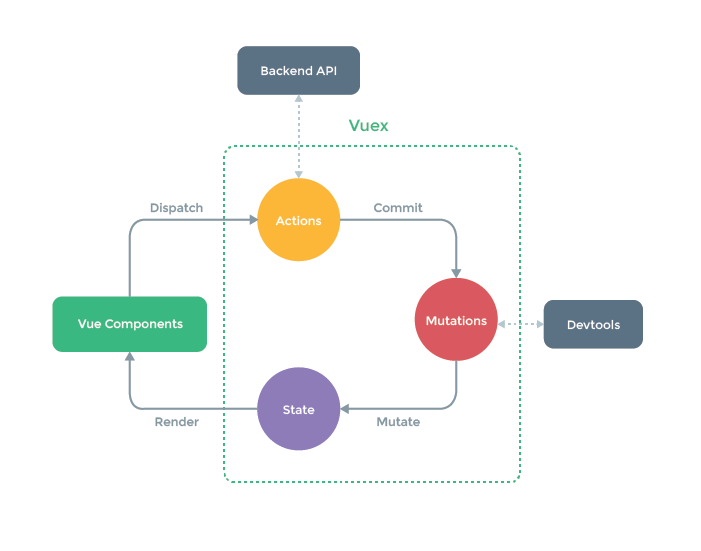
Đây là life cycle của vuex:
 Việc mô tả flow hoạt động của vuex có thể hiểu như sau:
Đầu tiên
 global state (store) sẽ thay đổi state thông qua việc dispatch một action. Sau đó action thực hiện việc xử lý bất đồng bộ (asynchronous) và sau đó commit mutation. Mutation thực hiện thay đổi state. Bất cứ khi nào state được thay đổi/cập nhật thì component sẽ reflect những thay đổi đó.
Demo
Mình sẽ lấy một ví dụ đơn giản về TODO app để demo hoạt động của vuex để giúp mọi người dễ hình dung ra hơn. Đầu tiên chúng ta cần phải install nó thông qua yarn hoặc npm (mình xin bỏ qua phần này).
Để cho dễ hình dung và dễ nhìn mình sẽ tách state, getter, mutation và action thành những file riêng cho dễ nhìn về sau khi project của bạn khá lớn, bạn có thể quản lý chúng thông qua các module.
Ở root folder mình sẽ define các mutation type:
# mutation-type.js
export const ADD_NEW_TODO = 'ADD_NEW_TODO'
export const TOGGLE_STATUS = 'TOGGLE_STATUS'
export const DELETE_TODO = 'DELETE_TODO'
Rồi mình tạo ra một vài sample với store và import getter, mutation, action như sau:
# src/store/index.js

import Vue from 'vue'
import Vuex from 'vuex'
import getters from './getters.js'
import mutations from './mutations.js'
import actions from './actions.js'

Vue.use(Vuex)

export default new Vuex.Store({
 state: {
	todos: [{content: 'Analyze requirement', isCompleted: true},
	        {content: 'Design Database', isCompleted: false},
	        {content: 'Technical requirement', isCompleted: true},
	        {content: 'Implement Backend', isCompleted: false},
	        {content: 'Implement Frontend', isCompleted: false},]
 },
 getters,
 mutations,
 actions
})
Bây giờ là đến getters:
# src/store/getters.js
let getters = {
	completed(state) {
		return state.todos.filter(e => e.isCompleted === true);
	},
	remaining(state) {
		return state.todos.filter((e => e.isCompleted === false));
	}
}

export default getters
ở đây mình kiểm tra và return task với status là hoàn thành hoặc chưa hoàn thành qua attributes isCompleted qua 2 methods đó là completed và remain. Getter tương tự selectors trong Redux.
Tiếp đó chúng ta define mutations:
# src/store/mutations.js
import * as types from '../../mutation-types.js'

let mutations = {
	[types.ADD_NEW_TODO](state, payload) {
		let newTodo = {content: payload, isCompleted: false};
		state.todos.push(newTodo);
	},
	[types.TOGGLE_STATUS](state, payload) {
		let todo = payload
		todo.isCompleted = !todo.isCompleted
	},
	[types.DELETE_TODO](state, payload) {
		state.todos.splice(state.todos.indexOf(payload), 1);
	}
}

export default mutations
ADD_NEW_TODO: thêm todo vào trong todo list TOGGLE_STATUS: chuyển todo tới complete or remain list todo DELETE_TODO: xóa 1 todo (có thể dùng remove thay vì splice) Và sau đó chúng ta define actions để commit các mutation:
import * as types from '../../mutation-types.js'

let actions = {
	addTodo({commit}, payload) {
		commit(types.ADD_NEW_TODO, payload)
	},
	toggleStatus({commit}, payload) {
		commit(types.TOGGLE_STATUS,payload)
	},
	deleteTodo({commit}, payload) {
		commit(types.DELETE_TODO,payload)
	}
}

export default actions
Ok mọi thứ đã ổn, giờ chúng ta qua component App.vue và file main.js:
# src/App.vue
<template>
  <div id="app">
    <div class="container-fluid col-centered todo-app">
      <center><h1><strong>todos</strong></h1></center>
      <input class="form-control" v-model="newTodo" v-on:keyup.enter="addTodo(newTodo)">
      <h3><i>uncompleted </i>({{ remaining.length }})</span></h3>
      <ul class="list-group">
        <li class="list-group-item list-group-item-info" v-for="todo in remaining">
          <span>{{ todo.content }}</span>
          <button class="btn btn-default" @click="deleteTodo(todo)"><span class="glyphicon glyphicon-remove" />
          </button>
          <button class="btn btn-default" @click="toggleStatus(todo)"><span class="glyphicon glyphicon-ok" />
          </button>
        </li>
      </ul>
      <p>Start hacking and add some tasks!</p>
      <div v-if="completed.length">
        <h3><i>completed</i> ({{ completed.length }})</h3>
        <ul class="list-group">
          <li class="list-group-item list-group-item-success" v-for="todo in completed">
            {{ todo.content }}
            <button class="btn btn-default" @click="toggleStatus(todo)"><i class="fa fa-ban"></i></button>
          </li>
        </ul>
      </div>
    </div>
  </div>
</template>
<script>
    import { mapGetters, mapActions } from 'vuex';

    export default {
      name: 'app',
      data() {
        return {
          newTodo : ''
        }
      },
      computed: mapGetters(['remaining', 'completed']),
      methods: mapActions(['addTodo','toggleStatus','deleteTodo'])
    }
</script>
Ở đây chúng ta phải viết method computed để khai báo mỗi khi state có thay đổi thì nó sẽ re-render lại component. ở đây mình có dùng mapGetters, mapActions đó là helper của vuex (import nó nếu dùng nhé  ).
Cuối cùng thì ném thằng
 store vào trong Vue app.
require('../bootstrap.js')

import Vue from 'vue'
import App from './App.vue'
import index from  './store/index.js'

new Vue({
  el: '#app',
  store: index,
  render: h => h(App)
})
Reference
All rights reserved