Giới thiệu về Spring Security ACL
Bài đăng này đã không được cập nhật trong 6 năm
1. Giới thiệu
Access Control List (ACL) là một danh sách các quyền được gán cho một object. Spring Security Access Control List là một Spring component hỗ trợ giải quyết bài toán về Domain Object Security. Nói một cách đơn giản, Spring ACL giúp xác định quyền cho người dùng / vai trò cụ thể trên một domain object.
Ví dụ: Người dùng có vai trò là quản trị viên (Admin) có quyền đọc (READ) và chỉnh sửa (WRITE) tất cả message trong một Central Notice Box, nhưng người dùng thông thường chỉ có thể đọc những message này. Và một số người có vai trò là Editor sẽ được phép chỉnh sửa một vài loại message cụ thể.
Do đó, mỗi loại người dùng khác nhau sẽ có quyền thao tác khác nhau trên một đối tượng cụ thể. Để đơn giản nhất, chúng ta sẽ sử dụng Spring ACL để giải quyết những bài toán dạng như thế này.
Bài viết dưới đây mình sẽ demo một bài toán nhỏ về việc quản lý thông tin User và Resource của hệ thống. Mình sẽ chỉ tập chung vào những thành phần chính và các bước cấu hình ACL security sử dụng Spring Boot framework.
2. Cấu hình
2.1. Database
-
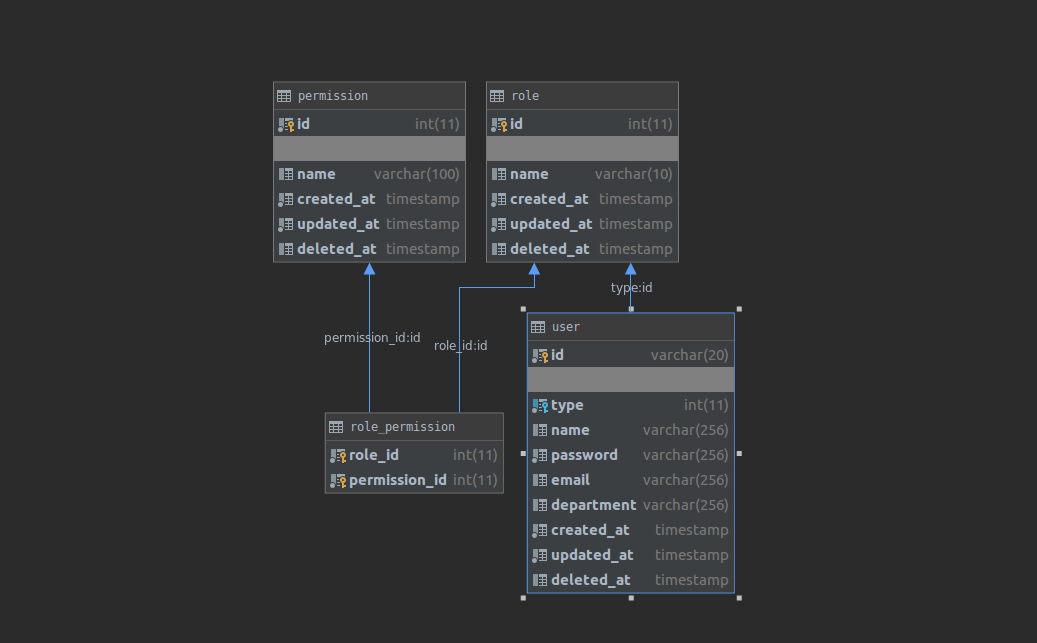
Đầu tiên chúng ta cần setup Database, việc đầu tiên là cần tạo 1 bảng chứa thông tin đăng nhập của User và 3 bảng lưu trữ danh sách các quyền truy cập trong hệ thống.
![]()
-
Example data:
1. Role table

2. Permission table
Ở đây mình liệt kê các domain và mỗi quyền access cho nó

3. User table
Mình set thông tin và role cho 2 user: 001 (admin) và 002 (staff)

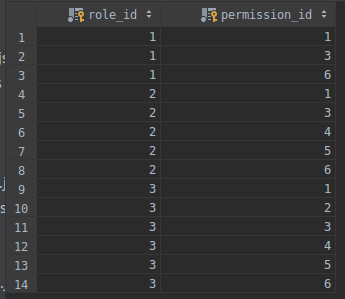
4. Role Permission table
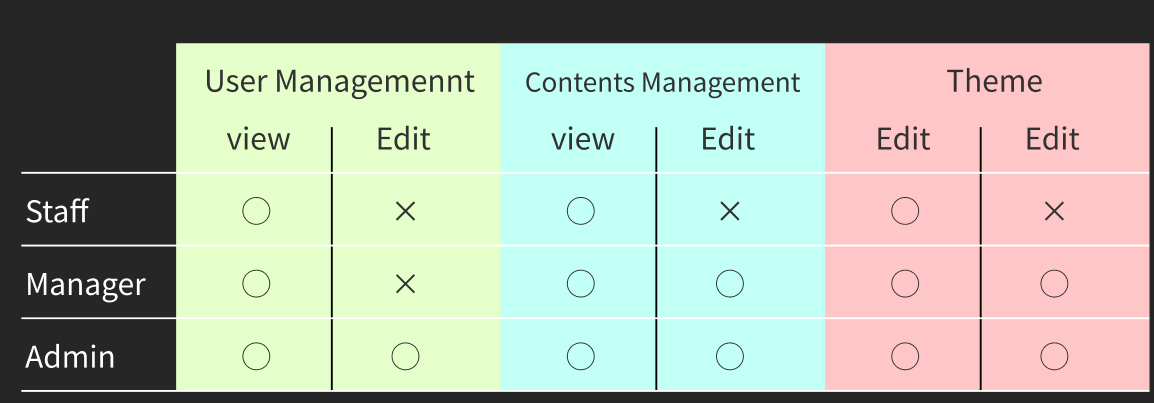
Ma trận trên đây mô tả các quyền của hệ thống như sau. Staff sẽ chỉ có quyền view tất cả resource trong hệ thống. Manager ngoài view thì có thể edit Content và Theme. Còn Admin sẽ có thể thay đổi tất cả resource trong hệ thống.
2.2. Cấu hình server
- Bước 1: Ta sẽ phải custom lại đối tương GrantedAuthorirty của Spring Security để có thể gán thêm danh sách permission cho user hiện tại thay vì chỉ 1 như default.
@Data
@AllArgsConstructorpublic class CustomGrantedAuthority implements GrantedAuthority {
    private String role;
    private List<String> permissions;
    @Override
    public String getAuthority() {
        return this.role;
    }
}
- Bước 2: Tạo CustomEvaluatorService để kiểm tra quyền của user hiện tại
@Service
public class CustomPermissionEvaluator implements PermissionEvaluator {
    @Override
    public boolean hasPermission(Authentication auth, Object targetDomainObject, Object permission) {
        if ((auth == null) || (targetDomainObject == null) || !(permission instanceof String)) {
            return false;
        }
        return hasPrivilege(auth, targetDomainObject.toString().toUpperCase(), permission.toString().toUpperCase());}

    @Override
    public boolean hasPermission(Authentication auth, Serializable targetId, String targetType, Object permission) {
        if ((auth == null) || (targetType == null) || !(permission instanceof String)) {
            return false;
        }
        return hasPrivilege(auth, targetType.toUpperCase(), permission.toString().toUpperCase());}

    private boolean hasPrivilege(Authentication auth, String targetType, String permission) {
        for (CustomGrantedAuthority grantedAuth : (List<CustomGrantedAuthority>) auth.getAuthorities()) {
            for (String grantedPermission : grantedAuth.getPermissions()) {
                if (grantedPermission.startsWith(targetType) && grantedPermission.contains(permission)) {
                    return true;
                 }
            }
        }
        return false;
    }
}
- Bước 3: Đăng ký service cho Spring Security
@Configuration
//Bạn cần enable prePost để có thể sử dụng @PreAuthorize
@EnableGlobalMethodSecurity(prePostEnabled = true)
public class MethodSecurityConfig extends GlobalMethodSecurityConfiguration {
    @Autowired
    private PermissionEvaluator permissionEvaluator;

    @Override
    protected MethodSecurityExpressionHandler createExpressionHandler() {
        DefaultMethodSecurityExpressionHandler expressionHandler =
                new DefaultMethodSecurityExpressionHandler();
       expressionHandler.setPermissionEvaluator(permissionEvaluator);
        return expressionHandler;
    }
}
2.3. Định nghĩa service của bạn
Trong UserService mình có 2 phương thức lấy thông tin và xóa user, bạn có thể thấy trên mỗi method mình sẽ yêu cầu user hiện tại cần có quyền READ hoặc EDIT trên domain USER hay ko.
public interface UserService {
    @PreAuthorize("hasPermission('USER', 'READ')")
    UserRegisterDto getUser(String userId);

    @PreAuthorize("hasPermission('USER', 'EDIT')")
    void deleteUser(String userName);
}
3. Testing
Khai báo controller để có thể call api từ postman
@RestController
@RequestMapping(value = "/users")
public class UserController extends BaseController {
    @Autowired
    private UserService userService;

    @GetMapping("/{id}")
    public String findUser(@PathVariable String id) {
       return ResponseEntity.ok(userService.getUser(id));
    }

    @DeleteMapping("/delete")
    public void deleteUser(@RequestParam String userId) {
        userService.deleteUser(userId);
    }
}
Nếu đăng nhập với tài khoản Staff, khi call tới endpoint "localhost:8080/users/delete" chắc chắn sẽ bị lỗi 403. Và sẽ bình thường khi bạn đăng nhập với tài khoản Admin.
All rights reserved
