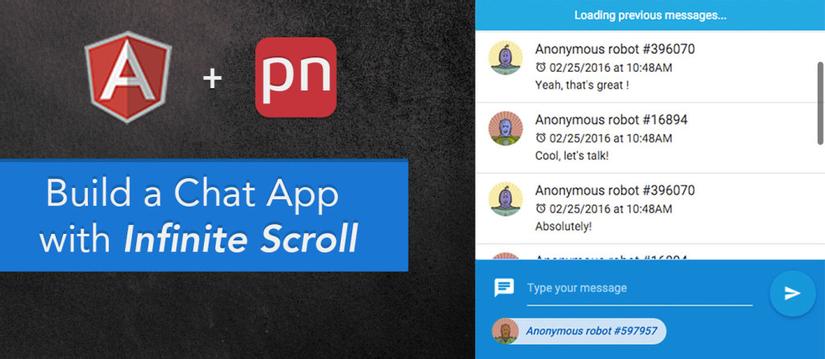
Free App Chat with PubNub and AngularJS - Part 2
Bài đăng này đã không được cập nhật trong 4 năm
Phần 2: chúng ta sẽ đi tìm hiểu cách xây dụng App Chat sử dụng History API để lưu trữ tin nhắn, từ đó chúng ta có xem được lịch sử tin nhắn hay tìm lại tin nhắn bằng cách cuộn thanh cuộn. Và thêm nữa là giới thiệu về cách quản lý cấu trúc source code sao cho hợp lý sao cho khoa học.
Overview: Application Architecture
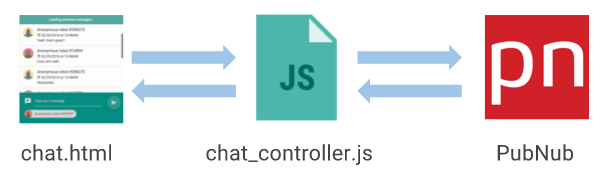
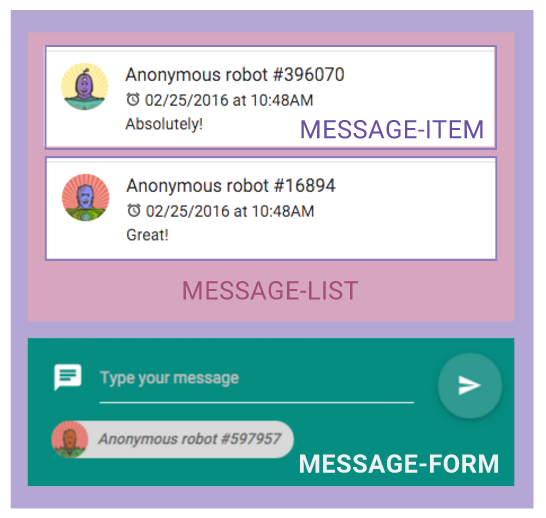
Có rất nhiều cách để thiết kế code. Ví dụ bạn có thể sử dụng duy nhất một controller và cho tất cả mọi thứ vào trong controller đó, rồi sau đó bạn sử dụng một file HTML để chứa tất cả các view của app, giống như hình bên dưới.
Nhưng đó không phải là cách hay.
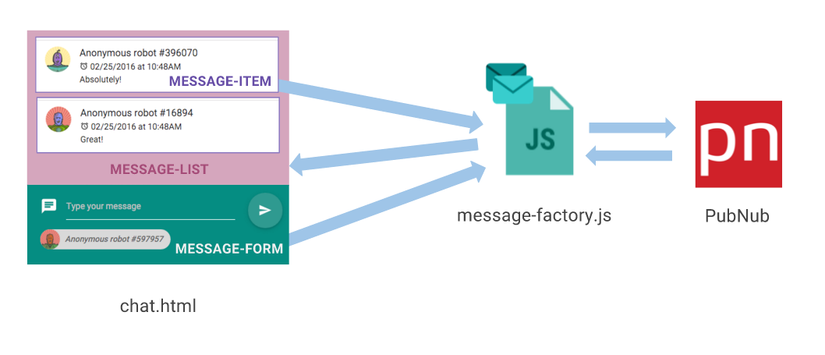
Hình ở trên miêu tả một cấu trúc có chứa nhiều thành phần khác nhau, mỗi thành phần lại có nhiệm vụ nhất định nào đó:
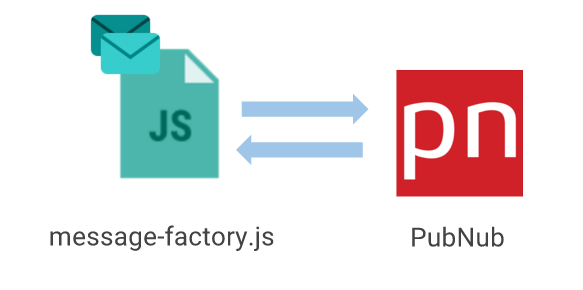
- MessageService đảm nhiệm lưu trữ tin nhắn và giao tiếp trực tiếp với PubNub để lấy tin nhắn real time.
- Các Directives khác có nhiệm vụ là xậy dựng hệ thống của app, và có thể tái sử dụng được. Và tất nhiên các directive này làm việc trực tiếp với MessageService để lấy tin nhắn ra hiển thị
Dưới đây là cấu trúc source code, cái mà chúng ta sắp làm:
app/
├── app.config.js
├── app.js
├── app.routes.js
├── components
│   ├── message-form
│   │   ├── message-form.directive.js
│   │   └── message-form.html
│   ├── message-item
│   │   ├── message-item.directive.js
│   │   └── message-item.html
│   └── message-list
│       ├── message-list.directive.js
│       └── message-list.html
├── index.html
├── services
│   ├── current_user.service.js
│   └── message-factory.js
├── shared
│   └── user-avatar.directive.js
├── styles
│   ├── chat.css
│   └── ng-notify.theme.css
└── views
    └── chat.html
Configure PubNub và khởi tạo UID cho Current User
Tạo value service trong services/current_user.service.js:
angular.module('app')
.value('currentUser', _.random(1000000).toString());
Chú ý: Ở đây chúng ta sẽ dùng lodash library để sử dụng các random function và rất nhiều các function khác mà chúng ta sẽ dùng trong app này.
Khi tạo xong value service cho user xong chúng ta khởi tạo PubNub cho App trong thư mục app.config.js
angular.module('app')
.run(['Pubnub', 'currentUser', function(Pubnub, currentUser) {
  Pubnub.init({
    // Please signup to PubNub to use your own keys: https://admin.pubnub.com/
    publish_key: 'YOUR-PUBNUB-PUBLISH-KEY',
    subscribe_key: 'YOUR-PUBNUB-SUBSCRIBE-KEY',
    uuid: currentUser
  });
}]);
Vậy là đã xong những bước set up cơ bản cho App.
Creating Message Service
Chúng ta sẽ sử dụng đối tượng [$pubnubChannel] để giao tiếp với PubNub. Bạn có thể tham khảo thêm tài liệu ở đây về cách create một message service.
PubNub Storage
Để lưu trữ và nhận messages thì bạn phải active PubNub Storage and Playback add-on ở trong app của bạn. Bạn vào Admin Dashboard chọn app mà bạn đang sử dụng để xậy dựng APP JS này, đến phần Application add-on và bật Storage and Playback lên và configure thời gian lưu trữ messages. Tất cả messages sẽ được lưu theo từng channel mà bạn đẩy lên. Nếu bạn muốn đọc thêm về history API, bạn có thể xem thêm video dưới đây:
Xây dựng Message Service
MessageService có nhiệm vụ trả về một object $pubnubChannel, cài mà tự động lưu trữ, nhận về và load những messages cũ mà đã được published vào một channel nào đó.
Chúng tga sẽ thêm một vài thông tin vào đối tượng $pubnubChannel khi mà chúng ta định publish message nào đó (uid của message, sender_uid, date, ...)
angular.module('app')
.factory('MessageService', ['$rootScope', '$pubnubChannel', 'currentUser',
    function MessageServiceFactory($rootScope, $pubnubChannel, currentUser) {
        // We create an extended $pubnubChannel channel object that add an additional sendMessage method
        // that publish a message with a predefined structure.
        var Channel = $pubnubChannel.$extend({
            sendMessage: function(messageContent) {
                return this.$publish({
                    uuid: (Date.now() + currentUser), // Add a uuid for each message sent to keep track of each message sent.
                    content: messageContent,
                    sender_uuid: currentUser,
                    date: Date.now()
                })
            }
        });
        return Channel('messages-channel', {
            autoload: 20,
            presence: true
        });
    }
]);
Vậy là chúng ta đã tạo xong và có thể gọi MessageService này ở bất cứ một controller nào
app.controller("ChatCtrl", ["$scope", "Scores", function($scope, MessageService) {
  $scope.messages = MessageService();
]);
Xây dựng giao diện cho AngularJS Chat App
Bây giờ chúng ta đã có Message Service rồi, việc bây giờ là đi xây dựng chat UI.
Chúng ta sẽ chia ra nhiều các components khác nhau và từng cái có thể giao tiếp với MessageService để làm một chức năng nào đó, ví dụ ở đây chúng ta có:
- Hiển thị messages.
- Gửi messages.
- Hiển thị các messages cũ hơn khi chúng ta kéo thanh scroll lên top.
Chat View
Chúng ta sẽ tạo ra một file html ở trong views, cái mà sẽ chứa messages list và form để nhập messages views/chat.html:
<div class="message-container">
 <message-list></message-list>
 <message-form></message-form>
</div>
Hiển thị avatar của user
Chúng ta sẽ tạo user-avatar directive để hiển thị avatar image của user có uuid nào đó:
#shared/user-avatar.directive.js

angular.module('app').directive('userAvatar', function() {
    return {
        restrict: "E",
        template: ‘ < img src = "{{avatarUrl}}"
        alt = "{{uuid}}"
        class = "circle" > ’,
        scope: {
            uuid: "@",
        },
        controller: function($scope) {
            // Generating a uniq avatar for the given uniq string provided using robohash.org service
            $scope.avatarUrl = '//robohash.org/' + $scope.uuid + '?set=set2&bgset=bg2&size=70x70';
        }
    };
});
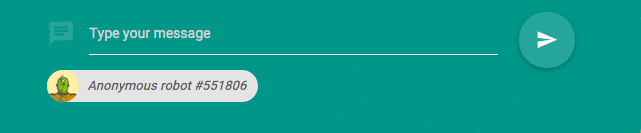
Form nhập messages
app/
  ├── components
  │   ├── message-form
  │   │   ├── message-form.directive.js
  │   │   └── message-form.html
message-form.directive.js:
angular.module('app').directive('messageForm', function() {
    return {
        restrict: "E",
        replace: true,
        templateUrl: 'components/message-form/message-form.html',
        scope: {},
        controller: function($scope, currentUser, MessageService) {
            $scope.uuid = currentUser;
            $scope.messageContent = '';
            $scope.sendMessage = function() {
                MessageService.sendMessage($scope.messageContent);
                $scope.messageContent = '';
            }
        }
    };
});
và view của directive trên message-form.html:
<div class="message-form">
 <form ng-submit="sendMessage()" class="container">
   <div class="row">
     <div class="input-field col s10">
       <i class="prefix mdi-communication-chat"></i>
       <input ng-model="messageContent" type="text" placeholder="Type your message" >
       <span class="chip left">
          <user-avatar uuid="{{uuid}}" />
        Anonymous robot #{{uuid}}
       </span>
     </div>
     <div class="input-field col s2">
       <button type="submit" class="waves-effect waves-light btn-floating btn-large">
         <i class="mdi-content-send"></i>
       </button>
     </div>
   </div>
  </form>
</div>
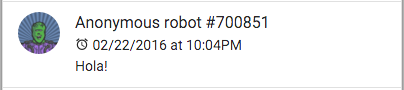
Hiển thị một message của list
app
  ├── components
  │   ├── message-item
  │   │   ├── message-item.directive.js
  │   │   └── message-item.html
message-item.directive.js:
angular.module('app').directive('messageItem', function(MessageService) {
    return {
        restrict: "E",
        templateUrl: '/templates/directives/message-item.html',
        scope: {
            senderUuid: "@",
            content: "@",
            date: "@"
        }
    }
});
và view của directive trên message-item.html:
<user-avatar uuid="{{senderUuid}}"/>
<span class="title">Anonymous robot #{{ senderUuid }}</span>
<p><i class="prefix mdi-action-alarm"></i> {{ date | date:"MM/dd/yyyy 'at' h:mma"}}</br> {{ content }}</p>
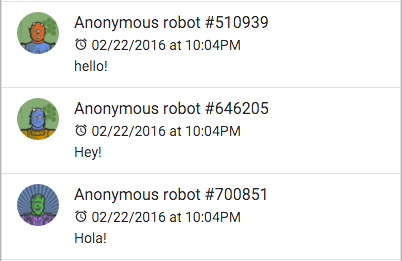
Hiển thị danh sách các messages
app
  ├── components
  │   └── message-list
  │       ├── message-list.directive.js
  │       └── message-list.html
Chúng ta sẽ viết message-list directive để lấy các messages ra từ MessageService
angular.module('app').directive('messageList', function($timeout, $anchorScroll, MessageService, ngNotify) {
    return {
        restrict: "E",
        replace: true,
        templateUrl: 'components/message-list/message-list.html',
        link: function(scope, element, attrs, ctrl) {
            var element = angular.element(element)
            var init = function() {};
            init();
        },
        controller: function($scope) {
            $scope.messages = MessageService;
        }
    };
});
Function init sẽ được gọi mỗi khi mà cái component đó được render ra.
sau đó ta tạo view cho directive:
<ul class="message-list collection">
    <li class="collection-item message-item avatar" ng-repeat="message in messages track by message.uuid">
        <message-item id="{{message.uuid}}" content="{{message.content}}" sender-uuid="{{message.sender_uuid}}" date="{{message.date}}"></message-item>
    </li>
</ul>
Tự động scroll xuống dưới khi message-list được render ra hoặc nhận được một message
Trong controller message-list, ta sẽ thêm một function có tác dụng là thay đổi vị trí của scroll xuống dưới(bottom)
//...
controller: function($scope) {
    $scope.messages = MessageService;
    $scope.scrollToBottom = function() {
        var uuid_last_message = _.last($scope.messages).uuid;
        $anchorScroll(uuid_last_message);
    };
}
Chúng ta cần biết khi nào thì cần gọi function scrollToBottom() khi load ng-repeat xong? Nhưng AngularJS không support chúng ta việc đấy, vì vậy chúng ta sẽ dùng repeat-complete tự viết để xử lý việc này handmade directive
trong message-list.html chúng ta thêm repeat-complete vào khai báo listDidRender() ở trong controller:
<ul class="message-list collection">
  <li class="collection-item message-item avatar" ng-repeat="message in messages track by message.uuid" repeat-complete="listDidRender()">
    <message-item id="{{message.uuid}}" content="{{message.content}}" sender-uuid="{{message.sender_uuid}}" date="{{message.date}}"></message-item>
  </li>
</ul>
-> trong controller của message-list.directive.js:
//..
controller: function($scope){

  $scope.messages = MessageService;
    // Hook that is called once the list is completely rendered
    $scope.listDidRender = function(){

          $scope.scrollToBottom();
    };
  //..
}
Cải tiến Auto Scroll Down
Có rất nhiều chat app không tự động scroll bottom trong khi bạn đang đọc các messages cũ mà có một tin nhắn mới đến. Chúng ta sẽ khắc phục nó ở đây
Trong controller của message-list directive, thêm một biến:
$scope.autoScrollDown
Chúng ta sẽ set true cho biến này khi scroll đang ở bottom, còn nếu không ở bottom thì set nó là false. Và viết một function cho biến này
var hasScrollReachedBottom = function() {
    return element.scrollTop() + element.innerHeight() >= element.prop('scrollHeight')
};
// ...
var watchScroll = function() {
   scope.autoScrollDown = hasScrollReachedBottom()
};
var init = function() {
   // …
   element.bind("scroll", _.throttle(watchScroll, 250));
};
Fetch những tin nhắn cũ khi scrolling up
Trong controller của message-list directive update hàm listDidRender() để chỉ scroll to bottom khi mà $scope.autoScrollDown = true
//..
controller: function($scope){

  $scope.messages = MessageService;
    // Hook that is called once the list is completely rendered
    $scope.listDidRender = function(){
        if($scope.autoScrollDown)
          $scope.scrollToBottom();
    };
  //..
}
Thêm hasScrollReachedTop function vào dể check xem chúng ta có scroll lên top hay chưa?
var hasScrollReachedTop = function() {
    return element.scrollTop() === 0;
};
Chúng ta sẽ dùng ng-notify để hiển thị notification.
Thêm function fetchPreviousMessages có chức năng hiển thị thông báo "Loading previous messages" và fetch tin nhắn cũ từ Message Service
var fetchPreviousMessages = function(){
  ngNotify.set('Loading previous messages...','success');
  var currentMessage = scope.messages[0].uuid.toString();
  scope.messages.$load(10);
};
Sau đó gọi function trên ở trong watchScroll function khi mà scroll được kéo lên top.
var watchScroll = function() {
    if (hasScrollReachedTop()) {
        if (MessageService.messagesAllFetched()) {
            ngNotify.set('All the messages have been loaded', 'grimace');
        } else {
            fetchPreviousMessages();
        }
    }
    //...
};
Như vậy bạn đã làm xong app chat bằng bằng AngularJS + PubNub. Chúc các bạn thành công
All rights reserved
