[Flutter] Viết ứng dụng chat với Flutter (P1)
Bài đăng này đã không được cập nhật trong 7 năm
Chào các bạn, tiếp tục với việc nghiên cứu Flutter, mình sẽ bắt đầu series xây dựng ứng dụng chat đơn giản.
Trong bài viết hôm nay, mình sẽ giới thiệu việc xây dựng layout Text input và hiển thị message list
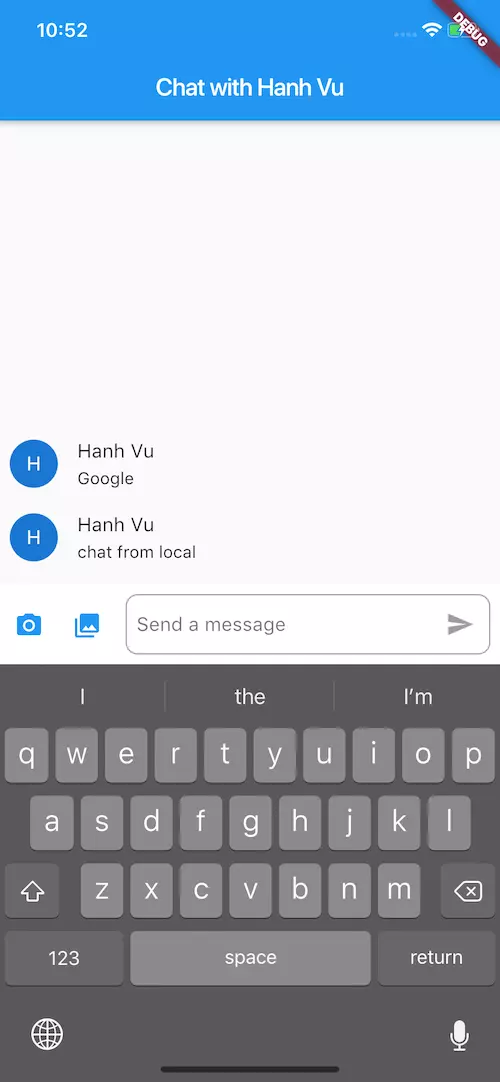
Xây dựng khung chat có chứa camera và gallery
Khung chat hiện tại mình có các thành phần :
- Camera button
- Gallery button
- Soạn message và nút Send
Chúng ta sẽ đặt các Widget con vào new Row, riêng phần input text sẽ được đặt trong Expanded sẽ được co giãn động theo size device.
  Widget _buildTextComposer() {
    return new IconTheme(
      data: IconThemeData(color: Theme.of(context).accentColor),
      child: new Row(
        crossAxisAlignment: CrossAxisAlignment.end,
        children: <Widget>[
          new Container(
            margin: const EdgeInsets.only(bottom: 8.0),
            child: new IconButton(
              icon: new Icon(Icons.photo_camera),
              onPressed: () => _handleTouchOnCamera()
            ),
          ),
          new Container(
            margin: const EdgeInsets.only(bottom: 8.0),
            child: new IconButton(
              icon: new Icon(Icons.photo_library),
              onPressed: () => _handleTouchOnGalleryPhoto()
            ),
          ),
          Expanded(
            child: _buildTextInput(),
          ),
        ],
      ),
    );
  }
Các button Camera và Gallery được handle touch thông qua callback : onPressed: () => .
Hiện tại trong bài này mình chưa xây dựng phần xử lý, mình sẽ tiếp tục trong bài sau.
Xây dựng layout phần soạn message và nút Send
Widget _buildTextInput() => Container(
        margin: const EdgeInsets.all(8.0),
        padding: const EdgeInsets.only(left: 8.0),
        decoration: myBoxDecoration(),
        child: new Row(
          children: <Widget>[
            new Flexible(
              child: new TextField(
                controller: _textController,
                onChanged: (String text) {
                  setState(() {
                    _isComposing = text.length > 0;
                  });
                },
                keyboardType: TextInputType.multiline,
                maxLines: 10,
                minLines: 1,
                decoration:
                    new InputDecoration.collapsed(hintText: "Send a message"),
              ),
            ),
            new Container(
              child: new IconButton(
                icon: new Icon(Icons.send),
                onPressed: _isComposing
                    ? () => _handleSubmitted(_textController.text)
                    : null),
            ),
          ],
        ),
      );
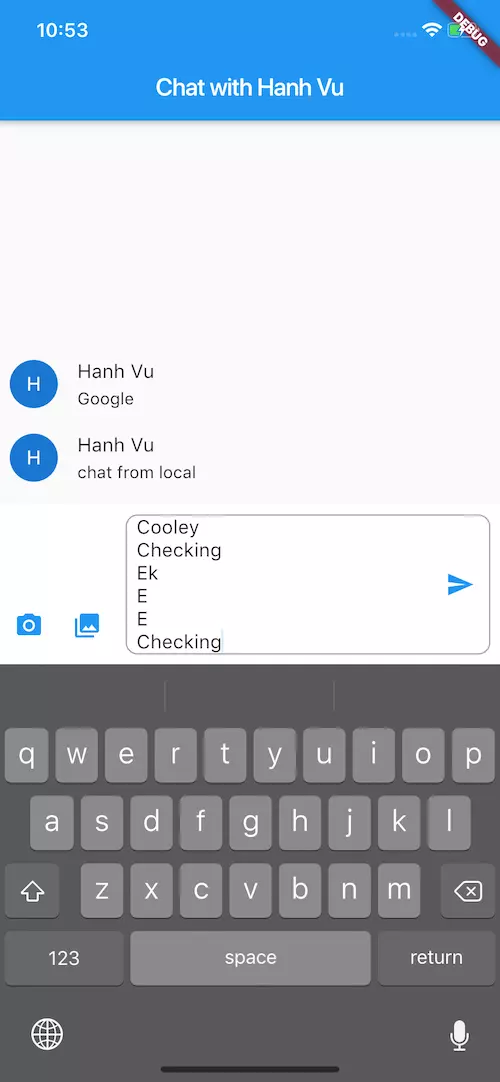
Đây là phần trọng tâm trong bài viết hôm nay, đó làm cách làm việc với TextField trong Flutter.
Sử dụng callback onChanged để bắt sự kiện thay đổi text Input.
Mình sử dụng biến isComposing để cập nhật trạng thái đang có nội dung input hay không. Nếu isComposing = false thì button Send bị disable và ngược lại.
keyboardType: TextInputType.multiline,
maxLines: 10,
minLines: 1,
Đây là các config cho TextFiled cho phép multiline, hỗ trợ hiển thị tối đa 10 lines, vượt quá thì sẽ là scrolling
Xử lý button Send
void _handleSubmitted(String text) {
    _textController.clear();
    setState(() {
      _isComposing = false;
    });
    if (text.length > 0) {
      ChatMessage message = new ChatMessage(
        text: text,
        animationController: new AnimationController(
          duration: new Duration(milliseconds: 700),
          vsync: this,
        ),
      );
      setState(() {
        _messages.insert(0, message);
      });
      message.animationController.forward();
    }
  }
Sau khi click button Send, thông qua textController sẽ gọi function clear() để xoá nội dung trong Textfield
Tiếp đó là cập nhật lại trạng thái isComposing = false để disable button Send
Thực hiện thêm object ChatMessage vào trong mảng _messages
Xây dựng layout phần hiển thị message list
class ChatMessage extends StatelessWidget {
ChatMessage({this.text, this.animationController}); //modified
final String text;
final AnimationController animationController;
Widget build(BuildContext context) {
return new SizeTransition(
sizeFactor: new CurvedAnimation(
parent: animationController, curve: Curves.easeOut),
axisAlignment: 0.0,
child: new Container(
margin: const EdgeInsets.symmetric(vertical: 10.0),
child: new Row(
crossAxisAlignment: CrossAxisAlignment.start,
children: <Widget>[
new Container(
margin: const EdgeInsets.only(right: 16.0),
child: new CircleAvatar(child: new Text(_name[0])),
),
new Column(
crossAxisAlignment: CrossAxisAlignment.start,
children: <Widget>[
new Text(_name, style: Theme.of(context).textTheme.subhead),
new Container(
margin: const EdgeInsets.only(top: 5.0),
child: new Text(text),
),
],
),
],
),
),
);
}
}
Kết hợp message list và phần input
//new
Widget build(BuildContext context) {
return new Scaffold(
appBar: new AppBar(title: new Text('Chat with ${_name}')),
body: new Column(
children: <Widget>[
new Flexible(
child: new ListView.builder(
controller: _controller,
padding: new EdgeInsets.all(8.0),
reverse: true,
itemBuilder: (_, int index) => _messages[index],
itemCount: _messages.length,
),
),
new Container(
decoration: new BoxDecoration(color: Theme.of(context).cardColor),
child: SafeArea(
bottom: true,
child: _buildTextComposer(),
),
),
],
),
);
}
}
Thiết kế màn hình chat gồm 2 phần: message list và input text. Tất cả được đăt trong new Column
Phần message list hiển thị dưới dạng ListView, message mới nhất sẽ nằm dưới cùng gần phần input.
Phần input text được config để hỗ trợ hiển thị theo SafeArea (iPhone X ... viền tai thỏ)
Các bạn có thể xem đầy đủ code ở đây nhé.
Bài tiếp theo mình xây dựng phần thao tác với gallery và xử lý hiển thị image lên message list .
All rights reserved
