Flutter: Một số ví dụ về Animation
Bài đăng này đã không được cập nhật trong 6 năm
Giới thiệu
Như bạn biết, Animation trong các ứng dụng moblie giúp tắng tính trực quan, tính tương tác cho giao diện người dùng. Animation, khi được sử dụng đúng cách, có thể tạo ra sự khác biệt lớn trong cách người dùng cảm nhận ứng dụng của bạn.
Với Flutter các animation được tạo bằng thư viện Animation. Bắt đầu tìm hiểu thôi nào.
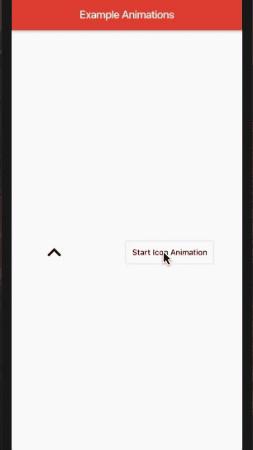
Rotation animation
Ta sẽ bắt đầu với một rotation animation đơn giản.
Bạn tạo một file là home_screen.dart với nội dung sau:
class HomeScreen extends StatefulWidget {
_HomeScreenState createState() => _HomeScreenState();
}
class _HomeScreenState extends State<HomeScreen> with TickerProviderStateMixin {
Animation _arrowAnimation;
AnimationController _arrowAnimationController;
void initState() {
super.initState();
_arrowAnimationController =
AnimationController(vsync: this, duration: Duration(milliseconds: 300));
_arrowAnimation =
Tween(begin: 0.0, end: pi).animate(_arrowAnimationController);
}
Widget build(BuildContext context) {}
}
Trong phương thức initState(), _arrowAnimationControll được khởi tạo với thời gian xảy ra của animation là 300 mili giây.
_arrowAnimation được khởi tạo với giá trị begin là 0,0 và giá trị end là pi do đó, nó sẽ xoay 180 độ. (pi = π = 180°)
Bây giờ là phần layout cho màn hình:
Widget build(BuildContext context) {
return Scaffold(
appBar: AppBar(
title: Text('Example Animations'),
),
body: Column(
mainAxisAlignment: MainAxisAlignment.center,
children: <Widget>[
firstChild(),
],
),
);
}
Phương thức firstChild() sẽ chứa một widget sẽ có animation và một button để bắt đầu animation đó.
Widget firstChild() {
    return Row(
      mainAxisAlignment: MainAxisAlignment.spaceAround,
      children: <Widget>[
        AnimatedBuilder(
          animation: _arrowAnimationController,
          builder: (context, child) => Transform.rotate(
                angle: _arrowAnimation.value,
                child: Icon(
                  Icons.expand_more,
                  size: 50.0,
                  color: Colors.black,
                ),
              ),
        ),
        OutlineButton(
          color: Colors.white,
          textColor: Colors.black,
          padding: const EdgeInsets.all(12.0),
          child: Text('Start Icon Animation'),
          onPressed: () {
            _arrowAnimationController.isCompleted
                ? _arrowAnimationController.reverse()
                : _arrowAnimationController.forward();
          },
          splashColor: Colors.red,
        )
      ],
    );
  }
Trong đoạn code trên Icon là widget cần có một animation, nó được bọc bởi AnimatedBuilder widget.
AnimatedBuilder widget là một widget rất hữu ích khi xây dựng animation. Nó hiệu quả hơn việc gọi setState() mỗi khi có sự thay đổi giá trị của animation. (Bạn có thể xem thêm ở đây)
2 thuộc tính của AnimatedBuilder trong đoạn code trên:
- animation : Nó mong đợi một animationController chịu trách nhiệm kiểm soát animation. Trong trường hợp này là _arrowAnimationController sẽ điều kiển animation xoay icon mũi tên.
- builder : Đây là một callback() được gọi mỗi khi giá trị của animation thay đổi. Trong hàm builder, trả về một widget icon được bọc trong widget Transform.rotate ().
Widget Transform.rotate () là một widget đặc biệt giúp chuyển đổi con của nó bằng cách xoay một góc với giá trị được truyền vào qua thuộc tính angle.
Widget còn lại là OutlineButton, anmation sẽ bắt đầu khi nút này được nhấn.
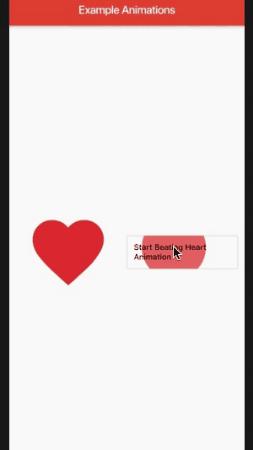
Scale Up, Down Animation
Tiếp theo ta sẽ làm một animation về trái tim đang đập 
Chỉnh sửa một chút file home_screen.dart ở trên.
class HomeScreen extends StatefulWidget {
_HomeScreenState createState() => _HomeScreenState();
}
class _HomeScreenState extends State<HomeScreen> with TickerProviderStateMixin {
Animation _arrowAnimation, _heartAnimation;
AnimationController _arrowAnimationController, _heartAnimationController;
void initState() {
super.initState();
_arrowAnimationController =
AnimationController(vsync: this, duration: Duration(milliseconds: 300));
_arrowAnimation =
Tween(begin: 0.0, end: pi).animate(_arrowAnimationController);
_heartAnimationController = AnimationController(
vsync: this, duration: Duration(milliseconds: 1200));
_heartAnimation = Tween(begin: 150.0, end: 170.0).animate(CurvedAnimation(
curve: Curves.bounceOut, parent: _heartAnimationController));
_heartAnimationController.addStatusListener((AnimationStatus status) {
if (status == AnimationStatus.completed) {
_heartAnimationController.repeat();
}
});
}
Widget build(BuildContext context) {}
}
Ta thêm hai biến _heartAnimation và _heartAnimationController tương ứng với Animation và AnimationController .
_heartAnimationController sẽ được khởi tạo với duration là 1200 mili giây.
_heartAnimation với begin là 150 và end là 170. Tương ứng với kích thước bé nhất và lớn nhất của trái tim .
Giờ thì ta cần ghép icon trái tim với animation ở trên.
Widget build(BuildContext context) {
return Scaffold(
appBar: AppBar(
title: Text('Example Animations'),
),
body: Column(
mainAxisAlignment: MainAxisAlignment.center,
children: <Widget>[
firstChild(),
SizedBox(
height: 50.0,
),
secondChild(),
],
),
);
}
Widget secondChild() {
return Row(
mainAxisAlignment: MainAxisAlignment.spaceAround,
children: <Widget>[
Expanded(
child: AnimatedBuilder(
animation: _heartAnimationController,
builder: (context, child) {
return Center(
child: Container(
child: Center(
child: Icon(
Icons.favorite,
color: Colors.red,
size: _heartAnimation.value,
),
),
),
);
},
),
),
Expanded(
child: Padding(
padding: const EdgeInsets.only(right: 12.0),
child: OutlineButton(
padding: const EdgeInsets.all(12.0),
color: Colors.white,
textColor: Colors.black,
child: Text('Start Beating Heart Animation'),
onPressed: () {
_heartAnimationController.forward();
},
splashColor: Colors.red,
),
),
)
],
);
}
Tương tự firstChild() ở trên secondChild() sẽ trả về widget có chứa một icon trái tim và một Button để bắt đầu animation. Kích thước của icon trái tim được gán bằng _heartAnimation.value có nghĩ là khi giá trị của _heartAnimation thay đổi thì kích thước của icon trái tim cũng sẽ thay đổi theo.
Cuối cùng ta cần override hàm dispose(), để loại bỏ hai AnimationController trên tránh memory leak.
void dispose() {
super.dispose();
_arrowAnimationController?.dispose();
_heartAnimationController?.dispose();
}
Tiếp theo ta sẽ thử kết hợp các animation lại với nhau.
Trong file home_screen.dart, ta thêm một OutlineButton sẽ điều hướng đến một màn hình khác, nơi chúng ta sẽ chạy animation sau.
Widget build(BuildContext context) {
return Scaffold(
appBar: AppBar(
title: Text('Example Animations'),
),
body: Column(
mainAxisAlignment: MainAxisAlignment.center,
children: <Widget>[
firstChild(),
SizedBox(
height: 50.0,
),
secondChild(),
SizedBox(
height: 50.0,
),
OutlineButton(
color: Colors.white,
textColor: Colors.black,
padding: const EdgeInsets.all(12.0),
child: Text('Start Container Animation'),
onPressed: () {
Navigator.push(context,
MaterialPageRoute(builder: (context) => AnimatedScreen()));
},
splashColor: Colors.red,
)
],
),
);
}
 Như bạn thấy trong hình trên, có 3 animation diễn ra đồng thời:
- Tăng kích thước
- Bán kính bo góc thay đổi
- Độ trong suốt thay đổi.
Tạo lớp AnimatedScreen với đoạn code sau:
class AnimatedScreen extends StatefulWidget {
_AnimatedScreenState createState() => _AnimatedScreenState();
}
class _AnimatedScreenState extends State<AnimatedScreen>
with TickerProviderStateMixin {
Animation _containerRadiusAnimation,
_containerSizeAnimation,
_containerColorAnimation;
AnimationController _containerAnimationController;
void initState() {
super.initState();
_containerAnimationController = AnimationController(
vsync: this, duration: Duration(milliseconds: 5000));
_containerRadiusAnimation = BorderRadiusTween(
begin: BorderRadius.circular(100.0),
end: BorderRadius.circular(0.0))
.animate(CurvedAnimation(
curve: Curves.ease, parent: _containerAnimationController));
_containerSizeAnimation = Tween(begin: 0.0, end: 2.0).animate(
CurvedAnimation(
curve: Curves.ease, parent: _containerAnimationController));
_containerColorAnimation =
ColorTween(begin: Colors.black, end: Colors.white).animate(
CurvedAnimation(
curve: Curves.ease, parent: _containerAnimationController));
_containerAnimationController.forward();
}
Widget build(BuildContext context) {}
}
Trong đó _containerRadiusAnimation, _containerSizeAnimation, _containerColorAnimation là 3 animation và _containerAnimationController là controller điều khiển 3 animation trên.
Tiếp theo ta ghép các animation trên với widget Container.
Widget build(BuildContext context) {
final width = MediaQuery.of(context).size.width;
final height = MediaQuery.of(context).size.height;
return Scaffold(
appBar: AppBar(
title: Text('Animated Screen'),
),
body: Center(
child: AnimatedBuilder(
animation: _containerAnimationController,
builder: (context, index) {
return Container(
width: _containerSizeAnimation.value * width,
height: _containerSizeAnimation.value * height,
decoration: BoxDecoration(
borderRadius: _containerRadiusAnimation.value,
color: _containerColorAnimation.value),
);
},
),
),
);
}
Vậy là đã hoàn thành rồi!! Cảm ơn các bạn đã theo dõi.
Bài viết được tham khảo tại đây
All rights reserved
