Flutter : How to use Redux
Bài đăng này đã không được cập nhật trong 7 năm
What is Redux?
Với những người làm việc với JavaScript và tiếp nữa là React-Native thì khác niệm Redux hẳn sẽ không xa lại gì cả. Redux là một kiến trúc ứng dụng, được tạo ra ban đầu cho JavaScript và bây giờ được sử dụng trong các ứng dụng reactive frameworks (như React Native hoặc Flutter). Redux là phiên bản đơn giản của kiến trúc Flux, được thực hiện bởi Facebook. Cơ bản về Redux, bạn cần phải biết ba điều:
- Single source of truth: State của toàn bộ ứng dụng được lưu trong trong 1 store duy nhất là 1 Object mô hình tree.
- State is read-only: Chỉ có 1 cách duy nhất để thay đổi state đó là tạo ra một action (là 1 object mô tả những gì xảy ra).
- Changes are made with pure functions: Sử dụng hàm thuần túy (Gọi đơn giản đó là một hàm không có các tác dụng gì khác) để lấy trạng thái trước đó cùng một hành động, và trả về trạng thái mới.
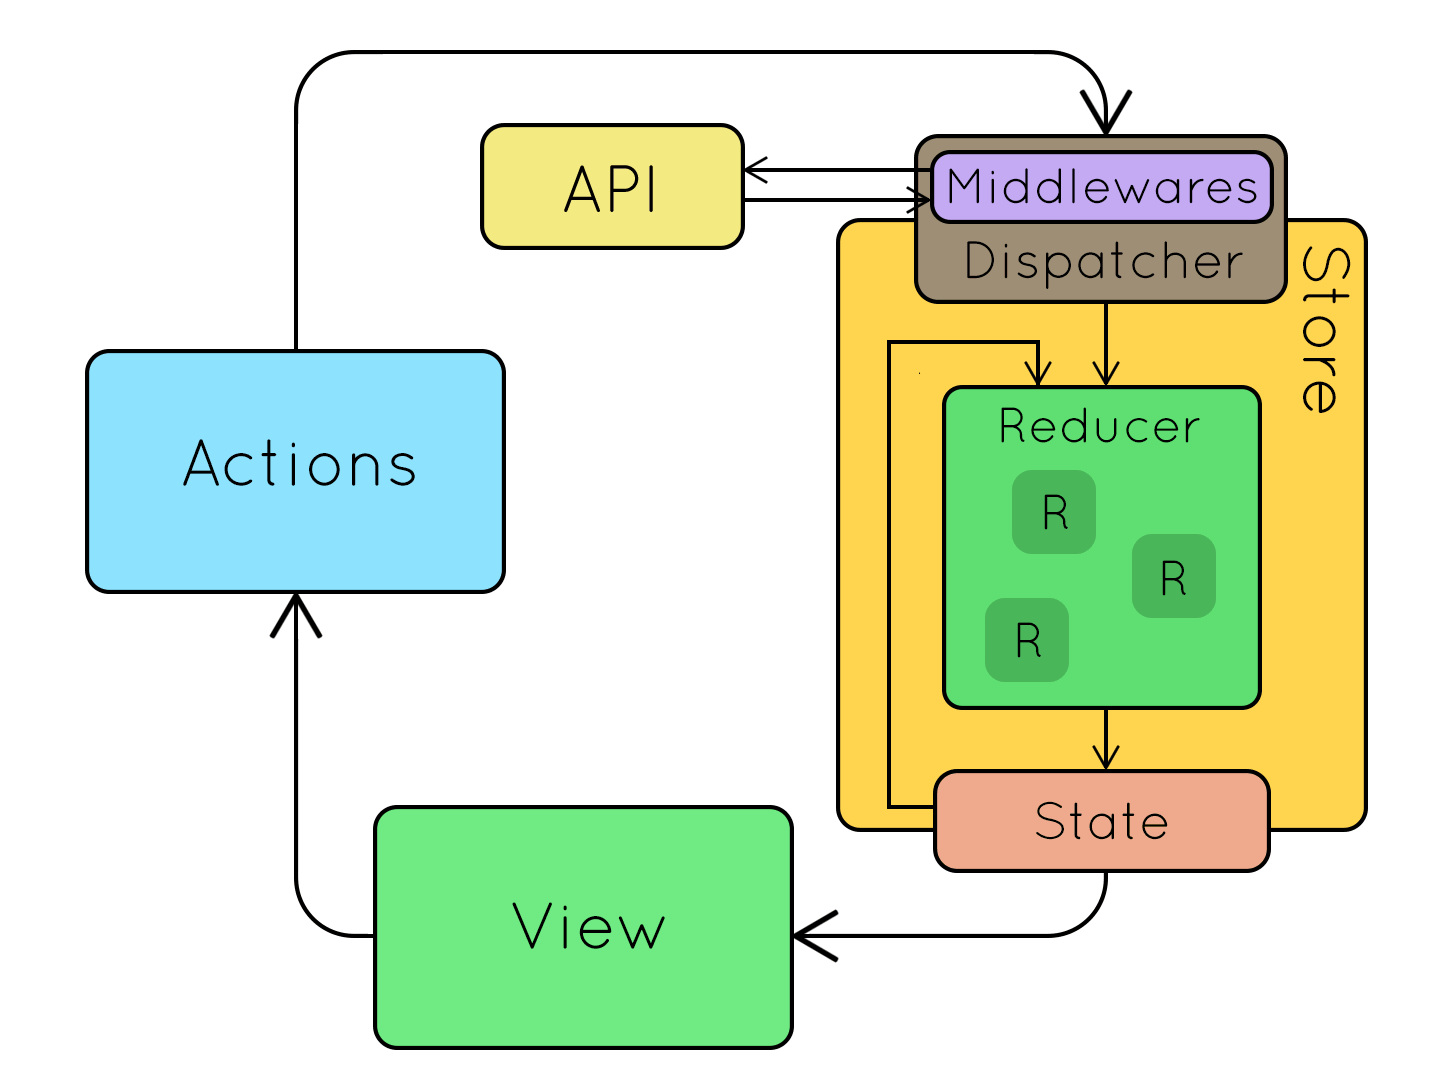
Vậy kiến trúc của Redux khi sử dụng với Flutter có gì khác biệt không? Chúng ta sẽ cùng đi tìm hiểu nhé. Let's go!
Redux in Flutter
Có hai gói (package) rất hữu ích mà chúng ta có thể sử dụng, thao tác dễ dàng và thuận tiện để thực hiện Redux trong một ứng dụng Flutter:
- redux : package thêm tất cả các thành phần cần thiết để sử dụng Redux trong Dart:
Store,ReducervàMiddleware. - flutter_redux : đây là một gói Flutter-specific cung cấp các thành phần bổ sung trên thư viện redux rất hữu ích cho việc thực thi Redux trong Flutter:
- StoreProvider : Widget cơ sở cho ứng dụng sẽ được sử dụng để cung cấp Store cho tất cả các Widget cần nó.
- StoreBuilder : Một widget được sử dụng để nhận store từ StoreProvider
- StoreConnector: Một widget rất hữu ích được sử dung để thay thế cho StoreBuilder, có chức năng chuyển đổi Store thành một ViewModel với hàm chuyển đổi đã cho, và chuyển ViewModel thành một
builder function. Bất cứ khi nào Store phát ra một sự kiện thay đổi, Widget sẽ tự động được xây dựng lại. Không cần quản lý đăng ký!
How to use Redux Widgets
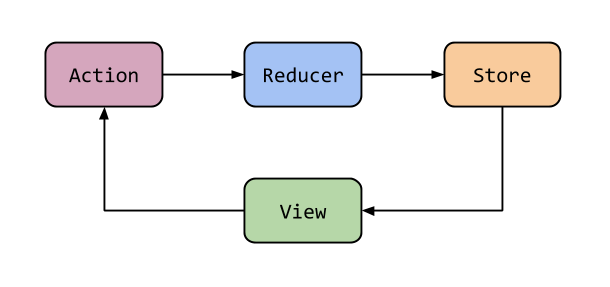
Để hiểu rõ hơn về cách sử dụng Redux trong Flutter, chúng ta cùng đi xem qua ví dụ đơn giản sau, qua đó nắm bắt được những khái niệm : actions, reducers, store và states
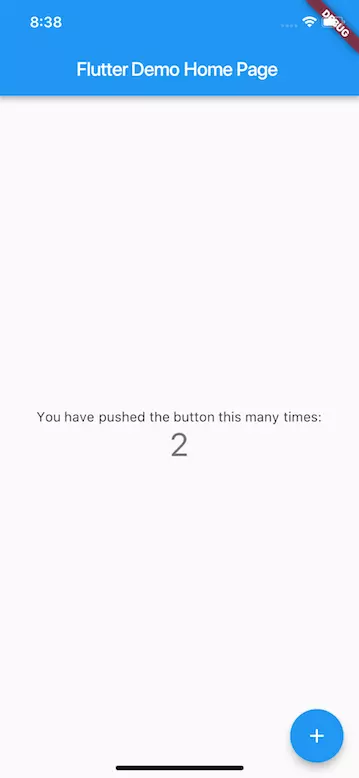
Ví dụ đơn giản sau chỉ có 1 button (plus), mỗi lần click vào button này thì giá trị count + 1 và hiển thị lên màn hình
Đầu tiên bạn bạn phải thêm package flutter_redux vào trong file pubspec.yaml
dependencies:
...
         flutter_redux: "^0.5.0"
Trong file main.dart, bạn triển khai code như sau :
import 'package:flutter/material.dart';
import 'package:flutter_redux/flutter_redux.dart';
import 'package:redux/redux.dart';
// One simple action: Increment
enum Actions { Increment }
// The reducer : lấy được giá trị trước đó và tăng lên khi nhận được action Increment
int counterReducer(int state, dynamic action) {
if (action == Actions.Increment) {
return state + 1;
}
return state;
}
void main() {
// Create your store as a final variable in a base Widget.
final store = new Store<int>(counterReducer, initialState: 0);
runApp(new FlutterReduxApp(
title: 'Flutter Redux Demo',
store: store,
));
}
class FlutterReduxApp extends StatelessWidget {
final Store<int> store;
final String title;
FlutterReduxApp({Key key, this.store, this.title}) : super(key: key);
Widget build(BuildContext context) {
// StoreProvider nên chứa MaterialApp or WidgetsApp. Đảm bảo toàn bộ routers app của bạn sẽ thao tác được tới store.
return new StoreProvider<int>(
// Pass the store to the StoreProvider. Any ancestor `StoreConnector`
// Widgets will find and use this value as the `Store`.
store: store,
child: new MaterialApp(
theme: new ThemeData.dark(),
title: title,
home: new Scaffold(
appBar: new AppBar(
title: new Text(title),
),
body: new Center(
child: new Column(
mainAxisAlignment: MainAxisAlignment.center,
children: [
new Text(
'You have pushed the button this many times:',
),
// Connect the Store to a Text Widget that renders the current
// count.
//
// We'll wrap the Text Widget in a `StoreConnector` Widget. The
// `StoreConnector` will find the `Store` from the nearest
// `StoreProvider` ancestor, convert it into a String of the
// latest count, and pass that String to the `builder` function
// as the `count`.
//
// Every time the button is tapped, an action is dispatched and
// run through the reducer. After the reducer updates the state,
// the Widget will be automatically rebuilt with the latest
// count. No need to manually manage subscriptions or Streams!
new StoreConnector<int, String>(
converter: (store) => store.state.toString(),
builder: (context, count) {
return new Text(
count,
style: Theme.of(context).textTheme.display1,
);
},
)
],
),
),
// Connect the Store to a FloatingActionButton. In this case, we'll
// use the Store to build a callback that with dispatch an Increment
// Action.
//
// Then, we'll pass this callback to the button's `onPressed` handler.
floatingActionButton: new StoreConnector<int, VoidCallback>(
converter: (store) {
// Return a `VoidCallback`, which is a fancy name for a function
// with no parameters. It only dispatches an Increment action.
return () => store.dispatch(Actions.Increment);
},
builder: (context, callback) {
return new FloatingActionButton(
// Attach the `callback` to the `onPressed` attribute
onPressed: callback,
tooltip: 'Increment',
child: new Icon(Icons.add),
);
},
),
),
),
);
}
}
- Khởi tạo 1 store cho app có state ban đầu = 0
final store = new Store<int>(counterReducer, initialState: 0);
- Dựa trên state thì view sẽ hiển thị giá trị "0"
- Khi click vào button thì một action được gửi đi (IncrementCounter)
- reducer biết được giá trị hiện tại của state là bao nhiêu (counter 0) , khi nhận được action (IncrementCounter) sẽ trả về state mới (counter 1)
- App lúc này có state mới (counter 1)
- Dựa trên thay đổi của state, view sẽ tự động hiển thị với giá trị thay đổi.
Bài viết đơn giản nhưng hy vọng có thể giúp các bạn có cái nhìn sơ lược về việc sử dụng Redux trong Flutter, từ đó các bạn có thể đi sâu tìm hiểu và ứng dụng tốt hơn.
Happy Coding!
All rights reserved
