[Flutter] Đôi điều cần ghi nhớ
Bài đăng này đã không được cập nhật trong 7 năm
Cấu trúc thư mục
my_app
  |- android
  |  ... a bunch of junk
  |- ios
  |  ... a bunch of junk
  |- lib
  |  main.dart
  |- test
  pubspec.lock
  pubspec.yaml
  README.md
  ...
Bạn chỉ quan tâm đến thư mục lib và tệp pubspec.yaml, đây là nơi bạn liệt kê các dependencies dự án của bạn.
Thư mục lib là nơi bạn sẽ xây dựng ứng dụng của mình. Khi vừa mới khởi tạo project thì chỉ có tập tin duy nhất main.dart.
main.dart phải tồn tại và nó phải nằm trong thư mục gốc của lib. Đây là tệp mà Dart và Flutter biết để chạy vào ứng dụng của bạn. Tương tự như bạn phải có AppDelegate.
// import the Flutter sdk
import 'package:flutter/material.dart';

// Every Dart program ever must have a main() function
// This function is essentially JavaScripts Document.ready(), only its required.
// It's the entry point of your Dart code.
// runApp is a Flutter function that runs the app.
// It takes a Widget as an argument.
void main() => runApp(new MyApp());

// EVERYTHING is a Widget.
// Including the root of your entire App:
class MyApp extends Stateless Widget {
  ...

// NB: MyApp is an arbitrary name.
Stateless và StatefulWidgets
Các widget Flutter khi xây dựng phải được mở rộng từ một số lớp trong thư viện Flutter. Hai loại (class) bạn hầu như luôn luôn sử dụng là StatlessWidget và StatefulWidget. Sự khác biệt giữa hai loại này là StatefulWidget có một thể hiện trạng thái trong Widget và một số phương thức được xây dựng để bảo Flutter re-render lại nếu trạng thái đó thay đổi.
Ví dụ về Stateless Widgets
// Stateless Widgets won't do anything to change state.
// Root of your application
class MyApp extends StatelessWidget {
// Build method
Widget build(BuildContext context) {
// MaterialApp is a built in Flutter Widget that gives
// us a lot styling out of the box.
// The most important arguments for MaterialApp are title and home
return new MaterialApp(
// Arguments that Material App is looking for.
title: 'Flutter Demo',
theme: new ThemeData(
// This is setting the primary color of the app to Blue.
primarySwatch: Colors.blue,
),
// MyHomePage is just another arbitrary widget
// named by you, the developer
home: new MyHomePage(title: 'Flutter Home Demo Page'),
);
}
}
Bạn có thể so sánh với việc sử dụng StatefulWidget
// This Widget is Stateful,
// because it's managing the state of the counter.
class MyHomePage extends StatefulWidget {
MyHomePage({Key key, this.title}) : super(key: key);
// It's being passed in title, you can see above.
final String title; // => Flutter Home Demo Page
// Stateful Widgets don't have build methods.
// They have createState() methods.
// Create State returns a class that extends Flutters State class.
_MyHomePageState createState() => new _MyHomePageState();
// Stateful Widgets are rarely more complicated than this.
}
// This is the state that MyHomePage created.
class _MyHomePageState extends State<MyHomePage> {
int _counter = 0;
void _incrementCounter() {
// Built in Flutter Method.
setState(() {
// This call to setState tells the Flutter framework that something has
// changed in this State, which causes it to rerun the build method below
// so that the display can reflect the updated values. If we changed
// _counter without calling setState(), then the build method would not be
// called again, and so nothing would appear to happen.
_counter++;
});
}
Widget build(BuildContext context) {
// This method is rerun every time setState is called,
// for instance as done by the _incrementCounter method above.
// Scaffold is another build in app that gives us a standard
// mobile app layout. You'll most likely use this on every page
// of your app
return new Scaffold(
// the bar accross the top of the app
appBar: new AppBar(
// State classes access properties on their
// parent by calling widget.someProperty
// It's easier to think of StatefulWidgets and their corresponding
// StateClasses as a single Widget.
title: new Text(widget.title),
),
body: new Center(
// Center is a layout widget. It takes a single child
// and positions it in the middle of the parent.
child: new Column(
// Column is also layout widget. It takes a List of children and
// arranges them vertically. By default, it sizes itself to fit its
// children horizontally, and tries to be as tall as its parent.
//
// Column has various properties to control how it sizes itself and
// how it positions its children. Here we use mainAxisAlignment to
// center the children vertically; the main axis here is the vertical
// axis because Columns are vertical (the cross axis would be
// horizontal).
//
// mainAxisAlignment and crossAxisAlignment should feel very familiar
// if you're used to using CSS's Flexbox or Grid.
mainAxisAlignment: MainAxisAlignment.center,
children: <Widget>[
new Text(
'You have pushed the button this many times:',
),
new Text(
// Text takes a String as it's first argument.
// We're passing in the value of the counter
// as an interpolated String.
'$_counter',
style: Theme.of(context).textTheme.display1,
),
],
),
),
// Floating action buttons are special button
floatingActionButton: new FloatingActionButton(
onPressed: _incrementCounter,
tooltip: 'Increment',
child: new Icon(Icons.add),
),
);
}
}
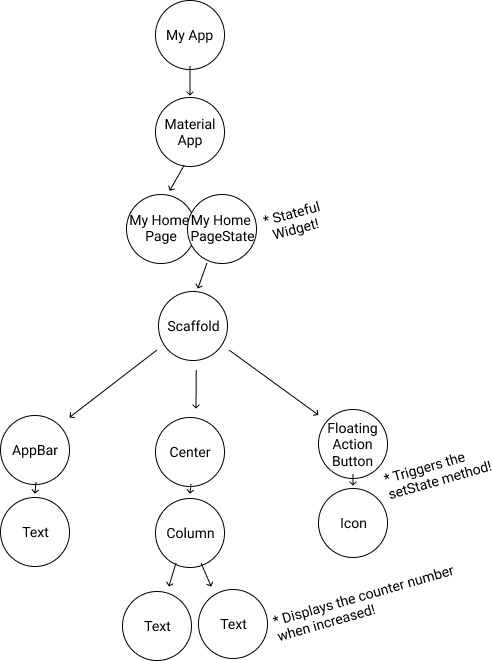
The Widget Tree
Cùng nhau xem qua Widget tree của ví dụ StatefulWidget phía trên. Bạn sẽ có cái nhìn dễ dàng hơn về các widget được lồng nhau như thế nào, cũng đơn giản giống như các thành phần React lồng nhau hoặc các thành phần web HTML với tất cả các chức năng JS được tích hợp.
StatefulWidget Lifecycle
Khi Flutter xây dựng StatefulWidget, nó sẽ tạo ra một đối tượng State. Đối tượng này là nơi lưu giữ tất cả trạng thái có thể thay đổi cho widget đó.
Khái niệm state trong Flutter thể hiện qua :
- Dữ liệu được sử dụng bởi các widget có thể thay đổi.
- Dữ liệu không thể đọc đồng bộ khi widget đã được xây dựng. (Tất cả state phải được thiết lập cùng với thời điểm phương thức build được gọi).
Vòng đời của một StatefulWidget trải qua các bước sau:
1. createState()
2. mounted == true
3. initState()
4. didChangeDependencies()
5. build()
6. didUpdateWidget()
7. setState()
8. deactivate()
9. dispose()
10. mounted == false
1. createState()
Khi Flutter xây dựng StatefulWidget, nó sẽ ngay lập tức gọi createdState (). Bắt buộc bạn phải thực hiện bước này
class MyHomePage extends StatefulWidget {
_MyHomePageState createState() => new _MyHomePageState();
}
2. mounted is true
Khi createdState tạo lớp trạng thái, buildContext được gán cho trạng thái đó.
BuildContext, định nghĩa đơn giản nhất thì nó xác định và điều khiển vị trí của một widget trong cây widget..
Tất cả các widget có thuộc tính bool this.mounted. Nó trả về giá trị true khi buildContext được gán. Và sẽ trả về lỗi khi gọi setState nếu một widget bị ngắt kết nối.
Bạn nên sử dụng if (mounted) {... để đảm bảo State tồn tại trước khi gọi setState ().
3. initState()
Đây là phương thức đầu tiên được gọi khi widget được tạo.
initState được gọi một lần và chỉ một lần. Bạn cũng phải gọi super.initState ().
initState() {
super.initState();
// Add listeners to this class
cartItemStream.listen((data) {
_updateWidget(data);
});
}
4. didChangeDependencies()
Phương thức didChangeDependencies được gọi ngay sau initState cho lần đầu tiên widget được xây dựng.
Nó cũng sẽ được gọi bất cứ khi nào một đối tượng mà widget này phụ thuộc vào dữ liệu được gọi. Ví dụ: nếu nó dựa vào một InheritedWidget.
Phương thức này cũng được gọi ngay sau initState. Sẽ an toàn khi gọi BuildContext.inheritFromWidgetOfExactType từ phương thức này.
5. build()
Phương thức này được gọi thường xuyên để render, @override và trả về một Widget.
Widget build(BuildContext context) {
...
}
6. didUpdateWidget(Widget oldWidget)
didUpdateWidget () được gọi nếu widget cha thay đổi và phải xây dựng lại widget này (vì cần cung cấp cho nó dữ liệu mới), nhưng nó đang được rebuilt lại với cùng runtimeType, nên phương thức này được gọi. Là do Flutter đang sử dụng lại state. Trong trường hợp này, yêu cầu là khởi tạo lại một số dữ liệu, giống như trong initState ().
Nếu phương thức build () của trạng thái phụ thuộc vào Stream hoặc đối tượng khác có thể thay đổi, hãy hủy đăng ký khỏi đối tượng cũ và đăng ký lại đối tượng mới trong didUpdateWidget ().
void didUpdateWidget(Widget oldWidget) {
if (oldWidget.importantProperty != widget.importantProperty) {
_init();
}
}
7. setState()
Phương thức setState () thường được gọi từ Flutter framwork và từ phía developer.
Nó được sử dụng để thông báo rằng "dữ liệu đã thay đổi" và widget ở build context này nên được rebuilt.
void updateProfile(String name) {
 setState(() => this.name = name);
}
8. deactivate()
Phương thức này rất ít khi được sử dụng.
deactivate() được gọi khi State được xóa khỏi cây, nhưng nó có thể được xác nhận lại trước khi quá trình xoá kết thúc. Phương thức này tồn tại về cơ bản vì các đối tượng State có thể được di chuyển từ điểm này sang cây khác.
9. dispose()
dispose() được gọi khi đối tượng State bị xóa vĩnh viễn.
10. mounted is false
Khi đối tượng state không bao giờ có thể remount và khi bạn gọi setState() sẽ có lỗi .
Bài viết được dich và tổng hợp từ nguồn Happy learning!
All rights reserved
