Ezyfox Server tập 1 - Hướng dẫn viết ứng dụng WS đơn giản
Bài đăng này đã không được cập nhật trong 2 năm
Dự án Ezyfox Server:
Đây là dự án miễn phí, mã nguồn mở của Youngmonkeys, một nhóm các developer của Việt Nam, nhằm tạo ra một framework dành cho việc phát triển các ứng dụng realtime như game server, WebSocket server một cách nhanh chóng. Hiện dự án đã được 543 stars và 94 forks trên Github.
Một số tính năng chính của Ezyfox Server:
- Hỗ trợ Socket (TCP/UDP), WebSocket
- IoC Container & Dependency Injection: Tương tự Spring, Ezyfox Server cũng hỗ trợ quản lý các bean, binding, code generation, v.v
- Traffic Encryption: hỗ trợ mã hóa TLS để tăng độ bảo mật
- Hỗ trợ nhiều Client SDKs: Web, Java, Android, iOS, Unity, React, C++, Flutter, v.v.
- Hỗ trợ embedded container
- Document: https://youngmonkeys.org/ezyfox-server/guides/get-started
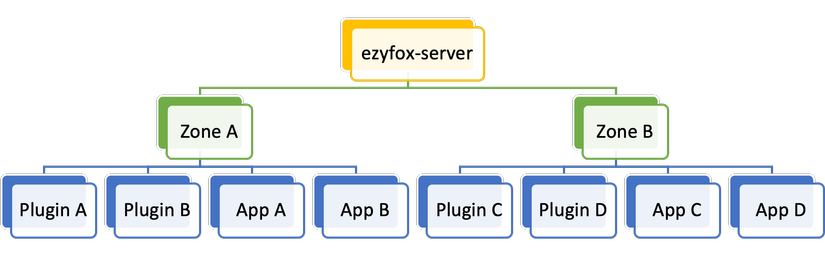
Kiến trúc của Ezyfox Server:
Ezyfox Server hướng tới việc hỗ trợ chạy nhiều service trên một server node, do đó mỗi server sẽ bao gồm nhiều zone, mỗi zone sẽ chứa nhiều app và plugin. Chi tiết các bạn có thể xem thêm ở đây.
Các business logic thường chúng ta sẽ đặt vào các app.
Viết ứng dụng WS đầu tiên bằng Ezyfox Embedded Server:
Đây là 1 ứng dụng nhỏ lắng nghe kết nối WebSocket từ phía client và trả về 1 response đơn giản. Trước mắt chúng ta chỉ cần 1 zone và 1 app là đủ. Link project here
Đầu tiên, hãy tạo 1 maven project. Thêm ezyfox-server-embedded vào pom.xml như sau:
<?xml version="1.0"?>
<project xmlns:xsi="http://www.w3.org/2001/XMLSchema-instance"
         xsi:schemaLocation="http://maven.apache.org/POM/4.0.0 http://maven.apache.org/xsd/maven-4.0.0.xsd"
         xmlns="http://maven.apache.org/POM/4.0.0">
    <modelVersion>4.0.0</modelVersion>
    <groupId>com.ezyfoxserver</groupId>
    <artifactId>simple-chat</artifactId>
    <version>1.0.0</version>
    <dependencies>
        <dependency>
            <groupId>com.tvd12</groupId>
            <artifactId>ezyfox-server-embedded</artifactId>
            <version>1.2.8.1</version>
        </dependency>
        <dependency>
            <groupId>org.projectlombok</groupId>
            <artifactId>lombok</artifactId>
            <version>1.18.4</version>
            <scope>compile</scope>
        </dependency>
    </dependencies>

    <build>
        <plugins>
            <plugin>
                <groupId>com.spotify.fmt</groupId>
                <artifactId>fmt-maven-plugin</artifactId>
                <version>2.21.1</version>
                <executions>
                    <execution>
                        <goals>
                            <goal>format</goal>
                        </goals>
                    </execution>
                </executions>
            </plugin>
        </plugins>
    </build>
</project>
Tại package gốc, tạo package con app.support, chúng ta sẽ viết 2 class để khởi tạo app cho Ezyfox Server.
- Tạo class
AppEntrykế thừa từEzySimpleAppEntry. Đây là nơi chứa các callback để chúng ta manage các phase trong lifecycle của app. Chú yếu tôi chỉ log ra để xem Ezyfox Server có khởi tạo được app không:
public class AppEntry extends EzySimpleAppEntry {

  @Override
  protected void preConfig(EzyAppContext ctx) {
    logger.info("\n=================== APP START CONFIG ================\n");
  }

  @Override
  protected void postConfig(EzyAppContext ctx) {
    logger.info("\n=================== APP END CONFIG ================\n");
  }

  @Override
  public void start() {
    logger.info("start app");
  }

  @Override
  protected String[] getScanablePackages() {
    return new String[] {
        "com.ezyfoxserver.app",
    };
  }
}
Chú ý method getScanablePackages, chúng ta sẽ cung cấp những package chứa các managed bean để IoC container khởi tạo và quản lý chúng.
- Tạo
AppEntryLoaderkế thừa từEzyAbstractAppEntryLoader:
public class AppEntryLoader extends EzyAbstractAppEntryLoader {

  @Override
  public EzyAppEntry load() {
    return new AppEntry();
  }
}
Tại package gốc, tạo class ServerApplication chứa hàm main. Đây là entrypoint để start embedded server:
public class ServerApplication {

  public static void main(String[] args) throws Exception {
    EzyAppSettingBuilder appSettingBuilder =
        new EzyAppSettingBuilder().name("hello-world").entryLoader(AppEntryLoader.class);

    EzyZoneSettingBuilder zoneSettingBuilder =
        new EzyZoneSettingBuilder().name("example").application(appSettingBuilder.build());

    EzySimpleSettings settings =
        new EzySettingsBuilder()
            .debug(true)
            .zone(zoneSettingBuilder.build())
            .build();

    EzyEmbeddedServer server = EzyEmbeddedServer.builder().settings(settings).build();
    server.start();
  }
}
Khởi chạy hàm main, chúng ta sẽ thấy đoạn log sau:
  ______ ________     ________ ______   __           _____  ______          _______     __
 |  ____|___  /\ \   / /  ____/ __ \ \ / /          |  __ \|  ____|   /\   |  __ \ \   / /
 | |__     / /  \ \_/ /| |__ | |  | \ V /   ______  | |__) | |__     /  \  | |  | \ \_/ /
 |  __|   / /    \   / |  __|| |  | |> <   |______| |  _  /|  __|   / /\ \ | |  | |\   /
 | |____ / /__    | |  | |   | |__| / . \           | | \ \| |____ / ____ \| |__| | | |
 |______/_____|   |_|  |_|    \____/_/ \_\          |_|  \_\______/_/    \_\_____/  |_|

14:32:51.774 [main] DEBUG com.tvd12.ezyfoxserver.command.impl.EzyBroadcastEventImpl - broadcast server event: SERVER_READY
14:32:51.774 [main] DEBUG com.tvd12.ezyfoxserver.command.impl.EzyZoneBroadcastEventImpl - zone: example fire event: SERVER_READY
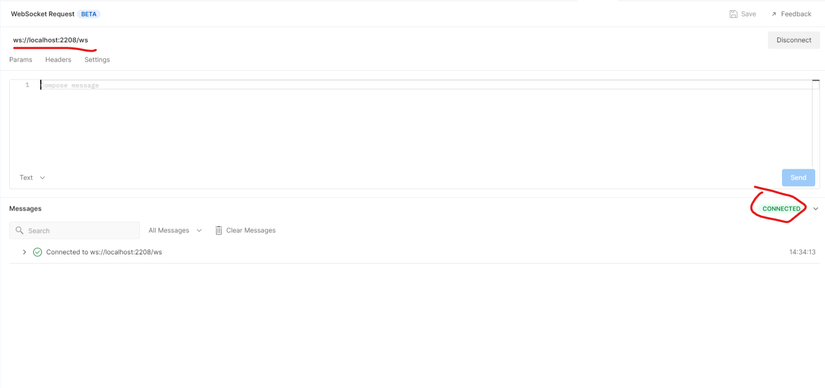
Có nghĩa là Ezyfox Server đã bootstrap thành công. Sử dụng postman để test WS: ws://localhost:2208/ws
Viết 1 handler lắng nghe greet command từ client và phản hồi 1 lời chào:
- Tại package gốc, tạo package
servicevà classGreetingbên trong:
@EzySingleton
public class Greeting {

  public String greet(String who) {
    return "Greet " + who + "!";
  }
}
@EzySingleton tương tự như @Service với @Scope(SCOPE_SINGLETON) của Spring.
- Tại package gốc, tạo package
event.handlervà các handler bên trong:
@Setter
public abstract class AbstractClientRequestHandler extends EzyLoggable
    implements EzyHandler, EzyAppContextAware, EzySessionAware, EzyUserAware {

  protected EzyUser user;
  protected EzySession session;
  protected EzyAppContext appContext;

  @EzyAutoBind("appResponseFactory")
  protected EzyResponseFactory responseFactory;

  @Override
  public final void handle() {
    execute();
  }

  protected abstract void execute() throws EzyBadRequestException;
}
@EzyAutoBind("appResponseFactory") tương tự như @Autowire với @Qualifier("appResponseFactory") trong Spring.
@Setter
@EzyPrototype
@EzyObjectBinding(write = false)
@EzyRequestListener("greet")
public class GreetRequestHandler extends AbstractClientRequestHandler implements EzyDataBinding {

  private String who;

  @EzyAutoBind private Greeting greeting;

  @Override
  protected void execute() {
    responseFactory
        .newObjectResponse()
        .command("greet")
        .param("message", greeting.greet(who))
        .session(session)
        .execute();
  }
}
Class GreetRequestHandler sẽ lắng nghe WS command greet (chú ý @EzyRequestListener("greet"))từ client và phản hồi 1 response bằng responseFactory.
Quay lại class AppEntry và sửa method getScanablePackages:
  @Override
  protected String[] getScanablePackages() {
    return new String[] {
      "com.ezyfoxserver.app", "com.ezyfoxserver.event.handler", "com.ezyfoxserver.service",
    };
  }
Ezyfox Server sẽ scan các bean trong package handler và service.
OK, đến phần client:
Client là 1 html đơn giản, có sử dụng Jquery và Ezyclient viết bằng Javascript
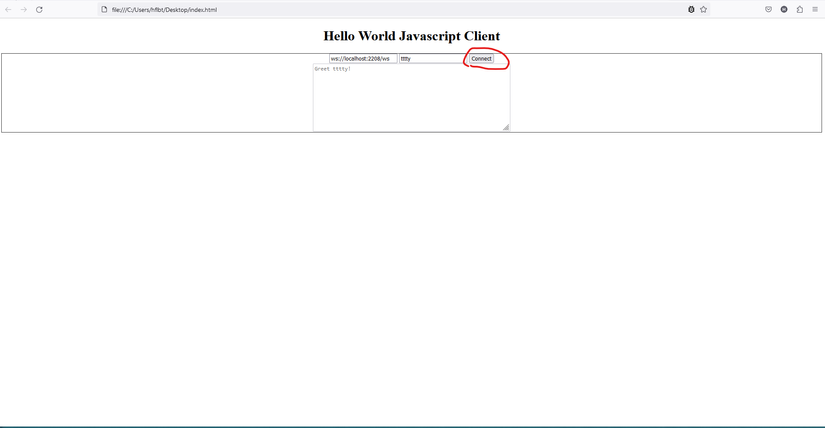
Khi người dùng nhập tên vào và click connect, Ezyclient sẽ gọi các command HANDSHAKE, LOGIN, APP_ACCESS và greet theo thứ tự.
Ở phía backend, 3 event đầu tiên sẽ được xử lý tự động bởi Ezyfox Server. Event greet sẽ được class GreetRequestHandler xử lý và trả về 1 lời chào, cái sẽ được hiển thị ở thẻ textarea.
Chú ý các dòng sau đây:
//handshakeHandler sẽ được gọi sau khi Ezyfox Server trả về một response hợp lệ với command HANDSHAKE
//Tương tự cho userLoginHandler và accessAppHandler
setup.addDataHandler(EzyCommand.HANDSHAKE, handshakeHandler);
setup.addDataHandler(EzyCommand.LOGIN, userLoginHandler);
setup.addDataHandler(EzyCommand.APP_ACCESS, accessAppHandler);
var setupApp = setup.setupApp(appName);

//Khi Ezyfox Server trả response theo command greet về client thì function(app, data) sẽ được gọi và đổ content lên textarea
setupApp.addDataHandler("greet", function(app, data) {
    var message = data.message;
    $('#messages').val(message);
});
Đây là source code hoàn chỉnh của client
<!doctype html>
<head>
<meta charset="utf-8">
<meta http-equiv="X-UA-Compatible" content="IE=edge,chrome=1">
<title>Hello EzyFox Server</title>
<style type="text/css">
.page-title {
    text-align: center;
}

.container {
    border: 1px solid rgba(0, 0, 0, 0.8);
    text-align: center;
}

.container textarea {
    width: 450px;
    height: 150px;
}
</style>
</head>

<body>
<h1 class="page-title">Hello World Javascript Client</h1>
<div class="container">
        <div class="connect">
            <input type="text" id="url" value="ws://localhost:2208/ws"/>
            <input type="username" id="username" placeholder="your's name"/>
            <input type="submit" id="connect" value="Connect"/>
        </div>
        <div class="messages">
            <textarea id="messages" disabled></textarea>
        </div>
    </div>
<script src="https://ajax.googleapis.com/ajax/libs/jquery/1.4.2/jquery.min.js"></script>
<script src="https://resources.tvd12.com/ezyclient-1.0.5.min.js"></script>
<script type="text/javascript">

var zoneName = "example";
var appName = "hello-world";

var log = function(msg) {
    var log = $('#log')
    log.append(msg + " \n").scrollTop(log[0].scrollHeight - log.height());
}

var handshakeHandler = new EzyHandshakeHandler();
handshakeHandler.getLoginRequest = function(context) {
    return [zoneName, $('#username').val(), "123456", []];
}

var userLoginHandler = new EzyLoginSuccessHandler();
userLoginHandler.handleLoginSuccess = function() {
    var accessAppRequest = [appName, []];
    this.client.sendRequest(EzyCommand.APP_ACCESS, accessAppRequest);
}

var accessAppHandler = new EzyAppAccessHandler();
accessAppHandler.postHandle = function(app, data) {
    app.sendRequest('greet', {who: app.client.me.name});
}

var config = new EzyClientConfig;
config.zoneName = zoneName;
var clients = EzyClients.getInstance();
var client = clients.newDefaultClient(config);
var setup = client.setup;

setup.addDataHandler(EzyCommand.HANDSHAKE, handshakeHandler);
setup.addDataHandler(EzyCommand.LOGIN, userLoginHandler);
setup.addDataHandler(EzyCommand.APP_ACCESS, accessAppHandler);
var setupApp = setup.setupApp(appName);
setupApp.addDataHandler("greet", function(app, data) {
    var message = data.message;
    $('#messages').val(message);
});

$(function () {
    $('#connect').click(function () {
        client.connect($('#url').val());
    });
})
</script>
</body>

</html>
Cùng đón xem bài tiếp theo về chức năng direct chat nhé!
All rights reserved
