Environment-specific configuration of Webpack builds
Bài đăng này đã không được cập nhật trong 4 năm
Injecting variables into builds
In many cases you might have some environment-specific variables or simply some data which needs to be injected into build.
There are 2 plugins which provide this feature: DefinePlugin and EnvironmentPlugin. Let’s overview them.
DefinePlugin allows to define any variable in the global scope, so it will be accessible from any place inside your code.
The plugin is a part of webpack package, so you can import it from it:
const {
    // ...
    DefinePlugin,
    // ...
} = require('webpack')
And include into plugins array as in following example:
plugins: [
    // ...
    new DefinePlugin({
        PRODUCTION: JSON.stringify(isProd),
        EXPRESSION: '1 + 1',
        RESULT: JSON.stringify('1 + 1'),
        DEV: JSON.stringify(!isProd),
    })
    // ...
]
Note that here I used JSON.stringify in three of four cases.
In our index.js file we can add an example usage:
if (PRODUCTION) {
    console.log('PRODUCTION BUILD.')
    console.log(EXPRESSION)
    console.log(RESULT)
}
if (DEV) {
    console.log('DEV BUILD.')
}
After we run npm run build our source will contain following lines:
if (true) {
    console.log('PRODUCTION BUILD.');
    console.log(1 + 1);
    console.log("1 + 1");
}
if (false) {
    console.log('DEV BUILD.');
}
Note how the values had been replaced. Webpack does not include initial variable names, but replaces them with values directly. One of the points is that it supports injecting expressions as code (see result of EXPRESSION). So if you need to pass a string, always use JSON.stringify or double quotes like '"Some String"'.
One of advantages of this approach is optimization during code uglification.
In uglified build the code above will look like this:
console.log("PRODUCTION BUILD."),console.log(2),console.log("1 + 1")
As you can see, there is no if (true) or if (false) conditions anymore, necessary code parts are either present by default or excluded from the build. Also 1+1 expression has been evaluated to its result 2.
One of the approaches is to use environment variables for such purposes. By default those variables are stored inside process.env object.
// Webpack config
plugins: [
    // ...
    new DefinePlugin({
        'process.env.NODE_ENV': JSON.stringify(process.env.NODE_ENV),
    })
    // ...
]

// Source code
if (process.env.NODE_ENV === 'production') {
    // Do something in production.
}
Webpack is being run as NodeJS process, so it has process.env defined inside the build as well. In this case NODE_ENV is being passed when running npm run build command, but it is undefined during debug build.
One way is to use default value for it with JSON.stringify(process.env.NODE_ENV) || ‘development’) or use another plugin.
EnvironmentPlugin is a shorthand to define environment variables with support of default values.
const {
    // ...
    EnvironmentPlugin,
    // ...
} = require('webpack')

// ...

plugins: [
    // ...

    // Without default values
    new EnvironmentPlugin(['NODE_ENV', 'DEBUG']),

    // OR with default values
    new EnvironmentPlugin({
         NODE_ENV: 'development',
         DEBUG: false,
    }),

    // ...
]
Note that it injects values, not expressions. If an array of keys is passed, there are no default values provided. While object notation allows to provide fallback values if the variable is not defined during build.
And the most handy usage of this feature is to have an .env file which may be modified for your local environment, staging or production server.
# .env file
DEBUG=true
This file can be loaded with dotenv package. Install it with npm i -D dotenv and add to base.config.js
const dotenv = require('dotenv')
dotenv.load()
// Now DEBUG variable is available in process.env object
We will come back to environment variables with Server-Side rendering topic.
Source maps
Let’s make a mistake in our code 😉
$(window).on('load', () => {
    aTerribleUndefinedClosure.call()
    // ...
})
And run the code.
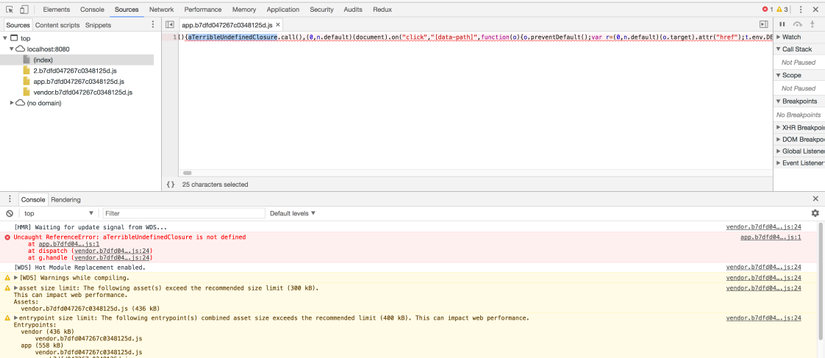
Not very informative, is it? We still can see function name, but no idea about initial file name and line number.
This is the case when we need to map compiled and minified code onto initial structure and source maps can help with it.
The devtool option (Docs) and SourceMapDevToolPlugin (Docs) can help us with that.
There are many types of source maps available and there is a very good article available describing effect of various options.
In general, we need the map to be as much detailed as possible and keep good build speed for development.
Let’s choose cheap-module-eval-source-map for development and source-map for production (I will explain in the next article how to keep the source map private).
const config = {
    // Include source maps in development files
    devtool: isProd ? '#source-map' : '#cheap-module-eval-source-map',
    // ...
}
We also need to enable source maps in our plugins and loaders if needed.
new UglifyJsPlugin({
    sourceMap: true,
}),
And run our dev server again.
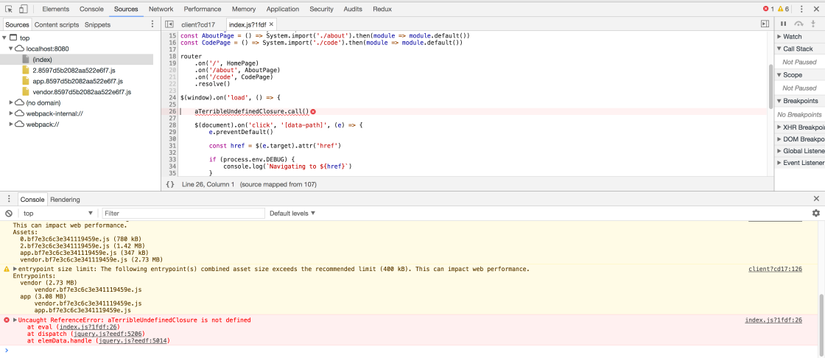
Much better now. We can see file name and line number as well as see the source code right inside the browser. Note that you can browse through all your code in webpack:// path in Sources tab.
SourceMapDevToolPlugin allows to tune the settings for source maps and in some cases increase build speed by excluding some files or bundles (e. g. vendor bundle).
const {
    // ...
    SourceMapDevToolPlugin,
    // ...
} = require('webpack')

plugins: [
     // ...
     new SourceMapDevToolPlugin({
          exclude: ['vendor.js'],
          columns: false,
     }),
     // ...
]
Code banners
In many cases you might need to provide additional information like license, copyright or any other notice in your compiled files.
In order to do that you can use webpack.BannerPlugin
const {
    // ...
    BannerPlugin,
    // ...
} = require('webpack')

const banner = `
file: [file]
author: rkgrep
source: https://github.com/rkgrep/spa-tutorial
license: MIT
`

// ...

plugins: [
    // ...
    new BannerPlugin({
        banner, // Defined above
    }),
    // ...
]
Now every file in the build will contain a comment header:
/*!
 *
 * file: app.5d56ca35351a7e2dd571.js
 * author: rkgrep
 * source: https://github.com/rkgrep/spa-tutorial
 * license: MIT
 *
 */
Tuning development builds
In most cases you would need a separate configuration for your dev and production builds.
The best practice is to exclude unnecessary code transformations during development to speed up the process and keep debugging comfortable.
- Disable uglification if not necessary
- Disable CSS file extraction as it is not compatible with hot reloading
- Disable banners, analyzers and other things which does not contain valid information during dev builds.
config = {
    // ...
}

if (isProd) {
    // Modify config for production
    config.plugins = [
        ...config.plugins,
        new BundleAnalyzerPlugin({
            analyzerMode: isProd ? 'static' : 'disabled',
            generateStatsFile: isProd,
            openAnalyzer: false,
        }),
        new UglifyJsPlugin({
            sourceMap: true,
        }),
        new BannerPlugin({
            banner,
        }),
    ]
}
In next article I will describe how to set up CDN for cookie-less domains, additional server to test production builds and use SRI to protect your app. Repository with this tutorial sources available on GitHub
All rights reserved
