Ember.js for beginers
Bài đăng này đã không được cập nhật trong 4 năm
What is Ember.js?
Ember.js là 1 framework mã nguồn mở sử dụng cho phía client trong việc phát triển ứng dụng web và được dựa trên mô hình kiến trúc MVC (Model-View-Controller).
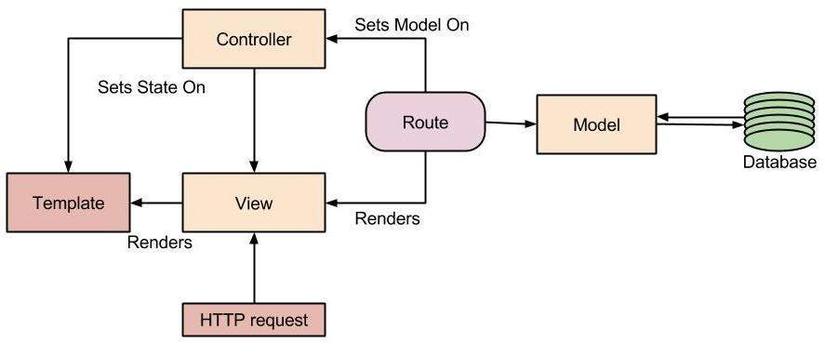
Trong framework này, thì route được sử dụng như model, handlebar tương tự view và controller dùng để điều khiển dữ liệu trong model.
Ngoài lề
Ban đầu Ember.js có tên là SproutCore MVC framework, được phát triển bởi Yehuda Katz và được đưa ra đầu tiên vào tháng 12/2011.
Tại sao nên dùng?
- Mã nguồn mở (MIT license)
- Linh hoạt, có thể tăng hiệu năng của ứng dụng mà không cần phải load lại cả trang
- Sử dụng các thư viện tương tự như HTML
- Ứng dụng dùng Ember.js có kích cỡ nhỏ hơn dùng các thư viện khác
- Các thuộc tính ràng buộc được hỗ trợ đầy đủ, ví dụ khi đã tạo tạo liên kết giữa 2 thuộc tính, 1 cái thay đổi, cái còn lại được update theo thành giá trị mới.
Download
Các bạn download thư viện tại đây. hoặc sử dụng CDN
<script src="https://cdnjs.cloudflare.com/ajax/libs/handlebars.js/3.0.1/handlebars.min.js"></script>
<script src="https://code.jquery.com/jquery-2.1.3.min.js"></script>
<script src="https://cdnjs.cloudflare.com/ajax/libs/ember.js/1.10.0/ember.min.js"></script>
<script src="http://builds.emberjs.com/tags/v1.10.0-beta.3/ember-template-compiler.js"></script>
<script src="http://builds.emberjs.com/release/ember.debug.js"></script>
<script src="http://builds.emberjs.com/beta/ember-data.js"></script>
Ví dụ
<!DOCTYPE html>
<html>
    <head>
        <title>Ember.js Application example</title>
        <!-- CDN's -->
        <script src="https://cdnjs.cloudflare.com/ajax/libs/handlebars.js/3.0.1/handlebars.min.js"></script>
        <script src="https://code.jquery.com/jquery-2.1.3.min.js"></script>
        <script src="https://cdnjs.cloudflare.com/ajax/libs/ember.js/1.10.0/ember.min.js"></script>
        <script src="http://builds.emberjs.com/tags/v1.10.0-beta.3/ember-template-compiler.js"></script>
        <script src="http://builds.emberjs.com/release/ember.debug.js"></script>
        <script src="http://builds.emberjs.com/beta/ember-data.js"></script>
    </head>
    <body>
        <script type="text/x-handlebars">
            <h1>{{App.name}}</h1>
                {{outlet}}
        </script>

        <script type="text/javascript">
            App = Ember.Application.create();
            App.name= "Hello world!";
        </script>
    </body>
</html>
Kết quả sẽ là

Kiến trúc
 Kiến trúc của Ember.js về cơ bản bao gồm các thành phần:
- Model
- View
- Template
- Controller
- Route
Template
Bạn có thể trực tiếp nhúng templates vào các thẻ HTML. Ember.js cung cấp thư viện Handlebar template để xây dựng các ứng dụng front-end, giống như HTML thông thường.
Template, viết bằng ngôn ngữ Handlebars templating, mô tả các giao diện người dùng của ứng dụng. Mỗi template được hỗ trợ bởi một model, và các template tự động cập nhật nếu các model thay đổi.
Ngoài plain HTML, các template có thể chứa:
- Expressions, ví dụ:
{{firstName}}, lấy giá trị từ model và truyền vào HTML. - Outlets, dùng để giữ chỗ cho template khác.
- Components, tuỳ chỉnh lại HTML dùng để làm sạch các template lặp lại hoặc để tái sử dụng.
Route
Một route là một đối tượng mà nó sẽ làm cho template hiển thị thông tin theo model quy định.
Các router dịch một URL vào một loạt các template lồng nhau, mỗi template được hỗ trợ bởi một model. Nếu templates hoặc models thay đổi do người dùng thay đổi, Ember tự động cập nhật URL trên thanh URL của trình duyệt.
Điều này có nghĩa rằng, vào thời điểm bất kỳ, người dùng có thể chia sẻ các URL của ứng dụng. Khi ai đó nhấp chuột vào liên kết, họ đang xem nội dung tương tự như người chia sẻ đã thấy.
Model
Model là một đối tượng được lưu trong persistent state. Template có trách nhiệm hiển thị các mô hình cho người dùng bằng cách biến nó thành HTML. Trong nhiều ứng dụng, các model được nạp thông qua giao thức HTTP JSON API.
Các model và route được liên kết với nhau bởi vì model thực hiện các route bằng cách đi qua như là đối số mỗi khi route được gọi đến. Nó sử dụng các dữ liệu được lưu trữ trong cơ sở dữ liệu. Các model là lớp đơn giản mà được mở rộng bằng các chức năng của Ember Data. Ember Data là một thư viện liên kết chặt chẽ cùng với Ember.js để thao tác với dữ liệu được lưu trữ trong cơ sở dữ liệu.
View
Views được tạo ra vì 2 lý do:
- Nếu có sự phức tạp của xử lý sự kiện do người dùng tạo ra
- Tạo ra 1 thành phần có thể tái sử dụng
Views có trách nhiệm xử lý sự kiện người dùng và cập nhật DOM.
Controller
Controller quản lý logic hiển thị của model và cũng kiểm soát các hoạt động giữa các route, model, và view. Nó lấy model từ route và tạo ra các kết nối giữa các view, model, and template. Ember.js tự động sinh ra controller.
Ngoài ra
Nếu các bạn muốn tìm hiểu kỹ hơn, có thể tham khảo
First app with Ember.js
Tạo app xem ảnh đơn giản
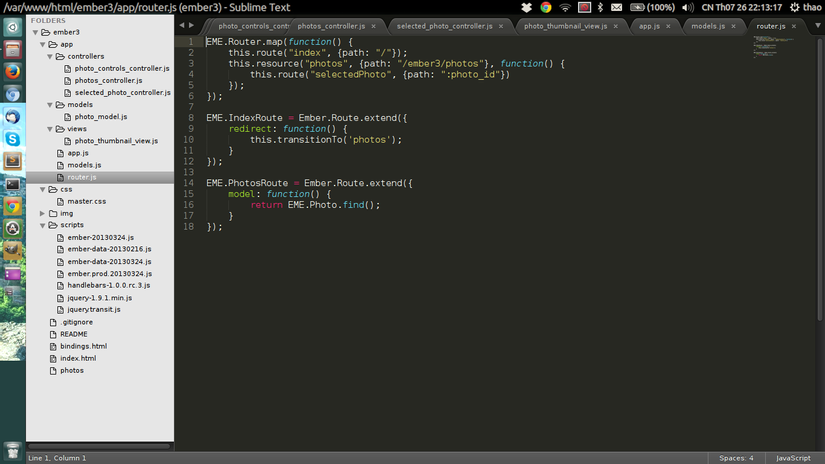
Cấu trúc thư mục app

Tạo file index.html
<!DOCTYPE html PUBLIC "-//W3C//DTD HTML 4.01//EN"
        "http://www.w3.org/TR/html4/strict.dtd">
<html lang="en">
<head>
    <meta http-equiv="Content-Type" content="text/html; charset=utf-8">
    <meta name="viewport" content="width=device-width, initial-scale=1.0, maximum-scale=1.0">

    <title>Ember.js Example Application</title>
    <link rel="stylesheet" href="css/master.css" type="text/css" charset="utf-8">
    <meta name="author" content="Joachim Haagen Skeie">
    <script src="scripts/jquery-1.9.1.min.js" type="text/javascript" charset="utf-8"></script>
    <script src="scripts/handlebars-1.0.0.rc.3.js" type="text/javascript" charset="utf-8"></script>
    <script src="scripts/ember.prod.20130324.js" type="text/javascript" charset="utf-8"></script>
    <script src="scripts/ember-data-20130216.js" type="text/javascript" charset="utf-8"></script>
    <script src="app/app.js" type="text/javascript" charset="utf-8"></script>

    <script type="text/x-handlebars">

    </script>
</head>
<body bgcolor="#555154">
</body>
</html>
Khai báo Ember
Trong file app.js
EME = Ember.Application.create({});
Tạo Datastore
Tạo file model.js
EME.Photo = DS.Model.extend({
    imageTitle: DS.attr('string'),
    imageUrl: DS.attr('string')
});
Chỉ cần 1 loại dữ liệu là picture nên chỉ cần 3 thuộc tính là id, title và URL.
Tạo ruote
Trong file router.js
EME.Router.map(function() {
    this.route("index", {path: "/"});
    this.resource("photos", {path: "/photos"}, function() {
        this.route("selectedPhoto", {path: ":photo_id"})
    });
});

EME.IndexRoute = Ember.Route.extend({
    redirect: function() {
        this.transitionTo('photos');
    }
});

EME.PhotosRoute = Ember.Route.extend({
    model: function() {
        return EME.Photo.find();
    }
});
Quay lại trang index.html
Thêm dòng code này:
<script type="text/x-handlebars">
    <div id="mainArea">
        {{outlet}}
    </div>
</script>
ứng dụng sẽ hiển thị tại khu vực này. Và thêm đoạn này để hiển thị danh sách các bức ảnh trong DB:
   <script type="text/x-handlebars" id="photos">
       {{outlet}}
       <div class="thumbnailViewList">
           {{#each photo in controller}}
           <div class="thumbnailItem">
               {{#linkTo photos.selectedPhoto photo}}
                   {{view EME.PhotoThumbnailView
                        srcBinding="photo.imageUrl"
                        contentBinding="photo"}}
                   {{/linkTo}}
            </div>
            {{/each}}
       </div>
    </script>
Và đoạn này sẽ hiển thị bức ảnh được chọn
<script type="text/x-handlebars" id="photos/selectedPhoto">
    <div id="selectedPhoto">
        <h1>{{imageTitle}}</h1>

        <div class="selectedPhotoItem">
            < img id="selectedImage" {{bindAttr src="imageUrl"}} />
        </div>
    </div>
</script>
Trong photo_controller.js
EME.PhotosController = Ember.ArrayController.extend({
    needs: ['photosSelectedPhoto'],

    selectPhotoAction: function(photo) {
        this.set('selectedPhoto', photo);
    },

    nextPhoto: function() {
        var selectedPhoto = null;
        if (!this.get('controllers.photosSelectedPhoto.content')) {
            this.transitionToRoute("photos.selectedPhoto", this.get('content.firstObject'));
        } else {
            var selectedIndex = this.findSelectedItemIndex();

            if (selectedIndex >= (this.get('content.length') - 1)) {
                selectedIndex = 0;
            } else {
                selectedIndex++;
            }

            this.transitionToRoute("photos.selectedPhoto", this.get('content').objectAt(selectedIndex))
        }
    },

    prevPhoto: function() {
        console.log('PhotoListController prevPhoto');
        if (!this.get('controllers.photosSelectedPhoto.content')) {
            this.transitionToRoute("photos.selectedPhoto", this.get('content.lastObject'));
        } else {
            var selectedIndex = this.findSelectedItemIndex();

            if (selectedIndex <= 0) {
                selectedIndex = this.get('content.length') - 1;
            } else {
                selectedIndex--;
            }

            this.transitionToRoute("photos.selectedPhoto", this.get('content').objectAt(selectedIndex))
        }
    },

    findSelectedItemIndex: function() {
        var content = this.get('content');
        var selectedPhoto = this.get('controllers.photosSelectedPhoto.content');

        for (index = 0; index < content.get('length'); index++) {
            if (this.get('controllers.photosSelectedPhoto.content') === content.objectAt(index)) {
                return index;
            }
        }

        return 0;
    }
});
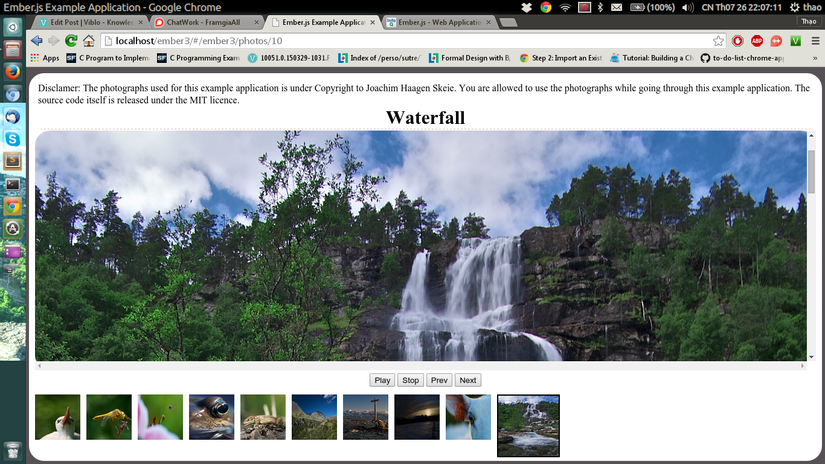
và đây là kết quả

Kết luận
Tham khảo
Ember.js - Web Applications Done Right
Download demo
Tại đây
All rights reserved