ECMAScript and ES6: Part 2
Bài đăng này đã không được cập nhật trong 8 năm
This is the second part of my previous article ECMAScript and ES6: Part 1. After completing this 2 article with es6, anyone can jump start learning any frontend framework like React, Angular or VueJS. In this article I will describe the topics modules, symbols, arrays & collections, promises in es6 in details with appripriate example.
Modules
Prior to ES6, everything inside a JavaScript application, including code across different files of the application, shared the same scope. This is where modules come in to help better manage and introduce code separation, reducing problems like naming collisions and increasing data security. JavaScript developers were forced to resort to external libraries to incorporate modules to help with these particular issues, but with ES6, modules have now been included as an official part of the language. Modules are simply JavaScript files that are loaded into JavaScript code from other files.
- Modules in ES6 make it easier to compartmentalize and separate code into smaller standalone snippets that can then be reused and injected into other places
- when they are required, making the process of testing your code easier as the modules are decoupled from the primary code.
- Modules are also useful in loading scripts asynchronously, improving load times of apps.
Exporting
There are two kinds of exports: named exports (several per module) and default exports (one per module).
Named exports(several per module)
A module can export multiple things by prefixing its declarations with the keyword export. These exports are distinguished by their names and are called named exports. You can export a variable, a function, or a class declaration from a module. Variables, Functions, or Classes not exported from a module are not accessible outside the module.
export var text = "Framgia is awesome";
export let name = "Framgia";
export const number = 7;
Here in this example, you are exporting text, name, and number, all declared using different variable declaration keywords. You can also export a function or a Class from the module. Consider the following examples:
export function add(a, b) {
  return a + b;
}
export class Rectangle {
  constructor(length, width) {
    this.length = length;
    this.width = width;
  }
}
Another example of exporting
//------ lib.js ------
export const sqrt = Math.sqrt;
export function square(x) {
    return x * x;
}
export function diag(x, y) {
    return sqrt(square(x) + square(y));
}

//------ main.js ------
import { square, diag } from 'lib';
console.log(square(11)); // 121
console.log(diag(4, 3)); // 5
Default exports (one per module)
In front-end JS where we use classes for models and components, one class per module is a common practice. An ES6 module is built to pick a default export that will be the main exported value. A single variable, function, or class can be specified as the default export of the module using the default keyword.
// The following ECMAScript 6 module “is” a single function:
//------ myFunc.js ------
export default function () {} // no semicolon!

//------ main1.js ------
import myFunc from 'myFunc';
myFunc();

// An ECMAScript 6 module whose default export is a class looks as follows:
//------ MyClass.js ------
export default class {} // no semicolon!

//------ main2.js ------
import MyClass from 'MyClass';
const inst = new MyClass();
You can have only one value as a default export inside a module. Using the keyword on more than one export inside the module will raise an error.
You can also assign the reference of a function to a variable and then export the function reference using default.
function multiply(a, b) {
  return a * b;
}

export default multiply;
Importing
Once a module with the relevant exports is set up, it can be accessed inside another module by using the import keyword. There are two parts to an import statement: the identifier you’re importing and the module from which those identifiers should be imported. This is the statement in its basic form:
import { identifier1, identifier2 } from "./moduleFileName.js";
In the above statement identifier1 and identifier2 are the bindings imported from moduleFileName.js. The module is specified using a string representing the path to the file containing the module after the from keyword. \
Notice that, the bindings are like variables defined using const, that is, you cannot define any other variables using the same name or import another module with the same name.
Using the above syntax, you can import specific bindings from a module as follows:
// importing the functions sum and multiply
import { sum, multiply } from "./ moduleFile.js";
console.log(sum(1, 7)); // 8
console.log(multiply(2, 3)); // 6
Here, there are two bindings imported from the moduleFile module: sum and multiply can be used just like locally defined identifiers. But let us consider the case where you want to import all the exports available in the module without having to explicitly declare them by name. This can be done using the wildcard * and importing the identifiers as properties of an object.
// import everything
import * as example from "./ moduleFile.js";
console.log(example.sum(1,7)); // 8
console.log(example.multiply(2, 3)); // 6
In this code, all exported bindings in moduleFile are loaded into an object called example.
Importing Default Values
Importing default values from a module is as simple as follows:
import multiply from "./moduleFile.js";
This import statement imports the default value from the module. Notice that we do not use any curly braces unlike when we import named exports. The name multiply in this case is local and will be used to refer to the default value imported from the module.
In case of modules that export both default and non-default values, you can import all the bindings using a single statement.
// example.js
export let message = "Framgia is awesome";
export default function(a, b) {
  return a * b;
}

// import_everything.js
import multiply, { message } from "./example.js";
console.log(multiply (2, 2)); // 4
console.log(message); // "Framgia is awesome"
You need to use a comma to separate the default local name and the non-default identifiers listed inside curly braces. Make sure to always have the default before the nondefault values.
Another way to import a default module with a specific local name would be:
import { default as multiply, message } from "./moduleFile.js";
In this case, just like the previous example, multiply stores the default module exported from moduleFile.js.
Exporting an Imported Binding
In case you need to re-export a binding that you imported into the module, you can do that using an export statement:
import { message } from "./example.js";
// some javascript code
export message;
In this example, we imported the binding message from moduleFile.js and again exported the same binding. You can also do this in one statement instead of two like this:
export { multiply } from "./moduleFile.js";
Furthermore, you can re-export everything using the wildcard ‘*’ like in the following example:
export * from "./moduleFile.js";
Renaming Identifiers
In many cases you might not want to use the original name of the imported variable, function, or class because it can cause a conflict with other declarations in the code. ES6 helps you solve this issue by letting you rename exports and imports using the as keyword.
function sum(a, b) {
return a + b;
}

export { sum as add };
In this example, sum is the local name of the exported function. But the function is exported as add and needs to be imported in another module using its exported name add.
import { add } from "./moduleFIle.js";
Similarly, if you want to use a different name when you import the identifier, you can do something like this:
import { add as sum } from "./moduleFile.js";
console.log(typeof add); // "undefined"
console.log(sum(1, 2)); // 3
Symbols
ES6 introduces a brand new primitive data type - Symbol. Symbols represent a unique value and at its heart, a symbol is a unique token that is guaranteed to never clash with any other Symbol. The Symbol() method can be used to create a new symbol. Consider the following example:
const foo = Symbol();
console.log(typeof foo); // "symbol"
Every time you call the factory function, a new and unique symbol is created. The output from the typeof on a symbol type is "symbol," and this is the primary way to identify symbols.Optionally, while creating a Symbol, you can also give it a label by passing a string as an argument into the Symbol() method:
const test = Symbol("It is a test symbol");
console.log(chocolate);
// Symbol(It is a test symbol)
console.log(chocolate.toString());
// "Symbol(this is my chocolate)"
- The label passed in as the argument does not affect the value of the Symbol. It has no other consequence except for being a string to describe the symbol while printing it.
- A symbol is always unique and two symbols can never be the same. You can, however, create multiple symbols with the same label but the returned symbols would always be unique. Check the following code snippet for an example:
const kit = Symbol("hello");
const kat = Symbol("hello");
console.log(kit === kat); // false
//or you can simply try,
Symbol() !== Symbol() // true
Application of Symbols:
Symbols, by their very nature, are mainly used as unique property keys because a symbol can never clash with any other property (symbol or string) of the object, which can be incredibly helpful in cases where you don’t want to take chances on overriding native properties of an object.
Arrays and Collections
Prior to es6, many popular JavaScript libraries like Underscore and Lodash have evolved with the array data structure being one of the most commonly extended features. But now es6 introduced some new array functionalities and we will look into a few use cases here where they shine.
Usefull array manipulating method
Array.from()
The Array.from() method creates a new, shallow-copied Array instance from an array-like or iterable object.
console.log(Array.from('foo'));
// expected output: Array ["f", "o", "o"]

console.log(Array.from([1, 2, 3], x => x + x));
// expected output: Array [2, 4, 6]

console.log(Array.from([1, 5, 7, 8]));
// expected output: Array [1, 5, 7, 8]
Array.of()
The Array.of() method creates a new Array instance with a variable number of arguments, regardless of number or type of the arguments.
Array.of(7);       // [7]
Array.of(1, 2, 3); // [1, 2, 3]

Array(7);          // [ , , , , , , ]
Array(1, 2, 3);    // [1, 2, 3]
The difference between Array.of() and the Array constructor is in the handling of integer arguments: Array.of(7) creates an array with a single element, 7, whereas Array(7) creates an empty array with a length property of 7
Array.prototype.fill( )
This is a very simple method that allows us to fill all the elements of an array with a static value. It also takes optional start and end index values.
[1, 2, 3].fill(4);   // [4, 4, 4]
[1, 2, 3].fill(4, 1);   // [1, 4, 4]
[1, 2, 3].fill(4, 1, 2);   // [1, 4, 3]
Array.prototype.findIndex()
The findIndex() method returns the index of the first element in the array that satisfies the provided testing function. Otherwise -1 is returned.
let array1 = [5, 12, 8, 130, 44];

console.log(array1.findIndex(element => element > 13));
// expected output: 3
You can visit my previous article ECMAScript and ES6: Part 1 to see some other popular array manipulating method in es6.
Promises in ES6
Why Promises
In cases where it is required to wait for an asynchronous operation to complete and then perform a task, JavaScript heavily relies on callbacks, allowing the code execution to proceed past the long-running task. You must already know that setTimeout, XMLHttpRequest, and all browser-based asynchronous functions are callback based. It can lead to some really confusing and difficult-to-follow code, especially in cases when it is needed to make a callback after a callback (nested callbacks), which is more often termed “Callback Hell.”\
Consider the following code snippet, for example, where X must happen before Y must happen before Z:
x = getData();
y = getMoreData(x);
z = getMoreData(y);
Prior to ES6, you could have asynchronously fetched x and then passed it as an argument to fetch y and similarly for z, using callbacks as follows:
getData(function(x){
  getMoreData(x, function(y){
    getMoreData(y, function(z){
      ...
    });
  });
});
This can get more and more complex in real-life applications where you have lots of callback functions, which can lead to a callback pyramid. These callback pyramids appear everywhere – in handling HTTP requests, database manipulation, animation, interprocess communication, and all manners of other places.
This is where promises come in.
- Promises give us a way to handle asynchronous processing in a more controlled pattern.
- They represent a value that can be handled at some point in the future, and offer an escape from the callback hell Promises provide a simpler alternative for executing, composing, and managing asynchronous operations in comparison to callback-based approaches.
- They also allow the logical flow of the code to be much easier to follow.
Creating a Promise
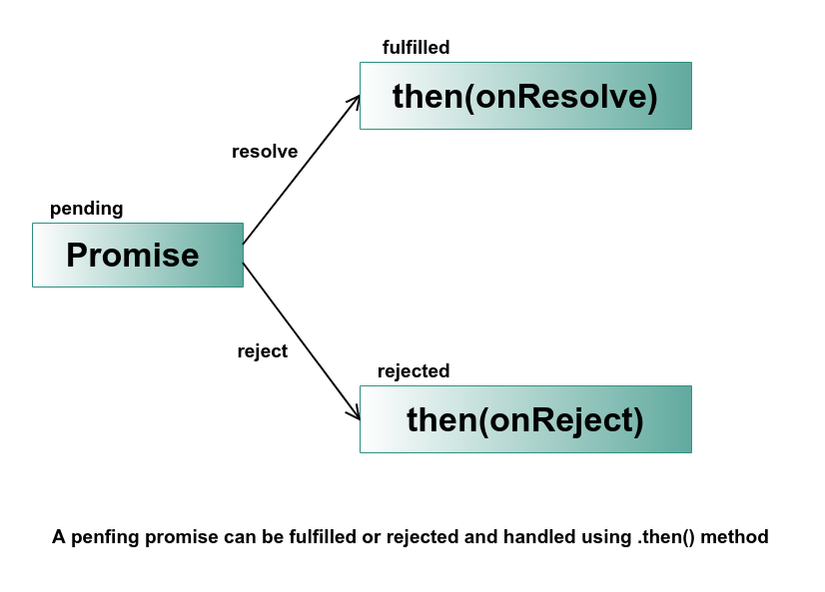
A promise is an object that is waiting for an asynchronous operation to complete, and when that operation completes, the promise is either fulfilled or rejected. A promise object can be any of these three states:
- fulfilled – when the promise succeeds
- rejected – when the promise fails
- pending – when it’s neither fulfilled or rejected
A pending promise may transition into a fulfilled or rejected state, and the promise is considered to be settled when it’s either fulfilled or rejected. Promises are created using the new Promise() constructor that accepts an executor (a function) that takes two parameters:
- The first parameter (typically named resolve) is a function that is called with the future value when it's ready, that is, when the promise is fulfilled;
- And the second parameter (typically named reject) is a function that is called to reject the promise if it can't resolve the future value.
A simple Promise looks like this:
const p = new Promise((resolve, reject) => {
if (/* some condition */) {
  resolve(/* some value */); // fulfilled successfully
} else {
    reject(/* some reason */); // error, rejected
  }
});
The second method (reject) is optional, and you can very well create a promise with only the resolve method, as demonstrated in the code snippet below where the promises are fulfilled and rejected, respectively:
new Promise(resolve => resolve()) // promise is fulfilled
new Promise((resolve, reject) => reject()) // promise is rejected
ou can also create an immediately resolved promise using:
const sayHello = Promise.resolve("hello!");
Usually, a promise will resolve to some value that could be a result from an HTTP request, animation, or some other asynchronous operation.
Consuming a Promise with then() and catch()
- When a promise is created, it can be passed around as a value, essentially representing a placeholder for a future value.
- This value can be consumed when the promise is fulfilled using .then() method.
- This method takes a function that will be passed to the resolved value of the Promise when it is fulfilled. Consider the following code snippet, for example:
const p = new Promise((resolve, reject) => resolve(42));
p.then((val) => console.log(val)); // 42
Every promise must have a .then() method that actually takes two possible parameters. The first parameter is the function to be called when the promise is fulfilled and the second arameter is a function to be called if the promise is rejected.
p.then((value) => {
  console.log("Promise Fulfilled:", value)
  }, (error) => {
    console.log("Promise Rejected: ", error)
});
If you’re only interested in rejecting a promise, you can omit the first parameter and pass it as null. Check the following code snippet, for example:
const networkReq = new Promise((resolve, reject) => {
  reject("No Server Found");
});

networkReq.then(
  null,
  (error) => { console.log(error); }   // No Server Found
);
you can also handle a rejected promise in a more compact way using the catch() method. For instance, you can rewrite the above example as follows:
const networkReq = new Promise((resolve, reject) => {
  reject("No Server Found");
});

networkReq.catch((error) => {
  console.log(error);     // No Server Found
});
- The catch() method is useful for error handling in promise composition.
- Similar to then() method, it also returns a promise, but only deals with the rejected cases.
So we can handle an error in promise with the following two ways:
somePromise().then(onResolved, onRejected);
// or simply using catch()
somePromise()
  .then(onResolved)
  .catch(onRejected);
But which one should you prefer and why? The answer to this question lies in the very scenario where your onResolved() function throws an error. If we have more than one then() call, then the error is passed on until there is an error handler. Therefore, it is recommended to end all promise chains with a catch() method.
Chaining of Promises
Since .then() and .catch() always return a new promise, it is easy to chain promises with extreme control over how and where the errors are handled. Chaining promises allows asynchronous operations to be chained together, so that they are guaranteed to happen in the correct and expected order, resulting in code that looks almost synchronous. Consider the following example:
const bond = new Promise((resolve, reject) => {
  resolve("Bond");
});

bond.then((str) => `${str}, James ${str}`)
    .then((str) => `Hello, I’m ${str}!`)
    .then((str) => console.log(str));  // Hello, I’m Bond, James Bond!
References:
All rights reserved
