Easy nested attributes với Cocoon
Bài đăng này đã không được cập nhật trong 9 năm
I. Giới thiệu
Xin chào các bác (lay2)
Khi xây dựng web app, chắc hẳn các bác đã gặp trường hợp phải tạo record ở 2 bảng khác nhau, nhưng kết nối với nhau, mà phải xử lý trên cùng một Form.
VD: Tạo mới 1 Product và Category mà nó trực thuộc cùng lúc.
Đối với Rails, phương pháp đầu tiên ta nghĩ tới là sử dụng Nested attributes mà nó cung cấp sẵn.
Tuy nhiên, để các form con đó có thể "động", thêm và xóa tùy ý, thì Rails không hỗ trợ tận răng đến mức đấy (yaoming). Ta phải xử lý bằng tay, đơn giản nhất là dùng Javascript.
Đối với những Form phức tạp, có cả tá các field sắp xếp ba lăng nhăng hoặc đơn giản là các bác lười viết JS thì hãy dùng thử gem Cocoon
II. Demo
Các công việc sẽ làm:
- Khởi tạo rails app cùng với MVC basic.
- Sử dụng Nested Attributes cho form.
- Add thêm Cocoon để làm form dynamic.
Công cụ sử dụng:
- Rails 5.0
- Ruby 2.3.1
Let's start (honho)
1. Khởi tạo
rails new coconut
Generate ra 2 model có quan hệ 1-n với nhau
rails g model question title:string
rails g model answer description:string question:references
Nhớ add thêm đoạn sau vào model questions để sử dụng Nested attributes
accepts_nested_attributes_for :answers, allow_destroy: true, reject_if: :all_blank
Tạo ra 1 basic controller cho Questions, với các chức năng CRUD cơ bản
class QuestionsController < ApplicationController
  def index
    @questions = Question.all
  end

  def new
    @question = Question.new
    @question.answers.build
  end

  def create
    @question = Question.new question_params
    if @question.save
      redirect_to root_path
    else
      render :new
    end
  end

  def edit
    @question = Question.find_by id: params[:id]
  end

  def update
    @question = Question.find_by id: params[:id]
    if @question.update_attributes question_params
      redirect_to root_path
    else
      render :edit
    end
  end

  private
  def question_params
    params.require(:question).permit :title, answers_attributes: [:id, :description, :_destroy]
  end
end
Trang index show ra danh sách các questions và answer tương ứng của nó
# questions/index.html.erb
<h1>Questions</h1>

<p><%= link_to 'Add question', new_question_path %></p>

<ul><%= render @questions %></ul>
Form để tạo mới, edit Questions sẽ như sau:
<%= form_for @question do |f| %>
  <div>
    <%= f.label :title %>
    <%= f.text_field :title %>
  </div>
  <%= f.fields_for :answers do |answer| %>
    <%= render "answer_fields", f: answer %>
  <% end %>

  <%= f.submit %>
<% end %>
Trong đó, answer_fields là form con được nested từ questions
# _answer_fields.html.erb
<%= f.label :description %>
<%= f.text_field :description %>
OK, như vậy ta có thể tạo được 1 Questions cùng với 1 Answers cho question đó được rồi.
Nhưng đó là tất cả những gì nested attributes rails hỗ trợ chúng ta.
Nếu ta muốn mở rộng thêm số lượng Answers cho Questions ấy, hoặc xóa Answers đi khi edit, buộc phải xử lý bằng tay qua các đoạn code JS.
Cocoon sẽ giúp ta xử lý nốt vấn đề còn lại ấy (yaoming)
2. Add Cocoon
Add thêm gem Cocoon trong Gemfile
gem "cocoon"
Sau khi install xong thì require nó trong applicaion.js
//= require cocoon
Công việc của Cocoon khá đơn giản. Nó cung cấp cho người dùng 2 hàm chính, hỗ trợ việc xóa hoặc thêm Form con là:
- link_to_add_association
- link_to_remove_association
Vì việc làm form động bằng JS, nên ta phải cung cấp vị trí mà Cocoon sẽ tác động thông qua DOM.
_answer_fields.html.erb
<div class="nested-fields">
  <%= f.label :description %>
  <%= f.text_field :description %>

  <%= link_to_remove_association "remove answer", f %>
</div>
Form được bọc ngoài bằng thẻ div có class nested-fields.
Tên class này là mặc định của gem. Như đã nói ở trên, class này giúp Cocoon xác định vị trí tác động tới. Đoạn code
<%= link_to_remove_association "remove answer", f %>
Là một helper của Cocoon định nghĩa. Khi click vào, nó sẽ remove field tương ứng đang hiển thị, đồng thời set cho hidden field có value = 1 để dùng cho việc destroy khi submit.
Method này có 3 agrument truyền vào
- "remove answer": Đoạn text của link
- f: Form object
- options: Chi tiết các bác đọc thêm ở đây link_to_remove_association
Vậy là xong phần xóa Answer (honho), vậy muốn thêm field Answer thì làm như thế nào (??)
Quay trở lại form cha của anwser_fields, ta thêm method helper như sau:
<%= form_for @question do |f| %>
  <div>
    <%= f.label :title %>
    <%= f.text_field :title %>
  </div>

  <p><strong>Answers: </strong></p>

  <div id="answers">
    <%= f.fields_for :answers do |answer| %>
      <%= render "answer_fields", f: answer %>
    <% end %>
    <%= link_to_add_association 'add answer', f, :answers %>

    <p class="count">Total: <span><%= @question.answers.count %></span></p>
  </div>

  <%= f.submit %>
<% end %>
Khi click vào link có tên "add answer", nó sẽ tạo ra 1 fields answer mới y hệt cái mà mình render ra. Agrument của nó như sau:
- "add answer": Đoạn text của link
- f: Form object
- :answers: Association của nó
- options: các bác có thể xem chi tiết ở đây link_to_add_association
3. Callback
Cocoon cung cấp 4 cái callback JS bổ trợ cho lúc thêm hoặc xóa form là:
cocoon:before-insert: được gọi trước khi add thêm formcocoon:after-insert: được gọi sau khi add thêm formcocoon:before-remove: được gọi trước khi xóa thêm formcocoon:after-remove: được gọi sau khi add thêm form
Ta tạo file JS, thử dùng các callback để tạo animation phát:
jQuery(document).on 'turbolinks:load', ->
  answers = $('#answers')
  count = answers.find('.count > span')

  recount = -> count.text answers.find('.nested-fields').size()

  answers.on 'cocoon:before-insert', (e, el_to_add) ->
    el_to_add.fadeIn(1000)

  answers.on 'cocoon:after-insert', (e, added_el) ->
    recount()

  answers.on 'cocoon:before-remove', (e, el_to_remove) ->
    $(this).data('remove-timeout', 1000)
    el_to_remove.fadeOut(1000)

  answers.on 'cocoon:after-remove', (e, removed_el) ->
    recount()
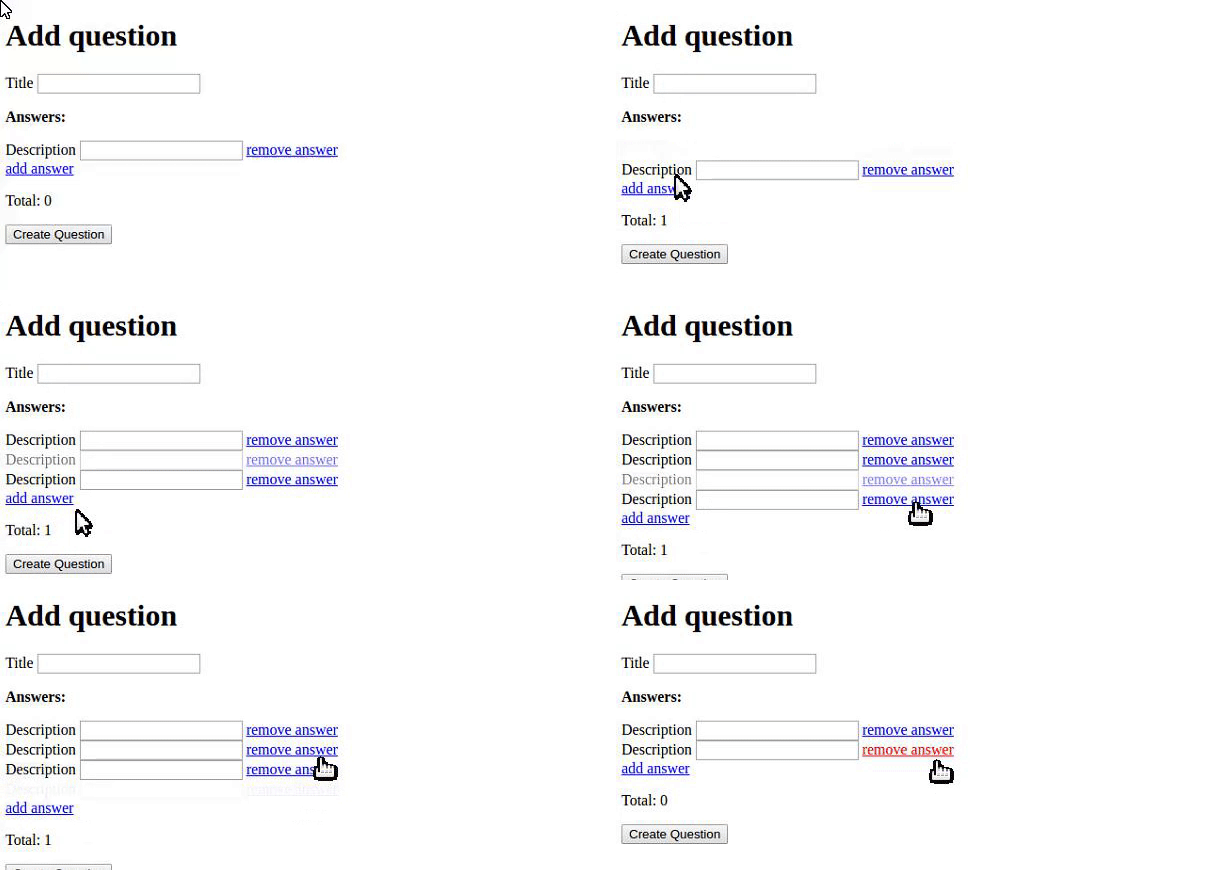
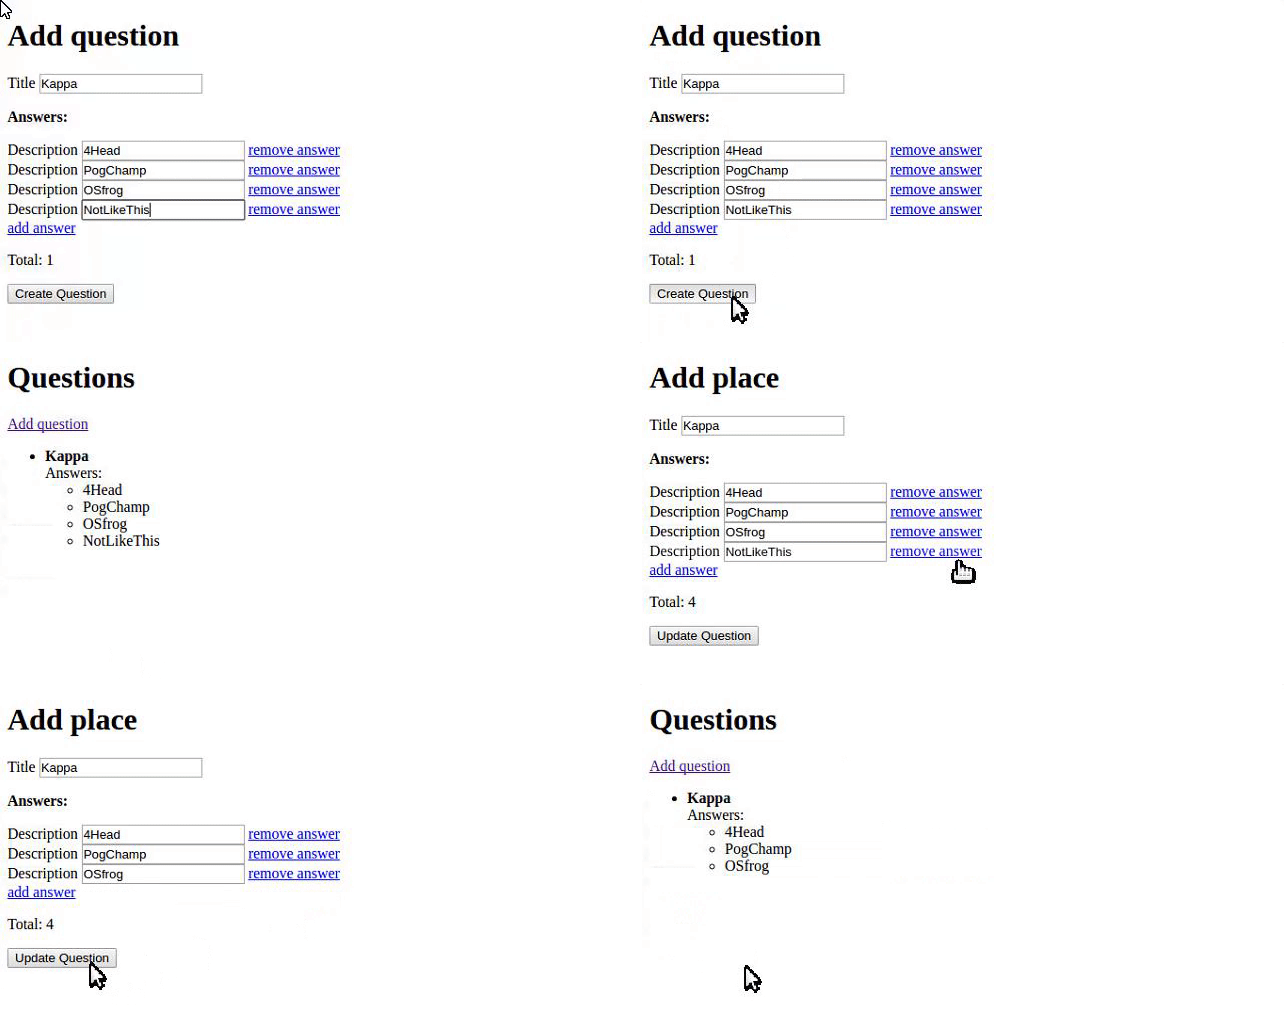
Kết quả:
Thêm và xóa form
Khi submit form
Source code
Nguồn tham khảo
All rights reserved

