Dependency Injection trong iOS với Swinject
Bài đăng này đã không được cập nhật trong 4 năm
1. Giới thiệu
DI là gì?
Trước đây, tôi đã có 1 bài giới thiệu về DI cho ứng dụng iOS sử dụng Typhoon. Tôi xin phép viết lại đoạn giới thiệu về DI ở đây để các bạn tiện theo dõi.
DI - Dependency Injection là 1 design pattern thực thi inversion of control (IoC). Một "injection" là việc đưa một đối tượng phụ thuộc (service) vào client. Đưa service vào client thay vì để client tìm và tạo service là yêu cầu cơ bản nhất của pattern này.
Ưu điểm
- Do các client giảm sự phụ thuộc vào service nên dễ dàng hơn trong việc viết unit test.
- Tăng khả năng tái sử dụng code, test và bảo trì.
- Giúp chương trình có khả năng cấu hình hoạt động chương trình theo các file cấu hình mà không cần phải biên dịch lại.
- Giảm các code khởi tạo
Nhược điểm:
- Code khó đọc hiểu hơn, lập trình viên phải đọc cấu hình để hiểu được cách hoạt động của hệ thống.
- Code dài hơn cách code truyền thống
Swinject là gì?
Github: https://github.com/Swinject/Swinject
Swinject, cùng với Typhoon là 1 trong 2 framework DI (Dependency Injection). Như tên của nó Swinject - Swift Inject dành riêng cho Swift, khác với Typhoon thích hợp với Objective-C hơn.
Tôi cũng đã sử dụng Typhoon trong 1 dự án cá nhân, tuy nhiên cách sử dụng cũng khá phức tạp nên sau đấy cũng không sử dụng nữa.
Gần đây Swinject ra đời, với cách sử dụng đơn giản hơn nhiều và hỗ trợ Swift tốt hơn nhiều, tôi thấy đây là thời điểm chín muồi để áp dụng DI vào các dự án của mình.
Các tính năng của Swinject:
- Pure Swift Type Support
- Injection with Arguments
- Initializer/Property/Method Injections
- Initialization Callback
- Circular Dependency Injection
- Object Scopes as None (Transient), Graph, Container (Singleton) and Hierarchy
- Support of both Reference and Value Types
- Self-registration (Self-binding)
- Container Hierarchy
- Thread Safety
- Modular Components
Để demo thì tôi sẽ tạo 1 project về quản lý sản phẩm - đây như kiểu 1 project Code Kata mà tôi hay sử dụng để học các công nghệ, kiến trúc hay thư viện mới. (để biết Code Kata là gì thì các bạn có thể tham khảo tại http://codekata.com)
2. Demo
2.1. Tạo project
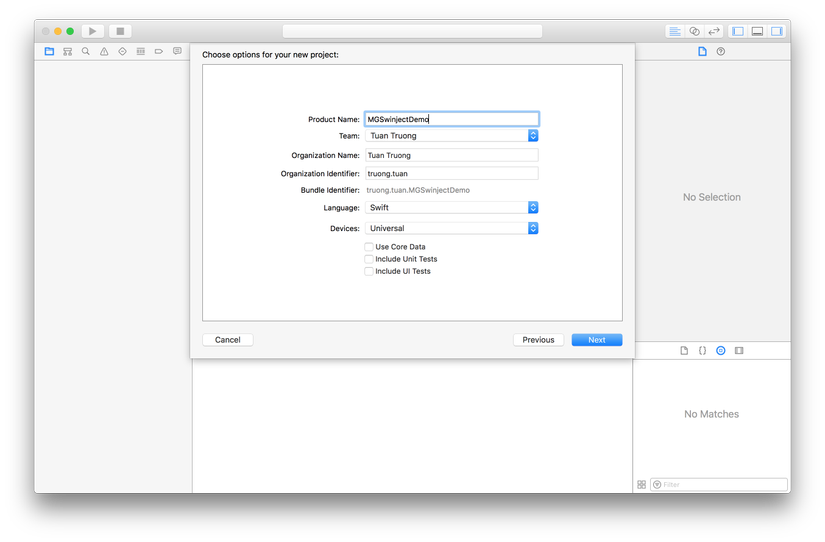
Tạo project demo trên Xcode 8, iOS, Swift 3.0, template Single View Application.
2.2. Model
Dự án của chúng ta chỉ dùng 1 data model là Product với các thuộc tính id, name và price:
class Product {
    var id = ""
    var name = ""
    var price: Double = 0.0

    init() {
    }

    init(id: String, name: String, price: Double) {
        self.id = id
        self.name = name
        self.price = price
    }
}
2.3. Service
Ta sử dụng class service để thực hiện các tính năng thêm, sửa, xóa product. Trước tiên, ta sẽ dùng mock service để có thể test tính năng của chương trình mà không cần phải tạo database.
class MockProductService {
    weak var delegate: ProductServiceDelegate?

    private static var productDictionary: [ String: Product] = {
        return [
            "ip": Product(id: "ip", name: "iPhone", price: 600),
            "mac": Product(id: "mac", name: "Macbook", price: 1500),
            "watch": Product(id: "watch", name: "Apple Watch", price: 400),
        ]
    }()

    func add(product: Product) {
        MockProductService.productDictionary[product.id] = product
        delegate?.addProductCompleted(product: product, success: true)
    }

    func update(product: Product) {
        MockProductService.productDictionary[product.id] = product
        delegate?.updateProductCompleted(product: product, success: true)
    }

    func delete(withID id: String) {
        MockProductService.productDictionary.removeValue(forKey: id)
        delegate?.deleteProductCompleted(productID: id, success: true)
    }

    func getAll() -> [Product] {
        var products = Array(MockProductService.productDictionary.values)
        products.sort { $0.id < $1.id }
        return products
    }
}
ProductServiceDelegate:
Product service "thật" sẽ thực hiện việc các hàm add, update, delete theo kiểu async nên chúng ta cần phải dùng delegate để thông báo khi nào công việc hoàn tất. Tất nhiên là cái mock service của chúng ta thì đang là theo kiểu sync rồi:
protocol ProductServiceDelegate: class {
    func addProductCompleted(product: Product, success: Bool)
    func updateProductCompleted(product: Product, success: Bool)
    func deleteProductCompleted(productID: String, success: Bool)
}

extension ProductServiceDelegate {
    func addProductCompleted(product: Product, success: Bool) {}
    func updateProductCompleted(product: Product, success: Bool) {}
    func deleteProductCompleted(productID: String, success: Bool) {}
}
Việc thêm extension như trên sẽ giúp cho các hàm trong ProductServiceDelegate thành hàm optional, tức là chúng ta có thể không cần phải implement hàm trong class thực thi ProductServiceDelegate.
2.4. View
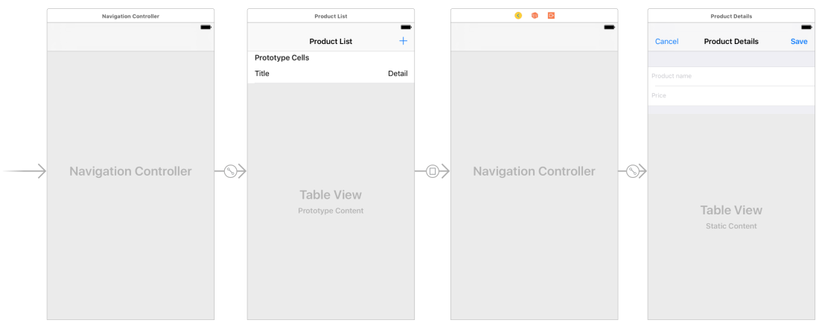
Chúng ta sẽ cần 2 view controller là ProductListViewController và ProductViewController đều là subclass của UITableViewController như sau:
2.5. Controller
ProductViewController
ProductViewController dùng để chỉnh sửa thông tin product khi add và edit product:
protocol ProductViewControllerDelegate: class {
    func didSaveProduct(product: Product)
}

class ProductViewController: UITableViewController {

    @IBOutlet weak var nameTextField: UITextField!
    @IBOutlet weak var priceTextField: UITextField!

    weak var delegate: ProductViewControllerDelegate?
    var product: Product!

    override func viewDidLoad() {
        super.viewDidLoad()

        nameTextField.text = product.name
        if product.price > 0 {
            priceTextField.text = String(product.price)
        }

        nameTextField.becomeFirstResponder()
    }

    @IBAction func save(_ sender: Any) {
        guard let name = nameTextField.text, !name.isEmpty else {
            return
        }
        guard let priceString = priceTextField.text else {
            return
        }
        product.name = name
        product.price = Double(priceString) ?? 0.0

        self.delegate?.didSaveProduct(product: product)
        self.dismiss(animated: true, completion: nil)
    }

    @IBAction func cancel(_ sender: Any) {
        self.dismiss(animated: true, completion: nil)
    }
}
ProductListViewController
ProductListViewController là view controller chính, cho phép chúng ta liệt kê danh sách sản phẩm, cũng như có nút add, edit và delete sản phẩm:
class ProductListViewController: UITableViewController {

    var productService = MockProductService()
    var products = [Product]()

    override func viewDidLoad() {
        super.viewDidLoad()

        self.navigationItem.leftBarButtonItem = self.editButtonItem
        productService.delegate = self

        getListProduct()
    }

    fileprivate func getListProduct() {
        products = productService.getAll()
        tableView.reloadData()
    }

    override func numberOfSections(in tableView: UITableView) -> Int {
        return 1
    }

    override func tableView(_ tableView: UITableView, numberOfRowsInSection section: Int) -> Int {
        return products.count
    }

    override func tableView(_ tableView: UITableView, cellForRowAt indexPath: IndexPath) -> UITableViewCell {
        let cell = tableView.dequeueReusableCell(withIdentifier: "ProductCell", for: indexPath)

        config(cell: cell, indexPath: indexPath)

        return cell
    }

    private func config(cell: UITableViewCell, indexPath: IndexPath) {
        let product = products[indexPath.row]
        switch cell {
        case let productCell as ProductCell:
            productCell.product = product
        default:
            break
        }
    }

    override func tableView(_ tableView: UITableView, didSelectRowAt indexPath: IndexPath) {
        let product = products[indexPath.row]
        self.performSegue(withIdentifier: "presentProduct", sender: product)
    }

    override func tableView(_ tableView: UITableView, canEditRowAt indexPath: IndexPath) -> Bool {
        return true
    }

    override func tableView(_ tableView: UITableView, commit editingStyle: UITableViewCellEditingStyle, forRowAt indexPath: IndexPath) {
        if editingStyle == .delete {
            let product = products[indexPath.row]
            productService.delete(withID: product.id)
        }
    }

    // MARK: - Navigation

    // In a storyboard-based application, you will often want to do a little preparation before navigation
    override func prepare(for segue: UIStoryboardSegue, sender: Any?) {
        guard let identifier = segue.identifier else {
            return
        }
        switch identifier {
        case "presentProduct":
            if let productViewController = (segue.destination as? UINavigationController)?.topViewController as? ProductViewController {
                productViewController.delegate = self
                if let product = sender as? Product {
                    productViewController.product = product
                }
                else {
                    productViewController.product = Product()
                }
            }
        default:
            break
        }
    }
}

extension ProductListViewController: ProductServiceDelegate {
    func addProductCompleted(product: Product, success: Bool) {
        getListProduct()
    }

    func updateProductCompleted(product: Product, success: Bool) {
        getListProduct()
    }

    func deleteProductCompleted(productID: String, success: Bool) {
        if let index = products.index(where: { $0.id == productID }) {
            let indexPath = IndexPath(row: index, section: 0)
            products.remove(at: index)
            tableView.deleteRows(at: [indexPath], with: .fade)
        }
    }
}

extension ProductListViewController: ProductViewControllerDelegate {
    func didSaveProduct(product: Product) {
        if product.id.isEmpty {
            product.id = NSUUID().uuidString
            productService.add(product: product)
        }
        else {
            productService.update(product: product)
        }
    }
}
Trong số các dòng code rất dài ở trên thì chúng ta chỉ cần chú ý tới 1 dòng code ở ngay trên đầu:
var productService = MockProductService()
Dòng code trên khai báo 1 biến tên productService và gán 1 instance của MockProductService cho biến đó. productService sẽ có nhiệm vụ thực hiện các việc add, update, delete, getAll product.
2.6. Cấu trúc chương trình
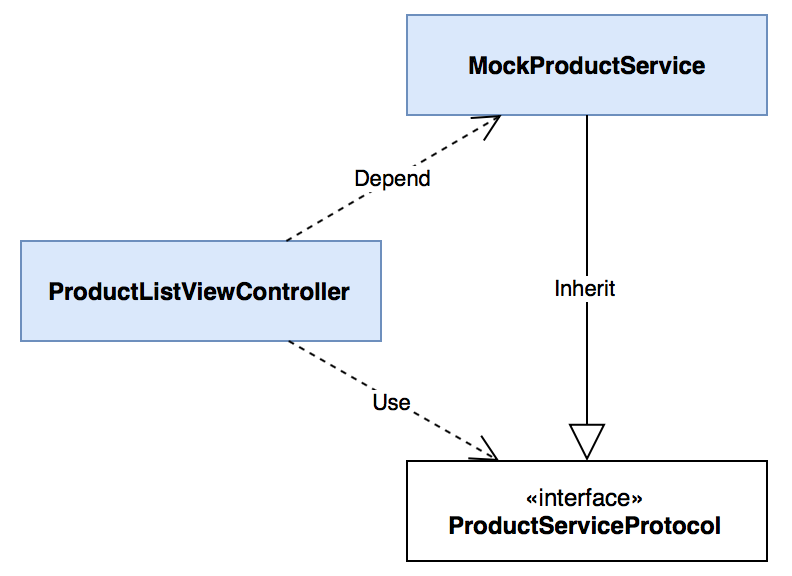
Class diagram của chương trình lúc này như dưới đây, ta có thể thấy ProductListViewController sử dụng MockProductService, nghĩa là mọi thay đổi của MockProductService có thể dẫn tới việc phải chỉnh sửa ProductListViewController:

Việc phụ thuộc như trên thì rõ ràng không hay ho gì, do đó ta sẽ thêm vào đó 1 protocol:
protocol ProductServiceProtocol {
    weak var delegate: ProductServiceDelegate? { get set }
    func add(product: Product)
    func update(product: Product)
    func delete(withID id: String)
    func getAll() -> [Product]
}
Và sửa lại khai báo của MockProductService để thực thi ProductServiceProtocol:
class MockProductService: ProductServiceProtocol {
  ...
}
Sửa lại phần khai báo biến productService của ProductListViewController:
var productService: ProductServiceProtocol = MockProductService()
Lúc này class diagram thay đổi, code đã có vẻ lỏng hơn ProductListViewController không còn sử dụng trực tiếp MockProductService nữa nhưng vẫn còn phụ thuộc vào nó:
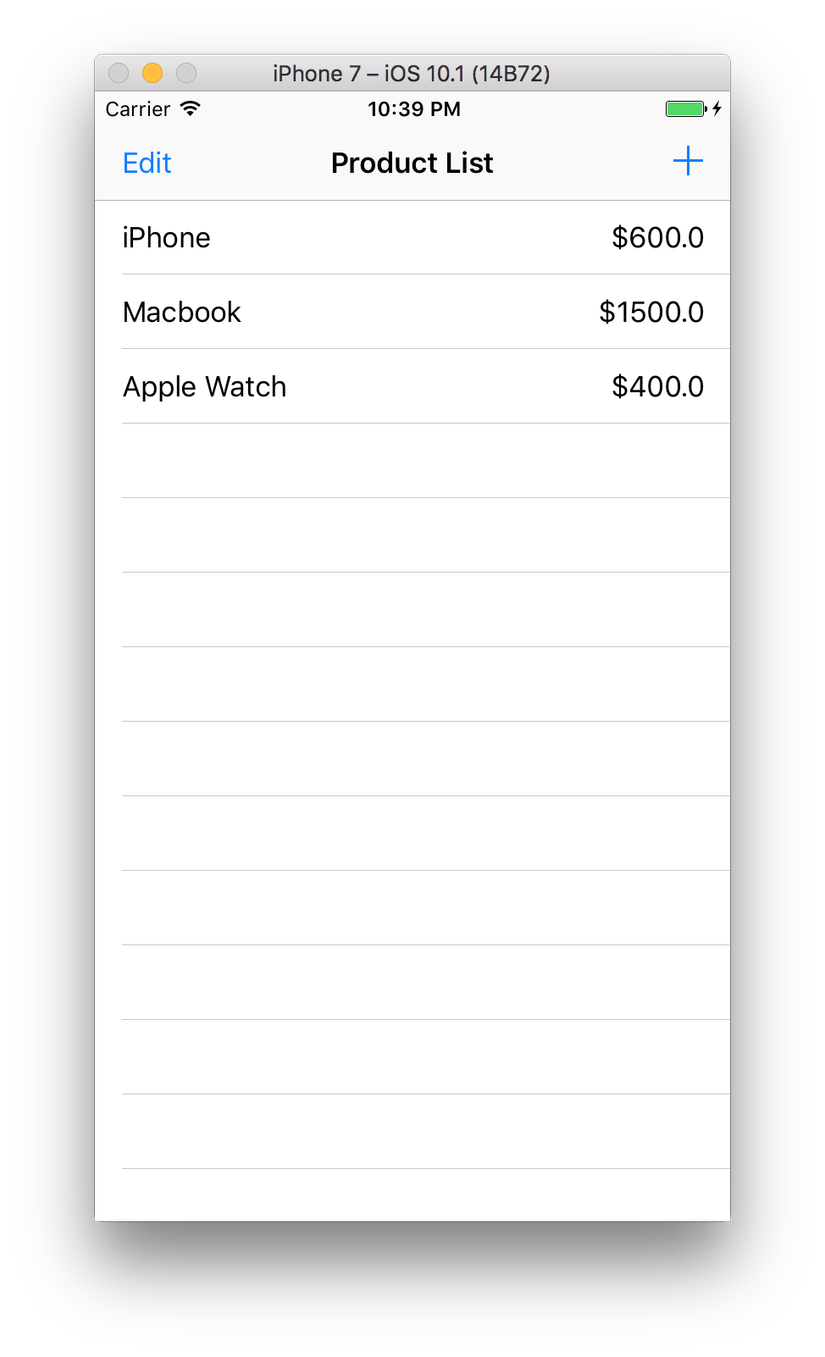
Chạy thử chương trình, ta có thể thấy có sẵn 3 product như dưới đây và có thể thực hiện các tính năng add, edit, delete product.
2.7. Database - Core Data
Chúng ta có thể thấy là sau mỗi lần bật lại chương trình thì danh sách sản phẩm lại reset về 3 sản phẩm như trên. Điều này dễ hiểu vì chúng ta đang sử dụng dictionary để lưu trữ sản phẩm. Để chương trình có tính thực tế hơn thì chúng ta sẽ sử dụng database, ở đây tôi dùng Core Data.
Ta thêm 1 product entity như sau:

Class EntityMapper để map ProductEntity với Product:
class EntityMapper {
    class func map(from entity: ProductEntity, to product: Product) {
        product.id = entity.id ?? ""
        product.name = entity.name ?? ""
        product.price = entity.price
    }

    class func map(from product: Product, to entity: ProductEntity) {
        entity.id = product.id
        entity.name = product.name
        entity.price = product.price
    }

    class func product(from entity: ProductEntity) -> Product {
        let product = Product()
        map(from: entity, to: product)
        return product
    }
}
Tiếp theo là ProductRepository dùng để tương tác với database cùng protocol của nó, ở đây tôi dùng thêm thư viện MagicalRecord 2.3:
protocol ProductRepositoryProtocol {
    func add(product: Product, completion: @escaping (_ success: Bool) -> Void)
    func update(product: Product, completion: @escaping (_ success: Bool) -> Void)
    func delete(withID id: String, completion: @escaping (_ success: Bool) -> Void)
    func getAll() -> [Product]
}
class ProductRepository: ProductRepositoryProtocol {
    func add(product: Product, completion: @escaping (_ success: Bool) -> Void) {
        MagicalRecord.save({ (context) in
            if let entity = ProductEntity.mr_createEntity(in: context) {
                EntityMapper.map(from: product, to: entity)
            }
            else {
                completion(false)
            }
        }, completion: { success, error in
            completion(success)
        })
    }

    func update(product: Product, completion: @escaping (_ success: Bool) -> Void) {
        MagicalRecord.save({ (context) in
            let predicate = NSPredicate(format: "id = '\(product.id)'")
            if let entity = ProductEntity.mr_findFirst(with: predicate, in: context) {
                EntityMapper.map(from: product, to: entity)
            }
            else {
                completion(false)
            }
        }, completion: { success, error in
            completion(success)
        })
    }

    func delete(withID id: String, completion: @escaping (_ success: Bool) -> Void) {
        MagicalRecord.save({ (context) in
            let predicate = NSPredicate(format: "id = '\(id)'")
            ProductEntity.mr_deleteAll(matching: predicate, in: context)
        }, completion: { success, error in
            completion(success)
        })
    }

    func getAll() -> [Product] {
        var products = [Product]()
        let context = NSManagedObjectContext.mr_()
        if let entities = ProductEntity.mr_findAll(in: context) as? [ProductEntity] {
            for entity in entities {
                let product = EntityMapper.product(from: entity)
                products.append(product)
            }
        }
        return products
    }
}
2.8. ProductService
Đến đây ta có thể viết 1 class thay thế cho MockProductService, sử dụng ProductRepositoryProtocol ở trên:
class ProductService: ProductServiceProtocol {
    weak var delegate: ProductServiceDelegate?

    private var productRepository: ProductRepositoryProtocol

    init(productRepository: ProductRepositoryProtocol) {
        self.productRepository = productRepository
    }

    func add(product: Product) {
        productRepository.add(product: product, completion: { [weak self] success in
            self?.delegate?.addProductCompleted(product: product, success: success)
        })
    }

    func update(product: Product) {
        productRepository.update(product: product, completion: { [weak self] success in
            self?.delegate?.addProductCompleted(product: product, success: success)
        })
    }

    func delete(withID id: String) {
        productRepository.delete(withID: id, completion: { [weak self] success in
            self?.delegate?.deleteProductCompleted(productID: id, success: success)
        })
    }

    func getAll() -> [Product] {
        return productRepository.getAll()
    }
}
Các bạn có thể thấy ở constructor của ProductService, tôi sử dụng 1 pattern của DI đó là Constructor Injection, trong đó các dependency sẽ được container truyền vào (inject vào) 1 class thông qua constructor của class đó:
private var productRepository: ProductRepositoryProtocol

init(productRepository: ProductRepositoryProtocol) {
    self.productRepository = productRepository
}
Viết lại khai báo của productService trong ProductListViewController:
var productService: ProductServiceProtocol = ProductService(productRepository: ProductRepository())
Ta tạo một instance của ProductRepository và inject vào instance ProductService, sau đó gán cho biến productService. Class diagram như sau:
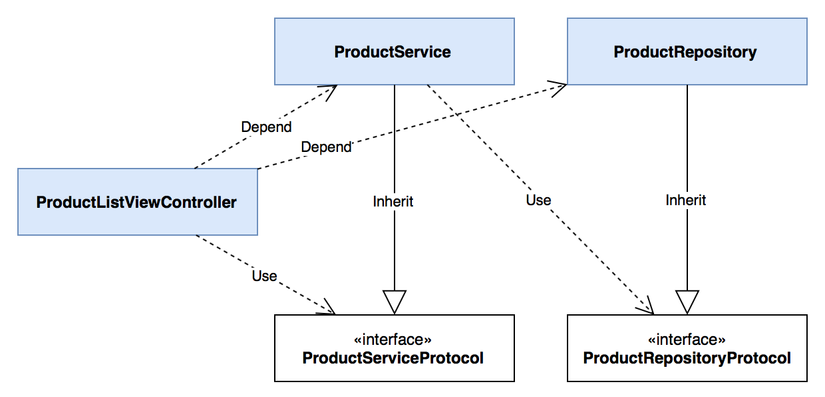
Như ta có thể thấy, giờ đây ProductListViewController tuy sử dụng ProductServiceProtocol, nhưng vì việc gán instance như ở trên khiến cho nó phụ thuộc cả vào ProductService và ProductRepository.
Việc gỡ bỏ các mối quan hệ lằng nhằng ở trên không hề đơn giản, đến lúc này Swinject mới vào cuộc.
2.9. Swinject
Ta có thể cài Swinject qua pod như sau:
pod 'Swinject', '2.0.0-beta.2'
pod 'SwinjectStoryboard', '1.0.0-beta.2'
Việc tiếp theo là tạo 1 file Swinject.swift, trong đó extension SwinjectStoryboard để đăng ký các instance tương ứng với các protocol và "inject" các đối tượng:
extension SwinjectStoryboard
{
    class func setup ()
    {
        defaultContainer.register(ProductRepositoryProtocol.self) { _ in return ProductRepository() }

        defaultContainer.register(ProductServiceProtocol.self) { resolveable in
            return ProductService(productRepository: resolveable.resolve(ProductRepositoryProtocol.self)!)
        }

        defaultContainer.registerForStoryboard(ProductListViewController.self) {
            resolveable, viewController in
            viewController.productService = resolveable.resolve(ProductServiceProtocol.self)!
        }
    }
}
Trong extension ta cần tạo 1 class function tên là setup, trong đó ta đăng ký ProductRepository cho ProductRepositoryProtocol, ProductService cho ProductServiceProtocol (kèm inject instance của ProductRepositoryProtocol vào constructor). Cuối cùng là inject instance của ProductServiceProtocol vào trong ProductListViewController theo kiểu Property Injection.
Sau đó ta có thể sửa khai báo của productService trong ProductListViewController như sau:
var productService: ProductServiceProtocol!
Class diagram của chúng ta sẽ trở thành như thế này:
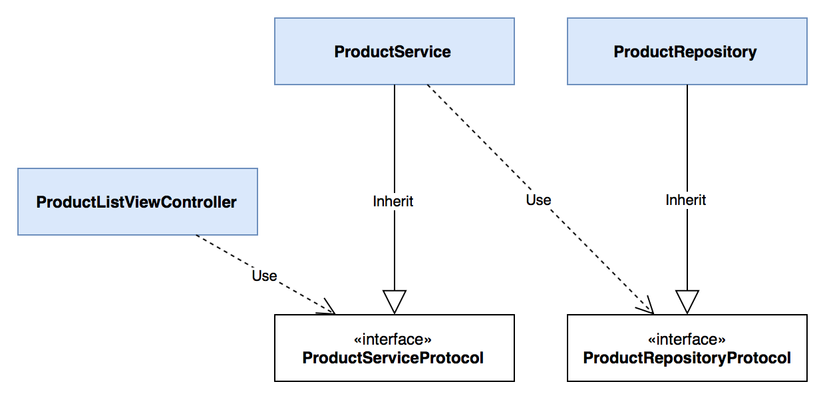
Chúng ta có thể thấy là giờ đây ProductListViewController hoàn toàn không phụ thuộc vào ProductService và ProductRepository, instance của cả 2 class trên sẽ được Swinject tạo và inject vào controller khi chương trình chạy. Ngoài ra chúng ta có thể cấu hình file Swinject.swift để sử dụng MockProductService nếu muốn:
defaultContainer.register(ProductServiceProtocol.self) { resolveable in
    return MockProductService()
}
Do ProductListViewController chỉ dùng ProductServiceProtocol nên việc test cũng rất đơn giản, chúng ta có thể tạo 1 fake class thỏa mãn ProductServiceProtocol và gán instance cho biến productService:
import XCTest
@testable import MGSwinjectDemo

class MGSwinjectDemoTests: XCTestCase {
    var viewController: ProductListViewController!

    class FakeProductService: ProductServiceProtocol {
        weak var delegate: ProductServiceDelegate?
        func add(product: Product) {}
        func update(product: Product) {}
        func delete(withID id: String) {}
        func getAll() -> [Product] { return [] }
    }

    override func setUp() {
        super.setUp()
        viewController = UIStoryboard(name: "Main", bundle: nil).instantiateViewController(withIdentifier: "ProductListViewController") as! ProductListViewController
        viewController.productService = FakeProductService()
    }

    override func tearDown() {
        super.tearDown()
    }
}
3. Kết luận
Như vậy bằng việc áp dụng DI pattern với sự trợ giúp của Swinject, chương trình của chúng ta đã trở nên lỏng hơn rất nhiều, các class không còn phụ thuộc trực tiếp với nhau mà được qua trung gian là các protocol. Việc cấu hình các concrete class cũng đơn giản và chỉ tập trung ở 1 file duy nhất. Để hiểu rõ hơn thì các bạn có thể đọc về DI pattern vào Protocol-Oriented Programming.
Hi vọng các bạn thấy bài viết hữu ích và có thể áp dụng vào các dự án của mình.
All rights reserved