Đăng nhập sử dụng API NodeJS
Bài đăng này đã không được cập nhật trong 5 năm
Xin chào mọi người, ở bài trước thì mình có viết về việc authenticate và authorization với NodeJS (nếu chưa đọc thì các bạn có thể tìm đọc ở link này nha). Hôm nay thì mình sẽ nói về cách sử dụng những gì đã làm ở bài trước để đăng nhập vào app (ở đây mình sẽ làm một app to do list - khá là basic phải không  ). Thực ra mình đã có một bài nói về việc này nhưng là với Laravel và ReacJS, bài này thực chất cũng không khá quá nhiều nhưng mình vẫn sẽ đi lại từ đầu nhé (có thể format sẽ hơi khác bài cũ chút)
Tạo app
Đầu tiên để khởi tạo app thì chúng ta sẽ dùng câu lệnh
npx create-react-app ten-app
Có một số bạn chạy lệnh này sẽ bị lỗi không tự động render ra các file template, thì các bạn hãy uninstall create-react-app đã cái global nhé. Sau khi uninstall hãy kiểm tra lại xem đã được clear toàn bộ chưa bằng lệnh which create-react-app. Nếu còn thì hãy xóa cả folder đi nhé
Sau khi generate được app thì hay vào thư mục và chạy npm start để kiểm tra nhé. Lúc này thì app sẽ được chạy ở cổng 3000, vậy thì hãy vào .env của project NodeJS đổi sang công khác nhé, vì mặc định thì project đó cũng chạy ở cổng 3000
Cấu trúc thư mục
Để code được thì mình cần phân cấu trúc ra trước để cho clear. Tất nhiên là sẽ không phải không thay đổi, về sau nếu cần mình sẽ đổi theo đúng nhu cầu. Đây sẽ là cách mình phân chia thư mục
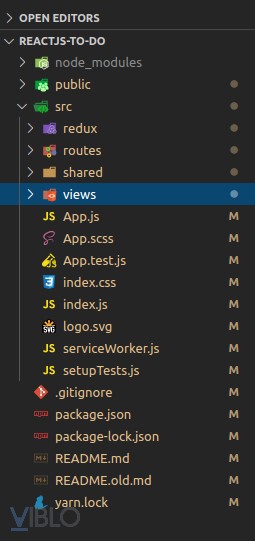
Ở đây thì mình vẫn sẽ tiếp tục dùng redux-saga để mình quản lý các side effect của app. Thư mục routes để mình chia ra làm 2 routes dành cho guest và user. shared để quản lý những file mình dùng chung (như là những const, configStore, config axios,...). views thì sẽ lưu những file template của mình rồi
Tạo các file xử lý chung
Đây là những file mình tạo ra, mình sẽ không đưa code lên đây vì cũng tương đối nhiều, mình sẽ giải thích công dụng từng file, còn code thì các bạn có thể lên github xem, link mình sẽ để cuối bài nhé
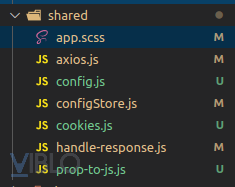
app.scss: Đây sẽ là mình gán những mã màu vào biến để import vào các file scss để sử dụngaxios.js: Config axios để mỗi lần sử dụng khỏi phải config lạiconfig.js: Lưu những const mà mình dùng xuyên suốt ở nhiều nơiconfigStore.js: Để config store reduxcookies.js: Lưu những function xử lý cookie như thêm, lấy, xóa.handle-response.js: Xử lý với từng status của response trả vềprop-to-js.js: Vì mình sử dụngimmuablenên mình cần 1 function để đưa những props về kiểu js thông thường để có thể đọc được
Tạo ra các routes
Như mình nói ở trên thì ngoài những routes liên quan đến các tính năng, thì mình sẽ phân ra thành 2 loại là guest và authenticate. Đầu tiên mình sẽ tạo file index chứa tất cả các routes
routes/index.js
import React from 'react';
import { Switch } from 'react-router-dom';
import propsToJS from '../shared/prop-to-js';

const Routes = () => (
    <Switch>

    </Switch>
);

export default propsToJS(Routes);
routes/history.js
import {createBrowserHistory} from 'history';

const history = createBrowserHistory();

export default history;
routes/guest-route/index.js
import React, {useEffect} from 'react';
import { Route } from 'react-router-dom';
import ReduxToastr from 'react-redux-toastr';
import propsToJS from '../../shared/prop-to-js';
import {getCookie} from '../../shared/cookies';
import history from '../history';

const GuestRoute = ({ component: Component, ...rest }) => {
    useEffect(() => {
        if (getCookie('user')) return history.push('/');
        return;
    }, []);

    return (
        <>
            <ReduxToastr
                timeOut={4000}
                transitionIn='fadeIn'
                transitionOut='fadeOut'
                progressBar
                closeOnToastrClick
                getState={state => state.get('toastr')}
            />
            <Route
                {...rest}
                render={props => (<Component {...props} />)
                }
            />
        </>
    )
};

export default propsToJS(GuestRoute);
Ở đây thì mình có lưu user vào trong cookie, và mình sẽ kiểm tra nếu có cookie đó thì sẽ đưa về trang chủ
routes/authenticate-route/index.js
import React, {useEffect} from 'react';
import { Route } from 'react-router-dom';
import ReduxToastr from 'react-redux-toastr';
import propsToJS from '../../shared/prop-to-js';
import {getCookie} from '../../shared/cookies';
import history from '../history';

const AuthenticateRoute = ({ component: Component, ...rest }) => {
    useEffect(() => {
        if (!getCookie('user')) return history.push('/login');
        return;
    }, []);

    return (
        <>
            <ReduxToastr
                timeOut={4000}
                transitionIn='fadeIn'
                transitionOut='fadeOut'
                progressBar
                closeOnToastrClick
                getState={state => state.get('toastr')}
            />
            <Route
                {...rest}
                render={props => (<Component {...props} />)
                }
            />
        </>
    )
};

export default propsToJS(AuthenticateRoute);
Ở đây thì mình sẽ kiểm tra ngược lại. Đến đây có lẽ vài bạn sẽ thắc mắc thế này chả lẽ chi xác nhận qua mỗi cookie thì có ổn không? Nếu các bạn đã đọc bài trước của mình, thì với nhưng api yêu cầu đăng nhập thì mình đã tạo ra 1 middleware để kiểm tra token. Tương tự ở đây cũng vậy, cookie có thể giúp bạn bypass qua được cách check lỏng lẻo này nhưng không thể giúp bạn gọi tới api được, và đương nhiên là mình sẽ kiểm tra nếu api trả về status 401 thì mình sẽ lại chuyển ngược bạn về trang login
Redux
Giờ ở trong folder redux, mình sẽ tạo ra 2 files
rootReducer.js:
import { all, spawn, call } from 'redux-saga/effects';

export default function* rootSaga() {
    const sagas = [
    ];

    yield all(sagas.map(saga => spawn(function* () {
        while (true) {
            try {
                yield call(saga);
                break;
            } catch (e) {
                console.log('saga error:', e);
            }
        }
    }))
    );
}
rootReducer.js
import { combineReducers } from 'redux-immutable';
import { reducer as toastrReducer } from 'react-redux-toastr'

export default function rootReducer(asyncReducers) {
    return combineReducers({
        toastr: toastrReducer,
        ...asyncReducers
    });
};
Và giờ file App.js của chúng ta sẽ biến đổi đôi chút:
App.js
import React from 'react';
import { BrowserRouter, Router } from 'react-router-dom';
import 'antd/dist/antd.css';
import 'react-redux-toastr/lib/css/react-redux-toastr.min.css'
import Routes from './routes';
import { Provider } from 'react-redux';
import configStore from './shared/configStore';
import rootReducer from './redux/rootReducer';
import rootSaga from './redux/rootSaga';
import history from './routes/history';
import './App.scss';

const initialState = {};
const store = configStore(initialState, history, rootReducer);
store.runSaga(rootSaga);

function App() {

  return (
    <div className="App">
      <Provider store={store}>
        <Router history={history}>
          <Routes />
        </Router>
      </Provider>
    </div>
  );
}

export default App;
Views
Giờ tới lúc tạo ra views login thôi, thực ra view thì các bạn có thể tạo ra theo tùy sở thích, mình sẽ chỉ tạo một cách khá basic vì mắt thẩm mỹ của mình khá là tệ
views/login/index.js
import React from 'react';
import { Form, Input, Button } from 'antd';
import { connect } from 'react-redux';
import { login } from '../../redux/modules/authenticate';
import propsToJS from '../../shared/prop-to-js';
import './login.scss';

const Login = (props) => {
    const { handleLogin } = props;

    const onFinish = values => {
        handleLogin(values);
    };

    return (
        <>
            <div className='login'>
                <div className='login__box'>
                    <Form
                        onFinish={onFinish}
                    >
                        <Form.Item
                            label="Email"
                            name="email"
                            rules={[
                                {
                                    required: true,
                                    message: 'Please input your email!',
                                },
                                {
                                    type: 'email',
                                    message: 'Please use valid email address'
                                }
                            ]}
                        >
                            <Input />
                        </Form.Item>

                        <Form.Item
                            label="Password"
                            name="password"
                            rules={[
                                {
                                    required: true,
                                    message: 'Please input your password!',
                                },
                            ]}
                        >
                            <Input.Password />
                        </Form.Item>

                        <Form.Item>
                            <Button type="primary" htmlType="submit">
                                Login
                            </Button>
                        </Form.Item>
                    </Form>
                </div>
            </div>
        </>
    )
}

const mapStateToProps = null;

const mapDispatchToProps = {
    handleLogin: login
}

export default connect(mapStateToProps, mapDispatchToProps)(propsToJS(Login));
Ở đây các bạn có thấy mình sử dụng handleLogin để xử lý đăng nhập, hàm đó được gán lại từ hàm login
redux/modules/authenticate.js
import { createAction, handleActions } from 'redux-actions';
import { fromJS } from 'immutable';
import { all, call, takeLatest, put } from 'redux-saga/effects';
import { toastr } from 'react-redux-toastr';
import history from '../../routes/history';
import axios from '../../shared/axios';
import handleResponse from '../../shared/handle-response';
import { API_URL } from '../../shared/config';
import { setCookie } from '../../shared/cookies';

export const LOGIN = 'LOGIN';
export const LOGIN_SUCCESSFULLY = 'LOGIN_SUCCESSFULLY';

export const login = createAction(LOGIN);
export const loginSuccessfully = createAction(LOGIN_SUCCESSFULLY);

const setLoginUser = (state, action) => state.set('user', fromJS(action.payload));

const authenticateInitialState = fromJS({
    user: localStorage.getItem('user') || {}
})

export default handleActions({
    [LOGIN_SUCCESSFULLY]: setLoginUser
}, authenticateInitialState);

export const getAuthenticateState = state => state.get('authenticate');
export const getUser = state => getAuthenticateState(state).get('user');

export function* authenticateSagas() {
    yield all([
        takeLatest(LOGIN, callLogin),
    ]);
}

function* callLogin(action) {
    const { payload } = action;
    const response = yield call(loginApi, payload);

    if (response.status === 200) {
        const { data } = response;
        yield put(loginSuccessfully(data.user));
        setCookie('access_token', data.token, 60 * 60 * 24);
        setCookie('user', JSON.stringify(data.user), 60 * 60 * 24);
        toastr.success('Login Successfully')
        history.push('/');

        return;
    }

    handleResponse(response);
}

export function loginApi(params) {
    return axios.post(`${API_URL}/api/auth/login`, params)
        .then(response => response)
        .catch(error => error.response);
}
Tiện đây thì tạo thêm saga cho trang chủ luôn nhỉ. Lúc này thì mình sẽ cần một api lấy ra các tasks,. Nhưng vì chưa thao tác thêm sửa xóa gì mà đơn thuần chỉ là một api lấy ra tất cả dữ liệu nên mình sẽ không nó tới nhé, các bạn hãy tự vào project NodeJS và tự tạo cho mình 1 api nhé, coi như thực hành chút
redux/modules/tasks.js
import { createAction, handleActions } from 'redux-actions';
import { fromJS } from 'immutable';
import { all, call, takeLatest, put } from 'redux-saga/effects';
import axios from '../../shared/axios';
import handleResponse from '../../shared/handle-response';
import { API_URL } from '../../shared/config';

export const FETCH_TASKS = 'FETCH_TASKS';
export const FETCH_TASKS_SUCCESSFULLY = 'FETCH_TASKS_SUCCESSFULLY';

export const fetchTasks = createAction(FETCH_TASKS);
export const fetchTasksSuccessfully = createAction(FETCH_TASKS_SUCCESSFULLY);

const setTasks = (state, action) => state.set('tasks', fromJS(action.payload));

const tasksInitialState = fromJS({
    tasks: []
})

export default handleActions({
    [FETCH_TASKS_SUCCESSFULLY]: setTasks
}, tasksInitialState);

export const getTasksState = state => state.get('tasks');

export function* tasksSagas() {
    yield all([
        takeLatest(FETCH_TASKS, fetchTasksFromApi),
    ]);
}

function* fetchTasksFromApi() {
    const response = yield call(apiFetchTasks);

    if (response.status === 200) {
        const {data} = response;
        yield put(fetchTasksSuccessfully(data.tasks));

        return;
    }

    handleResponse(response);
}

export function apiFetchTasks() {
    return axios.get(`${API_URL}/api/tasks`)
        .then(response => response)
        .catch(error => error.response);
}
Views thì ở đây mình sẽ chưa làm views chi tiết vì cái đó sẽ có trong bài sau. Còn giờ mình sẽ chỉ tạo 1 đoạn text thôi nhé
views/tasks/index.js
import React, {useEffect} from 'react';
import { connect } from 'react-redux';
import propsToJS from '../../shared/prop-to-js';
import {getTasksState, fetchTasks} from '../../redux/modules/tasks';

const Tasks = (props) => {
    const {handleFetchTasks} = props;

    useEffect(() => {
        handleFetchTasks();
    }, []);

    return (
        <>
            <p>This is tasks list</p>
        </>
    )
};

const mapStateToProps = (state) => {
    const tasks = getTasksState(state);

    return {
        tasks
    }
};

const mapDispatchToProps = {
    handleFetchTasks: fetchTasks
};

export default connect(mapStateToProps, mapDispatchToProps)(propsToJS(Tasks));
À suýt quên, chưa thêm vào routes thì làm sao mà có thể truy cập được vào views này nhỉ
routes/index.js
import React from 'react';
import { Switch } from 'react-router-dom';
import GuestRoute from './guest-route';
import AuthenticateRoute from './authenticate-route';
import Login from '../views/login';
import propsToJS from '../shared/prop-to-js';
import Tasks from '../views/tasks';

const Routes = () => (
    <Switch>
        <GuestRoute
            exact
            path='/login'
            component={Login}
        />

        <AuthenticateRoute
            exact
            path='/'
            component={Tasks}
        />
    </Switch>
);

export default propsToJS(Routes);
Về cơ bản vậy là cũng có thể dùng được rồi. Nhưng mà khi chạy thử demo chắc các bạn sẽ gặp lỗi cors nhỉ. Giờ thì chúng ta cần quay lại project NodeJS, cài thêm thư viện cors
npm install cors --save
Trong file app.js bổ sung thêm:
const cors = require('cors');
app.use(cors());
Giờ thì có thể sử dụng được rồi đó . Mình sẽ để link 2 repo dưới này nhé
- api NodeJS: https://github.com/duongmanhhoang/demo-node-js
- reactjs app: https://github.com/duongmanhhoang/reactjs-to-do
All rights reserved
