Custom In-App Keyboard in Flutter
Bài đăng này đã không được cập nhật trong 5 năm
Bài viết này sẽ hướng dẫn bạn cách tạo một bàn phím tùy chỉnh để nhập văn bản trong ứng dụng của riêng bạn. Các trường hợp sử dụng bao gồm nhập văn bản cho các ký tự hoặc ngôn ngữ đặc biệt trong đó bàn phím hệ thống có thể không tồn tại hoặc người dùng có thể không cài đặt đúng bàn phím. Ví dụ: tôi đã sử dụng phương pháp này với gói mongol để tạo bàn phím cơ bản để nhập văn bản Mông Cổ truyền thống:
Hôm nay chúng tôi sẽ tạo một phiên bản đơn giản hơn:
Lưu ý: Bài viết này sẽ không cho bạn biết cách xây dựng bàn phím hệ thống mà người dùng cài đặt và có thể sử dụng trong bất kỳ ứng dụng nào. Đây chỉ là cách tiếp cận dựa trên tiện ích con để sử dụng trong ứng dụng của riêng bạn.
Mã đầy đủ ở dưới cùng của bài viết. Nó được cập nhật cho Flutter 1.22 và Dart 2.10.
1. Tạo key widget
Flutter có thể dễ dàng tạo các bố cục phức tạp như bàn phím bằng cách kết hợp các widget đơn giản hơn. Vì vậy, để bắt đầu, bạn sẽ tạo một vài widget chính đơn giản.
1.1 Text key
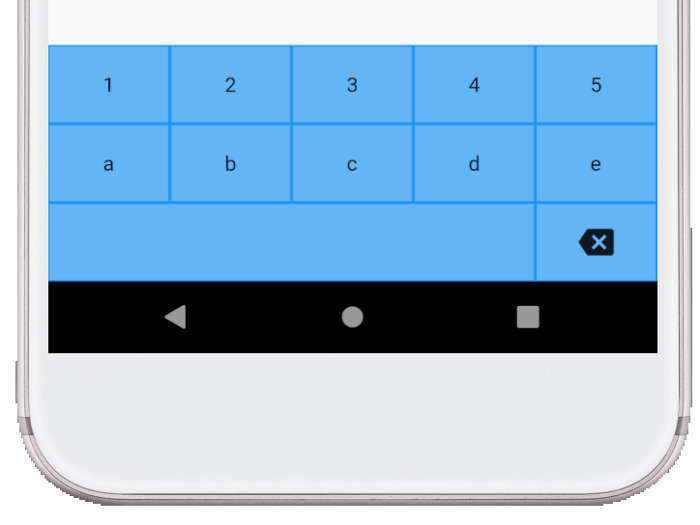
Tôi đã khoanh tròn các phím được tạo từ tiện ích TextKey mà bạn sẽ tạo trước tiên.
 Thêm tiện ích TextKey này vào dự án của bạn:
class TextKey extends StatelessWidget {
  const TextKey({
    Key key,
    @required this.text,
    this.onTextInput,
    this.flex = 1,
  }) : super(key: key);
  final String text;
  final ValueSetter<String> onTextInput;
  final int flex;
  @override
  Widget build(BuildContext context) {
    return Expanded(
      flex: flex,
      child: Padding(
        padding: const EdgeInsets.all(1.0),
        child: Material(
          color: Colors.blue.shade300,
          child: InkWell(
            onTap: () {
              onTextInput?.call(text);
            },
            child: Container(
              child: Center(child: Text(text)),
            ),
          ),
        ),
      ),
    );
  }
}
Đây là phần thú vị: Thuộc tính flex cho phép các phím của bạn được phân bổ đồng đều trên một hàng hoặc thậm chí chiếm tỷ lệ lớn hơn của một hàng (như phím khoảng trắng trong hình trên). Khi phím được nhấn, nó sẽ chuyển giá trị của nó lên bàn phím dưới dạng một lệnh gọi lại onTextInput.
1.2 Backspace key
Bạn cũng cần một phím xóa có giao diện và chức năng khác với tiện ích TextKey.
class BackspaceKey extends StatelessWidget {
  const BackspaceKey({
    Key key,
    this.onBackspace,
    this.flex = 1,
  }) : super(key: key);
  final VoidCallback onBackspace;
  final int flex;
  @override
  Widget build(BuildContext context) {
    return Expanded(
      flex: flex,
      child: Padding(
        padding: const EdgeInsets.all(1.0),
        child: Material(
          color: Colors.blue.shade300,
          child: InkWell(
            onTap: () {
              onBackspace?.call();
            },
            child: Container(
              child: Center(
                child: Icon(Icons.backspace),
              ),
            ),
          ),
        ),
      ),
    );
  }
}
Chú ý : Có một chút trùng lặp với mã TextKey, vì vậy một số cấu trúc lại sẽ làm cho nó KHÔ hơn, đặc biệt nếu bạn thêm các loại phím khác như shift. Tuy nhiên, nó được phép cho mục đích học tập ngày hôm nay. onBackspace là một VoidCallback vì không cần chuyển bất kỳ văn bản nào trở lại bàn phím.
1.3 Sắp xếp các phím thành bàn phím
Bàn phím dễ dàng bố trí khi bạn có các phím vì chúng chỉ là các hàng trong một cột.
 Đây là mã. Tôi bỏ qua một số phần lặp lại cho ngắn gọn. Tuy nhiên, bạn có thể tìm thấy tất cả ở cuối bài viết.
class CustomKeyboard extends StatelessWidget {
  CustomKeyboard({
    Key key,
    this.onTextInput,
    this.onBackspace,
  }) : super(key: key);
  final ValueSetter<String> onTextInput;
  final VoidCallback onBackspace;
  void _textInputHandler(String text) => onTextInput?.call(text);
  void _backspaceHandler() => onBackspace?.call();
  @override
  Widget build(BuildContext context) {
    return Container(
      height: 160,
      color: Colors.blue,
      child: Column(        // <-- Column
        children: [
          buildRowOne(),    // <-- Row
          buildRowTwo(),    // <-- Row
          buildRowThree(),  // <-- Row
        ],
      ),
    );
  }
  Expanded buildRowOne() {
    return Expanded(
      child: Row(
        children: [
          TextKey(
            text: '1',
            onTextInput: _textInputHandler,
          ),
          TextKey(
            text: '2',
            onTextInput: _textInputHandler,
          ),
          ...
        ],
      ),
    );
  }
  Expanded buildRowTwo() {
    ...
  }
  Expanded buildRowThree() {
    return Expanded(
      child: Row(
        children: [
          TextKey(
            text: ' ',
            flex: 4,
            onTextInput: _textInputHandler,
          ),
          BackspaceKey(
            onBackspace: _backspaceHandler,
          ),
        ],
      ),
    );
  }
}
Bàn phím thu thập các cuộc gọi lại từ các phím và chuyển chúng lên giao diện. Bằng cách đó, bất kỳ ai sử dụng CustomKeyboard sẽ nhận được lệnh gọi lại. Bạn có thể thấy cách flex được sử dụng trong hàng thứ ba. Phím khoảng trắng có độ linh hoạt là 4 trong khi phím xóa lùi vẫn giữ độ linh hoạt mặc định là 1. Điều đó làm cho phím khoảng trắng có chiều rộng gấp bốn lần chiều rộng của phím xóa.
CustomKeyboard(
  onTextInput: (myText) {
    _insertText(myText);
  },
  onBackspace: () {
    _backspace();
  },
),
1.4 Handling text input
void _insertText(String myText) {
  final text = _controller.text;
  final textSelection = _controller.selection;
  final newText = text.replaceRange(
    textSelection.start,
    textSelection.end,
    myText,
  );
  final myTextLength = myText.length;
  _controller.text = newText;
  _controller.selection = textSelection.copyWith(
    baseOffset: textSelection.start + myTextLength,
    extentOffset: textSelection.start + myTextLength,
  );
}
Controller là TextE EditorController cho TextField. Bạn phải nhớ rằng có thể có một lựa chọn, vì vậy nếu có, bạn hãy thay thế nó bằng văn bản mà khóa được truyền vào.
1.5 Handling backspace
Bạn nghĩ rằng backspace sẽ đơn giản, nhưng có một số trường hợp khác nhau cần suy nghĩ: Có một lựa chọn (xóa lựa chọn) Con trỏ ở đầu (không làm gì cả) Mọi thứ khác (xóa ký tự trước đó) Đây là triển khai phương thức _backspace:
void _backspace() {
  final text = _controller.text;
  final textSelection = _controller.selection;
  final selectionLength = textSelection.end - textSelection.start;
  // There is a selection.
  if (selectionLength > 0) {
    final newText = text.replaceRange(
      textSelection.start,
      textSelection.end,
      '',
    );
    _controller.text = newText;
    _controller.selection = textSelection.copyWith(
      baseOffset: textSelection.start,
      extentOffset: textSelection.start,
    );
    return;
  }
  // The cursor is at the beginning.
  if (textSelection.start == 0) {
    return;
  }
  // Delete the previous character
  final previousCodeUnit = text.codeUnitAt(textSelection.start - 1);
  final offset = _isUtf16Surrogate(previousCodeUnit) ? 2 : 1;
  final newStart = textSelection.start - offset;
  final newEnd = textSelection.start;
  final newText = text.replaceRange(
    newStart,
    newEnd,
    '',
  );
  _controller.text = newText;
  _controller.selection = textSelection.copyWith(
    baseOffset: newStart,
    extentOffset: newStart,
  );
}
bool _isUtf16Surrogate(int value) {
  return value & 0xF800 == 0xD800;
}
Ngay cả việc xóa ký tự trước đó cũng là một chút khó khăn. Nếu bạn chỉ xóa lùi một đơn vị mã khi bạn có biểu tượng cảm xúc hoặc một số cặp thay thế khác (xem Làm việc với Unicode và Grapheme Clusters trong Dart), điều này sẽ gây ra lỗi. Như một giải pháp khác trong đoạn mã trên, tôi đã kiểm tra xem ký tự trước đó có phải là ký tự thay thế UFT-16 hay không và nếu có thì khoảng cách giữa hai ký tự. (Tôi đã nhận phương thức isUtf16Surrogate từ mã nguồn Flutter TextPainter.) Tuy nhiên, đây vẫn không phải là một giải pháp hoàn hảo vì nó sẽ không hoạt động đối với các cụm grapheme như 🇪🇬 hoặc 👨👩👧, được tạo thành từ nhiều hơn một cặp thay thế duy nhất. Tuy nhiên, ít nhất nó sẽ không gây ra sự cố.
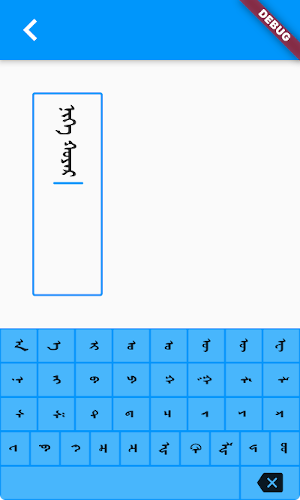
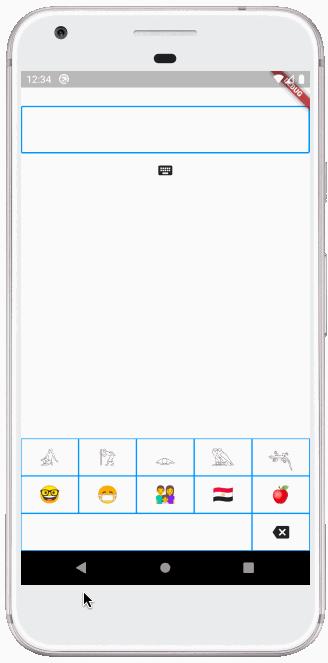
Đây là một bàn phím chữ tượng hình và biểu tượng cảm xúc như một minh chứng:
1.5 Prevent the system keyboard from showing
Sẽ rất khó chịu nếu bạn muốn sử dụng bàn phím tùy chỉnh của mình với TextField nhưng bàn phím hệ thống cứ bật lên. Đó là hành vi mặc định. Cách để ngăn bàn phím hệ thống hiển thị là đặt thuộc tính readOnly của TextField thành true.
TextField(
  ...
  showCursor: true,
  readOnly: true,
),
1.6 Chuyển đổi giữa bàn phím hệ thống và bàn phím của bạn
Nếu bạn muốn cung cấp cho người dùng lựa chọn sử dụng bàn phím hệ thống hoặc bàn phím tùy chỉnh của mình, bạn chỉ có thể tạo lại với một giá trị khác cho readOnly.
Đây là cách TextField được thiết lập trong ứng dụng demo:
class _KeyboardDemoState extends State<KeyboardDemo> {
  TextEditingController _controller = TextEditingController();
  bool _readOnly = true;
  @override
  Widget build(BuildContext context) {
    return Scaffold(
      resizeToAvoidBottomInset: false,
      body: Column(
        children: [
          ...
          TextField(
            controller: _controller,
            decoration: ...,
            style: TextStyle(fontSize: 24),
            autofocus: true,
            showCursor: true,
            readOnly: _readOnly,
          ),
          IconButton(
            icon: Icon(Icons.keyboard),
            onPressed: () {
              setState(() {
                _readOnly = !_readOnly;
              });
            },
          ),
Khi nhấn IconButton trên bàn phím, giá trị của _readOnly bị thay đổi và sau đó bố cục được xây dựng lại. Điều này khiến bàn phím hệ thống ẩn hoặc hiện. Đặt resizeToAvoidBottomInset trên Scaffold thành false cho phép bàn phím hệ thống che bàn phím tùy chỉnh. Một tùy chọn khác là ẩn bàn phím tùy chỉnh khi bàn phím hệ thống đang hiển thị. Tuy nhiên, khi tôi làm điều đó trong các thử nghiệm của mình, tôi thấy rằng tôi phải sử dụng một boolean riêng để ẩn bàn phím tùy chỉnh để tôi có thể trì hoãn hiển thị nó cho đến khi bàn phím hệ thống biến mất. Nếu không, nó sẽ nhảy lên đầu bàn phím hệ thống trong tích tắc. Đó là nó! Như bạn có thể thấy, không quá khó để tạo bàn phím trong ứng dụng của riêng bạn.
1.7 Full code
import 'package:flutter/material.dart';

void main() => runApp(MyApp());

class MyApp extends StatelessWidget {
  @override
  Widget build(BuildContext context) {
    return MaterialApp(
      home: KeyboardDemo(),
    );
  }
}

class KeyboardDemo extends StatefulWidget {
  @override
  _KeyboardDemoState createState() => _KeyboardDemoState();
}

class _KeyboardDemoState extends State<KeyboardDemo> {
  TextEditingController _controller = TextEditingController();
  bool _readOnly = true;

  @override
  Widget build(BuildContext context) {
    return Scaffold(
      resizeToAvoidBottomInset: false,
      body: Column(
        children: [
          SizedBox(height: 50),
          TextField(
            controller: _controller,
            decoration: InputDecoration(
              border: OutlineInputBorder(
                borderRadius: BorderRadius.circular(3),
              ),
            ),
            style: TextStyle(fontSize: 24),
            autofocus: true,
            showCursor: true,
            readOnly: _readOnly,
          ),
          IconButton(
            icon: Icon(Icons.keyboard),
            onPressed: () {
              setState(() {
                _readOnly = !_readOnly;
              });
            },
          ),
          Spacer(),
          CustomKeyboard(
            onTextInput: (myText) {
              _insertText(myText);
            },
            onBackspace: () {
              _backspace();
            },
          ),
        ],
      ),
    );
  }

  void _insertText(String myText) {
    final text = _controller.text;
    final textSelection = _controller.selection;
    final newText = text.replaceRange(
      textSelection.start,
      textSelection.end,
      myText,
    );
    final myTextLength = myText.length;
    _controller.text = newText;
    _controller.selection = textSelection.copyWith(
      baseOffset: textSelection.start + myTextLength,
      extentOffset: textSelection.start + myTextLength,
    );
  }

  void _backspace() {
    final text = _controller.text;
    final textSelection = _controller.selection;
    final selectionLength = textSelection.end - textSelection.start;

    // There is a selection.
    if (selectionLength > 0) {
      final newText = text.replaceRange(
        textSelection.start,
        textSelection.end,
        '',
      );
      _controller.text = newText;
      _controller.selection = textSelection.copyWith(
        baseOffset: textSelection.start,
        extentOffset: textSelection.start,
      );
      return;
    }

    // The cursor is at the beginning.
    if (textSelection.start == 0) {
      return;
    }

    // Delete the previous character
    final previousCodeUnit = text.codeUnitAt(textSelection.start - 1);
    final offset = _isUtf16Surrogate(previousCodeUnit) ? 2 : 1;
    final newStart = textSelection.start - offset;
    final newEnd = textSelection.start;
    final newText = text.replaceRange(
      newStart,
      newEnd,
      '',
    );
    _controller.text = newText;
    _controller.selection = textSelection.copyWith(
      baseOffset: newStart,
      extentOffset: newStart,
    );
  }

  bool _isUtf16Surrogate(int value) {
    return value & 0xF800 == 0xD800;
  }

  @override
  void dispose() {
    _controller.dispose();
    super.dispose();
  }
}

class CustomKeyboard extends StatelessWidget {
  CustomKeyboard({
    Key key,
    this.onTextInput,
    this.onBackspace,
  }) : super(key: key);

  final ValueSetter<String> onTextInput;
  final VoidCallback onBackspace;

  void _textInputHandler(String text) => onTextInput?.call(text);

  void _backspaceHandler() => onBackspace?.call();

  @override
  Widget build(BuildContext context) {
    return Container(
      height: 160,
      color: Colors.blue,
      child: Column(
        children: [
          buildRowOne(),
          buildRowTwo(),
          buildRowThree(),
        ],
      ),
    );
  }

  Expanded buildRowOne() {
    return Expanded(
      child: Row(
        children: [
          TextKey(
            text: '1',
            onTextInput: _textInputHandler,
          ),
          TextKey(
            text: '2',
            onTextInput: _textInputHandler,
          ),
          TextKey(
            text: '3',
            onTextInput: _textInputHandler,
          ),
          TextKey(
            text: '4',
            onTextInput: _textInputHandler,
          ),
          TextKey(
            text: '5',
            onTextInput: _textInputHandler,
          ),
        ],
      ),
    );
  }

  Expanded buildRowTwo() {
    return Expanded(
      child: Row(
        children: [
          TextKey(
            text: 'a',
            onTextInput: _textInputHandler,
          ),
          TextKey(
            text: 'b',
            onTextInput: _textInputHandler,
          ),
          TextKey(
            text: 'c',
            onTextInput: _textInputHandler,
          ),
          TextKey(
            text: 'd',
            onTextInput: _textInputHandler,
          ),
          TextKey(
            text: 'e',
            onTextInput: _textInputHandler,
          ),
        ],
      ),
    );
  }

  Expanded buildRowThree() {
    return Expanded(
      child: Row(
        children: [
          TextKey(
            text: ' ',
            flex: 4,
            onTextInput: _textInputHandler,
          ),
          BackspaceKey(
            onBackspace: _backspaceHandler,
          ),
        ],
      ),
    );
  }
}

class TextKey extends StatelessWidget {
  const TextKey({
    Key key,
    @required this.text,
    this.onTextInput,
    this.flex = 1,
  }) : super(key: key);

  final String text;
  final ValueSetter<String> onTextInput;
  final int flex;

  @override
  Widget build(BuildContext context) {
    return Expanded(
      flex: flex,
      child: Padding(
        padding: const EdgeInsets.all(1.0),
        child: Material(
          color: Colors.blue.shade300,
          child: InkWell(
            onTap: () {
              onTextInput?.call(text);
            },
            child: Container(
              child: Center(child: Text(text)),
            ),
          ),
        ),
      ),
    );
  }
}

class BackspaceKey extends StatelessWidget {
  const BackspaceKey({
    Key key,
    this.onBackspace,
    this.flex = 1,
  }) : super(key: key);

  final VoidCallback onBackspace;
  final int flex;

  @override
  Widget build(BuildContext context) {
    return Expanded(
      flex: flex,
      child: Padding(
        padding: const EdgeInsets.all(1.0),
        child: Material(
          color: Colors.blue.shade300,
          child: InkWell(
            onTap: () {
              onBackspace?.call();
            },
            child: Container(
              child: Center(
                child: Icon(Icons.backspace),
              ),
            ),
          ),
        ),
      ),
    );
  }
}
All rights reserved
