Custom a notification for Android
Bài đăng này đã không được cập nhật trong 5 năm
Notification là một message mà Android xử lý để hiển thị lên UI, như lời nhắc nhở, giao tiếp từ những người khác hoặc thông báo từ app khác đến bạn. Bạn có thể tap vào notification để mở app hoặc thực hiên các hành động điều hướng từ notification. Sau đây mời mọi người cùng mình tìm hiểu về Notification nhé! Let's go!
1. Overview
Appearances on a device
Notification có từ Android 4.0 (API level 14) trở lên.
Icon notification xuất hiện ở phía bên trái của status bar.
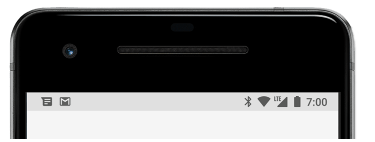
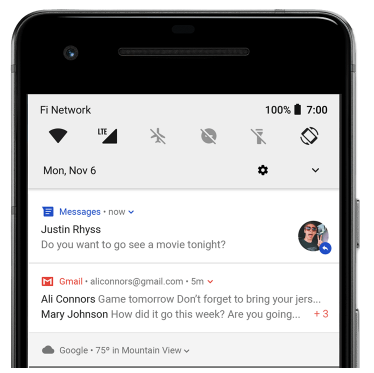
Người dùng có thể kéo thanh status bar xuống để thấy được nội dung của notification, có thể thực hiện các action có thể có của notification cung cấp.
Notification này nó sẽ hiển thị ở thanh status bar cho đến khi người dùng xóa nó đi.
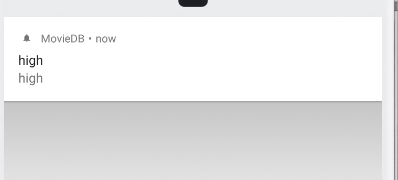
Từ Android 5.0, notification có thể xuất hiện trong thời gian ngắn trong floating window, cái đó được gọi là heads-up notification. Sử dụng trong trường hợp notification này là quan trọng, cần user phải biết đến ngay lập tức. Và nó chỉ hiển thị khi mà không khóa màn hình, thời gian nó xuất hiện ngắn, ngay sau đó nó sẽ ẩn đi và icon cho notification đó tiếp tục hiển thị trên thanh status bar. Các điều kiện ví dụ để hiển thị một heads-up noptification là :
- Sử dụng setFullScreenIntent(pendingIntent, true)
- Set priority cho notification là high và set ở chế độ chuông hoặc rung với các thiết bị Android 7.1 (API level 25) trở xuống. : .setPriority(NotificationCompat.PRIORITY_HIGH) .
- Set chế độ important cho notification chanel là high trên các thiết bị Androi 8.0 (API level 26) trở lên : NotificationManager.IMPORTANCE_HIGH
Kể từ Android 5.0 thì notification có thể hiển thị ngay tại màn hình khóa, và việc hiển thị detail hay không thì user hoàn toàn có thể setting trong system được. Từ Android 8.0 thì user có thể cài đặt cho phép hiển thị hoặc không hiển thị notification ở màn lock với từng notification channel.
Bạn cũng có thể set chế độ hiển thị cho notification ở lock screen như sau : gọi hàm setVisibility() và truyền vào một trong những tham số sau tùy thuộc vào mục đích sử dụng của bạn :
- VISIBILITY_PUBLIC : hiển thị đầy đủ nội dung của notification.
- VISIBILITY_SECRET: không hiển thị bất kỳ phần nào của notification này.
- VISIBILITY_PRIVATE : hiển thị những thông tin cơ bản của notification như là: icon, title, nhưng ẩn toàn bộ phần nội dung của notification.
Những tham số trên bạn gọi Notification. hoặc NotificationCompat. đều có.
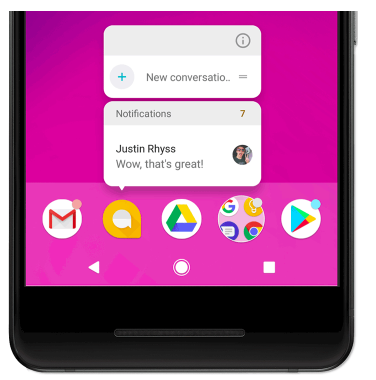
App icon badge : kể từ Android 8.0 (API level 26) trở lên, nếu app có notification thì ở mỗi icon app thì sẽ xuất hiện một cái badge (huy hiệu), cái huy hiệu này thì anh em dev không thể ẩn nó đi được, vì nó thuộc về hệ thống Android cung cấp rồi, badge có thể cài đặt được theo 2 mode, một là hiển thị chấm tròn hai là hiển thị số notification của app hiện có.
Notification anatomy
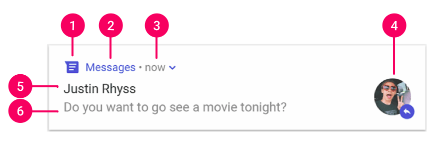
Trên hình là mô tả những phần chung của notification, gồm :
- Small icon: yêu cầu phải set icon cho notification, bằng cách sử dụng setSmallIcon().
- App name: được cung cấp bởi hệ thống.
- Time stamp: được cung cấp bởi hệ thống nhưng bạn có thể ghi đè nó bằng cách dùng setWhen() hoặc ẩn nó bằng cách setShowWhen(false).
- Large icon: cái này thì tùy có sử dụng hay không cũng đc, thường thì nên dùng với những ảnh liên lạc, không sử dụng nó cho icon app, để dùng thì setLargeIcon().
- Title: cái này cũng là optinal, dùng bằng cách setContentTitle().
- Text: điều này là optional và sử dụng bằng cách setContentText().
Notification actions: bắt đầu từ Android 7.0 (API level 24), bạn có thể thực hiện các action ngay trên notification ví dụ như reply tin nhắn, nhập text. Bắt đầu từ Android 10 (API level 29), platform sẽ tự động sinh ra các action button dựa trên intent gửi tới.
2. Create a notification
Set the notification content
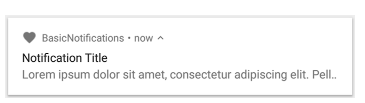
Để tạo notification như trên thì mình làm như sau :
val notificationBuilder = NotificationCompat.Builder(this.applicationContext, channelId)
                .setSmallIcon(R.drawable.notification_icon)
                .setContentTitle(title)
                .setContentText(body)
                .setAutoCancel(true)
                .setPriority(NotificationCompat.PRIORITY_DEFAULT)
                .setContentIntent(pendingIntent)
- Small icon, gọi bởi hàm setSmallIcon(). Small icon là phần duy nhất được yêu cầu phải có.
- Title, gọi bởi hàm setContentTitle().
- Body text, gọi bởi setContentText().
- Auto cancel: notification sẽ auto cancel khi user tap vào nó, gọi bởi hàm setAutoCancel(true).
- Notification priority, gọi bởi setPriority(). Giá trị này nhằm xác định cách thức hiển thị của notification trên Android 7.1 trở xuống, với Android 8.0 trở lên thì phải set giá trị cho channel importance. Một số tag phổ biến thường dùng mà NotificationCompat support như : PRIORITY_DEFAULT, PRIORITY_LOW, PRIORITY_HIGH. Tất cả giá trị này đều cho phép notification show mọi nơi, nhưng khác nhau ở chế độ làm phiền.
Ở dòng đầu tiên có hàm khởi tạo NotificationCompat.Builder, hàm này phải truyền channelId, channelId là bắt buộc đối với Android 8.0 trở lên, còn với những phiên bản thấp hơn thì nó sẽ được bỏ qua.
Phần content của notification thường sẽ chỉ hiển thị một dòng, nếu như nội dung dài quá thì nó sẽ được cắt bớt đi để hiển thị ba chấm. Để hiển thị nhiều hơn thì ta set cho notification có thể expand được bằng cách sử dụng setStyle(NotificationCompat.BigTextStyle()).
Create a channel and set the importance
Kể từ Android 8.0 trở lên, bạn phải đăng ký notification channel của app với hệ thống, làm như sau :
val notificationManager =
                getSystemService(Context.NOTIFICATION_SERVICE) as NotificationManager
            if (Build.VERSION.SDK_INT >= Build.VERSION_CODES.O) {
                val channel = NotificationChannel(
                    channelId,
                    getString(R.string.notification_channel),
                    NotificationManager.IMPORTANCE_HIGH
                )
                notificationManager.createNotificationChannel(channel)
            }
Khi tạo channel, hàm khở tạo sẽ yêu cầu set importance cho channel, bạn phải chọn một trong các tag: IMPORTANCE_HIGH, IMPORTANCE_DEFAULT, IMPORTANCE_LOW.
Set the notification's tap action
Tất cả các notification đều gửi phản hồi khi mà tap vào nó, nó có thể là mở ra một màn hình trong app. Để làm được điều đó thì mình truyền một PendingIntent cho hàm .setContentIntent() :
val intent = Intent(this, MainActivity::class.java).apply {
            addFlags(Intent.FLAG_ACTIVITY_SINGLE_TOP)
        }
**val pendingIntent = PendingIntent.getActivity(
                this.applicationContext, 0 /* Request code */, intent,
                PendingIntent.FLAG_UPDATE_CURRENT
            )**
            val notificationBuilder = NotificationCompat.Builder(this.applicationContext, channelId)
                .setSmallIcon(R.drawable.default_notification)
                .setContentTitle(title)
                .setContentText(body)
                .setAutoCancel(true)
                .setStyle(NotificationCompat.BigTextStyle())
                .setPriority(NotificationCompat.PRIORITY_DEFAULT)
               ** .setContentIntent(pendingIntent)**
Để show notification, ta sử dụng :
with(NotificationManagerCompat.from(this)) {
                notify(notificationId, notificationBuilder.build())
            }
Nhớ là hãy nên truyền notificationId, để phòng trường hợp sau này bạn muốn update hoặc remove notification đó.
Kể từ Android 8.1 (API level 27), ứng dụng sẽ không thể phát ra âm thanh thông báo nhiều hơn một lần mỗi giây. Nếu ứng dụng của bạn nhận nhiều notification cùng một lúc thì nó sẽ đều hiển thị nhưng mà chỉ có âm thanh thông báo cho notification đầu tiên.
Remove a notification
Notification sẽ duy trì hiển thị ở status bar nếu như không có một trong những tác động sau:
- User tự tay xóa notification
- Khi user click vào notification và bạn set hàm setAutoCancel(true) khi khởi tạo notification.
- Sử dụng hàm cancel(idNotification) để xóa notification khi cả đang hiển thị.
- Gọi hàm cancelAll() để xóa đi cả những notification đã nhận.
- Gọi hàm .setTimeoutAfter() ngay khi tạo notification, sau thời gian truyền vào thì notification sẽ được xóa đi.
3. Create a Custom Notification Layout
Để đảm bảo notification của bạn là mới nhất trên các phiên bản Android thì bạn nên sử dụng template notification chuẩn như mình đã trình bày ở trên. Tuy nhiên, nếu như chuẩn đó chưa đáp ứng đủ nhu cầu cho ứng dụng của bạn thì mình có thể custom một notification theo như mong muốn.
- Chú ý rằng, khi bạn thiết kế custom notification layout thì phải đảm bảo được nó chạy ổn trên mọi hướng màn hình và độ phân giải khác nhau. Mặc dù điều này là cần thiết cho mỗi layout mà bạn thiết kế, nhưng mà nó còn cần thiết hơn đối với layout cho notificaiton, bởi vì không gian cho layout của notification bị hạn chế. Height cho một notification phụ thuộc vào chế độ xem notificaiton. Thông thường thì notification collapsed view được giới hạn là 64dp, còn expanded view layout thì được giới hạn là 256dp. Nếu vượt quá giới hạn này thì sao ?? Thì nó chỉ hiển thị những phần nằm trong khoảng 64dp đối với collapsed và 256dp đối với expanded thôi.
Nếu bạn cần custom một notification layout thì bạn có thể sử dụng NotificationCompat.DecoratedCustomViewStyle API này sẽ tùy chỉnh nội dung bố cục của notification như title, icon, image, content, action button, ...
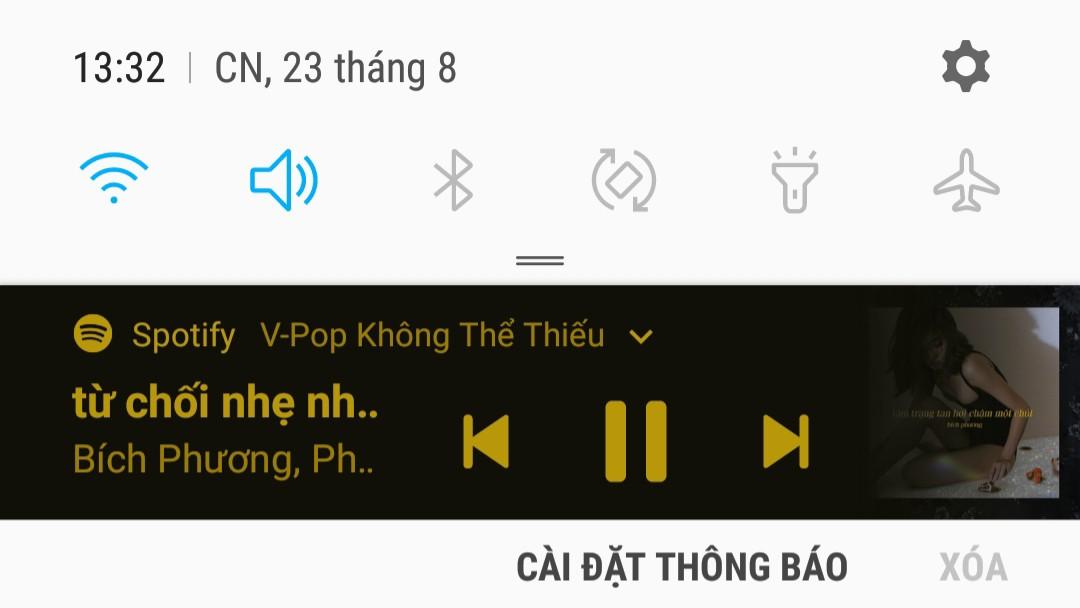
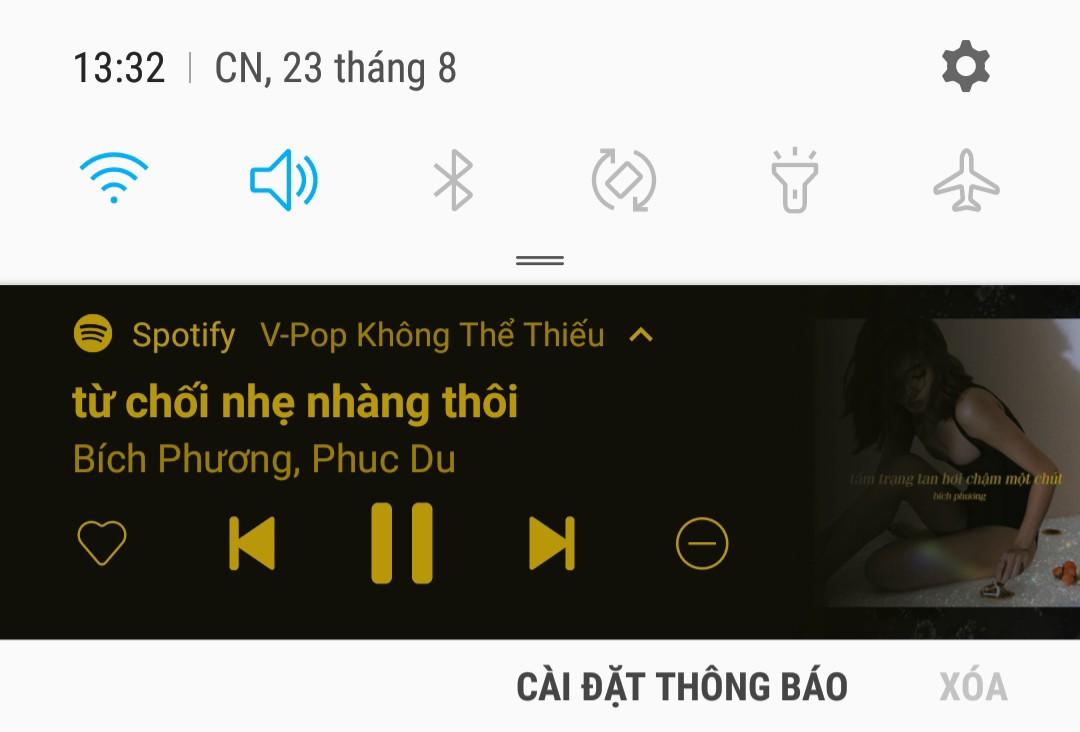
Để tạo custom notification, đầu tiên là phải thiết kế layout cho notification collapsed và expanded. Giao diện sẽ như sau :
Collapsed : collapsed_notification.xml:
Expanded: expanded_notification.xml:
Khi tạo file layout cho hai giao diện trên xong rồi thì mình implement chúng trong code nhé :
private fun createCollapsedNotificationView(): RemoteViews {
        val intentApp = Intent(applicationContext, MainActivity::class.java).apply {
            addFlags(Intent.FLAG_ACTIVITY_SINGLE_TOP)
        }
        val pendingIntentApp = PendingIntent.getActivity(
            applicationContext, 0 /* Request code */, intentApp,
            PendingIntent.FLAG_UPDATE_CURRENT
        )

        return RemoteViews(this.packageName, R.layout.collapsed_notification).apply {
            setOnClickPendingIntent(R.id.appName, pendingIntentApp)
            setOnClickPendingIntent(
                R.id.playPause,
                handleAction(Constants.ACTION_PAUSE)
            )
            setOnClickPendingIntent(
                R.id.rewind,
                handleAction(Constants.ACTION_REWIND)
            )
            setOnClickPendingIntent(
                R.id.forward,
                handleAction(Constants.ACTION_FORWARD)
            )
            setOnClickPendingIntent(R.id.notificationContent, pendingIntentApp)

            setTextViewText(R.id.title, title)
            setTextViewText(R.id.content, content)
            setImageViewResource(R.id.image, R.drawable.image_notification)
        }
    }
private fun createExpandedNotificationView(): RemoteViews {
        val intentApp = Intent(applicationContext, MainActivity::class.java).apply {
            addFlags(Intent.FLAG_ACTIVITY_SINGLE_TOP)
        }
        val pendingIntentApp = PendingIntent.getActivity(
            applicationContext, 0 /* Request code */, intentApp,
            PendingIntent.FLAG_UPDATE_CURRENT
        )
        return RemoteViews(this.packageName, R.layout.expanded_notification).apply {
            setOnClickPendingIntent(R.id.appName, pendingIntentApp)
            setOnClickPendingIntent(
                R.id.playPause,
                handleAction(Constants.ACTION_PAUSE)
            )
            setOnClickPendingIntent(
                R.id.rewind,
                handleAction(Constants.ACTION_REWIND)
            )
            setOnClickPendingIntent(
                R.id.forward,
                handleAction(Constants.ACTION_FORWARD)
            )
            setOnClickPendingIntent(
                R.id.favorite,
                handleAction(Constants.ACTION_FAVORITE)
            )
             setOnClickPendingIntent(
                R.id.hide,
                handleAction(Constants.ACTION_HIDE)
            )
            setOnClickPendingIntent(R.id.notificationContent, pendingIntentApp)
            setTextViewText(R.id.title, title)
            setTextViewText(R.id.content, content)
            setImageViewResource(R.id.image, R.drawable.image_notification)
        }
View mà sử dụng để custom layout cho notification là RemoteView, cái này chỉ support một số layout như sau:
- FrameLayout
- LinearLayout
- RelativeLayout
- GridLayout
Tham khảo RemoteView . Nếu không để ý mà bạn sử dụng ConstrainLayout là bị crash app ngay.
- setOnClickPendingIntent(): Để set các button và action cho button đó thì mình sử dụng hàm này.
- setTextViewText() : đổ text vào cho textView.
- setImageViewResource() : set image cho image view.
Xong phần UI rồi, giờ mình tạo notification nhé :
private fun createServiceNotification(): NotificationCompat.Builder {
        collapsedNotificationView = createCollapsedNotificationView()
        expandedNotificationView = createExpandedNotificationView()

        val largeIcon = BitmapFactory.decodeResource(
            resources,
            R.mipmap.icon_app
        )

        return NotificationCompat.Builder(applicationContext, notificationChannelID)
            .setShowWhen(false)
            .setLargeIcon(largeIcon)
            .setSmallIcon(R.drawable.ic_logo_24dp_notification)
            .setCustomContentView(collapsedNotificationView)
            .setCustomBigContentView(expandedNotificationView)
            //.setStyle(NotificationCompat.DecoratedCustomViewStyle())
            .setPriority(NotificationCompat.PRIORITY_DEFAULT)
            .setNotificationSilent()
            .setVisibility(NotificationCompat.VISIBILITY_PUBLIC)
    }
- setShowWhen(false) : chỉ định xem có show timestamp hay không.
- setCustomContentView(collapsedNotificationView): hàm này dùng để set phần view cho notification collapsed.
- setCustomBigContentView(expandedNotificationView): hàm này để set phần view cho notification expanded.
- setStyle(NotificationCompat.DecoratedCustomViewStyle()) : Khi bạn build lên thì style này sẽ được áp dụng cho notification của bạn, một điều kiện nữa là nếu như platform không cung cấp style này cho notification thì hàm này cũng không có tác dụng, ở đây mình để vào để giới thiệu thôi, còn không set cũng được nha.
- setNotificationSilent() : set câm cho loại thông báo này. Nếu device của bạn để chuông hay rung đi chăng nữa thì mỗi khi notification này hiển thị thì nó đều câm lặng hết.
Như vậy là mình đã tạo xong một custom notification rồi, cảm ơn mọi người đã theo dõi bài của mình !! (F)
Tham khảo :
https://developer.android.com/training/notify-user/custom-notification
All rights reserved
