Create app: Rails API, ReactJS, Redux Saga
Bài đăng này đã không được cập nhật trong 6 năm
Giới thiệu
Trong bài viết hôm này mình sẽ giới thiệu các bạn cách xây dựng một app đơn giản có sử dụng kết hợp rails và react-redux, redux-saga. Với app này mình sẽ chia làm 2 phần riêng biệt: rails làm backend và react-redux, redux-saga là frontend.
Cài đặt
Cài đặt rails Api: rails new backend --api
Theo hướng dẫn của Rails guide, thì tất cả những gì chúng ta cần làm để tạo một API trong rails là thêm --api phía sau câu lệnh khởi tạo project mới trong Rails.
- Cấu hình ứng dụng của bạn để bắt đầu với một bộ middleware hạn chế hơn bình thường. Cụ thể, nó sẽ không bao gồm bất kỳ middleware nào chủ yếu hữu ích cho các ứng dụng trình duyệt (như hỗ trợ cookie) theo mặc định.
- ApplicationController kế thừa từ ActionController::API thay vì ActionController::Base. Cũng như middleware, điều này sẽ loại bỏ mọi mô-đun Action Controller cung cấp các chức năng chủ yếu được sử dụng bởi các ứng dụng trình duyệt.
- Cấu hình trình tạo để bỏ qua việc tạo chế độ views, helpers, và assets khi bạn tạo resource mới.
Cài đặt react, redux saga: npx create-react-app frontend
Tiếp theo là cài đặt một số thư viện: npm redux react-redux redux-saga react-router
Khi đó, ta sẽ có cấu trúc thư mục như sau:
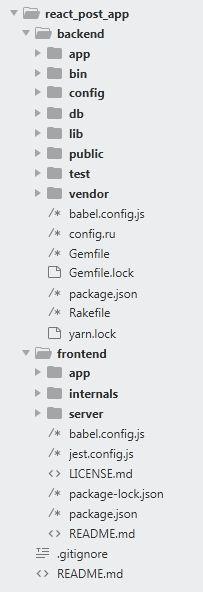
Sau khi cài đặt và cấu hình xong, ta bắt đầu đi xây dựng một ứng dụng để hiển thị danh sách post.
Backend
Đối với bên backend, ta sẽ tạo các bảng cần thiết, model và controller.
Tạo bảng posts: rails generate migration CreatePosts title:string description:string image:string
Chạy lệnh:rails db:migrate
Trong Models ta tạo file post.rb:
class Post < ApplicationRecord
  ATTRIBUTE_PARAMS = %i(title image description)

  validates :title, presence: true
  validates :description, presence: true
  validates :image, presence: true

  mount_base64_uploader :image, ImageUploader

  scope :order_by, -> {order created_at: :desc}
end
Tiếp theo là controller, với api file controller sẽ có đường dẫn như sau: app>controllers>api>v1>posts_controller.rb
class Api::V1::PostsController < Api::V1::BaseController
 def index
   @posts = Post.order_by
   response_success({ posts: @posts }, I18n.t("controllers.posts.list_post"))
 end

 private
 def post_params
   params.require(:post).permit(Post::ATTRIBUTE_PARAMS)
 end
end
File base_controllerrb: File này sẽ dùng để viết những cái có thể sử dụng chung.
class Api::V1::BaseController < ApplicationController
  protected

  def response_success(data = {}, message)
    render json: data.merge(message: message || 'success')
  end

  def response_error(response_code, messages)
    render json: { message: messages },
      status: response_code
  end
Frontend
Cấu trúc thư mục bên frontend sẽ như sau:
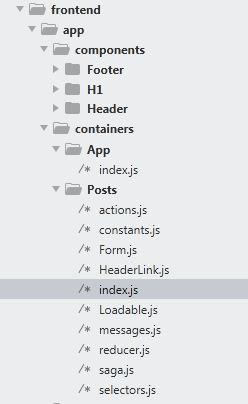
Trong đó:
- index.js - là cốt lỗi của ứng dụng được viết bằng React.
- sagas.js - nơi viết các tác vụ bất đồng bộ và các request để tương tác với server api.
- reducer.js - nơi quản lý các state của container đó.
- actions.js - nơi viết tất cả các actions mà container gửi đi
- constants.js - nơi lưu trữ tất cả các constants reducers/actions.
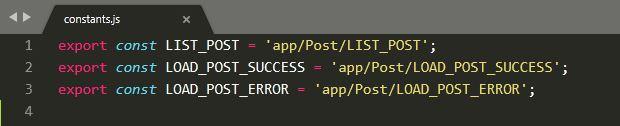
Đầu tiên, tạo file constants.js:
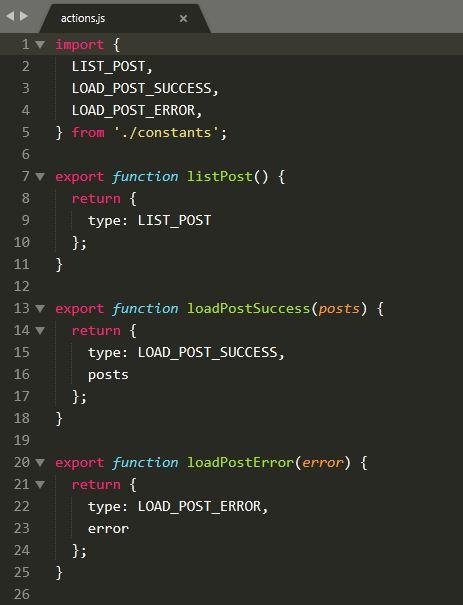
Tiếp theo, ta sẽ viết các action để list posts:
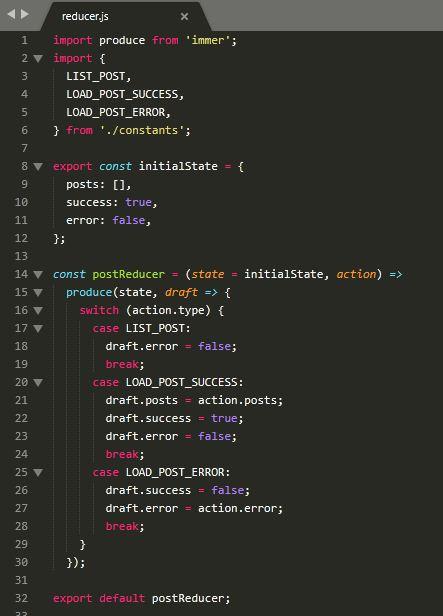
Tạo file reducer.js: Nó sẽ quản lý các state.
Tiếp theo, ta tạo file saga.js:
 import axios from 'axios';
import { take, call, put, takeLatest } from 'redux-saga/effects';
import {
  loadPostSuccess,
  loadPostError,
} from './actions';
import {
  LIST_POST,
} from './constants';

const urlConfig = `${process.env.DOMAIN_API_SERVER}/api/v1/`;

const callApi = (method, subUrl, params) => {
  let common = {
    method: method,
    url: urlConfig + subUrl,
  };

  common =
    method.toUpperCase() === 'GET'
      ? { ...common, params: params }
      : { ...common, data: params };

      return axios(common);
}

export function* getPosts() {
  try {
    const repos = yield call(callApi, 'GET', 'posts');
    yield put(loadPostSuccess(repos.data));
  } catch (err) {
    yield put(loadPostError(err));
  }
}

export default function* postsSaga() {
  yield takeLatest(LIST_POST, getPosts);
}
Trong fiel saga.js, ta có sử dụng axios, nó là một thư viện HTTP Client dựa trên Promise. Cơ bản thì nó cung cấp một API cho việc xử lý XHR (XMLHttpRequests). Bạn cài đặt thêm để sử dụng: npm install --save axios.
Ở đây, trong hàm getPosts Ta thực hiện request bằng việc sử dụng call gọi một hàm, lấy các tham số và thực hiện hàm đó. Ta đưa vào cho call một hàm là callApi có nhiệm vụ thực thi gọi đến server và trả về nội dung response khi thành công. Cuối cùng, ta sẽ phát đi action là loadPostSuccess để cập nhật UI với dữ liệu bạn nhận được. và nếu lấy dữ liệu lỗi nó sẽ chạy vào action loadPostError trả về lỗi.
Tiếp theo, ta xử lý trong file reducer.js
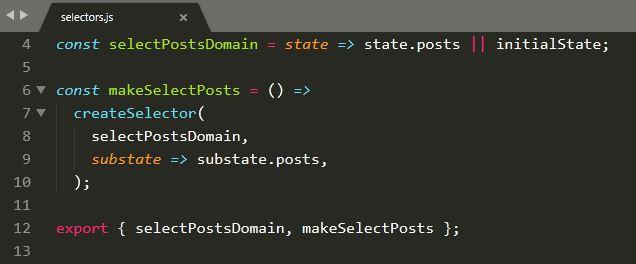
Và để lấy dữ liệu, ta thêm file selectors.js
Cuối cùng, ta tạo file index.js:
import React, { memo, useEffect } from 'react';
import PropTypes from 'prop-types';
import { connect } from 'react-redux';
import { FormattedMessage } from 'react-intl';
import { createStructuredSelector } from 'reselect';
import { compose } from 'redux';
import { useInjectSaga } from 'utils/injectSaga';
import { useInjectReducer } from 'utils/injectReducer';
import makeSelectPost from './selectors';
import reducer from './reducer';
import saga from './saga';
import messages from './messages';
import { listPost } from './actions';
import HeaderLink from './HeaderLink';
import Card from '@material-ui/core/Card';
import CardActions from '@material-ui/core/CardActions';
import CardContent from '@material-ui/core/CardContent';
import CardMedia from '@material-ui/core/CardMedia';
import Grid from '@material-ui/core/Grid';
import Typography from '@material-ui/core/Typography';
import { makeStyles } from '@material-ui/core/styles';
import Container from '@material-ui/core/Container';

const useStyles = makeStyles(theme => ({
  cardGrid: {
    paddingTop: theme.spacing(8),
    paddingBottom: theme.spacing(8),
  },
  card: {
    height: '100%',
    display: 'flex',
    flexDirection: 'column',
  },
  cardMedia: {
    paddingTop: '56.25%',
  },
  cardContent: {
    flexGrow: 1,
  },
}));

export function Posts({data, onGetPosts}) {
  useInjectReducer({ key: 'posts', reducer });
  useInjectSaga({ key: 'posts', saga });

  useEffect(() => {
    onGetPosts();
  }, []);

  const classes = useStyles();
  const configImage = (imageUrl) => process.env.DOMAIN_API_SERVER + `${imageUrl}`;

  var posts = data.posts;

  return (
    <div>
      <Container className={classes.cardGrid}>
          <Grid container spacing={4}>
            {posts.map(post => (
            <Grid item key={post.id} xs={12} sm={6} md={4}>
                <Card className={classes.card}>
                  <CardMedia
                    className={classes.cardMedia}
                    image={configImage(post.image.url)}
                    title="Image title"
                  />
                  <CardContent className={classes.cardContent}>
                    <Typography gutterBottom variant="h5" component="h2">
                      {post.title}
                    </Typography>
                    <Typography>
                      {post.description}
                    </Typography>
                  </CardContent>
                  <CardActions>
                    View
                    Edit
                  </CardActions>
                </Card>
              </Grid>
            )))}
          </Grid>
        </Container>
    </div>
  );
}

Posts.propTypes = {
  onGetPosts: PropTypes.func,
  data: PropTypes.oneOfType([PropTypes.object, PropTypes.array, PropTypes.bool]),
};

const mapStateToProps = createStructuredSelector({
  data: makeSelectPost(),
});

function mapDispatchToProps(dispatch) {
  return {
    onGetPosts: () => {
      dispatch(listPost())
    },
  }
}

const withConnect = connect(
  mapStateToProps,
  mapDispatchToProps,
);

export default compose(
  withConnect,
  memo,
)(Posts);
connect giúp kết nối một component react với store của Redux.
mapStateToProps giúp kết nối một phần của State Redux với các props trong component của React. Bằng cách đó, một component React được kết nối sẽ có quyền truy cập vào các phần dữ liệu mà nó cần.
mapDispatchToProps giúp kết nối các action Redux với các props bằng React. Bằng cách này, một component React được kết nối sẽ có thể gửi các action.
Kết luận
Vậy là chúng ta đã xây dựng được một app đơn giản sử dụng react, react-redux, react-saga. Ứng dụng chia theo 2 phần tách biệt: backend và frontend giúp các bạn phần nào hiểu rõ hơn về cách hoạt động và luồng xử lý của nó.
All rights reserved
