Corona SDK tutorial: game Flappy Bat phần 2
Bài đăng này đã không được cập nhật trong 4 năm
Tiếp tục bài tutorial hướng dẫn về game flappy bird bằng corona sdk, như trong bài viết trước chúng ta đã tạo được màn hình start của game, sử dụng physics để tạo chuyển động cho ground và sử dụng animation cho text. Người đọc có thể tham khảo lại ở đây:
https://viblo.asia/TienNM87/posts/ojaqG0oOMEKw
Trong phần 2, bài viết này sẽ hướng dẫn để tạo màn hình game, tạo chuyển động cho nhân vật và cơ chế sinh chướng ngại vật.
Để bắt đầu, xin được nhắc lại một khái niệm trong game programming, đó là scene, scene được hiểu nôm na nghĩa là 1 cảnh, giống như khi chúng ta xem 1 vở kịch, luôn được chia thành nhiều phần, mỗi phần là 1 cảnh, bắt đầu 1 cảnh, các nhân vật, bố cục trên sân khấu xuất hiện và các hành động diễn ra, kết thúc 1 cảnh, các nhân vật, bố cục được ẩn đi chuẩn bị cho 1 cảnh mới.
Cũng giống như vậy, cấu trúc 1 game được chia thành nhiều scene tuần tự, kết thúc scene này lại đi đến scene khác, các game engine hầu hết đều hỗ trợ 1 cấu trúc gọi là Scene. Một Scene thông thường có 3 events cơ bản: onStart, onUpdate, onDestroy, tuỳ thuộc vào thời điểm cũng như tác vụ thực hiện mà các engine khác nhau có thể xây dựng thêm các events như onLoaded, onPause ..vv Đối với corona muốn tạo 1 scene chúng ta tạo 1 file .lua cách implement 1 scene như sau ví dụ ở đây chúng ta đã có scene Start cho main menu và muốn tạo scene Game cho game chính.
Ở scene start, chúng ta đã có button start game:
--draw the start button
	startBtn = display.newImageRect("start_btn.png",300,65)
	startBtn.anchorX = 0.5
	startBtn.anchorY = 1
	startBtn.x = display.contentCenterX
	startBtn.y = display.contentHeight - 400
	sceneGroup:insert(startBtn)
và chúng ta đã đăng ký xử lý sự kiên touch cho nó:
startBtn:addEventListener( 'touch', startGame )
việc cần làm bây giờ là trong method ‘startGame’ cần dịch chuyển đến scene Game:
function startGame( event )
	-- body
	if event.phase == 'ended' then
		composer.gotoScene( 'game' )
	end
end
composer là 1 đối tượng có sẵn trong corona, dùng để quản lý các scene, ngoài composer chúng ta cũng có thể sử dụng 1 đối tượng quản lý scene khác là storyboard(cũ hơn). Đối với scene ‘game’, ta tạo file game.lua để định nghĩa 1 scene như sau:
local composer = require( "composer" )

local scene = composer.newScene()

-- -----------------------------------------------------------------------------------------------------------------
-- All code outside of the listener functions will only be executed ONCE unless "composer.removeScene()" is called.
-- -----------------------------------------------------------------------------------------------------------------

-- local forward references should go here

-- -------------------------------------------------------------------------------

-- "scene:create()"
function scene:create( event )

    local sceneGroup = self.view

    -- Initialize the scene here.
    -- Example: add display objects to "sceneGroup", add touch listeners, etc.
end

-- "scene:show()"
function scene:show( event )

    local sceneGroup = self.view
    local phase = event.phase

    if ( phase == "will" ) then
        -- Called when the scene is still off screen (but is about to come on screen).
    elseif ( phase == "did" ) then
        -- Called when the scene is now on screen.
        -- Insert code here to make the scene come alive.
        -- Example: start timers, begin animation, play audio, etc.
    end
end

-- "scene:hide()"
function scene:hide( event )

    local sceneGroup = self.view
    local phase = event.phase

    if ( phase == "will" ) then
        -- Called when the scene is on screen (but is about to go off screen).
        -- Insert code here to "pause" the scene.
        -- Example: stop timers, stop animation, stop audio, etc.
    elseif ( phase == "did" ) then
        -- Called immediately after scene goes off screen.
    end
end

-- "scene:destroy()"
function scene:destroy( event )

    local sceneGroup = self.view

    -- Called prior to the removal of scene's view ("sceneGroup").
    -- Insert code here to clean up the scene.
    -- Example: remove display objects, save state, etc.
end

-- -------------------------------------------------------------------------------

-- Listener setup
scene:addEventListener( "create", scene )
scene:addEventListener( "show", scene )
scene:addEventListener( "hide", scene )
scene:addEventListener( "destroy", scene )

-- -------------------------------------------------------------------------------

return scene
đây chính là template chuẩn cho 1 scene. Các events được xây dựng cho những mục đích rất rõ ràng.
-
create: sự kiện khởi chạy đầu tiên - > init scene, khởi tạo biến, đăng ký sự kiên, các hoạt động tương tự.
-
show : sự kiện xảy ra khi scene trở nên visible - > tạo các hoạt động game
-
hide: sự kiện scene trở nên invisible - > tạm dừng các hoạt động để tránh lãng phí tài nguyên.
-
destroy: trước khi scene bị huỷ -> dùng để giải phóng, dọn dẹp những objects không sử dụng nữa.
Chỉ sử dụng 4 sự kiện này chúng ta có thể xây dựng được flow trong 1 scene ví dụ như scene game của chúng ta sẽ diễn ra theo flow như sau:
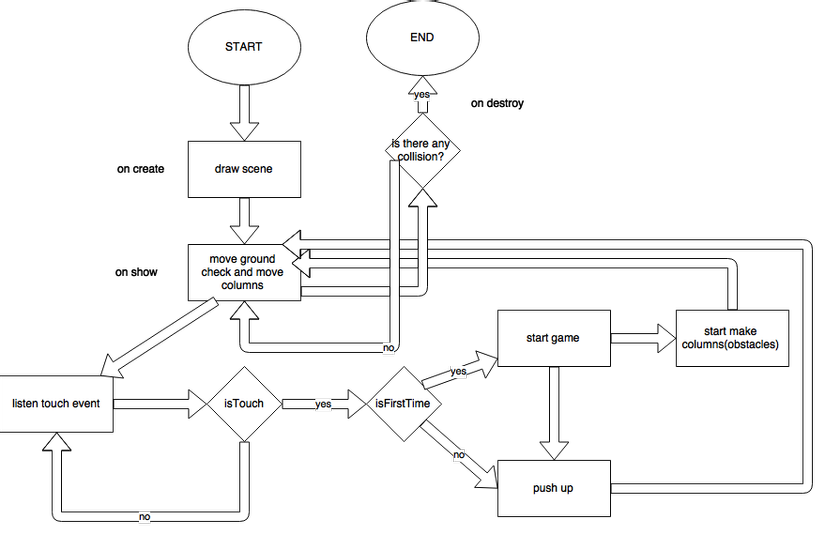
(flow giản lược)
cụ thể các function như sau:
--draw scene

function scene:create( event )
 	drawScene()
end

function drawScene()
	local sceneGroup = self.view

   gameStarted = false
   -- Initialize the scene here.
   -- Example: add display objects to "sceneGroup", add touch listeners, etc.

   local background = display.newImage("bg.png")
	sceneGroup:insert(background)

    bg = display.newImageRect('bg.png',900,1425)
	bg.anchorX = 0
	bg.anchorY = 1
	bg.x = 0
	bg.y = display.contentHeight
	bg.speed = 4
	sceneGroup:insert(bg)

    elements = display.newGroup()
	elements.anchorChildren = true
	elements.anchorX = 0
	elements.anchorY = 1
	elements.x = 0
	elements.y = 0
	sceneGroup:insert(elements)

	ground = display.newImageRect('ground.png',900,162)
	ground.anchorX = 0
	ground.anchorY = 1
	ground.x = 0
	ground.y = display.contentHeight
	sceneGroup:insert(ground)

	platform = display.newImageRect('platform.png',900,53)
	platform.anchorX = 0
	platform.anchorY = 1
	platform.x = 0
	platform.y = display.viewableContentHeight - 110
	physics.addBody(platform, "static", {density=.1, bounce=0.1, friction=.2})
	platform.speed = 4
	sceneGroup:insert(platform)

	platform2 = display.newImageRect('platform.png',900,53)
	platform2.anchorX = 0
	platform2.anchorY = 1
	platform2.x = platform2.width
	platform2.y = display.viewableContentHeight - 110
	physics.addBody(platform2, "static", {density=.1, bounce=0.1, friction=.2})
	platform2.speed = 4
	sceneGroup:insert(platform2)

	p_options =
	{
		-- Required params
		width = 80,
		height = 42,
		numFrames = 2,
		-- content scaling
		sheetContentWidth = 160,
		sheetContentHeight = 42,
	}

	playerSheet = graphics.newImageSheet( "bat.png", p_options )
	player = display.newSprite( playerSheet, { name="player", start=1, count=2, time=500 } )
	player.anchorX = 0.5
	player.anchorY = 0.5
	player.x = display.contentCenterX - 150
	player.y = display.contentCenterY
	physics.addBody(player, "static", {density=.1, bounce=0.1, friction=1})
	player:applyForce(0, -300, player.x, player.y)
	player:play()
	sceneGroup:insert(player)

	instructions = display.newImageRect("instructions.png",400,328)
	instructions.anchorX = 0.5
	instructions.anchorY = 0.5
	instructions.x = display.contentCenterX
	instructions.y = display.contentCenterY
	sceneGroup:insert(instructions)
end
các tác vụ chính ở đây là : draw background, ground, platform, player, instructions(chỉ dẫn).
Chi tiết ý nghĩa của các lệnh, bạn đọc có thể tham khảo ở bài viết trước hoặc trên trang chủ của corona sdk.
Khi ở trạng thái chuẩn bị, game sẽ show instructions để hướng dẫn cách chơi, thực chất là 1 ảnh có tên là instructions.png và play animation cho player với lệnh:
player = display.newSprite( playerSheet, { name="player", start=1, count=2, time=500 } )
Game đang ở trong trạng thái chờ user touch vào screen để thực sự chơi Ta cần đăng ký xử lí sự kiên touch screen bằng lệnh:
function scene:show( event )
	Runtime:addEventListener("touch", flyUp)
end

function flyUp(event)
   if event.phase == "began" then

		if gameStarted == false then
			 player.bodyType = "dynamic"
			 instructions.alpha = 0
			 tb.alpha = 1
			 addColumnTimer = timer.performWithDelay(2000, addColumns, -1)
			 moveColumnTimer = timer.performWithDelay(5, moveColumns, -1)
			 gameStarted = true
			 player:applyForce(0, -150, player.x, player.y)
		else

	    player:applyForce(0, -300, player.x, player.y)

      end
	end
end
Khi user touch vào screen, nếu lần đầu ta start screen, thực hiện tác vụ start việc add obstacles và move obstacles:
 addColumnTimer = timer.performWithDelay(2000, addColumns, -1)
 moveColumnTimer = timer.performWithDelay(5, moveColumns, -1)
timer là 1 đối tượng đặc biệt nó cho phép tạo ra các thread chạy 1 function sau 1 khoảng thời gian ở đây function truyền vào là ‘addColumn’ và ‘moveColumns’ với 2 tham số đầu tiên là 2000 và 5, có nghĩa là function addColumns sau 2s được gọi lại và moveColumns thực hiện lại sau 5/1000 = 0.005s, tham số -1 cuối cùng cho biết việc gọi lại hàm được loop forever. Với timer ta có thể tạo ra các thread ảo chạy song song với main loop thread cho phép control stepTime của 1 tác vụ, giống như method startCoroutine hoặc invoke của Unity. các function addColumns và moveColumns như sau:
function addColumns()

	height = math.random(display.contentCenterY - 200, display.contentCenterY + 200)

	topColumn = display.newImageRect('topColumn.png',100,714)
	topColumn.anchorX = 0.5
	topColumn.anchorY = 1
	topColumn.x = display.contentWidth + 100
	topColumn.y = height - 160
	topColumn.scoreAdded = false
	physics.addBody(topColumn, "static", {density=1, bounce=0.1, friction=.2})
	elements:insert(topColumn)

	bottomColumn = display.newImageRect('bottomColumn.png',100,714)
	bottomColumn.anchorX = 0.5
	bottomColumn.anchorY = 0
	bottomColumn.x = display.contentWidth + 100
	bottomColumn.y = height + 160
	physics.addBody(bottomColumn, "static", {density=1, bounce=0.1, friction=.2})
	elements:insert(bottomColumn)

end

function moveColumns()
		for a = elements.numChildren,1,-1  do
			if(elements[a].x > -100) then
				elements[a].x = elements[a].x - 12
			else
				elements:remove(elements[a])
			end
		end
end
chiều cao của cột được random và chúng ta tạo được 1 cột trên và 1 cột dưới cách đều chiều cao random. với function moveColumns chỉ đơn giản là thay đổi position theo 1 speed và xoá columns nếu như vị trí của nó ra phía ngoài màn hình 1 khoảng -100.
function để move ground:
function scene:show( event )
	platform.enterFrame = platformScroller
	Runtime:addEventListener("enterFrame", platform)

	platform2.enterFrame = platformScroller
	Runtime:addEventListener("enterFrame", platform2)
end

function platformScroller(self,event)
	if self.x - self.speed < -900 then
		self.x = 900 - ( -900 - self.x + self.speed )
	else
		self.x = self.x - self.speed
	end
end
function này giống hệt như ở màn hình start, chạy mỗi khi bắt đầu 1 frame làm nhiệm vụ là di chuyển ground tạo cảm giác chuyển động cho user.
Quay trở lại với function flyUp, được gọi mỗi khi user touch vào screen, trong trường hợp lần đầu tiên, chúng ta start game và start các hành động add columns và move columns, ngược lại ta tạo lực đẩy nhân vật lên trên bằng câu lệnh:
else
	  player:applyForce(0, -300, player.x, player.y)
rất đơn giản với physics component của corona, cần chú ý trước khi apply force chúng ta cần chuyển body về dạng ‘dynamics' bằng câu lệnh
player.bodyType = "dynamic"
Chạy thử chương trình, ta thấy nhân vật đã có thể chuyển động và chướng ngại vật được tạo ra liên tục. Ta thực hiện 1 số điều chỉnh về lực tác dụng và chiều cao các cột để thu kết quả tốt hơn.
Như vậy là ta đã thực hiện xong 2 bước khá quan trọng trong màn hình game đó là tạo cơ chế bay và tạo chướng ngại vật, phần cuối của loạt bài sẽ trình bày nốt về vấn đề xử lý và chạm và cơ chế lưu trữ trong Corona. Source code hoàn chỉnh đã được upload, người đọc có thể tham khảo ở đây:
https://github.com/TienHP/Report1507/tree/develop
Chúc các bạn chơi game vui vẻ, Thanks!
All rights reserved
