Core Data Migration using MagicalRecord
Bài đăng này đã không được cập nhật trong 4 năm
1. Giới thiệu
Trong số các ứng dụng iOS hiện nay, khó có thể tìm thấy ứng dụng nào không dùng tới cơ sở dữ liệu. Core Data là một lựa chọn hợp lý khi bạn cần sử dụng cơ sở dữ liệu cho ứng dụng iOS hoặc OS X.
Một bài toán mà mọi người hay gặp là thay đổi cơ sở dữ liệu qua các phiên bản phần mềm, khi đó chúng ta phải tiến hành 1 quá trình gọi là migration (tạm gọi là nâng cấp CSDL), chuyển dữ liệu từ model cũ sang model mới. Nếu không thực hiện quá trình này, toàn bộ dữ liệu của người dùng trong phiên bản cũ sẽ mất hết khi nâng cấp lên phiên bản mới với cơ sở dữ liệu thay đổi.
Có 3 cách chính để tiến hành nâng cấp đó là tự động hay còn gọi là lightweight, thủ công và bằng code. Trong thực tế, quá trình nâng cấp có thể bao gồm 1 hoặc nhiều hơn trong số các cách trên.
Bạn nên sử dụng lightweight bất cứ khi nào có thể. Cách thủ công hoặc code tay sẽ phức tạp hơn và phải giải quyết các bài toán về bộ nhớ.
Với mỗi phiên bản cập nhật iOS và OS X, Core Data đã hỗ trợ ngày một tốt hơn việc nâng cấp dữ liệu. Đặc biệt, với việc sử dụng thư viện MagicalRecord, phần lớn công việc sẽ được thực hiện hoàn toàn tự động.
Trong khuôn khổ bài viết này, tôi sẽ trình bày về nâng cấp cơ sở dữ liệu sử dụng MagicalRecord. Project demo được viết bằng ngôn ngữ Swift trên Xcode 6.2
2. Demo Project
2.1. Tạo project
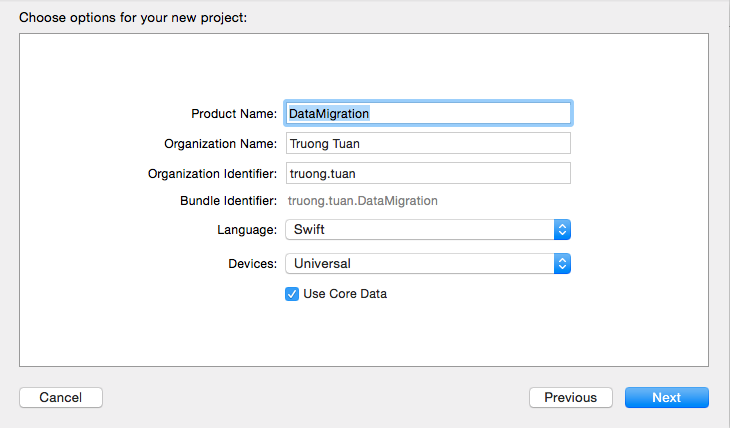
Mở Xcode, chọn tạo mới project theo template Single View Application, trên màn hình new project chọn Product Name là DataMigration, ngôn ngữ Swift, device Universal, tích chọn Use Core Data như hình dưới:
2.2. Nhúng thư viện MagicalRecord vào dự án
Có nhiều cách, trong đó đơn giản nhất là sử dụng pod. Bạn có thể tham khảo hướng dẫn setup pod tại: http://cocoapods.org
Sau khi cài đặt xong pod, bạn có thể search MagicalRecord tại đường link trên, phiên bản hiện tại là 2.2
Thêm đoạn code sau vào podfile:
pod 'MagicalRecord', '~> 2.2'
Trên cửa sổ Terminal, chạy pod install để thêm thư viện MagicalRecord vào dự án.
Sau khi quá trình install thành công, mở dự án thông qua file DataMigration.xcworkspace
2.3. Thiết lập MagicalRecord
Thêm 1 class Objective C bất kỳ vào project, Xcode sẽ hỏi ta thêm file Bridging Header, nhấn đồng ý để thêm file. Sau đó chúng ta xoá class Objective C vừa thêm vào ở trên.
Trong file DataMigration-Bridging-Header.h vừa tạo ra, chúng ta thêm dòng import MagicalRecord:
#import "CoreData+MagicalRecord.h"
Mở file AppDelegate và xoá các đoạn code boilerplate trong phần Core Data stack và Core Data Saving support.
Xoá dòng self.saveContext() trong hàm applicationWillTerminate:
Thêm các dòng code thiết lập MagicalRecord, kết quả cuối cùng ta được file AppDelegate.swift như sau:
class AppDelegate: UIResponder, UIApplicationDelegate {

    var window: UIWindow?

    func application(application: UIApplication, didFinishLaunchingWithOptions launchOptions: [NSObject: AnyObject]?) -> Bool {

        MagicalRecord.setupAutoMigratingCoreDataStack()

        return true
    }

    func applicationWillResignActive(application: UIApplication) {

    }

    func applicationDidEnterBackground(application: UIApplication) {

    }

    func applicationWillEnterForeground(application: UIApplication) {

    }

    func applicationDidBecomeActive(application: UIApplication) {

    }

    func applicationWillTerminate(application: UIApplication) {
        MagicalRecord.cleanUp()
    }
}
2.4. Tạo data model
Tạo entity Product gồm các trường:
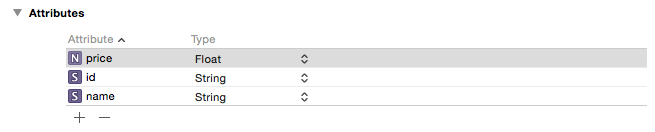
Sau khi thêm NSManagedObject subclass (Objective C) ta được class Product như sau:
@interface Product : NSManagedObject

@property (nonatomic, retain) NSString * id;
@property (nonatomic, retain) NSString * name;
@property (nonatomic, retain) NSNumber * price;

@end
Cập nhật file Bridge:
#import "CoreData+MagicalRecord.h"
#import "Product.h"
Thay vì dùng trực tiếp class entity Product, chúng ta sẽ tạo 1 class ProductDto, class này sẽ map dữ liệu với class Product:
class ProductDto: NSObject {
    var id = ""
    var name = ""
    var price:Float = 0
}
2.5. Tạo Repositories
Tạo class ProductRepository để thực hiện các tác vụ add/update/delete/get/getlist
class ProductRepository: NSObject {

    func addProduct(product: ProductDto) {
        MagicalRecord.saveUsingCurrentThreadContextWithBlockAndWait { (context) -> Void in
            var entity = Product.MR_createInContext(context) as Product
            entity.id = product.id
            entity.name = product.name
            entity.price = product.price
        }
    }

    func updateProduct(product: ProductDto) {
        MagicalRecord.saveUsingCurrentThreadContextWithBlockAndWait { (context) -> Void in
            var predicate = NSPredicate(format: "id = '\(product.id)'")
            if var entity = Product.MR_findFirstWithPredicate(predicate, inContext: context) as? Product {
                entity.name = product.name
                entity.price = product.price
            }
        }
    }

    func deleteProduct(productId: String) {
        MagicalRecord.saveUsingCurrentThreadContextWithBlockAndWait { (context) -> Void in
            var predicate = NSPredicate(format: "id = '\(productId)'")
            Product.MR_deleteAllMatchingPredicate(predicate, inContext: context)
        }
    }

    func getProductById(productId: String) -> Product? {
        var context = NSManagedObjectContext.MR_contextForCurrentThread()
        var predicate = NSPredicate(format: "id = '\(productId)'")
        if let product = Product.MR_findFirstWithPredicate(predicate, inContext: context) as? Product {
            return product
        }
        return nil
    }

    func getProducts() -> [Product]? {
        var context = NSManagedObjectContext.MR_contextForCurrentThread()

        if let products = Product.MR_findAllInContext(context) as [Product]? {
            return products
        }
        return nil
    }
}
2.6. Tạo Services
Tạo class ProductService sử dụng ProductRepository:
class ProductService: NSObject {
    private var productRepository = ProductRepository()

    func addProduct(product: ProductDto) {
        productRepository.addProduct(product)
    }

    func updateProduct(product: ProductDto) {
        productRepository.updateProduct(product)
    }

    func deleteProduct(productId: String) {
        productRepository.deleteProduct(productId)
    }

    func getProductById(productId: String) -> ProductDto? {
        if let entity = productRepository.getProductById(productId) {
            var product = ProductDto()
            product.id = entity.id
            product.name = entity.name
            product.price = entity.price.floatValue
        }
        return nil
    }

    func getProducts() -> [ProductDto] {
        var products = [ProductDto]()
        if let entities = productRepository.getProducts() {
            for entity in entities {
                var product = ProductDto()
                product.id = entity.id
                product.name = entity.name
                product.price = entity.price.floatValue
                products.append(product)
            }
        }
        return products
    }
}
2.7. Xây dựng giao diện
Tạo class ProductListViewController, subclass của UITableViewController để quản lý danh sách Product với các chức năng add/update/delete
Tạo class ProductViewController, subclass của UITableViewController để add/update Product.
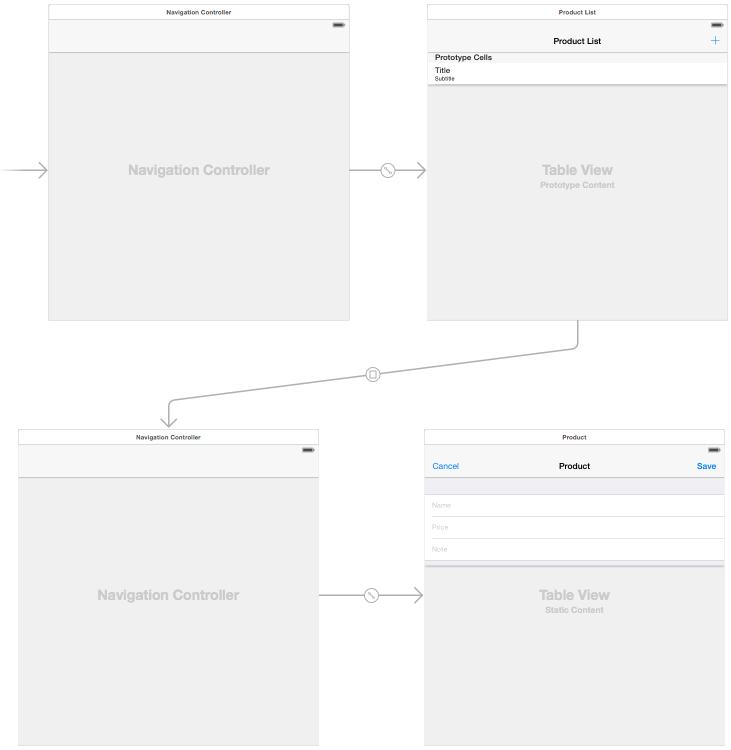
Segue từ ProductListViewController sang NavigationController của ProductViewController có kiểu là Present modal và id là “showProduct”.
Ta kéo outlet của các control vào ViewController tương ứng.
2.8. Viết chức năng cho ProductViewController
protocol ProductDelegate: class {
    func productDidAdd(product: ProductDto)
    func productDidUpdate(product: ProductDto)
}

class ProductViewController: UITableViewController {

    @IBOutlet weak var nameTextField: UITextField!

    @IBOutlet weak var priceTextField: UITextField!

    @IBOutlet weak var noteTextField: UITextField!

    var product: ProductDto!

    weak var delegate: ProductDelegate?

    override func viewDidLoad() {
        super.viewDidLoad()

        nameTextField.text = product.name
        priceTextField.text = "\(product.price)"

        nameTextField.becomeFirstResponder()
    }

    override func didReceiveMemoryWarning() {
        super.didReceiveMemoryWarning()
    }

    @IBAction func onSaveButtonClicked(sender: AnyObject) {
        product.name = nameTextField.text
        var string = NSString(string: priceTextField.text)
        product.price = string.floatValue

        if product.id == "" {
            delegate?.productDidAdd(product)
        }
        else {
            delegate?.productDidUpdate(product)
        }

        dismissView()
    }

    @IBAction func onCancelButtonClicked(sender: AnyObject) {
        dismissView()
    }

    private func dismissView() {
        self.dismissViewControllerAnimated(true, completion: nil)
    }

    // MARK: - Table view data source

    override func numberOfSectionsInTableView(tableView: UITableView) -> Int {
        return 1
    }

    override func tableView(tableView: UITableView, numberOfRowsInSection section: Int) -> Int {
        return 3
    }
}
2.9. Viết chức năng cho ProductListViewController
class ProductListViewController: UITableViewController, ProductDelegate {

    var productService = ProductService()
    var products: [ProductDto]!

    override func viewDidLoad() {
        super.viewDidLoad()
        self.navigationItem.rightBarButtonItem = self.editButtonItem()

        products = productService.getProducts()
    }

    override func didReceiveMemoryWarning() {
        super.didReceiveMemoryWarning()
        // Dispose of any resources that can be recreated.
    }

    @IBAction func onAddButtonClicked(sender: AnyObject) {
        self.performSegueWithIdentifier("showProduct", sender: ProductDto())
    }

    // MARK: - Table view data source

    override func numberOfSectionsInTableView(tableView: UITableView) -> Int {
        return 1
    }

    override func tableView(tableView: UITableView, numberOfRowsInSection section: Int) -> Int {
        return products.count
    }

    override func tableView(tableView: UITableView, heightForRowAtIndexPath indexPath: NSIndexPath) -> CGFloat {
        return 44
    }

    override func tableView(tableView: UITableView, didSelectRowAtIndexPath indexPath: NSIndexPath) {
        if self.editing {
            let product = products[indexPath.row]
            self.performSegueWithIdentifier("showProduct", sender: product)
        }
    }

    override func tableView(tableView: UITableView, cellForRowAtIndexPath indexPath: NSIndexPath) -> UITableViewCell {
        let cell = tableView.dequeueReusableCellWithIdentifier("ProductCell", forIndexPath: indexPath) as UITableViewCell

        let product = products[indexPath.row]
        cell.textLabel?.text = product.name
        cell.detailTextLabel?.text = "$\(product.price)"

        return cell
    }

    override func tableView(tableView: UITableView, canEditRowAtIndexPath indexPath: NSIndexPath) -> Bool {
        return true
    }

    override func tableView(tableView: UITableView, commitEditingStyle editingStyle: UITableViewCellEditingStyle, forRowAtIndexPath indexPath: NSIndexPath) {
        if editingStyle == .Delete {
            let product = products[indexPath.row]
            productService.deleteProduct(product.id)

            var row = -1
            for (index, value) in enumerate(products) {
                if value.id == product.id {
                    row = index
                    break
                }
            }
            if row != -1 {
                products.removeAtIndex(row)
            }
            tableView.deleteRowsAtIndexPaths([indexPath], withRowAnimation: .Fade)
        }
    }

    // MARK: - Navigation

    // In a storyboard-based application, you will often want to do a little preparation before navigation
    override func prepareForSegue(segue: UIStoryboardSegue, sender: AnyObject?) {
        if segue.identifier == "showProduct" {
            var controller = (segue.destinationViewController as UINavigationController).topViewController as ProductViewController
            controller.product = sender as ProductDto
            controller.delegate = self
        }
    }

    // MARK: - ProductDelegate

    func productDidAdd(product: ProductDto) {
        product.id = NSUUID().UUIDString
        productService.addProduct(product)
        products.append(product)
        tableView.insertRowsAtIndexPaths([NSIndexPath(forRow: products.count - 1, inSection: 0)], withRowAnimation: UITableViewRowAnimation.Automatic)
    }

    func productDidUpdate(product: ProductDto) {
        productService.updateProduct(product)
        var row = -1
        for (index, value) in enumerate(products) {
            if value.id == product.id {
                row = index
                break
            }
        }
        if row != -1 {
            tableView.reloadRowsAtIndexPaths([NSIndexPath(forRow: row, inSection: 0)], withRowAnimation: UITableViewRowAnimation.Automatic)
        }
    }
}
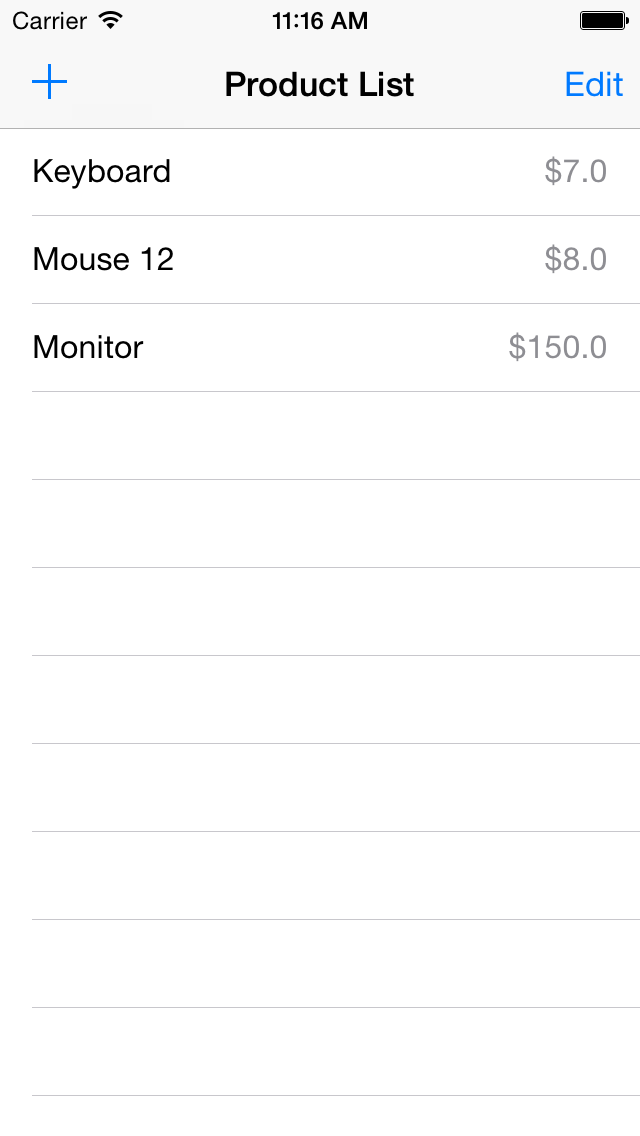
2.10. Chạy thử và nhập dữ liệu
Màn hình Product List:
Màn hình thêm/sửa Product:

Bạn có thể nhận thấy ở màn ProductViewController có thêm trường là Note, trường này chưa có trong bảng Product.
2.11. Thêm trường note vào Product
Ta sẽ thử thêm trường này vào entity Product, cập nhật lại file Product.m và Product.h sau đó chạy lại chương trình.
//  Product.h
@interface Product : NSManagedObject

@property (nonatomic, retain) NSString * id;
@property (nonatomic, retain) NSString * name;
@property (nonatomic, retain) NSNumber * price;
@property (nonatomic, retain) NSString * note;
@end
Ta sẽ thấy là dữ liệu bị mất hết!
Vấn đề là chúng đã thay đổi model nhưng không thêm version. Để nâng cấp database chúng ta cần model nguồn và model đích, điều này giúp cho Core Data biết data ở phiên bản trước và phiên bản này khác nhau ở điểm nào để tự động quá trình migration.
2.12. Thêm Model Version
Để thêm model version, chúng ta chọn file DataMigration.xcdatamodeld, vào menu Editor > Add Model Version … mặc định tên sẽ là DataMigration 2.xcdatamodel
Nhưng trước hết chúng ta hãy xoá trường note trong model và file Product.m, Product.h, chạy và nhập lại 1 số dữ liệu. Sau đó Add Model Version và lặp lại các thao các thêm trường note.
Thử chạy lại 1 lần nữa, các sản phẩm của bạn còn nguyên. Chúc mừng!
Bạn có thể update các file trong project để hỗ trợ thêm trường Note...
3. Kết luận
Như vậy, với Data Migration, bạn sẽ không cần phải lo ngại việc thêm tính năng sẽ làm thay đổi cấu trúc database và làm mất dữ liệu người dùng.
Cảm ơn đã theo dõi.
Bạn có thể download source code tại đây.
Để viết bài này tôi sử dụng Pomodoro Technique và đã tiết kiệm được 2h.
All rights reserved
