Context in ReactJS Applications
Bài đăng này đã không được cập nhật trong 7 năm
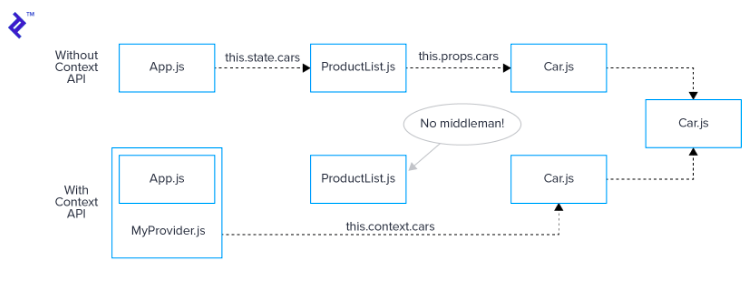
React Context API được sử dụng thử nghiệm ở một số phiên bản gần đây, và an toàn nhất bạn nên sử dụng từ phiên bản 16.3.0 trở đi. Bài viết dưới đây sẽ trình bày 2 ví dụ cơ bản về web, một web sử dụng Context API và một web thì không. API này giải quyết một vấn đề lớn với prop drilling. Có thể bạn chưa từng gặp nó, hoặc có thể bạn đã gặp rồi nhưng không biết. Prop drilling là một tiến trình lấy dữ liệu từ component A gửi đến component Z bằng cách chuyển nó qua nhiều component trung gian của React. Component sẽ nhận props một cách gián tiếp và bạn sẽ phải chắc chắn rằng mọi thứ hoạt động tốt.
Hãy cùng tìm hiểu cách bạn sẽ xử lý các vấn đề phổ biến mà không cần dùng React Context API.
App.js
class App extends Component {
    state = {
        cars: {
            car001: { name: 'Honda', price: 100 },
            car002: { name: 'BMW', price: 150 },
            car003: { name: 'Mercedes', price: 200 }
        }
    };
    incrementCarPrice = this.incrementCarPrice.bind(this);
    decrementCarPrice = this.decrementCarPrice.bind(this);

    incrementCarPrice(selectedID) {
        // a simple method that manipulates the state
        const cars = Object.assign({}, this.state.cars);
        cars[selectedID].price = cars[selectedID].price + 1;
        this.setState({
            cars
        });
    }

    decrementCarPrice(selectedID) {
        // a simple method that manipulates the state
        const cars = Object.assign({}, this.state.cars);
        cars[selectedID].price = cars[selectedID].price - 1;
        this.setState({
            cars
        });
    }

    render() {
        return (
            <div className="App">
                <header className="App-header">
                    <img src={logo} className="App-logo" alt="logo" />
                    <h1 className="App-title">Welcome to my web store</h1>
                </header>
                {/* Pass props twice */}
                <ProductList
                    cars={this.state.cars}
                    incrementCarPrice={this.incrementCarPrice}
                    decrementCarPrice={this.decrementCarPrice}
                />
            </div>
        );
    }
}
ProductList .js
const ProductList = props => (
    <div className="product-list">
        <h2>Product list:</h2>
        {/* Pass props twice */}
        <Cars
            cars={props.cars}
            incrementCarPrice={props.incrementCarPrice}
            decrementCarPrice={props.decrementCarPrice}
        />
        {/* Other potential product categories which we will skip for this demo: */}
        {/* <Electronics /> */}
        {/* <Clothes /> */}
        {/* <Shoes /> */}
    </div>
);

export default ProductList;
Cars.js
const Cars = props => (
    <Fragment>
        <h4>Cars:</h4>
        {/* Finally we can use data */}
        {Object.keys(props.cars).map(carID => (
            <Car
                key={carID}
                name={props.cars[carID].name}
                price={props.cars[carID].price}
                incrementPrice={() => props.incrementCarPrice(carID)}
                decrementPrice={() => props.decrementCarPrice(carID)}
            />
        ))}
    </Fragment>
);
Đây không phải là cách tốt để xử lý dữ liệu của bạn, nhưng tôi hy vọng nó sẽ chứng minh cho bạn thấy tại sao prop drilling sucks. Vậy làm sao để Context API có thể làm được điều này?
1. Giới thiệu về Context Web Store
Hãy refactor lại ứng dụng và chứng minh nó có thể làm được điều này. Chỉ trong một số thay đổi nhỏ, Context API cho phép bạn tạo ra một trung tâm lưu trữ - store, nơi mà nó cho phép dữ liệu sống sót. Store này có thể được thêm trực tiếp vào bất cứ component nào.
 Việc refactor là khá dễ dàng, chúng ta không có bất kỳ thay đổi để cấu trúc lại component. Chúng ta cần tạo ra một số component mới, một provider và một comsumer
Khởi tạo Context
Đầu tiên, chúng ta cần tạo context, nơi mà chúng ta có thể sử dụng để tạo Providers và consumers.
MyContext.js
import React from 'react';

// this is the equivalent to the createStore method of Redux
// https://redux.js.org/api/createstore

const MyContext = React.createContext();

export default MyContext;
Tạo Provider
Khi việc trên hoàn thành, chúng ta có thể import context và sử dụng nó để tạo các provider, ở đây tôi gọi provider là MyProvider. Trong nó, chúng ta khở tạo một state với một số giá trị, bạn có thể chia sẻ state này thông qua giá trị prop của provider component. trong ví dụ này, chúng ta chia sẻ this.state.cars cùng với một vài phương thức. Những phương thức này giống như reducers trong Redux
MyProvider.js
import MyContext from './MyContext';

class MyProvider extends Component {
    state = {
        cars: {
            car001: { name: 'Honda', price: 100 },
            car002: { name: 'BMW', price: 150 },
            car003: { name: 'Mercedes', price: 200 }
        }
    };

    render() {
        return (
            <MyContext.Provider
                value={{
                    cars: this.state.cars,
                    incrementPrice: selectedID => {
                        const cars = Object.assign({}, this.state.cars);
                        cars[selectedID].price = cars[selectedID].price + 1;
                        this.setState({
                            cars
                        });
                    },
                    decrementPrice: selectedID => {
                        const cars = Object.assign({}, this.state.cars);
                        cars[selectedID].price = cars[selectedID].price - 1;
                        this.setState({
                            cars
                        });
                    }
                }}
            >
                {this.props.children}
            </MyContext.Provider>
        );
    }
}
Để các component khác có thể truy cập với provider, chúng ta cần wrap ứng dụng với nó. Khi chúng ta đạt được điều đó, chúng ta có thể thoát trạng thái và các phương thức, bởi vì bây giờ chúng được định nghĩa trong file MyProvider.js
App.js
class App extends Component {
    render() {
        return (
            <MyProvider>
                <div className="App">
                    <header className="App-header">
                        <img src={logo} className="App-logo" alt="logo" />
                        <h1 className="App-title">Welcome to my web store</h1>
                    </header>
                    <ProductList />
                </div>
            </MyProvider>
        );
    }
}
Tạo Consumer
Chúng ta sẽ cần import context lại và wrap các component với nó, để injects context trong component. Sau đó bạn sẽ có thể sử dụng context, nó cũng giống với cách bạn sử dụng props. Nó nắm giữ tất cả giá trị chúng ta chia sẻ trong MyProvider, chúng ta chỉ cần sử dụng nó.
Cars.js
const Cars = () => (
    <MyContext.Consumer>
        {context => (
            <Fragment>
                <h4>Cars:</h4>
                {Object.keys(context.cars).map(carID => (
                    <Car
                        key={carID}
                        name={context.cars[carID].name}
                        price={context.cars[carID].price}
                        incrementPrice={() => context.incrementPrice(carID)}
                        decrementPrice={() => context.decrementPrice(carID)}
                    />
                ))}
            </Fragment>
        )}
    </MyContext.Consumer>
);
Chúng ta đã bỏ quên những gì? ProductList - là nơi đem lại nhiều hữu ích. Chúng ta không truyền bất kì dữ liệu hoặc phương thức nào. Component hết sức đơn giản, bởi vì nó chỉ cần để render ra một số component ProductList.js
const ProductList = () => (
    <div className="product-list">
        <h2>Product list:</h2>
        <Cars />
        {/* Other potential product categories which we will skip for this demo: */}
        {/* <Electronics /> */}
        {/* <Clothes /> */}
        {/* <Shoes /> */}
    </div>
);
Xuyên suốt bài viết này, tôi đã có một số so sánh giữa Redux và Context API. Một trong những ưu điểm lớn nhất của Redux là trong ứng dụng của bạn có thể tạo ra một trung tâm lưu trữ nơi bạn có thể truy cập từ bất kỳ component nào. Còn đối với Context API, bạn có 1 function mặc định. Nhiều người cho rằng tương lai Context API sẽ có ưu thế hơn Redux. Điều này có thể đúng với những người chỉ dùng Redux như là một trung tâm lưu trữ. Nếu bạn chỉ sử dụng tính năng này với Redux thì bạn có thể thay thế nó bằng Context API để tránh prop drilling và phải sử dụng thư viện của bên thứ ba.
2. Kết luận
Hi vọng bài viết này sẽ giúp các bạn hiểu thêm về Context API. Cảm ơn các bạn đã theo dõi. Trong bài viết có tham khảo tại https://www.toptal.com/react/react-context-api
All rights reserved
