ConstraintLayout trong Android
Bài đăng này đã không được cập nhật trong 8 năm
1. ConstrainLayout là gì?
Là 1 ViewGroup của với những đặc tính giống như cái tên của của nó, Constrain - Hạn Chế

thể hiện ở các View nằm bên trong ViewGroup này, chúng luôn có kết nối chặt chẽ với nhau

hay nói cách khác là View này sẽ phải phụ thuộc View kia để có thể xác định được 4 thuộc tính cơ bản:
- X
- Y
- Width
- Height
2. Tại sao lại nên dùng ConstrainLayout?
Layout này có thể thay thế được hầu hết các Layout cũ và có thêm nhiêu tính năng mới khác để giúp tạo giao diện 1 cách đơn giản hơn, nhanh hơn.
3. Làm thế nào sử dụng ConstrainLayout?
- Điều kiện đầu tiên để sử dụng:
- Android Studio version 2.2 hoặc cao hơn.
- Android min sdk 2.3
- Sau khi đã đủ điều kiện thì bạn chỉ cần thêm Maven và Library vào build.gradle file:
repositories {
    maven {
        url 'https://maven.google.com'
    }
}
dependencies {
    compile 'com.android.support.constraint:constraint-layout:1.0.2'
}
- Kế tiếp mình sẽ giới thệu bạn các phần hay được sử dụng trong ViewGroup này:
Relative positioning
Như mình có nói ở trên các View trong ConstrainLayout kết nối rất chặt chẽ với nhau và Android đã dùng 1 từ khoá trên để nói tới các thuộc tính mang đặc tính này:
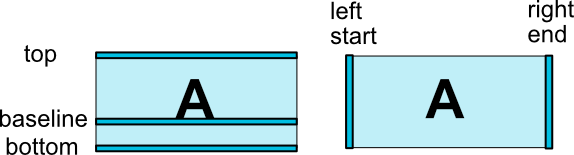
Nhìn hình trên các bạn có thể thấy được mấu nối(top, bottom, left, right, baseline) các View với nhau:
<Button android:id="@+id/buttonA" ... />
         <Button android:id="@+id/buttonB" ...
                 app:layout_constraintLeft_toRightOf="@+id/buttonA" />
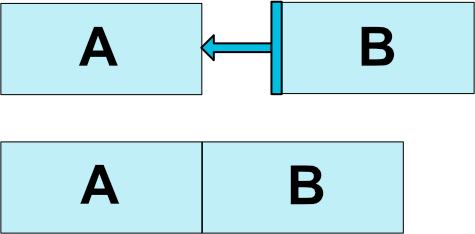
Ví dụ ở đây thể hiện Button B bám từ bên trái của nó vào bên phải của Button A.
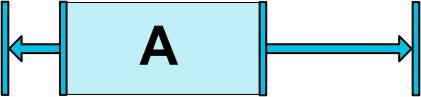
Bias
Nhằm mục đích để xác định vị trí bằng tỉ lệ theo Width hoặc Height của ViewGroup bọc View đó tương ứng với 2 thuộc tính:
- layout_constraintHorizontal_bias
- layout_constraintVertical_bias
<android.support.constraint.ConstraintLayout ...>
             <Button android:id="@+id/button" ...
                 app:layout_constraintHorizontal_bias="0.3"
                 app:layout_constraintLeft_toLeftOf="parent"
                 app:layout_constraintRight_toRightOf="parent/>
         </>
Với giá trị 0.3 của thuộc tính layout_constraintHorizontal_bias sẽ đại diện cho khoảng trống từ bên trái Button -> tới parent(ViewGroup)
Widgets dimension constraints
Ở phần này tập trung nói về giá trí của 2 thuộc tính:
- layout_width
- layout_height của View, thông thường thì chỉ có 2 giá trị WRAP_CONTENT, MATCH_PARENT, nhưng khi các View nằm trong ConstrainLayout thì sẽ có thêm 1 giá trị mới đó là MATCH_CONSTRAINT tương đương với 0dp. Vậy tại sao lại có thêm 1 giá trị mới trong Layout này, chúng ta hãy thử so sánh 2 giá trị MATCH_PARENT và MATCH_CONSTRAINT ở ví dụ sau:
<android.support.constraint.ConstraintLayout ...>
         <Button
            android:id="@+id/buttonA"
            android:layout_width="0dp"
            android:layout_height="wrap_content"
            android:background="@android:color/holo_red_light"
            app:layout_constraintBottom_toBottomOf="parent"
            app:layout_constraintLeft_toLeftOf="parent"
            app:layout_constraintTop_toTopOf="parent"
            app:layout_constraintRight_toLeftOf="@id/buttonB" />

        <Button
            android:id="@+id/buttonB"
            android:layout_width="wrap_content"
            android:layout_height="wrap_content"
            android:background="@android:color/holo_blue_bright"
            app:layout_constraintBottom_toBottomOf="parent"
            app:layout_constraintEnd_toEndOf="parent"
            app:layout_constraintStart_toEndOf="@+id/buttonA"
            app:layout_constraintTop_toTopOf="parent" />
     </>
Vẫn với đoạn code trên nhưng mình sẽ thay đổi thuộc tính layout_weight="match_parent":
4. Ví dụ chứng minh những điều mục 2
Với 1 chút tính năng ở trên mình sẽ làm 1 ví dụ để so sánh giữ cách làm bằng với Layout cũ và ConstrainLayout:
<?xml version="1.0" encoding="utf-8"?>
<android.support.constraint.ConstraintLayout
    xmlns:android="http://schemas.android.com/apk/res/android"
    xmlns:app="http://schemas.android.com/apk/res-auto"
    android:layout_width="match_parent"
    android:layout_height="match_parent">

    <View
        android:id="@+id/view"
        android:layout_width="1dp"
        android:layout_height="0dp"
        android:background="@android:color/holo_blue_light"
        app:layout_constraintBottom_toBottomOf="parent"
        app:layout_constraintHorizontal_bias="0.2"
        app:layout_constraintLeft_toLeftOf="parent"
        app:layout_constraintRight_toRightOf="parent"
        app:layout_constraintTop_toTopOf="parent" />

    <Button
        android:id="@+id/view2"
        android:layout_width="30dp"
        android:layout_height="30dp"
        android:background="@android:color/holo_red_light"
        app:layout_constraintBottom_toBottomOf="@+id/view"
        app:layout_constraintLeft_toLeftOf="@+id/view"
        app:layout_constraintRight_toRightOf="@+id/view"
        app:layout_constraintTop_toTopOf="@+id/view" />

    <Button
        android:id="@+id/view3"
        android:layout_width="30dp"
        android:layout_height="30dp"
        android:background="@android:color/holo_green_light"
        app:layout_constraintBottom_toBottomOf="@+id/view"
        app:layout_constraintLeft_toLeftOf="@+id/view"
        app:layout_constraintRight_toRightOf="parent"
        app:layout_constraintTop_toTopOf="@+id/view" />

    <Button
        android:id="@+id/view4"
        android:layout_width="30dp"
        android:layout_height="30dp"
        android:background="@android:color/holo_green_light"
        app:layout_constraintBottom_toTopOf="@+id/view3"
        app:layout_constraintEnd_toEndOf="parent"
        app:layout_constraintStart_toEndOf="@+id/view"
        app:layout_constraintTop_toTopOf="parent" />

    <Button
        android:layout_width="30dp"
        android:layout_height="30dp"
        android:background="@android:color/holo_green_light"
        app:layout_constraintTop_toBottomOf="@+id/view3"
        app:layout_constraintEnd_toEndOf="parent"
        app:layout_constraintStart_toEndOf="@+id/view"
        app:layout_constraintBottom_toBottomOf="parent" />

</android.support.constraint.ConstraintLayout>
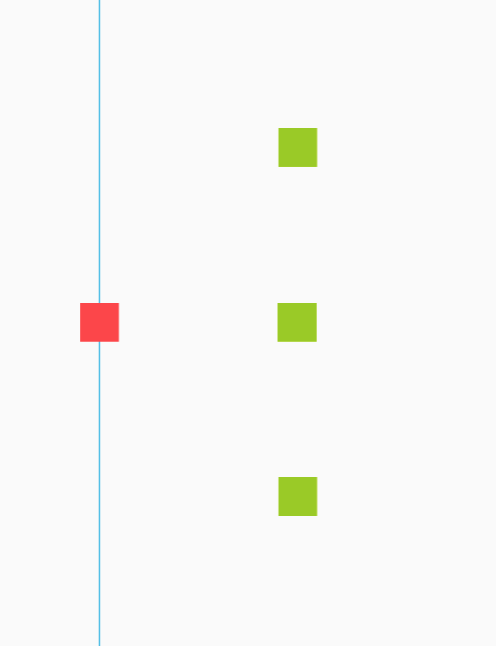
Giao diện này mình làm bằng kéo thả đã làm nên rất nhanh và dễ dàng. Các bạn thử làm giao diện này với các Layout cũ và thử xem nhé 
5. Phần kết
Vậy là mình đã giới thiệu xong về ConstrainLayout.
Cảm ơn bạn đã dành thời gian để đọc bài viết này.
All rights reserved
