Chrome Extension: Xây dựng một Trading BOT cơ bản
Bài đăng này đã không được cập nhật trong 2 năm
Tiếp tục đá sang chút Blockchain, trong bài viết này chúng ta sẽ cùng tìm hiểu làm thế nào để tạo ra một con Trading Bot cơ bản. Mục đích chúng ta có thể tạo ra một con bot có thể theo dõi các biến động của giao dịch và tự động thực hiện giao dịch mua vào, bán ra theo công thức nhằm sinh lời.
Trading bot của chúng ta cần hoạt động tốt trên nền tảng thật vậy nên trước khi thực hiện điều đó chúng ta sẽ kiểm tra toàn bộ trên môi trường ảo trước. Ví dụ: Sàn giao dịch điện tử ảo: https://bitcoinhero.me. Chúng tôi lựa chọn sử dụng trang này làm ví dụ nó không yêu cầu đăng nhập hay đăng kí để sử dụng.
Tổng quan Chrome Extension
Trước khi bắt đầu, chúng ta sẽ tìm hiểu nhanh các thức hoạt động của chrome extension. Dưới đây là các thành phần chính của Chrome Google:
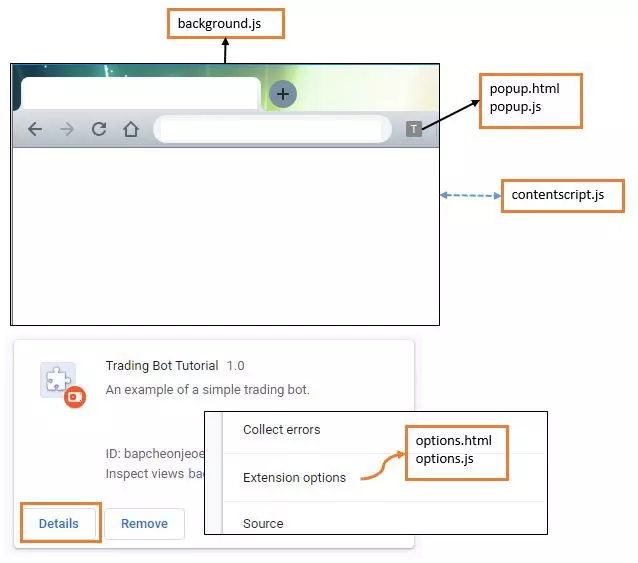
Bao gồm 5 files:
- manifest.json — là phần liệt kê các mô tả và các nguồn tài nguyên bắt buộc để chạy ứng dụng extension của chúng ta.
- background.js — là phần chạy nền khi ứng dụng của chúng ta được tải lên
- popup.html / popup.js — là phần sẽ hiển thị ra giao diện cho chúng ta tương tác với ứng dụng.
- options.html / options.js — là phần cấu hình tiện ích mở rộng có thể truy cập từ menu tùy chọn của extension.
- contentscript.js — là scripts sẽ được chạy trên trang đích. Chúng ta có thể dễ dàng theo dõi và tùy chỉnh các hoạt động của mình.
Công nghệ cho Trading Bot
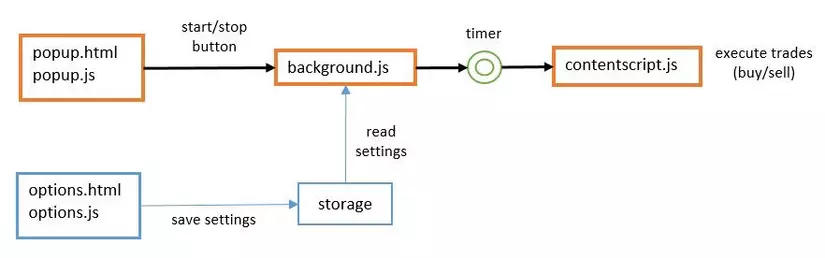
Dưới đây là sơ đồ quy trình xử lý đơn giản cho Trading Bot của chúng ta. Ngay sau đây chúng ta sẽ bắt tay vào xây dựng ứng dụng extension.
Tạo Extension
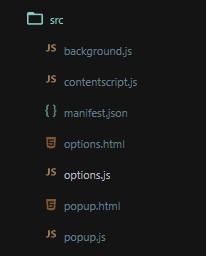
- Tạo các thư mục cho extension sau đó tạo các files là thành phần chính như sau:
- Chỉnh sửa file
manifest.jsonvới nội dung sau:
{
  "name": "Trading Bot",
  "version": "1.0",
  "description": "An example of a simple trading bot.",
  "permissions": ["activeTab", "declarativeContent", "storage"],
  "background": {
      "scripts": ["background.js"],
      "persistent": true
  },
  "page_action": {
      "default_popup": "popup.html"
  },
  "options_page": "options.html",
  "manifest_version": 2
}
- Chỉnh sửa file
background.jsvà thay thế với nội dung bên dưới. Điều này cho phép extension chỉ hoạt động khi truy cập bitcoinhero.me
/* Event: Runs when extension is installed */
chrome.runtime.onInstalled.addListener(function() {

  // Set which URL the extension can run on
  chrome.declarativeContent.onPageChanged.removeRules(undefined, function() {
    chrome.declarativeContent.onPageChanged.addRules([{
      conditions: [
        new chrome.declarativeContent.PageStateMatcher({
            pageUrl: { hostEquals: 'bitcoinhero.me' }
        }),
      ],
      actions: [new chrome.declarativeContent.ShowPageAction()]
    }]);
  });
});
- Mở 2 file
popup.htmlvàpopup.js, thay thế với nội dung sau:
popup.html
<!-- popup.html -->

<!DOCTYPE html>
  <html>
    <head>
      <style>
      body {
        width: 500px;
      }
      button {
        padding: 5px 10px 5px 10px;
        margin: 5px;
      }
      #status-label {
        margin-bottom: 20px;
      }
      </style>
    </head>
    <body>
      <div>
        <span id="status-label">Click start to begin</span>
      </div>
      <div>
          <button id="start-button">Start</button>
          <button id="stop-button">Stop</button>
      </div>
      <script src="popup.js"></script>
    </body>
  </html>
popup.js
let btnStart = document.getElementById('start-button');
let btnStop = document.getElementById('stop-button');
let lblStatus = document.getElementById('status-label');

btnStart.onclick = function(element) {
  lblStatus.innerHTML = "Started";
}

btnStop.onclick = function(element) {
  lblStatus.innerHTML = "Stopped";
}
Như vậy chúng ta đã có thể tải ứng dụng lên và chạy thử dưới chế độ Developer Mode.
Cài đặt Trading Bot
- Mở trang Extensions trong Google Chrome bằng cách truy cập thanh điều hướng với địa chỉ
chrome://extensions/. - Bật chế độ Developer Mode và lựa chọn Load unpacked sau đó chọn đường dẫn tới extension để tải ứng dụng lên.
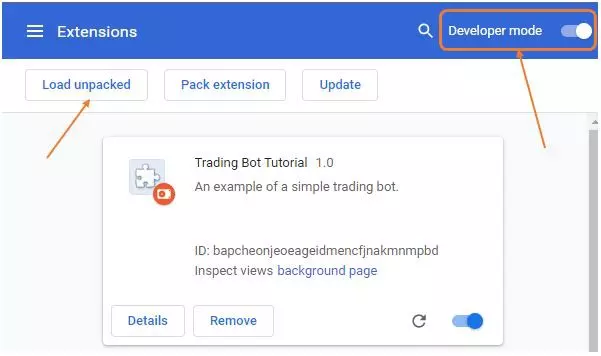
- Extension của chúng ta đã được cài đặt! Truy cập sàn giao dịch https://bitcoinhero.me và chúng ta sẽ thấy biểu tượng tiện ích mở rộng được bật bên cạnh thanh địa chỉ.
 4. Nhấp vào biểu tượng trên thanh tiện ích để mở trang
 popup.html mà chúng ta đã chuẩn bị trước đó. Sử dụng các nút Start và Stop để xem thay đổi nhãn trạng thái.
Thêm chức năng cho Trading Bot
Ứng dụng extension của chúng ta đã hoạt động và bây giờ chúng ta cùng xây dựng chức năng cho Trading Bot.
- Chỉnh sửa
popup.jsvới nội dung sau:
let btnStart = document.getElementById('start-button');
let btnStop = document.getElementById('stop-button');
let lblStatus = document.getElementById('status-label');

btnStart.onclick = function(element) {
  lblStatus.innerHTML = "Started";
  chrome.runtime.sendMessage({action: "start"}, function(response) {});
}

btnStop.onclick = function(element) {
  lblStatus.innerHTML = "Stopped";
  chrome.runtime.sendMessage({action: "stop"}, function(response) {});
}
- Chỉnh sửa
background.jsvà thay thế tất cả nội dung của nó bằng mã sau đây. Lưu ý ở đây, chúng ta sẽ thâm một bộ đếm thời gian kích hoạt cứ sau 5 giây để thực thicontentscript.jstrên trang web đích (ở đây là bitcoinhero).
/* Event: Runs when extension is installed */
chrome.runtime.onInstalled.addListener(function() {

  // Set which URL the extension can run on
  chrome.declarativeContent.onPageChanged.removeRules(undefined, function() {
    chrome.declarativeContent.onPageChanged.addRules([{
      conditions: [
        new chrome.declarativeContent.PageStateMatcher({
            pageUrl: { hostEquals: 'bitcoinhero.me' }
        }),
      ],
      actions: [new chrome.declarativeContent.ShowPageAction()]
    }]);
  });
});

let timer;
let timerInterval = 5 * 1000;  //seconds
let inPosition = false;

/* Event: Runs when background receives a message */
chrome.runtime.onMessage.addListener(
  function(request, sender, sendResponse) {

    // Execute action
    if (request.action == "start") {
      startAutomation();
    }
    else if (request.action == "stop") {
      stopAutomation();
    }

    // Send response back to caller (popup.js)
    // Note: This is required even when we're not sending anything back.
    sendResponse();
  }
);

function startAutomation() {
  timer = setInterval(onTimerElapsed, timerInterval);
}

function stopAutomation() {
  clearInterval(timer);
}

function onTimerElapsed() {

  let pageAction = '';
  if (inPosition == false) {
    pageAction = 'open-position';
  }
  else {
    pageAction = 'close-position';
  }

  chrome.tabs.query({active: true}, function(tabs) {
    // Call executeScript first time to declare the page_action variable on content page
    // This is also used to pass parameters that can be used by contentscript.js
    chrome.tabs.executeScript(tabs[0].id, { code: 'var page_action="' + pageAction + '";' },
      function() {

        // Call executeScript second time to run our contentscript.js file
        chrome.tabs.executeScript(tabs[0].id, {file: 'contentscript.js'});

        // Update our inPosition variable
        inPosition = !inPosition;
      }
    );
  });
}
- Chỉnh sửa tệp recordscript.js và thêm đoạn code sau:
console.log("Executing action: " + page_action);

if (page_action == "open-position") {
    if (canEnterPosition()) {
        // Open position by clicking the buy button
        document.getElementsByClassName("btn-trade-up")[0].click();
    }
}

if (page_action == "close-position") {
    if (canExitPosition()) {
        // Close position by clicking the sell button
        document.getElementsByClassName("btn-trade-stop")[0].click();

        // Close the trade summary popup
        setTimeout(function() {
            document.getElementsByClassName("resultpop")[0].click();
            document.getElementsByClassName("losepop")[0].click();
        }, 1000);
    }
}

function canEnterPosition() {
    // Algorithm/Trading strategy code goes here to determine if it is time to buy.
    return true;
}

function canExitPosition() {
    // Algorithm/Trading strategy code goes here to determine if it is time to sell.
    return true;
}
Nội dung sẽ là những kịch bản đã được xây dựng và đưa ra quyết định ở thời điểm này nên thực thi mua vào canEnterPosition hay bán ra canExitPosition hay không.
- Như vậy ứng dụng đã hoàn chỉnh. Làm mới phần mở rộng và tải lại trang web giao dịch. Nhấp vào nút bắt đầu thực hiện chạy Trading bot và chờ một vài giây để nó thực hiện giao dịch. Hãy trải nghiệm xem nó hoạt động như thế nào nhé.
Tạo thời gian giao dịch
Tiếp theo, chúng ta sẽ tạo ra một trang tùy chỉnh thời gian thực hiện giao dịch bằng cách thay đổi nội dung fle options.html và options.js như sau:
options.html
<!DOCTYPE html>
<html>
<head>
</head>
<body>
  <div>
    Trade Interval: <input id="interval-textbox">
  </div>
  <div>
    <button id="save-button">Save</button>
  </div>
</body>
<script src="options.js"></script>
</html>
options.js
let btnSave = document.getElementById('save-button');

chrome.storage.sync.get(null, function(data) {
    document.getElementById('interval-textbox').value = data.interval;
  });

btnSave.onclick = function(element) {
    let intervalValue = document.getElementById('interval-textbox').value;

    chrome.storage.sync.set({ interval: intervalValue },
      function() {
        console.log("Settings saved.");
      }
    );
}
Đoạn mã trên sẽ được gọi đến chrome.storage.sync để truy cập vào bộ nhớ trình duyệt của chúng ta để lưu giá trị khoảng thời gian của chúng ta trong bộ nhớ chrome.storage.sync.set. Mỗi lần trang options.html được gọi, chúng ta sẽ tự điền lại giá trị cho Trade Interval input là khoảng thời gian với cài đặt đã lưu trước đó - đây là nơi chúng ta truy xuất cài đặt từ bộ lưu trữ chrome.storage.sync.get.
Bây giờ, chúng ta đã lưu các thiết lập các tùy chỉnh của chúng ta trong bộ lưu trữ. Và đó sẽ là background.js của chúng tôi vì khoảng thời gian hẹn giờ của chúng tôi được khởi tạo ở đó.
Thay thế nội dung background.js một lần cuối cùng bằng đoạn code hoàn chỉnh sau:
/* Event: Runs when extension is installed */
chrome.runtime.onInstalled.addListener(function() {

  // Set which URL the extension can run on
  chrome.declarativeContent.onPageChanged.removeRules(undefined, function() {
    chrome.declarativeContent.onPageChanged.addRules([{
      conditions: [
        new chrome.declarativeContent.PageStateMatcher({
            pageUrl: { hostEquals: 'bitcoinhero.me' }
        }),
      ],
      actions: [new chrome.declarativeContent.ShowPageAction()]
    }]);
  });

  // Init default settings into storage
  chrome.storage.sync.set({ interval: 5000 }, null);

});

let timer;
let timerInterval = 5 * 1000;  //seconds
let inPosition = false;

/* Event: Runs when background receives a message */
chrome.runtime.onMessage.addListener(
  function(request, sender, sendResponse) {

    // Get latest settings from storage
    chrome.storage.sync.get(null, function(data) {
      timerInterval = parseInt(data.interval);
    });

    // Execute action
    if (request.action == "start") {
      startAutomation();
    }
    else if (request.action == "stop") {
      stopAutomation();
    }

    // Send response back to caller (popup.js)
    // Note: This is required even when we're not sending anything back.
    sendResponse();
  }
);

function startAutomation() {
  timer = setInterval(onTimerElapsed, timerInterval);
}

function stopAutomation() {
  clearInterval(timer);
}

function onTimerElapsed() {

  let pageAction = '';
  if (inPosition == false) {
    pageAction = 'open-position';
  }
  else {
    pageAction = 'close-position';
  }

  chrome.tabs.query({active: true}, function(tabs) {
    // Call executeScript first time to declare the page_action variable on content page
    // This is also used to pass parameters that can be used by contentscript.js
    chrome.tabs.executeScript(tabs[0].id, { code: 'var page_action="' + pageAction + '";' },
      function() {

        // Call executeScript second time to run our contentscript.js file
        chrome.tabs.executeScript(tabs[0].id, {file: 'contentscript.js'});

        // Update our inPosition variable
        inPosition = !inPosition;
      }
    );
  });

}
Bổ sung
Thay đổi icon
Để thay đổi được icon mặc định hiện tại, chúng ta có thể sử dụng đoạn code sau:
"page_action": {
    "default_popup": "popup.html",
    "default_icon": {
      "16": "images/icon16.png",
      "32": "images/icon32.png",
      "48": "images/icon48.png",
      "128": "images/icon128.png"
    }
},
"icons": {
  "16": "images/icon16.png",
  "32": "images/icon32.png",
  "48": "images/icon48.png",
  "128": "images/icon128.png"
},
Kết luận
Kết thúc ở đây, chúng ta đã xây dựng một ứng dụng Chrome Extension cơ bản hoàn chỉnh. Hy vọng, phần hướng dẫn của tôi có thể giúp các bạn hiểu được làm như thế nào để xây dựng được một ứng dụng Chrome Extension có thể tự động hoàn thành một tác vụ nhất định. Mọi đóng góp sẽ làm bài viết và ứng dụng của chúng ta trở nên hoàn ảo hơn. Mục đích có thể xây dựng được một con Bot hoàn chỉnh hơn vào những lần sau. Cảm ơn bạn đã đọc bài viết này.
All rights reserved
