Chrome Extension: Communicating between Popup and Content Script
Bài đăng này đã không được cập nhật trong 6 năm
1. Introduction
In the previous post Chrome Extension: Getting Started, I have introduced what chrome extension is and how to write a small but very useful chrome extension. In this post, we're gonna up our game a little bit by writing a more complex chrome extension. The final extension will look like this:
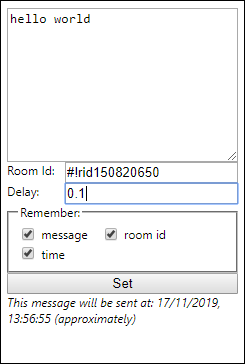
This extension will help us to automatically send a certain message to a certain room of the Chatwork website. The full source code can be found here: https://github.com/nguyenyou0812/auto-send-message
2. Key concepts
2.1. chrome.browserAction
Use browser actions to put icons in the main Google Chrome toolbar, to the right of the address bar. In addition to its icon, a browser action can have a tooltip, a badge, and a popup.
If a browser action has a popup, the popup appears when the user clicks the icon. The popup can contain any HTML contents that you like, and it's automatically sized to fit its contents.
To add a popup to your browser action, create an HTML file with the popup's contents. Specify the HTML file in the default_popup field of browser_action in the manifest, or call the browserAction.setPopup method.
2.2. Content Scripts
Content scripts are files that run in the context of web pages. By using the standard Document Object Model (DOM), they are able to read details of the web pages the browser visits, make changes to them and pass information to their parent extension.
Content scripts can access Chrome APIs used by their parent extension by exchanging messages with the extension. They can also access the URL of an extension's file with chrome.runtime.getURL() and use the result the same as other URLs.
2.3. Chrome.tabs
Use the chrome.tabs API to interact with the browser's tab system. You can use this API to create, modify, and rearrange tabs in the browser.
u can use most chrome.tabs methods and events without declaring any permissions in the extension's manifest file. However, if you require access to the url, pendingUrl, title, or favIconUrl properties of tabs.Tab, you must declare the "tabs" permission in the manifest
3. Implementation
Creating a folder named AuSeMe and adding the following files. After that, loading this extension in chrome extension developer mode.
AuSeMe
│--manifest.json
│--contentScript.js
│--popup.html
│--popup.js
manifest.json
{
  "manifest_version": 2,
  "name": "Auto Send Message",
  "version": "2.0",
  "content_scripts": [
    {
      "matches": ["https://www.chatwork.com/*"],
      "js": ["contentScript.js"]
    }
  ],
  "permissions": ["tabs", "storage"],
  "browser_action": {
    "default_popup": "popup.html",
    "default_title": "Auto send message popup"
  }
}
popup.html
<html>
  <head>
    <style>
      .clearfix::after {
        content: "";
        clear: both;
        display: table;
      }
      .f-right {
        float: right
      }
      .checkboxes label {
        display: inline-block;
        padding-right: 10px;
        white-space: nowrap;
      }
      .checkboxes input {
        vertical-align: middle;
      }
      .checkboxes label span {
        vertical-align: middle;
      }
    </style>
  </head>
  <body>
    <textarea id="chatText" cols="30" rows="10" placeholder="chat message"></textarea>
    <div class="clearfix">
      Room Id: <input class="f-right" id="roomId" placeholder="chat room id" title="e.g. #!rid000000000"/>
    </div>
    <div class="clearfix">
      Delay: <input class="f-right" id="delayTime" title="default value: 0" placeholder="delay time (minutes)">
    </div>
    <div>
      <fieldset style="margin-right: 0; margin-left: 0">
        <legend>Remember:</legend>
        <div class="checkboxes">
          <label for="rememberText"><input type="checkbox" id="rememberText" /> <span>message</span></label>
          <label for="rememberId"><input type="checkbox" id="rememberId" /> <span>room id</span></label>
          <label for="rememberTime"><input type="checkbox" id="rememberTime" /> <span>time</span></label>
        </div>
      </fieldset>
    </div>
    <button style="width: 100%" id="btnSet">Set</button>
    <div style="font-style:italic" id="calTime"></div>
    <script src="popup.js" type="text/javascript"></script>
  </body>
</html>
popup.js
let chatText = document.getElementById('chatText')
let delayTime = document.getElementById('delayTime')
let roomId = document.getElementById('roomId')
let button = document.getElementById('btnSet')
let chboxText = document.getElementById('rememberText')
let chboxId = document.getElementById('rememberId')
let chboxTime = document.getElementById('rememberTime')

delayTime.addEventListener('input', updateValue);
button.addEventListener('click', setAction)

chrome.storage.sync.get(['rid','txt','tme','cid','ctxt','ctme'], function(obj) {
  roomId.value = obj.rid ? obj.rid : ''
  chatText.value = obj.txt ? obj.txt : ''
  delayTime.value = obj.tme ? obj.tme : ''
  chboxId.checked = obj.cid
  chboxText.checked = obj.ctxt
  chboxTime.checked = obj.ctme
});

function addMinutes(date, minutes) {
  return new Date(date.getTime() + minutes*60000);
}

function updateValue(e) {
  const tme = parseFloat(e.target.value)
  let end = addMinutes(new Date(), tme)
  calTime.innerHTML = `This message will be sent at: ${end.toLocaleString('en-GB')} (approximately)`
}

function setAction() {
  let txt = chatText.value.trim()
  let tme = parseFloat(delayTime.value.trim())
  let rid = roomId.value.trim()

  if(txt.length > 255) {
    txt = txt.substring(0, 256)
  }
  if (isNaN(tme)) {
    tme = 0
    delayTime.value = tme
  }
  const regex = /^\#\!rid[0-9]{8,9}$/
  if (!regex.test(rid)) {
    alert('Invalid Room Id')
    return
  }

  const payload = {
    rid: chboxId.checked ? rid : null,
    txt: chboxText.checked ? txt: null,
    tme: chboxTime.checked ? tme: null,
    cid: chboxId.checked ? true : false,
    ctxt: chboxText.checked ? true : false,
    ctme: chboxTime.checked ? true: false
  }
  chrome.storage.sync.set(payload);

  let end = addMinutes(new Date(), tme)
  calTime.innerHTML = `This message will be sent at: ${end.toLocaleString('en-GB')} (approximately)`
  chrome.tabs.query({active: true, currentWindow: true}, function(tabs) {
    if(!tabs[0].url.includes('https://www.chatwork.com')) {
      alert('please go to https://www.chatwork.com')
      return
    }
    const payload = {
      txt, tme, rid
    }
    chrome.tabs.sendMessage(tabs[0].id, payload);
  });
}
contentScript.js
function simulateChat (content) {
  let input = document.getElementById('_chatText')
  if (input) {
    let nativeInputValueSetter = Object.getOwnPropertyDescriptor(window.HTMLTextAreaElement.prototype, "value").set;
    nativeInputValueSetter.call(input, content);
    let ev = new Event('input', { bubbles: true});
    input.dispatchEvent(ev);
    let button = document.getElementsByClassName('sc-kasBVs chatInput__submit dOfbLu')[0]
    setTimeout(() => {
      button.click()
    }, 500)
  }
}

function autoChat (minute, content, rid) {
  const time = minute * 60 * 1000
  setTimeout(() => {
    if (rid) {
      window.location.href = `https://www.chatwork.com/${rid}`
    }
    setTimeout(() => {
      simulateChat(content)
    }, rid ? 500 : 0)
  }, time)
}

chrome.runtime.onMessage.addListener(gotMessage)
function gotMessage (message, sender, sendResponse) {
  autoChat(message.tme, message.txt, message.rid)
}
4. Conclusion
In this post, I just showed you how to communicate between the popup and the content script by using Message Passing technique. Hopefully, this small tutorial will give you some ideas about how to connect the available chrome extension components and also inspire you to write many more big, power chrome extensions.
All rights reserved
