Chatbot tutorial with Rails - Part 2
Bài đăng này đã không được cập nhật trong 4 năm
Ở bài post trước, Chatbot tutorial with Rails - Part 1, mình đã giới thiệu các cài đặt cơ bản model cho ứng dụng như phone, television, laptop. Tiếp theo phần này, mình sẽ hướng dẫn tạo giao diện chat giữa người dùng và con bot, cài đặt các mối quan hệ trong model và hiển thị tin nhắn ra màn hình.
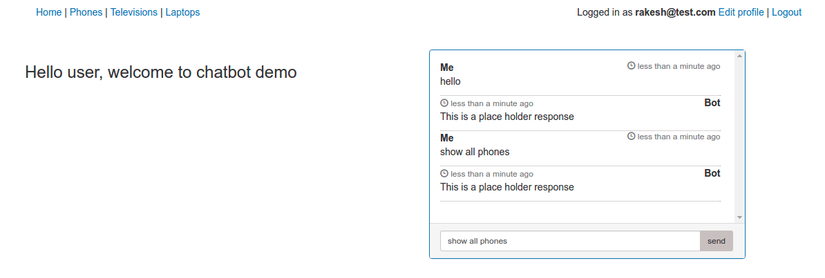
Cuối bài post, chúng ta sẽ có màn hình giao diện như sau:
 Đầu tiên chúng ta cần lưu trữ cuộc hội thoại giữa người dùng và con chatbot trong cơ sở dữ liệu. Vì vậy ta tiến hành tạo một model có tên là "bot_action.rb".
Vì người dùng sẽ gửi nhiều yêu cầu cho con chatbot và chúng ta muốn con bot xử lý từng hành động một dựa trên dữ liệu mà người dùng nhập vào, do đó chúng ta sẽ tạo mối quan hệ "has_many" giua 2 model, một user có nhiều hành động và mỗi hành động chỉ thuộc về một user.
Đầu tiên chúng ta cần lưu trữ cuộc hội thoại giữa người dùng và con chatbot trong cơ sở dữ liệu. Vì vậy ta tiến hành tạo một model có tên là "bot_action.rb".
Vì người dùng sẽ gửi nhiều yêu cầu cho con chatbot và chúng ta muốn con bot xử lý từng hành động một dựa trên dữ liệu mà người dùng nhập vào, do đó chúng ta sẽ tạo mối quan hệ "has_many" giua 2 model, một user có nhiều hành động và mỗi hành động chỉ thuộc về một user.
$rails generate model bot_action user_input:string bot_response:string user:references
$rake db:migrate
Sau khi tiến hành tạo file model, chúng ta sẽ tiến hành validate dữ liệu mà người dùng nhập vào:
#path: app/models/bot_action.rb
class BotAction < ApplicationRecord
  belongs_to :user
  validates_presence_of :user_input, message: "can't be empty"
  validates_length_of :user_input, minimum: 2, maximum: 200, message: "accepts only 2 - 200 characters"
end
Và ở model User, chúng ta thêm quan hệ has_many với model BotAction
#path: app/models/user.rb
class User < ApplicationRecord
  # Include default devise modules. Others available are:
  # :confirmable, :lockable, :timeoutable and :omniauthable
  devise :database_authenticatable, :registerable,
         :recoverable, :rememberable, :trackable, :validatable
  has_many :bot_actions
end
OK, bây giờ chúng ta sẽ tiến hành tạo một BotActions controller có hàm process_user_input để xử lý yêu cầu mà người dùng nhập vào.
$rails generate controller bot_actions process_user_input
Sau đó chúng ta chỉnh sửa type của request trong file config/routes từ get thành post
#path: config/routes.rb
Rails.application.routes.draw do
  post 'bot_actions/process_user_input'

  resources :phones
  resources :televisions
  resources :laptops
  devise_for :users
  # For details on the DSL available within this file, see http://guides.rubyonrails.org/routing.html
  root to: 'home#index'
end
Lúc này, chúng ta cần một cửa sổ chat hiển thị ở mỗi trang, để người dùng có thể gửi yêu cầu ở bất cứ trang nào họ truy cập đến. Để làm điều đó, chúng ta cần tạo một hàm "new_bot_action" ở application controller.
#path: app/controllers/application_controller.rb
class ApplicationController < ActionController::Base
  protect_from_forgery with: :exception
  before_action :new_bot_action

def new_bot_action
    if current_user.present?
      @bot_action = BotAction.new
      @bot_chat = current_user.bot_actions.last(2)
    end
  end
end
Sử dụng callback before_action để đảm bảo rằng đối tượng của BotAction luôn được build đầu tiên, trước khi ứng dụng bắt đầu. Chúng ta có 2 biến instance là @bot_action để khởi tạo một action mới cho con bot và @bot_chat lưu trữ đoạn hội thoại gần đây nhất giữa người dùng và con bot để hiển thị lên màn hình. Bây giờ, ở view, chúng ta cần tạo một cửa sổ chat để hiển thị đoạn hội thoại giữa người dùng, và một form để người dùng có thể nhập vào yêu cầu. Các bạn có thể tham khảo đoạn view dưới đây, ở đây mình tạo một partial ‘chatbot.html.haml’ trong thư mục views/layouts:
//path: app/views/layouts/_chat_bot.html.haml
.container
  .row
    .col-md-5
      .panel.panel-primary
        .panel-body
          %ul.chat
            - bot_chat.each do |chat|
              .chat-body.clearfix
                .header
                  %strong.primary-font Me
                  %small.pull-right.text-muted
                    %span.glyphicon.glyphicon-time
                    #{time_ago_in_words(chat.created_at)} ago
                %p= chat.user_input
              .chat-body.clearfix
                .header
                  %small.text-muted
                    %span.glyphicon.glyphicon-time
                    #{time_ago_in_words(chat.updated_at)} ago
                  %strong.pull-right.primary-font Bot
                %p= chat.bot_response
        .panel-footer
          = form_for bot_action, url: bot_actions_process_user_input_path, remote: true do |f|
            .input-group
              = f.text_field :user_input, autocomplete: 'off', class: 'form-control input-sm', id: 'btn-input', placeholder: 'Type your message here...'
              %span.input-group-btn
                = f.submit 'send', class: 'btn btn-sm', id: 'btn-chat'
Thêm vào một ít CSS cần thiết cho UI trong file chat_bot.scss
// path: app/assets/stylesheets/chat_bot.scss
.btn {
    background-color: #C8C1C1
}
.chat {
    list-style: none;
    margin: 0;
    padding: 0;
}

.chat li {
    margin-bottom: 10px;
    padding-bottom: 5px;
}
.chat-body {
    border-bottom: 1px dotted #B3A9A9;
}

.chat li.left .chat-body {
    margin-left: 60px;
}

.chat li.right .chat-body {
    margin-right: 60px;
}


.chat li .chat-body p {
    margin: 0;
    color: #777777;
}

.panel .chat {
    margin-right: 5px;
}

.panel-body {
    overflow-y: scroll;
    height: 250px;
}
Sau đó require file chat_bot.scss vào file application.css.scss
# path: app/assets/stylesheets/application.scss
/*
*= require chat_bot
*/
/* "bootstrap-sprockets" must be imported before "bootstrap" and "bootstrap/variables" */
@import "bootstrap-sprockets";
@import "bootstrap";
Hiện tại chúng ta đã có khung chat, việc tiếp theo chúng ta sẽ thêm partial đó vào file application.html.haml để khung chat có thể hiển thị ở mọi trang mà người dùng truy cập đến.
// path: app/views/layouts/application.html.haml
.
.
  .container
    .row
      .col-xs-6
        = yield
      .col-xs-0
        - if current_user.present?
          = render 'layouts/chat_bot', bot_action: @bot_action, bot_chat: @bot_chat
Chúng ta sẽ truyền các biến instance @bot_actiion và @botchat vào trong partial ứng với bot_action và bot_chat. Bằng cách này, chúng ta có thể truy cập dữ liệu ở các biến trong partial. Thêm điều kiện chỉ hiển thị khung chat khi người dùng đã login. Khởi động lại rails server và kiểm tra, khung chat sẽ hiển thị ở bên phải màn hình của mỗi trang.
All rights reserved
