


🚀 Chapter 3 — Scale: Biến CI/CD thành Internal Developer Platform
Bối cảnh: ShopNow đã phát triển từ vài developer lên hàng chục developer, application từ một service thành nhiều microservices. CI/CD đã tự động hóa deployment, nhưng mỗi team bắt đầu tự viết và copy pipeline của mình.
Mục tiêu: Thiết kế một CI/CD platform có thể tái sử dụng, chuẩn hóa cách Build → Test → Package → Deploy mà không bắt developer phải tự xây pipeline từ đầu.
1. Automation đã giải quyết được vấn đề gì?
Ở Chapter 2, chúng ta đã có:
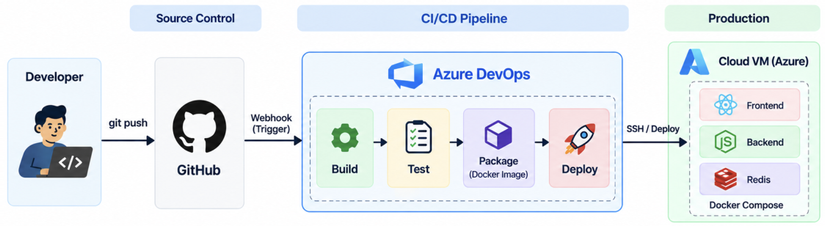
Điều này tốt hơn rất nhiều so với:
ssh
git pull
docker build
docker compose up
Nhưng công ty tiếp tục phát triển.
2. Từ 1 application đến 50 microservices
Ban đầu:
shopnow/
└── pipeline.yml
Sau đó:
shopnow/
├── frontend
├── checkout
├── cart
├── payment
├── product
├── recommendation
├── shipping
├── email
└── ...
Giả sử công ty có:
20 teams
100 microservices
Nếu mỗi team tự viết pipeline:
Service A → pipeline-a.yml
Service B → pipeline-b.yml
Service C → pipeline-c.yml
...
Service Z → pipeline-z.yml
sẽ nhanh chóng xuất hiện vấn đề.
3. Copy-paste YAML là một cái bẫy
Giả sử mọi service đều có:
steps:
  - Build
  - Test
  - Docker Build
  - Security Scan
  - Push
  - Deploy
Developer A copy pipeline:
pipeline-a.yml
Developer B copy:
pipeline-b.yml
Sau vài tháng:
pipeline-a → version 1
pipeline-b → version 2
pipeline-c → version 1
pipeline-d → version 3
Một thay đổi security mới xuất hiện.
Ví dụ:
"Tất cả Docker image phải được scan trước khi release."
Platform team phải sửa:
100 pipelines
Đây là maintenance nightmare.
4. Vấn đề thực sự là gì?
Không còn là:
"Làm sao chạy CI/CD?"
Mà là:
"Làm sao đảm bảo 100 service đều có một CI/CD process nhất quán?"
Đây là lúc chúng ta cần:
Reusable Pipeline + Standardization + Self-service
Hay nói cách khác:
Internal Developer Platform
5. Kiến trúc Platform mới
Thay vì:
Developer
   │
   ▼
Tự viết Pipeline
ta chuyển thành:
                    Platform Team
                         │
                         ▼
              ┌────────────────────┐
              │  CI/CD Templates   │
              │                    │
              │ Build              │
              │ Test               │
              │ Docker             │
              │ Security Scan      │
              │ Deploy             │
              └─────────┬──────────┘
                        │
             ┌──────────┼──────────┐
             ▼          ▼          ▼
          Team A      Team B      Team C
             │          │          │
             ▼          ▼          ▼
          Service A   Service B   Service C
Platform team xây paved road.
Developer chỉ cần đi trên con đường đã được chuẩn hóa.
6. "Paved Road" là gì?
Hãy tưởng tượng developer cần tạo một service mới.
Thay vì phải tự suy nghĩ:
Docker build thế nào?
Test thế nào?
Scan thế nào?
Push image thế nào?
Deploy thế nào?
Platform cung cấp sẵn:
Create Service
      │
      ▼
Choose Template
      │
      ▼
Node.js / Java / Go
      │
      ▼
Standard Pipeline
      │
      ▼
    Ready
Developer chỉ cần cung cấp:
service:
  name: checkout

runtime:
  language: node

deployment:
  environment: production
Platform xử lý phần còn lại.
7. Các bước thực thi
① Xác định phần nào nên Reuse
Không phải mọi thứ đều cần template.
Hãy tìm những phần lặp lại.
Ví dụ 100 service đều có:
Checkout
  ↓
Install
  ↓
Build
  ↓
Test
  ↓
Docker Build
  ↓
Scan
Ta có thể chuẩn hóa:
                 CI Template
                     │
       ┌─────────────┼─────────────┐
       ▼             ▼             ▼
    Install         Test     Docker Build
Trong khi những thứ đặc thù application vẫn để team tự định nghĩa.
Ví dụ:
Standard:
    Build
    Test
    Docker
    Scan

Custom:
    Integration Test
    Database Migration
    Special Deployment
Đây là một nguyên tắc quan trọng:
Standardize the common, customize the exceptional.
② Tạo Repository cho Platform
Thay vì để template nằm rải rác:
service-a/
service-b/
service-c/
chúng ta tạo repository riêng:
platform-pipelines/
│
├── templates/
│   ├── node-ci.yml
│   ├── java-ci.yml
│   ├── docker-build.yml
│   ├── security-scan.yml
│   └── deploy.yml
│
├── stages/
│   ├── ci.yml
│   └── cd.yml
│
└── README.md
Architecture:
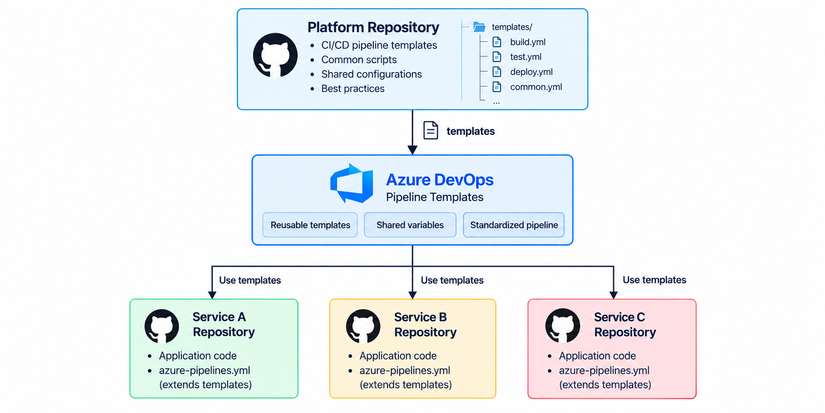
Đây là bước chuyển từ:
Pipeline as Code
sang:
Pipeline Platform
③ Service chỉ cần gọi Template
Service không cần copy toàn bộ pipeline.
Ví dụ:
extends:
  template: templates/node-ci.yml
  parameters:
    serviceName: checkout
Hoặc conceptually:
Service Repository
       │
       │ uses
       ▼
Platform Template
       │
       ├── Build
       ├── Test
       ├── Docker
       └── Scan
Developer chỉ cần biết:
"Tôi sử dụng standard pipeline nào?"
thay vì:
"Tôi phải viết 300 dòng YAML như thế nào?"
Một pipeline chuẩn
Platform team định nghĩa standard pipeline:
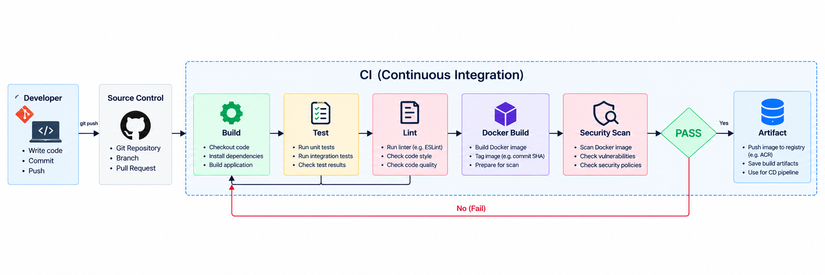
Mọi service đều đi qua flow này.
Ví dụ:
Service A ──┐
Service B ──┤
Service C ──┼──► Standard CI
Service D ──┤
Service E ──┘
Nhưng Platform không có nghĩa là ép mọi thứ giống nhau
Đây là lỗi thường gặp khi thiết kế Internal Platform.
Ví dụ:
Frontend
Backend
Worker
Batch Job
ML Service
không nhất thiết có cùng deployment process.
Có thể chia thành:
Platform
│
├── Node.js Template
├── Java Template
├── Go Template
├── Docker Template
└── Generic Template
Mỗi template có một contract rõ ràng.
Ví dụ:
Node Template
    Input:
      source
      testCommand

    Output:
      Docker Image
Platform cung cấp abstraction.
Developer không cần biết implementation bên trong.
④ Versioning Template
Đây là một vấn đề rất quan trọng.
Giả sử hôm nay platform có:
node-ci@v1
100 service đang sử dụng.
Platform team thay đổi template.
Nếu thay đổi trực tiếp:
v1 → modified
100 service có thể bị ảnh hưởng.
Vì vậy template cần version:
node-ci@v1
node-ci@v2
node-ci@v3
Ví dụ:
Service A → v1
Service B → v1
Service C → v2
Sau đó platform team có thể migration từng service.
Platform có API
Hãy nhìn template như một API.
Ví dụ:
Pipeline Template
có:
Input
    │
    ├── language
    ├── serviceName
    ├── testCommand
    └── deployTarget
và tạo ra:
Output
    │
    ├── Build Result
    ├── Test Result
    └── Docker Image
Do đó:
Pipeline template cũng cần contract và versioning giống một software library.
Đây là một tư duy Platform Engineer rất quan trọng.
⑤ Chuẩn hóa Artifact
Bây giờ 100 service đều build Docker image.
Nếu mỗi team đặt tên một kiểu:
checkout:v1
payment:latest
cart:release
frontend:prod
sẽ rất khó quản lý.
Platform đưa ra convention:
<registry>/<team>/<service>:<version>
Ví dụ:
registry.shopnow.io/
    ecommerce/
        checkout:a81f32c
Hoặc:
registry.shopnow.io/ecommerce/checkout:2026.09.04
Điểm quan trọng:
Source
   │
   ▼
Git Commit
   │
   ▼
Docker Image
   │
   ▼
Deployment
Phải trace được toàn bộ lifecycle.
⑥ Chuẩn hóa Pipeline Output
Platform không chỉ chuẩn hóa input.
Nó cũng cần chuẩn hóa output.
Ví dụ mỗi pipeline phải trả về:
Build Status
Test Status
Image Tag
Git Commit
Security Result
Deployment Version
Khi đó platform team có thể biết:
checkout
   │
   ├── commit: a81f32c
   ├── image: checkout:a81f32c
   ├── test: PASS
   ├── scan: PASS
   └── deployment: staging
Đây là nền tảng cho observability của delivery process.
⑦ Tách CI khỏi Environment
Một sai lầm phổ biến:
Build
   ↓
Deploy Production
Platform tốt hơn sẽ nghĩ theo environment:
                Artifact
                   │
                   ▼
                  Dev
                   │
                   ▼
               Staging
                   │
                   ▼
              Production
Điểm quan trọng:
Build một lần, promote nhiều lần.
Không nên:
Build Dev Image
Build Staging Image
Build Production Image
vì như vậy có thể tạo ra các artifact khác nhau.
Thay vào đó:
Source
  │
  ▼
Build ONCE
  │
  ▼
Image v1.5
  │
  ├────► Dev
  │
  ├────► Staging
  │
  └────► Production
Cùng một artifact đi xuyên suốt các environment.
⑧ Environment Configuration
Application cần những config khác nhau:
Dev
 ├── Database: dev-db
 └── API: dev-api

Staging
 ├── Database: staging-db
 └── API: staging-api

Production
 ├── Database: prod-db
 └── API: prod-api
Nhưng Docker image phải giống nhau:
checkout:a81f32c
Architecture:
                  Same Artifact
                       │
          ┌────────────┼────────────┐
          ▼            ▼            ▼
         Dev        Staging       Prod
          │            │            │
       Config A      Config B      Config C
Đây là separation giữa:
Application Artifact
        ≠
Environment Configuration
⑨ Pipeline Security
Khi platform trở thành hệ thống trung tâm, security trở nên rất quan trọng.
Không phải pipeline nào cũng nên có quyền:
Deploy Production
Delete Artifact
Modify Infrastructure
Access Database
Ta bắt đầu phân quyền:
Developer
   │
   ├── Run CI
   └── Deploy Dev
Release Manager
   │
   └── Approve Production
Platform Team
   │
   ├── Manage Templates
   └── Manage Connections
Nguyên tắc:
Least Privilege
Mỗi pipeline chỉ có quyền cần thiết.
8. Platform Team và Application Team
Bây giờ tổ chức cũng bắt đầu thay đổi.
                    Engineering
                         │
          ┌──────────────┴──────────────┐
          │                             │
          ▼                             ▼
 Application Teams               Platform Team
          │                             │
          │                             ├── CI/CD
          │                             ├── Templates
          │                             ├── Infrastructure
          │                             ├── Security
          │                             │
          └─────── use platform ────────┘
Application team tập trung:
Business Logic
Features
Application
Tests
Platform team tập trung:
Developer Experience
Automation
Infrastructure
Security
Delivery Platform
Đây là bước đầu tiên để hình thành Platform Engineering.
9. Nhưng Platform cũng có một cái bẫy
Platform team rất dễ biến thành:
"Team chuyên bắt developer phải làm theo platform."
Đó không phải Platform Engineering tốt.
Một platform tốt phải làm developer:
Before:

Developer
   │
   ├── Learn CI/CD
   ├── Write YAML
   ├── Manage Credentials
   ├── Configure Docker
   ├── Configure Scan
   └── Configure Deploy
After:

Developer
   │
   ▼
git push
   │
   ▼
Standard Platform
Platform phải giảm cognitive load cho developer.
11. Platform nên đo bằng gì?
Không chỉ đo:
Pipeline chạy thành công bao nhiêu %
Mà cần hỏi:
① Developer mất bao lâu để tạo service mới?
Before: 2 days
After: 30 minutes
② Developer mất bao lâu để có pipeline?
Before: 1 day
After: 5 minutes
③ Bao nhiêu service sử dụng standard pipeline?
20%
50%
90%
④ Bao nhiêu deployment cần manual intervention?
High → Bad
Low  → Better
Platform cuối cùng phục vụ Developer Experience.
12. Architecture cuối Chapter 3
Sau Chapter 3:
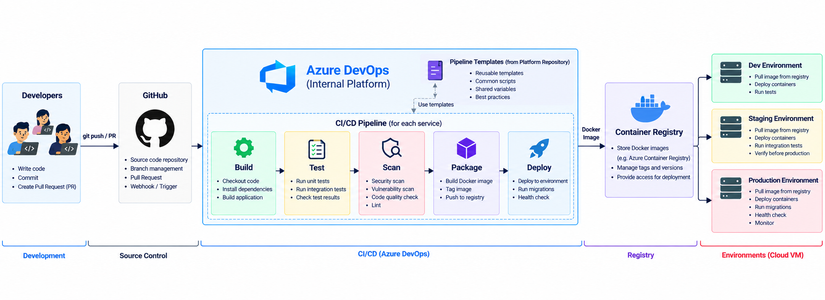
Một platform duy nhất phục vụ nhiều team:
                 CI/CD Platform
                      │
       ┌──────────────┼──────────────┐
       ▼              ▼              ▼
   Team A          Team B          Team C
       │              │              │
   Service 1       Service 10      Service 50
   Service 2       Service 11      Service 51
13. Senior Thinking
Ở Chapter này, đừng nghĩ:
"Tôi cần học Azure DevOps Template."
Hãy nghĩ:
"Tôi đang xây một platform để 100 developer có thể deploy 100 service mà không cần 100 DevOps engineer."
Đó mới là vấn đề.
Một Platform Engineer cần suy nghĩ theo 6 tầng:
1. Standardization
       ↓
2. Reusability
       ↓
3. Self-Service
       ↓
4. Security
       ↓
5. Governance
       ↓
6. Developer Experience
14. Senior Question
① Cái gì nên được Standardize?
Build
Test
Docker
Security
Deployment
② Cái gì nên được Customize?
Business-specific test
Special deployment
Special runtime
③ Template thay đổi thì xử lý thế nào?
Versioning
Backward Compatibility
Migration
④ Platform có quyền gì?
Least Privilege
Service Connections
Secrets
RBAC
⑤ Developer có thực sự muốn dùng Platform không?
Nếu:
Platform = khó hơn tự làm
thì platform thất bại.
Nếu:
Platform = con đường dễ nhất để deploy
thì platform thành công.
Key Takeaways
Many Services
     ↓
Many Pipelines
     ↓
Copy/Paste
     ↓
Inconsistency
     ↓
Platform
     ↓
Reusable Templates
     ↓
Standardization
     ↓
Self-Service
Chapter 3 không đơn thuần là học Azure DevOps YAML Templates.
Mục tiêu là hiểu một nguyên tắc lớn hơn:
Khi organization scale, DevOps cũng phải scale bằng Platform chứ không phải bằng cách tăng số lượng DevOps Engineer.
Nhưng Platform bây giờ đang build ra hàng trăm Docker Image.
Chúng ta cần một nơi để:
Store
Scan
Sign
Version
Control Access
Retain
Promote
các image đó.
Và lúc này câu hỏi tiếp theo xuất hiện:
"Docker Image của toàn công ty nên được lưu và quản lý ở đâu?"
Đó là lý do chúng ta bước sang:
Chapter 4 — Production: Harbor, Security & Release Governance
Từ đây, câu chuyện không còn chỉ là "deploy được".
Mà bắt đầu chuyển sang:
"Làm sao đảm bảo artifact được tin cậy, có thể audit và chỉ được phép đi vào Production khi đáp ứng các policy?"
All rights reserved