Cấu hình menu cho trang web bằng EzyPlatform và sử dụng nhiều ngôn ngữ cho trang web
Bài đăng này đã không được cập nhật trong 2 năm
Cấu hình menu cho trang web bằng EzyPlatform
B1: tạo class Service gọi tới WebMenuItemService và WebMenuRepository để thực hiện lấy dữ liệu menu từ phía Admin tạo ra với các thông tin sau
    private final WebMenuItemService menuItemService;
    private final WebMenuRepository menuRepository;

    public List<MenuItemModel> getMaiMenuItems() {
        //tìm kiếm menu bằng tên
        Menu menu = menuRepository.findByField("name", "main");
        return menuItemService.getMenuItemsByMenuId(
                menu.getId()
        );
    }
B2: sau khi đã thực hiện khởi tạo class Service phía Controller sẽ tiến hành gửi thông tin lưu vào View để gửi dữ liệu tới giao diện
trong HomeController thêm thuộc tính vào View.builder():
.addVariable (
"mainMenuItems",
[tên Class Service vừa tạo].getMainMenuItems()
)
ví dụ:
@Controller
@AllArgsConstructor
public class HomeController {

    private final WebBlogMenuItemService blogMenuItemService;

    @DoGet("/")
    public View home() {
        return View.builder()
            .template("home")
            .addVariable(
                "mainMenuItems",
                blogMenuItemService.getMaiMenuItems()
            )
            .addVariable(VIEW_VARIABLE_PAGE_TITLE, "home")
            .build();
    }
}
B3: sau khi hoàn tất thao tác phía giao diện sử dụng thymleaf để lặp qua các menuItems
<li th:each="mainMenuItem : ${mainMenuItems}" >
    [[${mainMenuItem.linkText}]]
</li>
- Trong MenuItemModel có chứa các thuộc tính sau:
    private long id;
    private String linkText;
    private String linkType;
    private String customLink;
    private long linkId;
    private int level;
    private long orderValue;
    private long parentId;
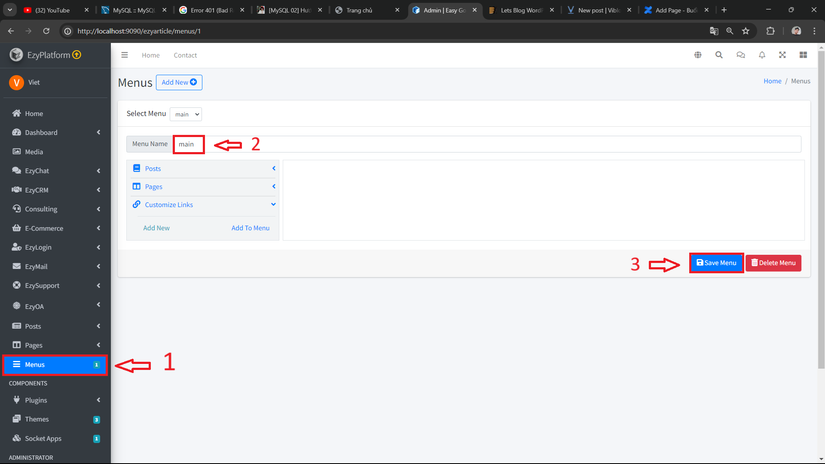
B4: sau khi đã hoàn thành các bước trên, chúng ta chạy server admin và khởi tạo menu:
- b1: chọn menu
- b2: đặt tên menu
- b3: lưu lại thông tin menu
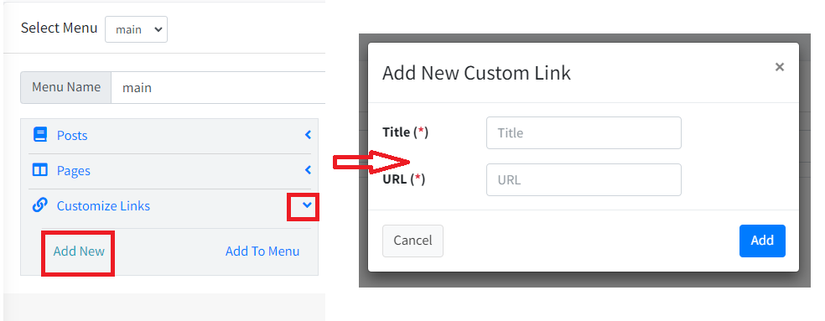
sau khi tạo xong chúng ta sẽ thêm các thông tin cho menu
- chọn Customize Links
- chọn add new và điền các thông tin như tên và URL
khi thêm thông tin xong, phía customize Links sẽ xuất hiện thông tin menu đã thêm, chúng ta chọn và thêm vào menu
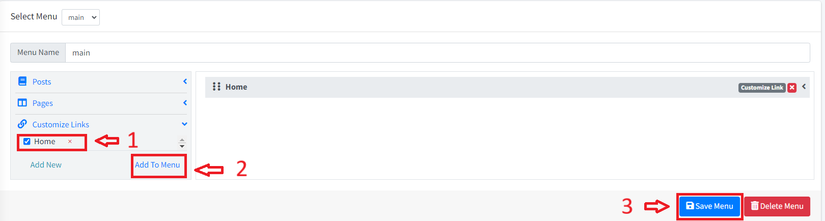
khi đã hoàn thành tất cả các thao tác trên, chúng ta sẽ chạy lại chương trình và kiểm tra, thông tin menu sẽ xuất hiện

**Cấu hình web đa ngôn ngữ với ezyPlatform **
B1: trong folder [project_name]_theme\src\main\java\view
- tạo Class
Web[name]ViewDecorator extends tới WebViewDecoratorví dụ:
@EzySingleton
public class WebBlogViewDecorator extends WebViewDecorator {}
B2: trong folder [project_name]_theme\src\main\resources\mesages\Resource Bundle ‘messages’
tạo file message[ngôn ngữ].properties và điền các thông tin ngôn ngữ cần chuyển đổi, vd:
trong message_vi.properties: chứa các thông tin như
home= Trang chủ
posts= Danh sách bài viết
contact_me = Thông tin liên hệ
about_me = Giới thiệu
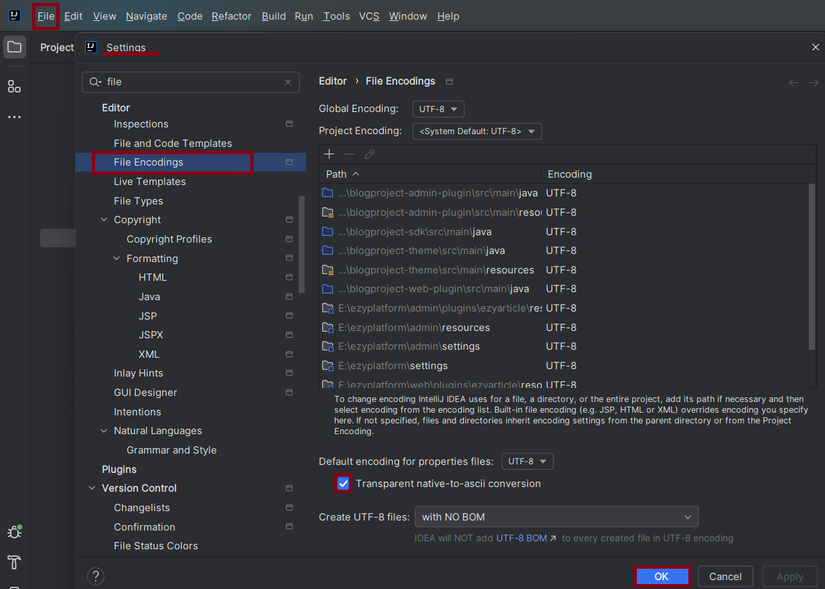
B3: sửa lỗi hiển thị tiếng việt:
chọn file -> setting -> tìm kiếm file encoding -> tích chọn Transparent native-to-ascii conversion
All rights reserved
