Cấu hình eslint airbnb, prettier cho dự next.js sử dụng typescript
Bài đăng này đã không được cập nhật trong 5 năm
Chào mọi, mình đã quay lại đây. Hôm nay mình sẽ đem đến một chủ đề linter cụ thể cấu hình eslint cho dự án next. Không lòng vòng mình vô thẳng chủ đề chính luôn nhé ^^ Giới thiệu một chút, chắc hẳn nhiều người cũng đã biết qua về eslint hoặc đã sử dụng chúng thường xuyên. Thì mình xin tóm tắt gọn một chút, linter được biết như là công cụ giúp chúng ta xác định được format code, những vấn đề về convention trong dự án, đặt biệt hữu dựng với dự án có nhiều người tham gia. Chúng giúp chúng ta code phải tuân thủ theo rules mà dự án đã định nghĩa. Đồng thời cảnh báo, ngăn chặn phân tích đưa ra hướng giải quyết cho bạn, có thể tự sửa code, thậm chí có thể ngăn chặn bạn đẩy code lên trên repo dự án nếu không tuân thủ convention của dự án. Ok giờ thì mình vào thực hiện luôn nhé.
Bước chuẩn bị:
- Ở đây mình sử dụng editor VS code
- Down các package cần thiết: ESLint, Prettier, Prettier Formatter, EditorConfig for VS Code, vscode-styled-components (nếu bạn có dùng styled-components trong dự án của mình)
- Các gói thư viện chính sự dụng: Eslint, prettier, airbnb, husky, stylelint
Triển thôi:
-
Để cài thư viện Eslint và Prettier vào dự án. Chúng ta sẽ bật terminal và thư mục trỏ vị trí thư mục gốc (chứa file package.json), chạy câu lệnh:
npm install -D eslint prettierđối với npm hoặcyarn add -D eslint prettierđối với yarn. -
Tiếp đến cài Airbnb. Ở phiên bản hiện tại npm ^ 5+, chúng ta chỉ cần chạy câu lệnh ngắn gọn
npx install-peerdeps --dev eslint-config-airbnbđể cài đặt cấu hình các dependencies của nó. Nếu bạn còn ở phiên bản npm thấp hơn mà không muốn nâng cấp lên thì cũng có thể tham khảo cách cài đặt ở đây -
Tiếp theo chúng ta cần cài
eslint-config-prettier(tắt các rule không cần thiết hoặc không cần thiết hoặc conflict với Prettier)eslint-plugin-prettier( cho phép ESlint hiển thị ra lỗi format, tích hợp prettier rules với eslint rules). Chạy lệnh: npm-npm install -D eslint-config-prettier eslint-plugin-prettierhoặcyarn add -D eslint-config-prettier eslint-plugin-prettier -
Bây giờ tạo file .eslintrc.js trong thực mục gốc
module.exports = {
  extends: [
      'airbnb',
      'prettier',
      'plugin:@typescript-eslint/recommended',
      'airbnb/hooks'
  ],
  plugins: ['prettier', 'import'],
  rules: {
    'prettier/prettier': ['error'],
    'import/no-unresolved': 'error', // turn on errors for missing imports
    'react/jsx-filename-extension': [0, { extensions: ['.tsx'] }],
    'react/react-in-jsx-scope': 'off',
    'react/jsx-props-no-spreading': [
      0,
      { html: 'ignore', custom: 'ignore', explicitSpread: 'ignore' },
    ],
    'no-use-before-define': 0,
    '@typescript-eslint/no-use-before-define': 2,
    'import/order': [
      2,
      {
        groups: [
          'builtin',
          'external',
          'internal',
          'parent',
          'sibling',
          'index',
        ],
        'newlines-between': 'always',
      },
    ],
    'import/newline-after-import': 1,
  },
  parserOptions: {
    project: './tsconfig.eslint.json',
  },
  settings: {
    'import/parsers': {
      '@typescript-eslint/parser': ['.ts', '.tsx'],
    },
    'import/resolver': {
      typescript: {
        project: './tsconfig.eslint.json',
      },
    },
  },
};
- Chúng ta cũng có thể custom một số rule theo ý ở
rulescòn lại thì airbnb đã config sẵn khá đầy đủ và sịn sò. Tham khảo thêm rules tại đây
- Tạo file
tsconfig.eslint.json
{
  "extends": "./tsconfig.json",
  "include": ["src/**/*.ts", "src/**/*.js", "test/**/*.ts", ".eslintrc.js", "**/*.ts", "**/*.tsx"]
}
- Tạo file
.prettierrc.jstrong thư mục gốc. File này sẽ là nơi bạn cài đặt cấu hình formating của mình.
module.exports = {
  // Change your rules accordingly to your coding style preferences.
  // https://prettier.io/docs/en/options.html
  semi: true,
  trailingComma: 'all',
  singleQuote: true,
  printWidth: 80,
  tabWidth: 2,
  useTabs: false,
}
- Cài đặt prettier:
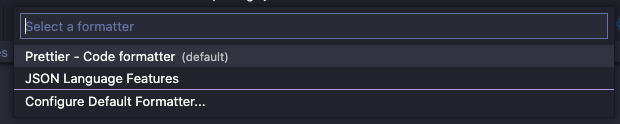
- Sau khi đã cài đặt Prettier Extention trên VS Code. Chúng ta cần cài bộ format mặc định là Prettier - Code Formatter
- Gõ
F1sau đó nhập>Format Document With...vào chọnConfigure Default Formatterrồi đếnPrettier - Code Formatter
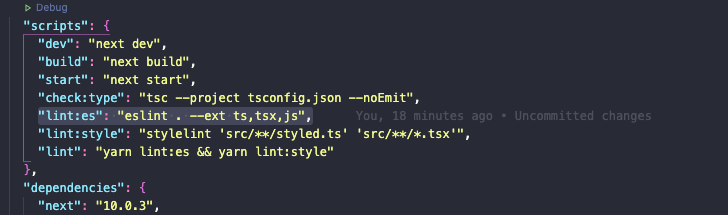
Ok. Sau khi cài xong Eslint và Prettier bạn cần phải thêm một đoạn "lint:es": "eslint . --ext ts,tsx,js", vào "scripts" trong package.json
- Setting cho VS code
- Để tạo tự động lưu khi
Savevà format cáceslint rulesmà prettier không tự động format, và nó cũng lưu các cài đặt vs code cho những người dùng khác khi work với project đó. - Tạo file
settings.jsonbên trong thư mục.vscodeđặt ở thư mục gốc.
{
  "editor.formatOnSave": true,
  "editor.codeActionsOnSave": {
    "source.fixAll.eslint": true
  },
  "files.insertFinalNewline": true
}
- Cài đặt Stylelint:
- Chúng ta cần tạo một file
.stylelintrc.jsontrong folder gốc, để lưu cấu hình rules của chúng. Với nội dung:
{
  "processors": ["stylelint-processor-styled-components"],
  "plugins": ["stylelint-a11y"],
  "rules": {
    "a11y/media-prefers-reduced-motion": true,
    "a11y/no-outline-none": true,
    "a11y/selector-pseudo-class-focus": true,
    "a11y/content-property-no-static-value": [true, { "severity": "warning" }],
    "a11y/font-size-is-readable": [true, { "severity": "warning" }],
    "a11y/line-height-is-vertical-rhythmed": [true, { "severity": "warning" }],
    "a11y/no-display-none": [true, { "severity": "warning" }],
    "a11y/no-spread-text": [true, { "severity": "warning" }],
    "a11y/no-obsolete-attribute": [true, { "severity": "warning" }],
    "a11y/no-obsolete-element": [true, { "severity": "warning" }],
    "a11y/no-text-align-justify": [true, { "severity": "warning" }],
    "a11y/media-prefers-color-scheme": [true, { "severity": "warning" }]
  },
  "extends": [
    "stylelint-config-standard",
    "stylelint-config-styled-components",
    "stylelint-config-prettier"
  ]
}
- Cuối cùng cài các package stylint vào nhé.
npm i -D stylelint stylelint-a11y stylelint-config-prettier stylelint-config-standard stylelint-config-styled-components stylelint-processor-styled-components
hoặc với Yarn
yarn add -D stylelint stylelint-a11y stylelint-config-prettier stylelint-config-standard stylelint-config-styled-components stylelint-processor-styled-components
- Giờ thì thêm
"lint:style": "stylelint 'src/**/styled.ts' 'src/**/*.tsx'",vào"scripts"trongpackage.json![]()
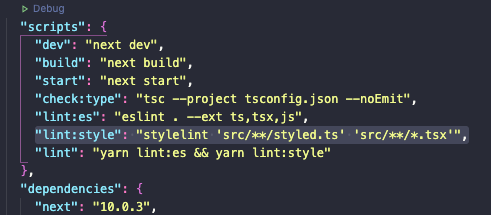
và cả "lint": "yarn lint:es && yarn lint:style" nữa nhé, tí nữa sẽ dùng tới.
- Cài đặt husky:
- Để cài
huskythì chúng ta cũng cần phải thằng bạn tri kỷ của nólint-stagedđể có performance tốt nhất =)) Tiếp tục là câu lệnh quen thuộc
npm install --save-dev lint-staged husky
hoặc
yarn add -D lint-staged husky
ở "scripts" chúng ta thêm
"lint-staged": {
    "*.{ts,tsx,js,jsx}": [
      "eslint --cache"
    ],
    "styled.ts": [
      "stylelint --cache"
    ]
  },
"husky": {
    "hooks": {
      "pre-commit": "yarn lint-staged && yarn check:type"
    }
}
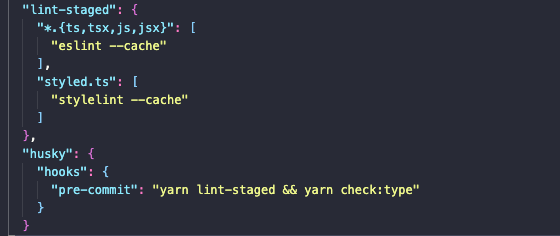
Trong lint-staged sẽ chúng sẽ thực thi các script ta đã viết ở trên, nếu như chúng pass qua hết các rules thì code chúng ta sẽ được đẩy lên, đảm bảo code luôn đúng rule và sạch sẽ.
Tuy nhiên bạn cũng có thể thêm hậu tố --no-verify để pass mà không cần quan tâm rules.
Đến đây cũng mõi tay rồi :v Nếu có thắc mắc hay để lại comment bên dưới, mình sẽ cùng thảo luận nhé. Thank các bạn đã đọc 
All rights reserved
